A scheduler automates sending notification, improving efficiency and ensuring that critical processes are carried out on time without manual intervention. schedulers play an essential role in streamlining operations and maintaining consistency in a system.
To setup scheduler Go to Rules > Create > Enter Rule Name > Select defined for Entity > Enter other conditions and Click Scheduler.

Schedule Screen is displayed.
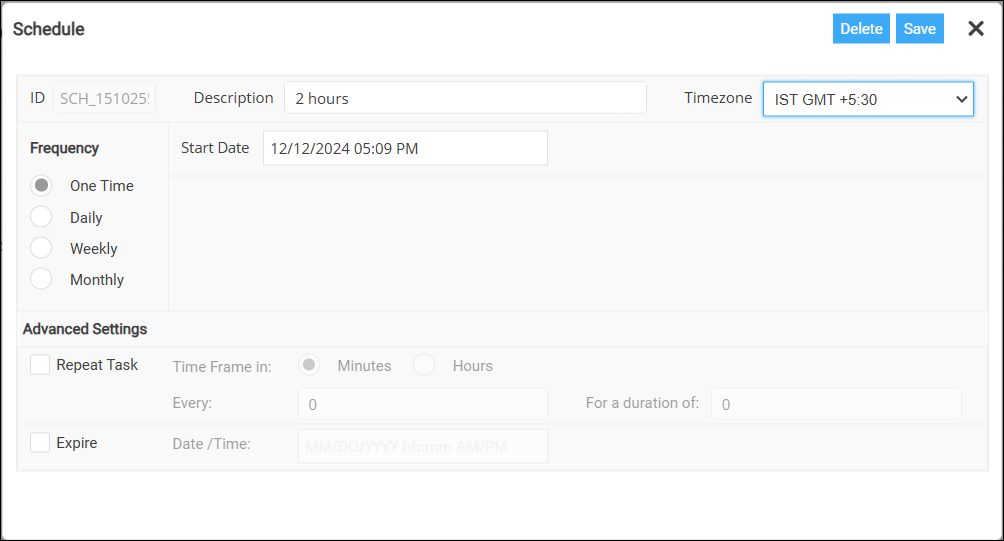
Fill/select the following fields to setup the schedule:
-
ID: ID created during schedule creation.
-
Description: This field allows you to enter a brief description of the scheduled rule or task.
-
Time zone: This field lets you specify the time zone in which the rule should be executed.
Example: You can select "UTC," "EST," "PST," or any specific time zone relevant to the operation of your business.
-
Frequency: The Field determines how often the rule should run. Select any option for regular execution intervals such as:
-
One-time: The rule is executed only once at a specified time.
-
Daily: The rule is triggered once every day at the specified time.
-
Weekly: The rule is triggered once every week, usually on a specific day of the week.
-
Monthly: The rule is triggered once every month, either on a specific date or a specific day of the month.
Example: A rule could be scheduled to run daily at 8:00 AM, or weekly every Monday at 10:00 AM.
-
-
Start Date: This field allows you to set the start date for the rule’s execution. It specifies the date when the rule or task should first be triggered.
Example: If you select January 1st, 2025, the rule will first execute on that date, based on the selected frequency (e.g., daily, weekly).
-
Advanced Settings: When enabled any option, those fields appear to customize the rule’s repeat interval and duration.
-
Repeat Task: When this option is enabled, it allows you to specify how frequently the rule should repeat after the initial execution. You can set the repetition interval using:
-
Time frame: Select whether the task should repeat in minutes or hours.
-
Every: Specify the exact interval for the repeat, such as "every 30 minutes" or "every 2 hours."
-
For a Duration of: Set how long the task will continue to repeat. For example, you could set the task to repeat every 30 minutes for 2 hours.
-
-
Expire: The Expire checkbox lets you define an expiration date for the rule. When enabled, the rule will automatically stop running after a specified date and time.
Example: If you want a rule to only run until a certain point, such as until the end of the month or a project deadline, you can set an expiration date.