Table of Contents
Planner workflow: Searching for an Order
The Planner may use a keyword to locate an order. Click on the Quick Search icon from the left menu (the magnifying glass icon). Type in your keyword and hit enter. The results are fetched.
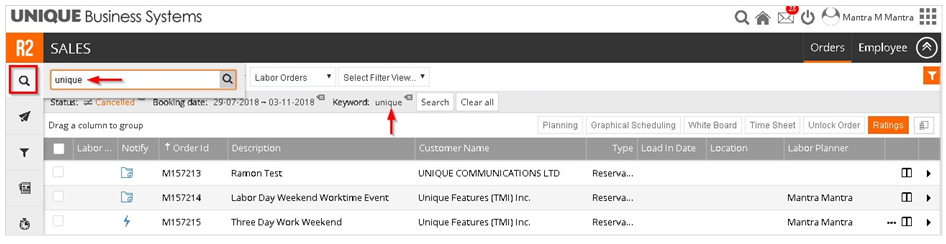
Next select the order (click the checkbox) and click on the Planning menu item
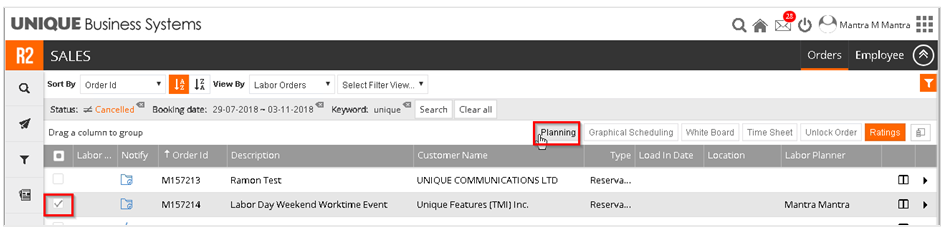
The Planning Order screen appears
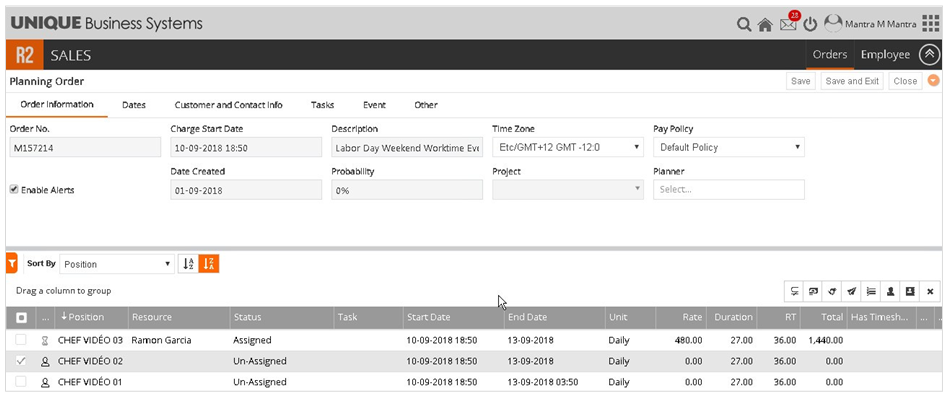
Planner workflow: Planning Order screen
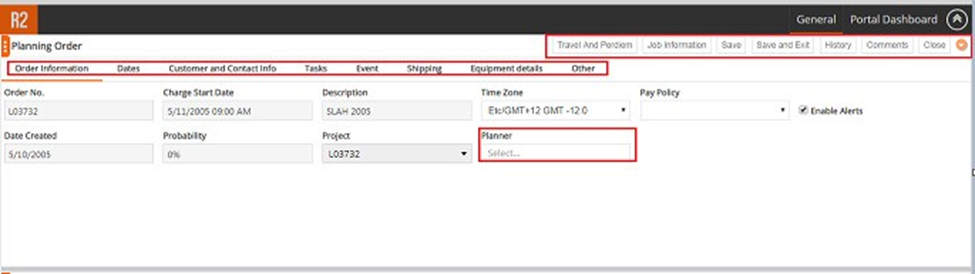
Header
The top of this screen consists of Tab which enable the planner to view additional information about the selected order. Below this menu is the Header information. This information is directly from the Order that was created in R2. Additional planners may be assigned to this order using the Planner drop down. They will then also receive notifications about this order. To collapse the header information, click the orange down arrow icon at the top right portion of the screen (as shown in the screenshot)
Grid
The Grid portion of the screen shows the labor requirements for this order.

Planner workflow: Assigning a resource
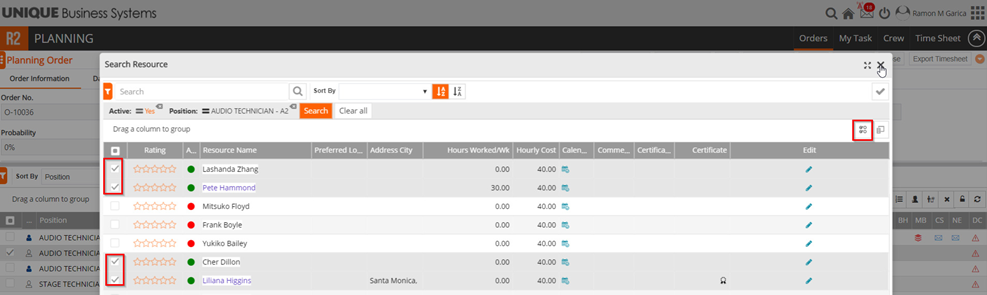
To assign a resource, hover over the line and click on the Search Resource icon from the hover menu.

The resource list will appear but will only display resources who match the Position skill to be filled (ie only Video Tech‘s will be shown for a Video Tech position). The Planner may apply additional filters using the Filter icon on the top left or use the keyword search box.

From the results, double click on the resource name to select the resource. The ‘Person icon’ on the left column now changes to “Blue” and the Status column now displays “Assigned”
Note: The green dot in the Availability column indicates that the resource is Available during the specified time period for this Job If it shows a Red dot then the planner may roll over this indicator to show the conflict details.
Assign Resource based on Certificate and Comments on Resource search screen:
Comma separated certificate tooltip displayed Whiteboard => Assign Resource, Planning order
=> Booking line => Search Resource, Planning order => Booking line => Assign Resource as shown in the image
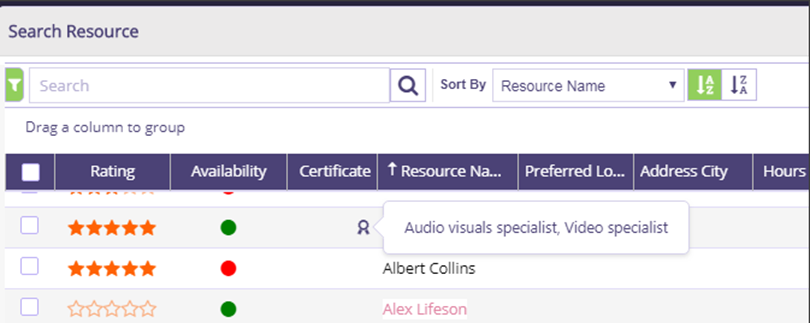
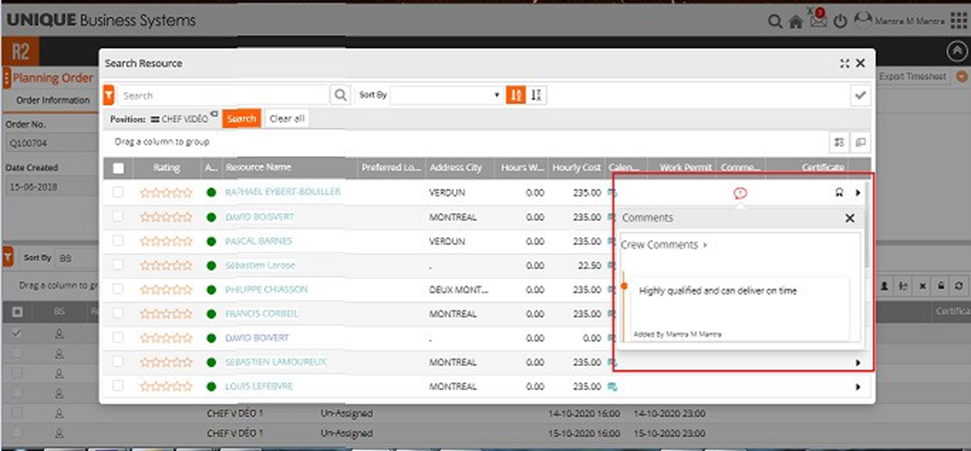
Comments entered for Resource is displayed on Resource search screens on Whiteboard => Assign Resource, Planning order => Booking line => Search Resource, Planning order => Booking line => Assign Resource as shown in the image.
Click on Comments icon and the comments section will list the comments entered for the resource
Note: Adding certificate for a crew is explained in below crew details section. .
Planner workflow: Assigning Multiple resources
The Planner may assign multiple positions at the same time. Use the checkboxes to the left of the row to select multiple positions. Select the checkbox on the header to select all rows. Once you have selected the positions, click on the resource icon from the top menu (shown in screenshot).

A drop down column appears adjacent to the Crew Full Name field
Click on the drop down. All positions that were filtered for are displayed along with the resource availability for the booking dates. Select the position using the checkbox to the left of the position name.
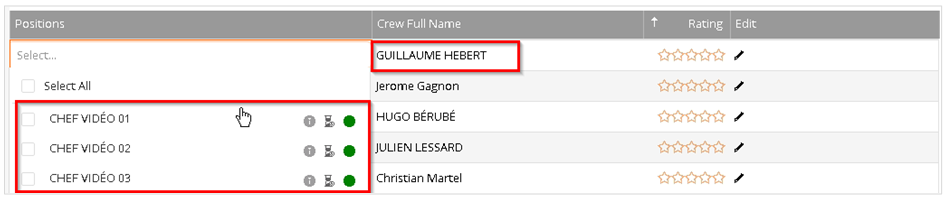
You may also type the resource’s name on the resource field to fill a specific position.

Planner workflow: Communications
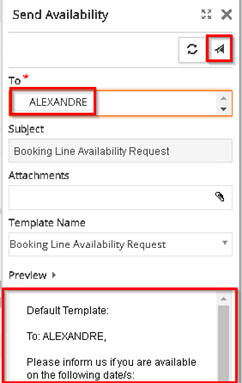
Availability Request
To communicate an Availability Request to the resource, click the send Availability Request icon (the paper airplane icon).

A side panel now opens. This panel allows the Planner to review the communication being sent. The Planner can review and revise the message, confirm the recipient and add an attachment if needed.

The Planner has to save the order in order to send the message. The following alert will be displayed if the order hasn’t been saved.
Once the resource accepts the Availability Request the green envelope icon turns green.

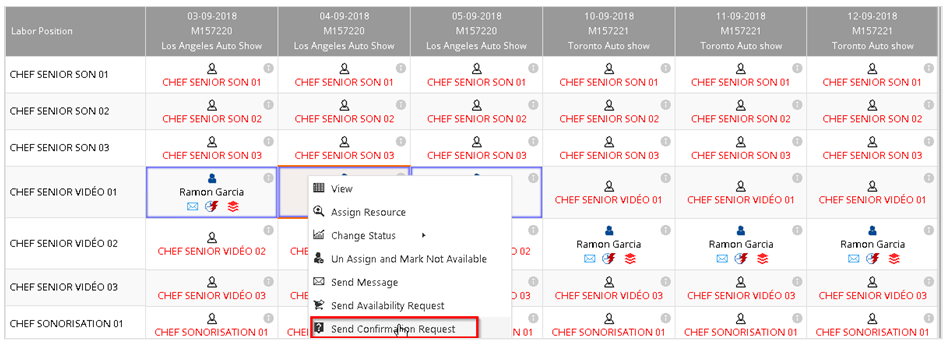
Confirmation Request
To communicate a Confirmation Request to the resource, click the send Confirmation Request icon.
The side panel opens. The Planner can preview the message, the Recipient and add an attachment if needed.
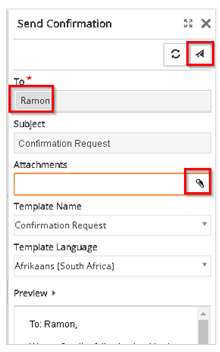
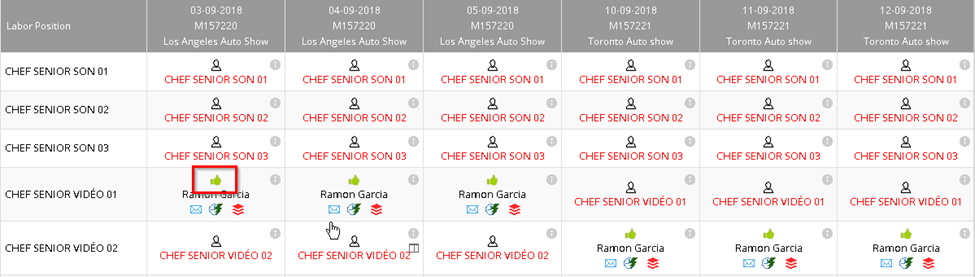
The Status icon (thumbs up icon) turns green and the Status changes from Assigned > Confirmed when the resource accepts the Confirmation Request.

Note: The Planner can also manually change the Status if the confirmation was made through a phone call or a direct email.
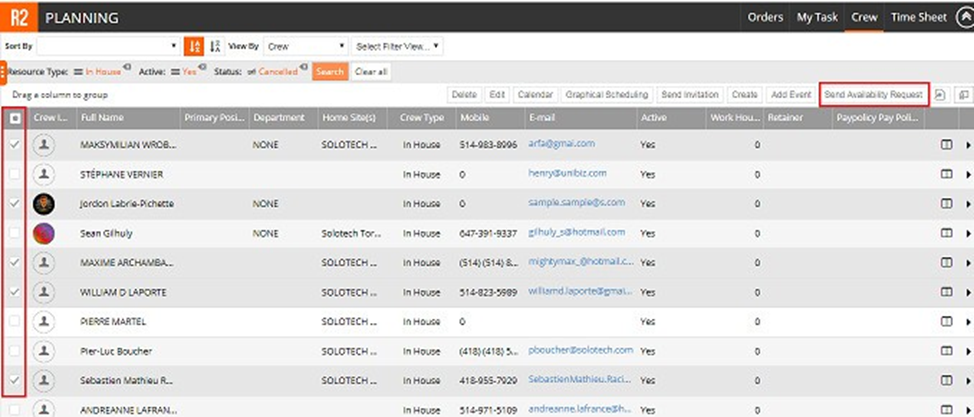
Multiple Availability or Confirmation Requests
Multiple Availability and Confirmation Requests may be sent using the multiple select checkbox to the left of the data table from within the Planning Screen The remaining process is the same as described earlier.

Note: Planner may also send an available request from the Search Resource Screen to multiple resources for a given position for a given Job. Select the available resources and click on send availability request.
Multiple Availability requests can also be sent from Crew Search Screen as shown in the image below
Planner workflow: Creating a Timesheet
From Search Orders
Select the order for which you wish to create a timesheet for and click the Time Sheet button from the top menu

If a timesheet does not exist, you will be prompted with the option to create one

Note: If a timesheet exists you will be taken to that timesheet. If multiple timesheets exist then a list will be presented to choose from. Also, creating a timesheet here through search orders will not allow the Planner to filter to import from Excel.
From the Dashboard
Use the Quick Launch menu to select Time Sheet

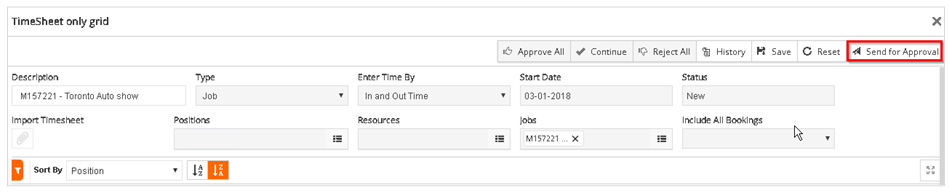
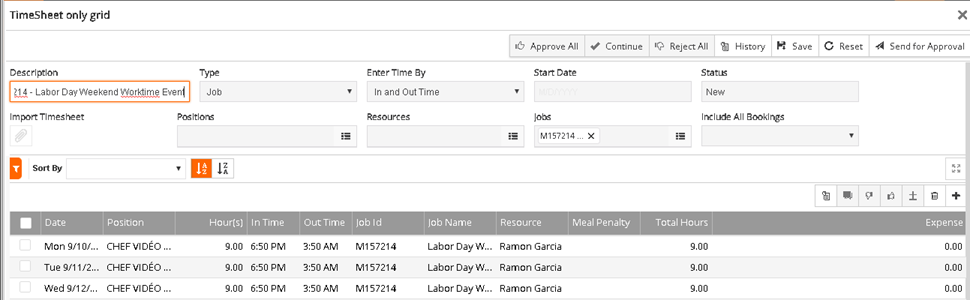
Creating the Timesheet
From the Time Sheet screen, fill in details

Note: The Planner can import an excel timesheet. However any adjustments made in the planning order will be ignored if a timesheet is uploaded..
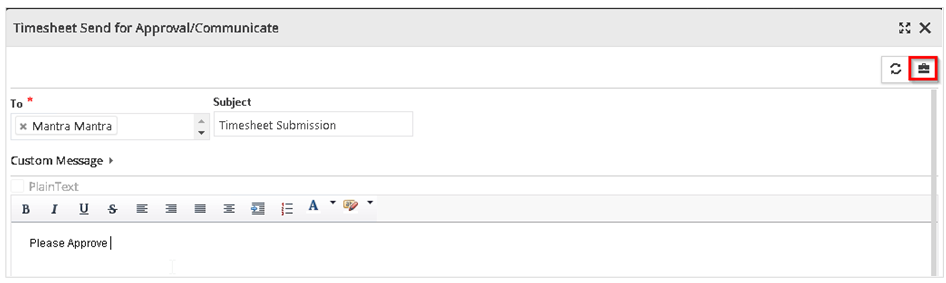
The Planner can adjust hours, In and Out Times and apply a meal penalty. The Planner can also delete any positions not required on the current timesheet. The Planner can also Send the Timesheet for approval
Approving the Timesheet
Once the timesheet has been submitted for approval, the Approver may approve or reject some lines or all lines on the timesheet (using the buttons at the top and on the grid level).
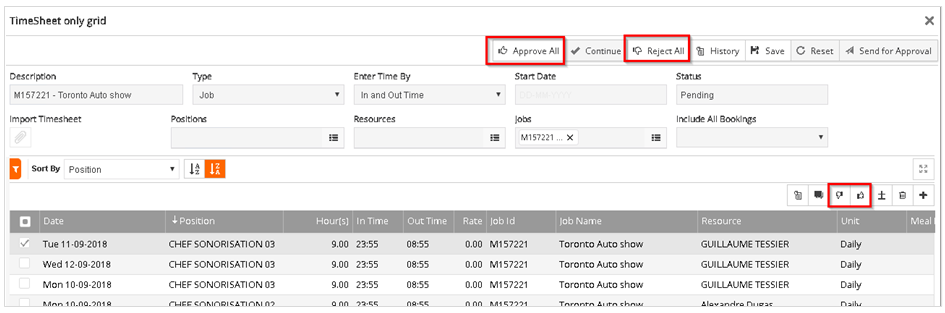
Individual line approval or disapproval

Planner workflow: Exporting a Timesheet
Exporting Timesheet from Order search screen
Select the order for which the timesheet is needed and then click the Export timesheet button from the top right.

Exporting Timesheet from Planning order screen
User may download the timesheet from planning order as illustrated below.
On accessing planning order from order search/Alerts/Recent activity, planning order screen is opened and user will be able to access Export timesheet button on header as shown in the image.
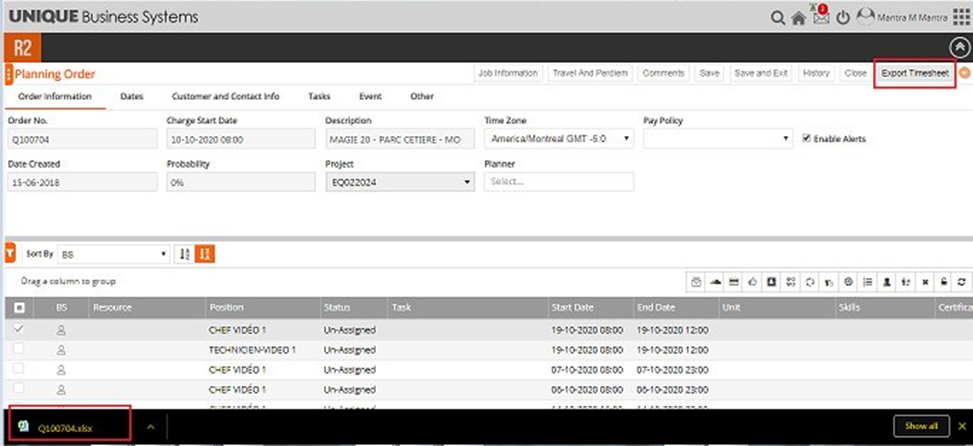
By selecting the Export Timesheet icon, an excel file containing resource assignment details and schedules will be downloaded as show in the image.
Planner workflow: Adding Positions
Step 1. Adding Positions
To add a position, click the Add Position icon from the top right icon.

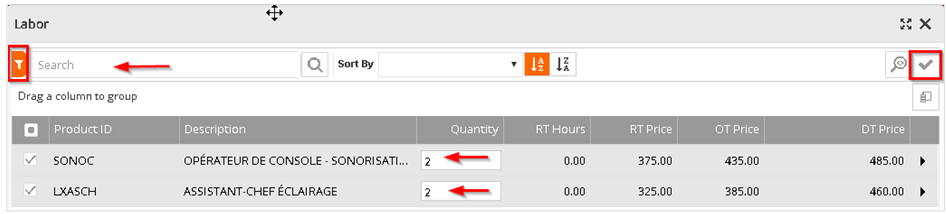
The Planner may use the Filters icon or the Quick Search textbox to help search for positions. Enter the Quantity of resources required for each position. Then click Ok (the checkmark icon).
The Planner may click the Quick Preview icon from the top right to view all positions that were selected and can adjust the quantity or delete the position on the fly.
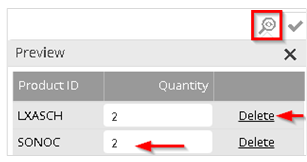
Once a position has been added a “Not on Order” icon displays next to that position
Step 2. Assigning Dates
The next step is to assign dates for this newly added position. Click on the Assign Dates icon (Calendar icon) from the hover menu.
Enter the Start Date and Time > Enter the End Date and Time. Click the Generate Icon. Note the Work Hours and Gap Hours are auto-generated.
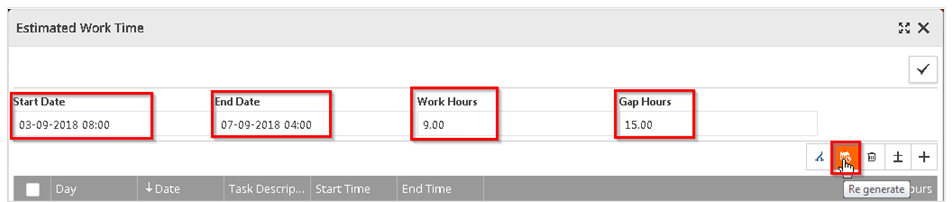
Once the Dates and Times have been added, you may use the grid to adjust the Time details or add a Task Description.

Once you have finalized the details, click the OK (checkmark) to save.

Note: If the dates of the position extend beyond the Job dates there will be a Conflict Alert shown on the position line. Action is not necessary at this point. It is just an alert.
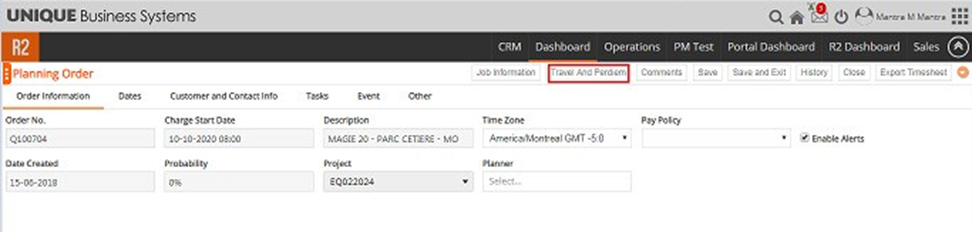
Step 3. Travel Cost
To add Travel Costs to the position, click on Travel and Per-Diem header action button on planning screen as shown below
Travel and Per-Diem Screen is displayed. Travel tab is displayed by default and user may add travel cost for the positions by clicking inside the Travel cost columns (Flight/Vehicle/Hotel/Taxi) as shown below.
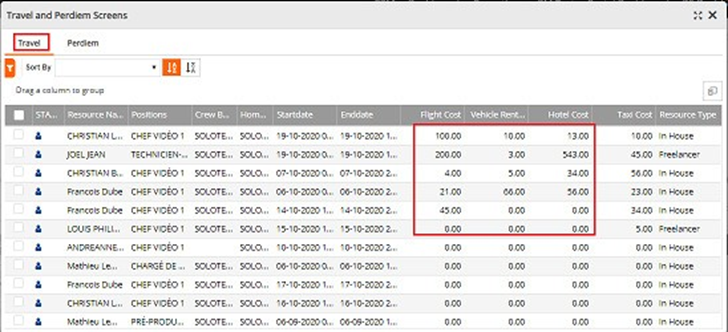
Note: Travel cost may be synced back into R2 for billing
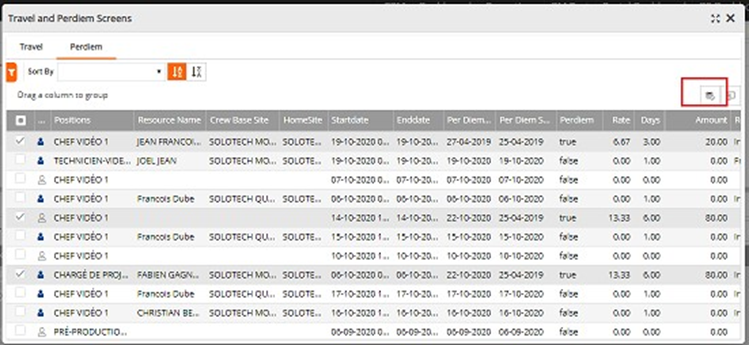
Step 4. Entering Per-Diem
From Travel and Per-Diem screen, select the Per-Diem tab to enter Per-Diem screen as shown below.
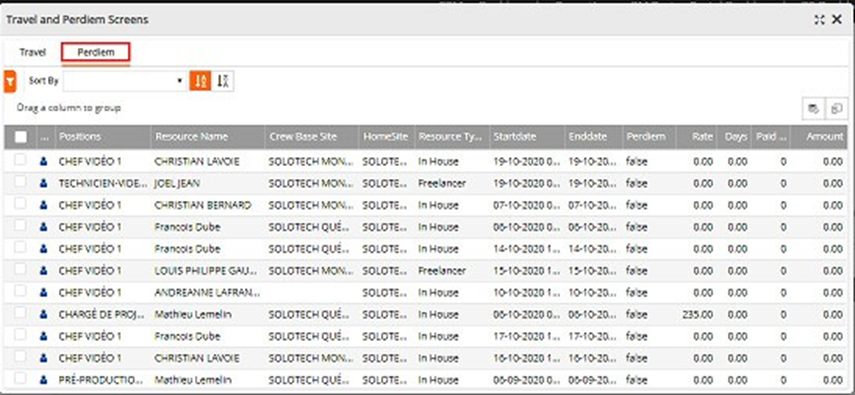
Details on the per diem screen are as follows:
-
Per Diem check box will be “Checked” if Per Diem is already created.
-
“Charge” is the total chargeable days
-
“Days” is the total Number of days.
-
“Paid Amount” is the Amount that was posted to Accounting.
-
If details are entered, then the paid amount will be the sum of Amounts exported to Pay extract.
-
If details are not entered then amount will be extracted to pay extract.
-
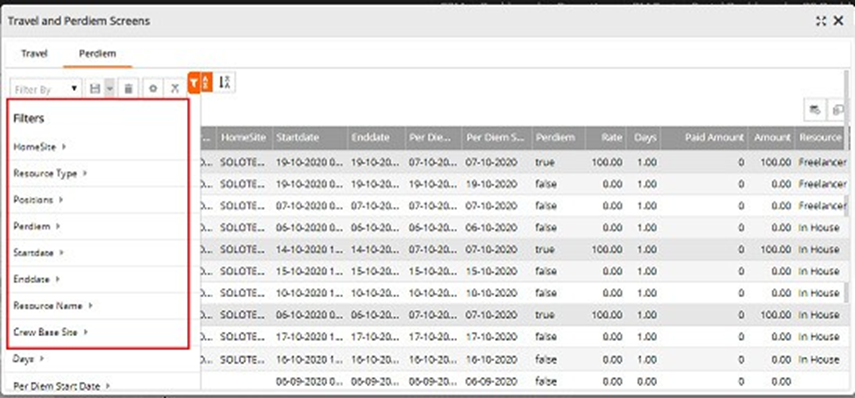
Travel and Per-Diem Filters:
Select the Filter icon as show in the image below to access the Filters
The filter provides the option to add the following column to the search criteria:
-
Home Site.
-
Resource Type
-
Position
-
Resource Name
-
Start Date
-
End date
-
Crew Base Site
-
Per Diem (All lines, Not Entered Lines, Already Entered Lines).
Per-Diem Cost Setup:
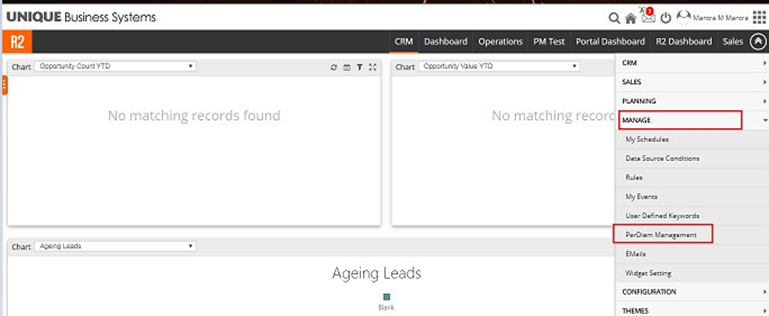
Pre-Requisites for Per-Diem Scheduling, Per-Diem settings are to be set. To do this, go to Dashboard click on the top right grid icon (shown in image). This brings down the menu. Select Mange and then Per-Diem Management
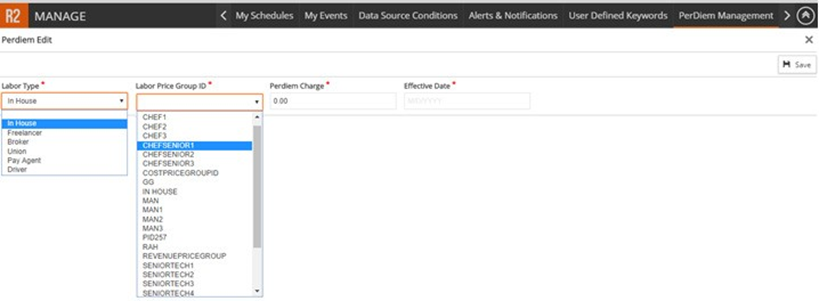
User can define per diem charges for In House, Freelancer, Union. We can also identify if per diem charges differ based on position by using the Labour Price Group.While entering the Per diem charges on the planning order if the Resource is In House and belongs to Chief Senior Price Group, system will automatically pull the rate from settings, based on the Start date of the Booking line.
Step 4. Entering Per-Diem Scheduling
Select the Per-Diem schedule button from Travel and Per-Diem screen (Per-Diem tab) to enter Per-Diem charges as shown in the image below
This will populate the Per-Diem Scheduling Screen as shown below. (with predefined data)
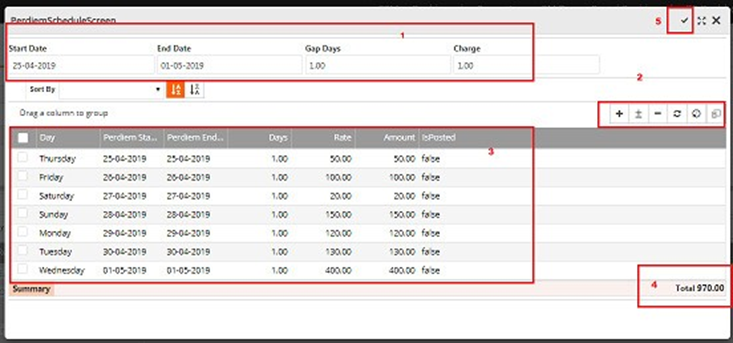
The start date, end date, gap days and charge are automatically populated based on default information when the screen is opened by the user. However, the line details can be edited by making changes to the following fields:
-
The start and end date for the per-diem
-
The per-diem rate
-
Any gap days where no per-diem is accrued
The user will select the Generate icon to accept the changes to edited the line details.
User has the option to enter start and end date, gap days and charge. Initially while opening the Per-Diem screen it will bring the booking line start date and end date, user can key in the Gap days and Charge after entering this information user can click the Generate Button, on clicking Generate schedule button. Based on the Gap days the data will be populated and Charge will be defaulted to all the lines, still user can override the “Days” and “Charge”.
Example: Start date is on 6th Dec 2018 and End date is 18th Dec 2018 if user key in (Gap in Days) as 7 Period will be 6th Dec 2018 to 12th Dec 2018 – 7 Days 13th Dec 2018 to 18th Dec 2018 – 6 Days. While adjusting the Gap Days if exceed the End date it will update the End date in the last period.
Other Actions:
-
Create per diem schedule by manually adding the line + Button:
It will add new schedule line. Start date will be last Date( Highest End date) + 1 and End date will be Gap Days + Start date.
-
Append additional data to existing per diem schedule:
Add additional schedule to existing lines with new Start date and End date.
-
Reconfigure/Regenerate the schedule with new date.
Re-configure:
This will update the New Start Date and New End date without changing the Charge. Selecting Reconfigure will update the 1st line with new start date and End date, with Gap days without changing the Charge. (Amount will be calculated based on the New Days). If the end date is more, the feature will add additional lines with the charge defined from the header. If the End date is less, this feature will remove the lines that are more than the end date.
Regenerate:
Selecting Regenerate, this feature will delete all lines in the Per diem schedule and add new lines with the Start date, End date, Gap (Days) & Charge.
-
Delete the per diem schedule
User has the option the sort the scheduling screen, by selecting the Schedule grid header on each column. If user select Days, the data will be sorted based on “Days”. Selecting the Start Date will sort the data based on the “Start Date”. Using these options, the user may select and delete single or multiple rows
Note: Details illustration of how Per-Diem schedules is entered and the resultant usage of the same is mentioned in below Section 3.6.
Whiteboard workflow
Accessing the Whiteboard
Select the Order(s) you would like to view on the Whiteboard. Click the Whiteboard button from the top menu.

The Whiteboard displays all positions for all selected jobs. The Jobs are columns and the Positions are rows . The Planner may use the ZOOM slider on the top right of the menubar to zoom in or out of the view.
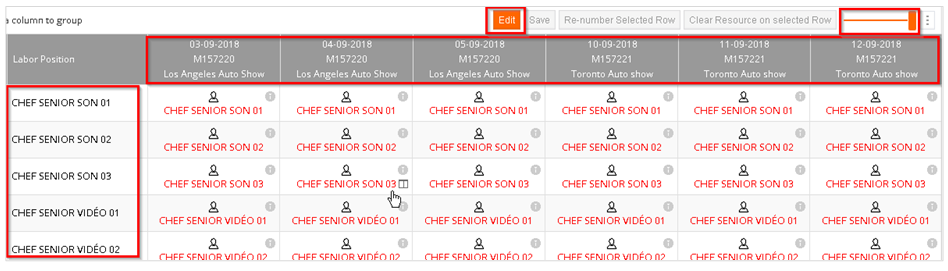
Assigning Resources
Click on the EDIT button from the top menu.
The Planner may assign resources to multiple positions across jobs by selecting the positions using the CTRL button held down while making multiple selections. Then right click and select “Assign Resources”
Note: The entire duration will be selected on a given job when a position is selected, regardless of the day that was selected.
By default, the system filters by the position the Planner is attempting to assign. The Planner may apply additional filters using the Filter icon or the Keyword search textbox.
Double click the resource name to select that resource. The Status changes from Unassigned > Assigned and the Blue person icon appears on the row.
Note: The Green dot indicates the Resource is available during the position dates. A Red icon indicates the Resource is not available. The Planner can roll over the red icon to view the details of the conflict (shown in screenshot below).

Sending Availability Requests
The Planner may send multiple Availability Requests. From the Whiteboard view, select multiple positions using CTRL-Click. The Right click and select “Send Availability Request”

The Side Panel opens allowing the Planner to review and revise the message, the Recipient(s) and add an attachment if needed.
The Planner must save the Order before the messages are sent.
Sending Confirmation Requests
Multiple Confirmation Requests can be sent by using the CTRL-Click method to select multiple positions on the Whiteboard.
Then select “Send Confirmation” Request from the right click menu.
When the resource accepts the Confirmation Request, the green Thumbs Up icon appears on the Position.
Note: The Planner can also manually change the Status if the confirmation was made through a phone call or a direct email. Right click and change status to “Confirm”
Addition Right Click Menu items
-
CHANGE STATUS – Manually change status of a position
-
RESET TASK/DATES – Reset the Task and Dates back to what was entered in R2
-
CHANGE DATE-TIME – Change Date and Time for a position
-
UNASSIGN and MARK AS NOT AVAILABLE – Removes a resource from the position and updates the resource’s calendar to show as Not Available.
Graphical Scheduling View
Select the Order(s) and click on the Graphical Scheduling button from the top menu.

This opens up the Graphical Schedule view. The Planner may click on the zoom in/zoom icon. Planner may also change the view based on the Schedule by and the Group By options on the top left. The Planner can click on the booking and open the Planner screen.
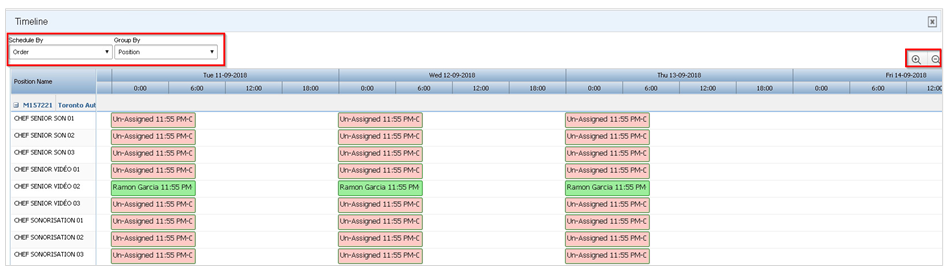
Note: This Graphical Schedule view is read only. You cannot schedule from this view
Project Manager Workflow
By design, Project Managers have limited access in the Labor Planning Module They must have the appropriate privilege in the Employee Security Settings to access this module. Resource rates are not viewable by Project Managers.
Viewing Order Dates
To view Job Details, click the Quick View option
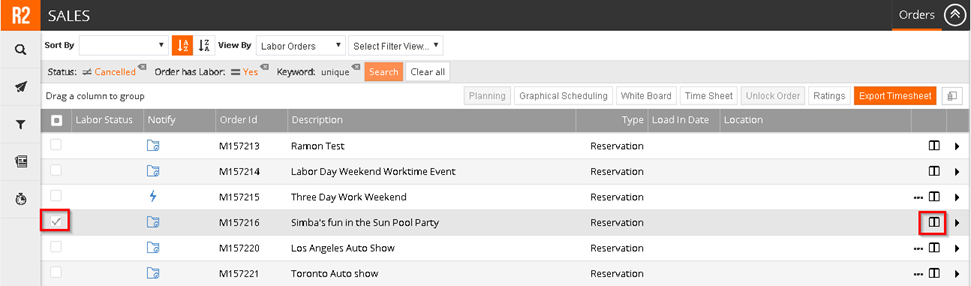
This opens up a drop-down panel. From here, click the Booking Line Details icon.
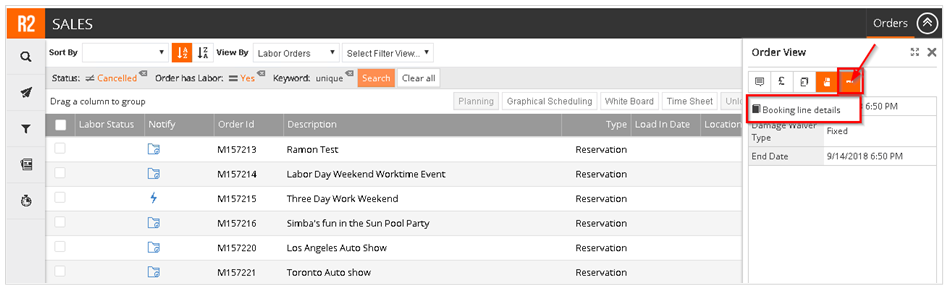
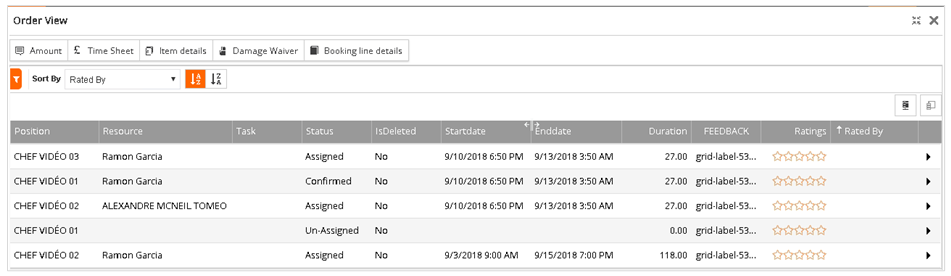
This opens up the Booking Line Details. The Project Manager can view Assigned Resources, Status and any changes to Start and End Dates.
Resource Ratings
The Project Manager may enter a rating for a Resource. Select an Order (checkbox on the left) and click the Ratings Button from the top right menu
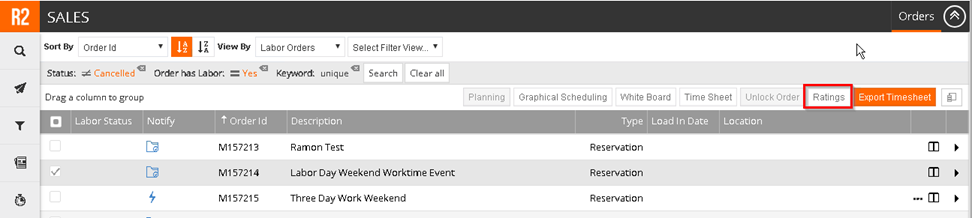
Ratings can now be entered
Export Timesheets
To export Timesheets to an Excel format. Select the order (via checkbox) and click the Export Timesheet button from the top menu. The timesheet will be exported to your local downloads folder.

Timesheet Processing
To export Timesheets to an Excel format. Select the order (via checkbox) and click the Timesheet button from the top menu.

Alternatively, the Project Manager may have a Quick Launch icon on their Dashboard. This will also lead to the timesheet processing screen.

The Timesheet processing page
Communicate

To communicate with resource assigned to a job, select the order(s) and click on the Communicate icon
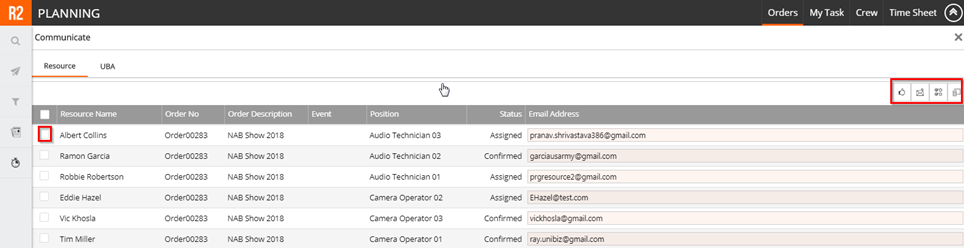
Select the resource(s) and click on one of the communication options.
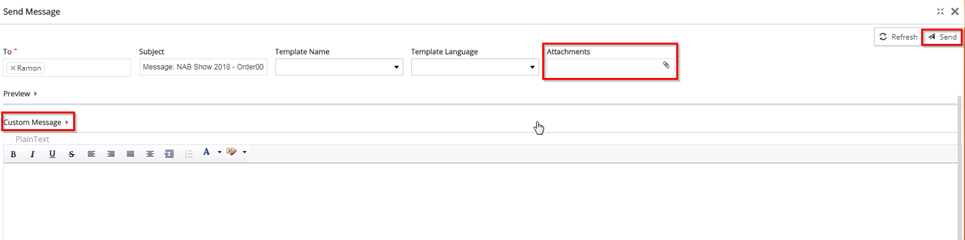
Enter the customer message, add attachments and click on Send