Changes in Edit Order Dates and Edit Event Dates
Reference No: R2-3545
Version No: 06.00.04-00
The following changes in the Edit Order Dates window and the Edit Event Dates window have been implemented:
The details are explained in the sample workflow given below:
Setting the Pickup Date as a Mandatory field or a Non-mandatory field
Prior to Version 06.00.04-00
Earlier the Pickup Date was displayed in the Order Dates tab by default, when the Start Date and the End Date was entered during the Order creation.
With Effect from Version 06.00.04-00
Now, during an Order creation, you can configure the Pickup Date to be displayed in the Order Dates tab, as a mandatory field or a non-mandatory field by selecting the Pickup check box or the Default to Blank check box in the Maintenance module > Employee Edit > Defaults ID Edit > Account tab > Orders tab > Dates tab > Mandatory Dates section, as shown in Figure 1.0.
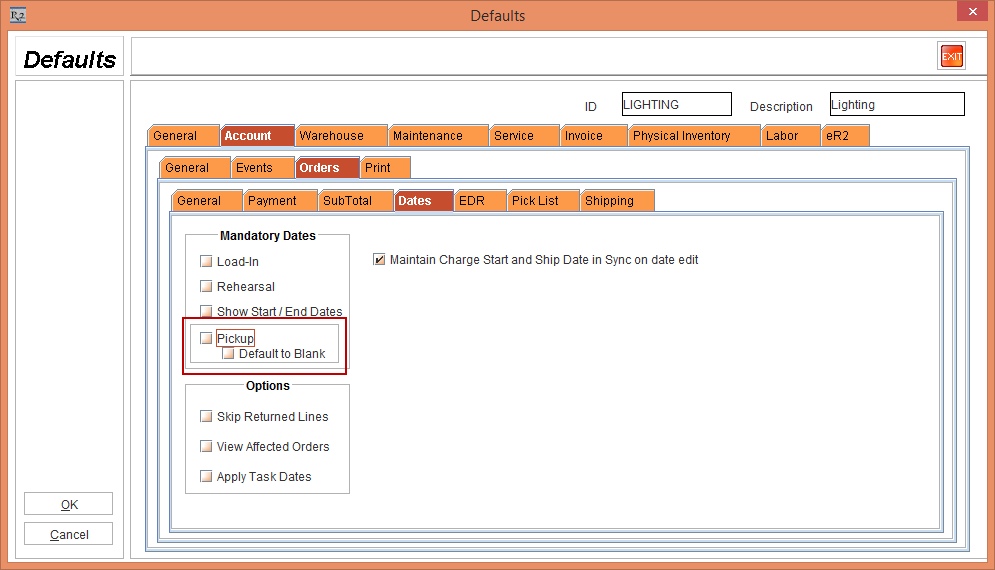
Figure 1.0 Maintenance module > Employee Edit > Defaults ID Edit > Account tab > Orders tab > Dates tab > Mandatory Dates section >Pickup Date and Default to Blank
When the Pickup check box or the Default to Blank check box is not selected, the Pickup Date is displayed in the Order Dates tab by default when the Start Date and the End Date is entered during the Order creation.
The details are explained in the sample workflow given below:
Scenario I - Select the Pickup Date Check box
Prerequisites
Select the Maintenance module > Employee Edit > Defaults ID Edit > Account tab > Orders tab > Dates tab > Mandatory Dates section.
Select the Pickup Date check box, as shown in Figure 1.1.
The Pickup Date check box is selected by default. If the Pickup Date check box is selected then the Default to Blank check box is disabled, as shown in Figure 1.1.
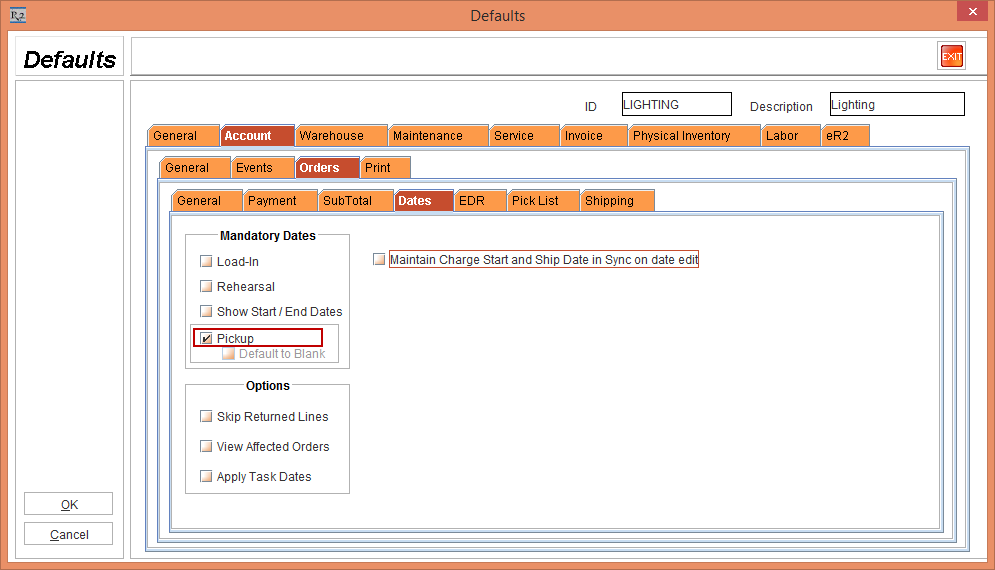
Figure 1.1 Employee Edit > Defaults ID Edit > Account tab > Orders tab > Dates tab > Mandatory Dates section > Pickup Date
Click OK.
Relaunch the R2 application.
Select the Items tab.
Create a Serial Item [NIKON D3400].
Save and Exit the Maintenance module.
Sample Workflow
Select the Account module. The Account window is displayed.
Tag a Company [NIKON INC.].
Create a Rental Reservation Order [ORD-1283] for 2 days duration.
Add the Serial Item [NIKON D3400] with 1 Qty, as shown in Figure 1.2.

Figure 1.2 Rental Reservation Order [ORD-1283] with the Serial Item [NIKON D3400]
Select the Dates tab > click the Edit Dates button. The Order Dates window is displayed with the Pickup Date displayed in blue color as a mandatory field, as shown in Figure 1.3.
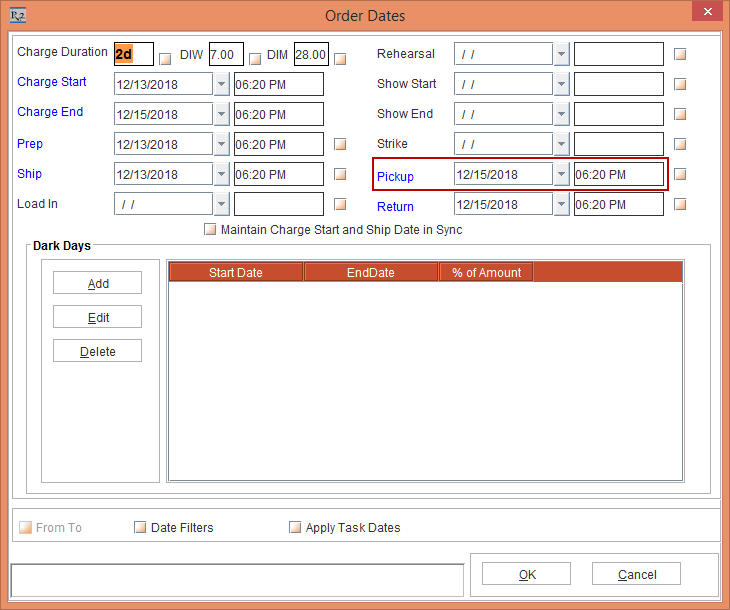
Figure 1.3 The Header Order Dates window displaying the Pickup Date in blue color as a mandatory field
Click OK.
Select the Order line [NIKON D3400] > Edit > Dates tab > Edit Dates button > OrderLine Dates window is displayed with the Pickup Date displayed in blue color as a mandatory field, as shown in Figure 1.4.
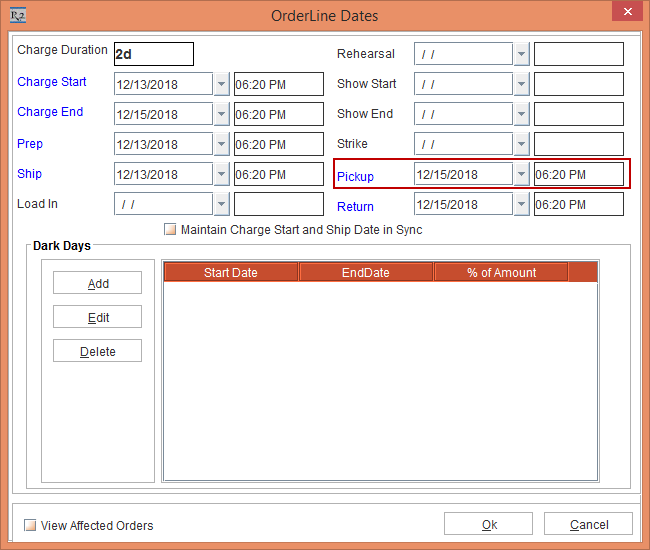
Figure 1.4 The Order Line Dates window displaying the Pickup Date in blue color as a mandatory field
Click Ok.
Save and Exit the Order [ORD-1283].
The existing Orders will display the Pickup Date in the Order Dates window as a mandatory field colored in blue color.
Scenario II - Select the Default to Blank Check box
Prerequisites
Select the Maintenance module > Employee Edit > Defaults ID Edit > Account tab > Orders tab > Dates tab > Mandatory Dates section.
Clear the Pickup Date check box and select the Default to Blank check box, as shown in Figure 1.5.
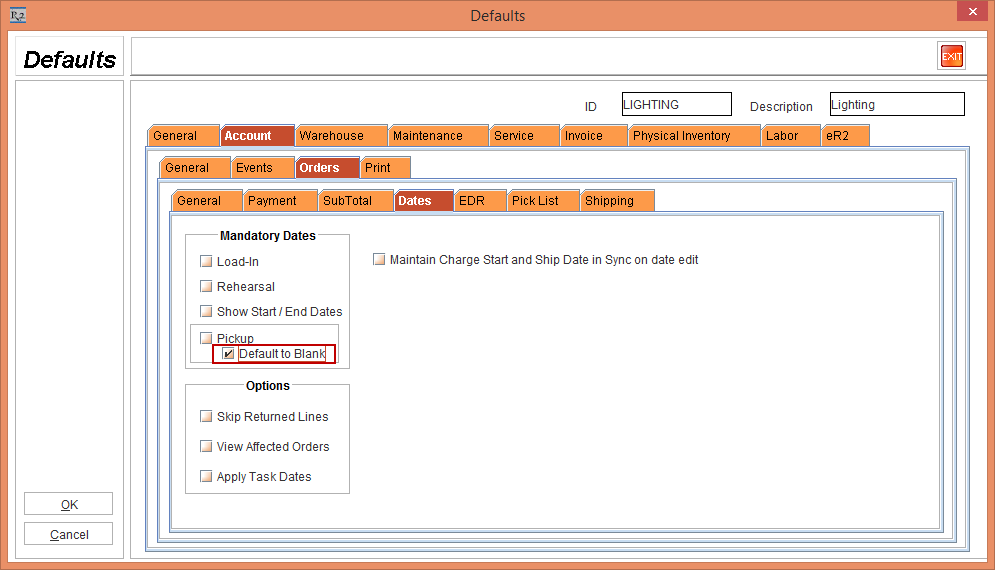
Figure 1.5 Defaults ID Edit > Account tab > Orders tab > Dates tab > Mandatory Dates section > Clear Pickup Date and select the Default to Blank check box
Click OK.
Relaunch the R2 application.
Select the Items tab.
Create a Serial Item [NIKON D3400].
Save and Exit the Maintenance module.
Sample Workflow
Select the Account module. The Account window is displayed.
Tag a Company [NIKON INC.].
Create a Rental Reservation Order [ORD-1284] for 2 days duration.
Add the Serial Item [NIKON D3400] with 1 Qty, as shown in Figure 1.6.
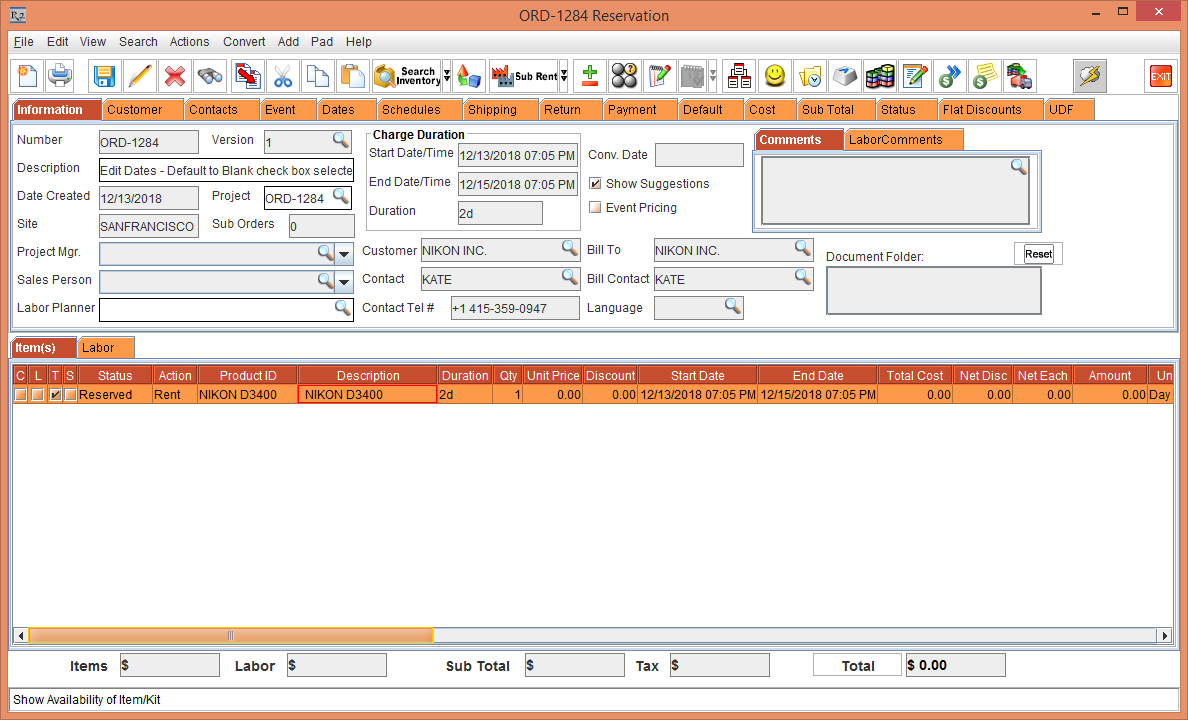
Figure 1.6 Rental Reservation Order [ORD-1284] with the Serial Item [NIKON D3400]
Select the Dates tab > click the Edit Dates button. The Order Dates window is displayed with the Pickup Date field as blank, as shown in Figure 1.7.

Figure 1.7 The Header Order Dates window displaying the Pickup Date field as blank
Click OK.
Select the Order line [NIKON D3400] > Edit > Dates tab > Edit Dates button > OrderLine Dates window is displayed with the Pickup Date field as blank, as shown in Figure 1.8.

Figure 1.8 The OrderLine Dates window displaying the Pickup Date field as blank
Click Ok.
Save and Exit the Order [ORD-1284].
The existing Orders will display the Pickup Date in the Order Dates window as a no-mandatory field colored not colored in blue color.
The Warehouse Pickup Schedule will be generated only for the Orders with the Pickup Date defined.
Scenario III - Unselect the Pickup Date check box and Default to Blank check box
Prerequisites
Select the Maintenance module > Employee Edit > Defaults ID Edit > Account tab > Orders tab > Dates tab > Mandatory Dates section.
Do not select the Pickup Date check box and the Default to Blank check box, as shown in Figure 1.9.

Figure 1.9 Employee Edit > Account tab > Orders tab > Dates tab > Mandatory Dates section > Do not select the Pickup Date check box and Default to Blank check box
Click OK.
Relaunch the R2 application.
Select the Items tab.
Create a Serial Item [NIKON D3400].
Save and Exit the Maintenance module.
Sample Workflow
Select the Account module. The Account window is displayed.
Tag a Company [NIKON INC.].
Create a Rental Reservation Order [ORD-1300] for 2 days duration.
Add the Serial Item [NIKON D3400] with 1 Qty, as shown in Figure 1.10.
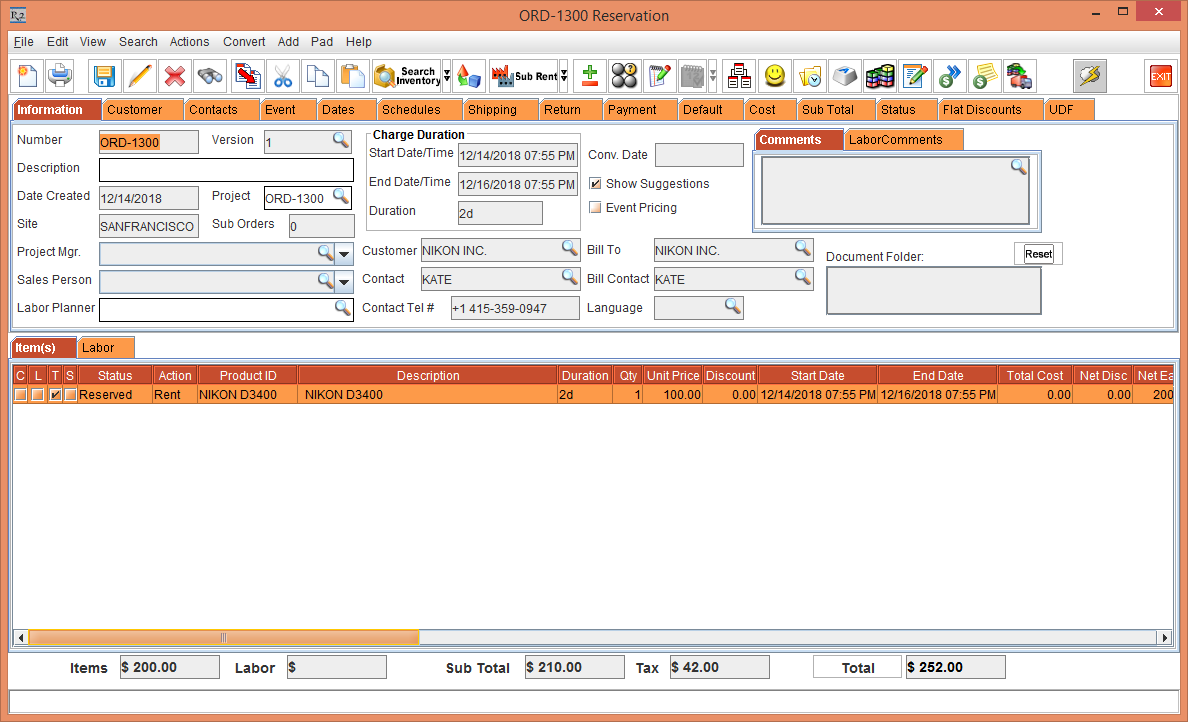
Figure 1.10 Rental Reservation Order [ORD-1300] with the Serial Item [NIKON D3400]
Select the Dates tab > click the Edit Dates button. The Order Dates window is displayed with the Pickup Date displayed as a non-mandatory field, as shown in Figure 1.11.
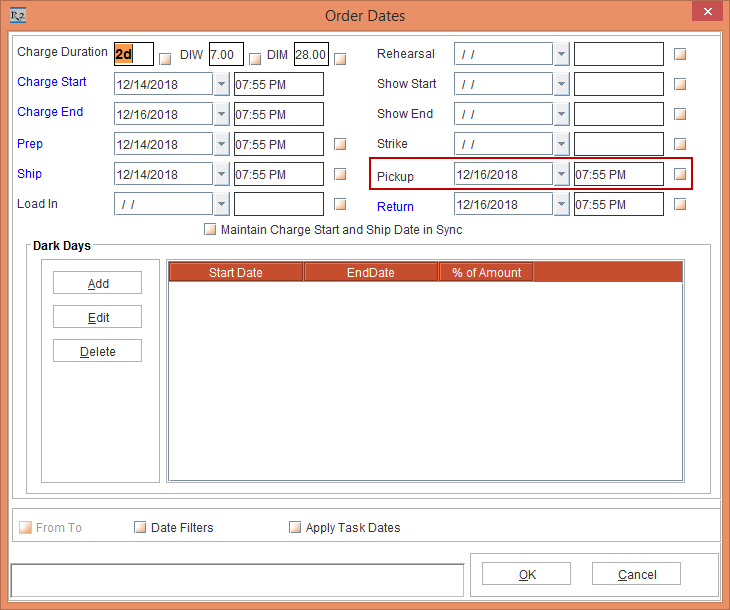
Figure 1.11 The Header Order Dates window displaying the Pickup Date as a non-mandatory field
Delete the Pickup Date [16-Dec-2018] Time [07:55 PM], as shown in Figure 1.12.
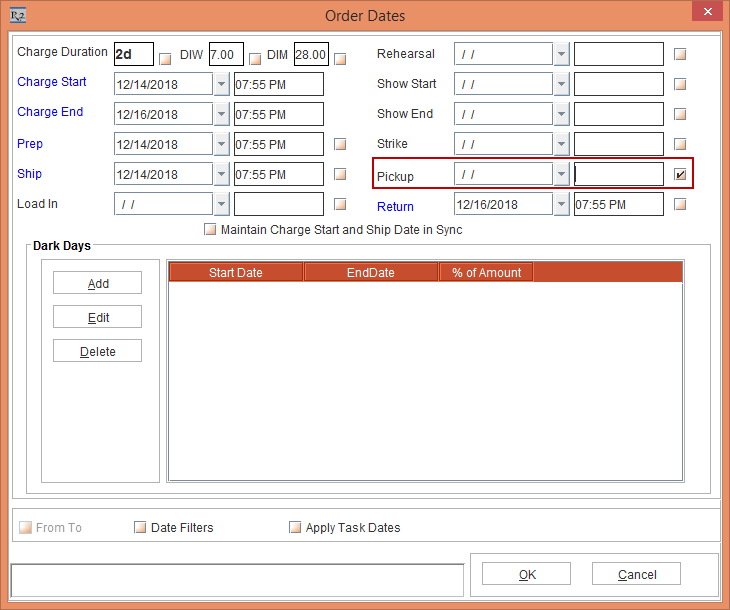
Figure 1.12 The Header Order Dates window > Delete the Pickup Date and Time
Click OK. Click the Edit Dates button > Order Dates window is displayed. The Pickup Dates get deleted from the Order Dates window, as shown in Figure 1.13.
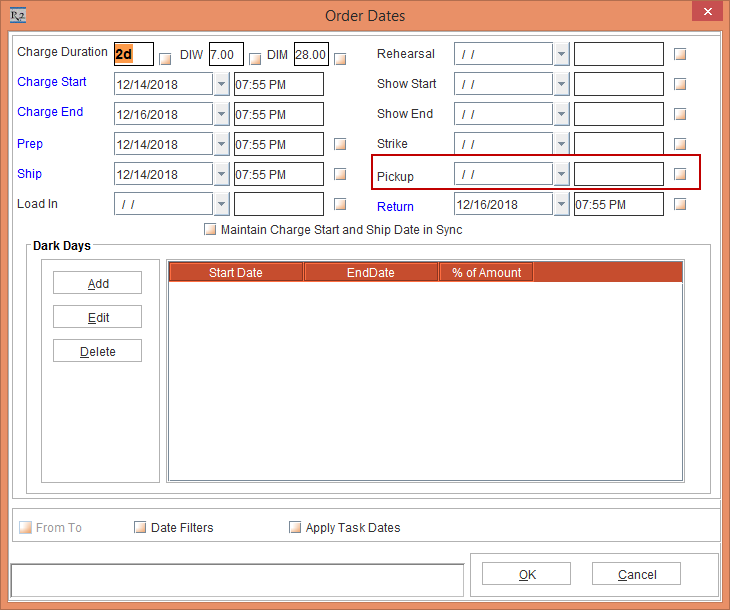
Figure 1.13 The Header Order Dates window displaying the no Pickup Date and Time
Select the Order line [NIKON D3400] > Edit > Dates tab > Edit Dates button > OrderLine Dates window is displayed with no Pickup Date, as shown in Figure 1.14.
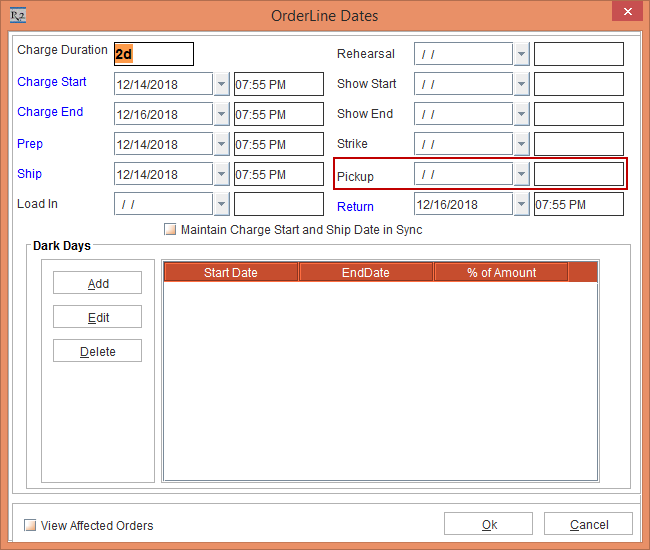
Figure 1.14 The OrderLine Dates window displaying no Pickup Date
Click Ok.
Save and Exit the Order [ORD-1300].
Adjusting the Invalid Dates on Order and Events
Prior to Version 06.00.04-00
Earlier when any Invalid Dates were assigned in the Order Edit Dates window or Event Edit Dates, the system displayed a prompt with the message "R2_00817:Please Verify the Date(s), some are Invalid," as shown in Figure 2.0.
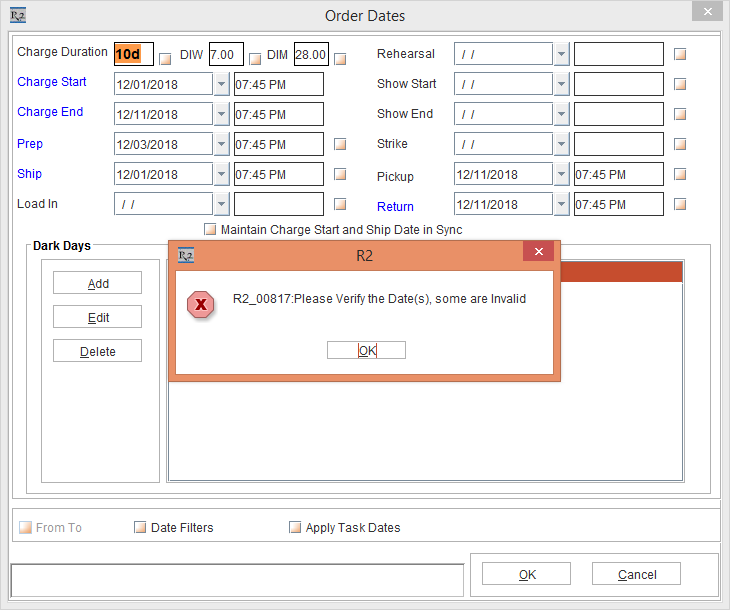
Figure 2.0 Prompt with a message displayed for invalid Dates
With Effect from Version 06.00.04-00
Now, if any invalid Dates are assigned in the Order Edit Dates window or Event Edit Dates window, the system does not display a prompt with the message "R2_00817:Please Verify the Date(s), some are Invalid," instead it gets auto adjusted if the Adjust invalid dates on Order and Event date edit check box in the Configuration module > General tab is selected, as shown in Figure 2.1.
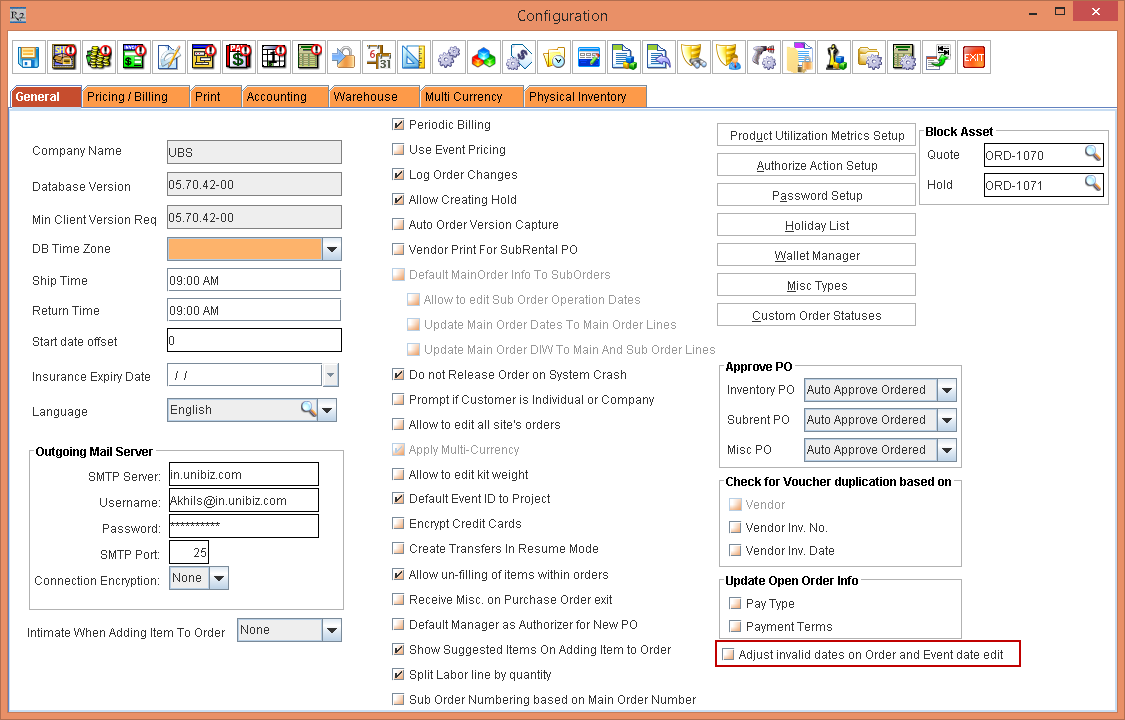
Figure 2.1 Configuration module > General tab > Adjust invalid dates on Order and Event date edit check box
The details are explained in the sample workflow given below:
Prerequisites
Select the Configuration module > General tab.
Select the Adjust invalid dates on Order and Event date edit check box, as shown in Figure 2.2.
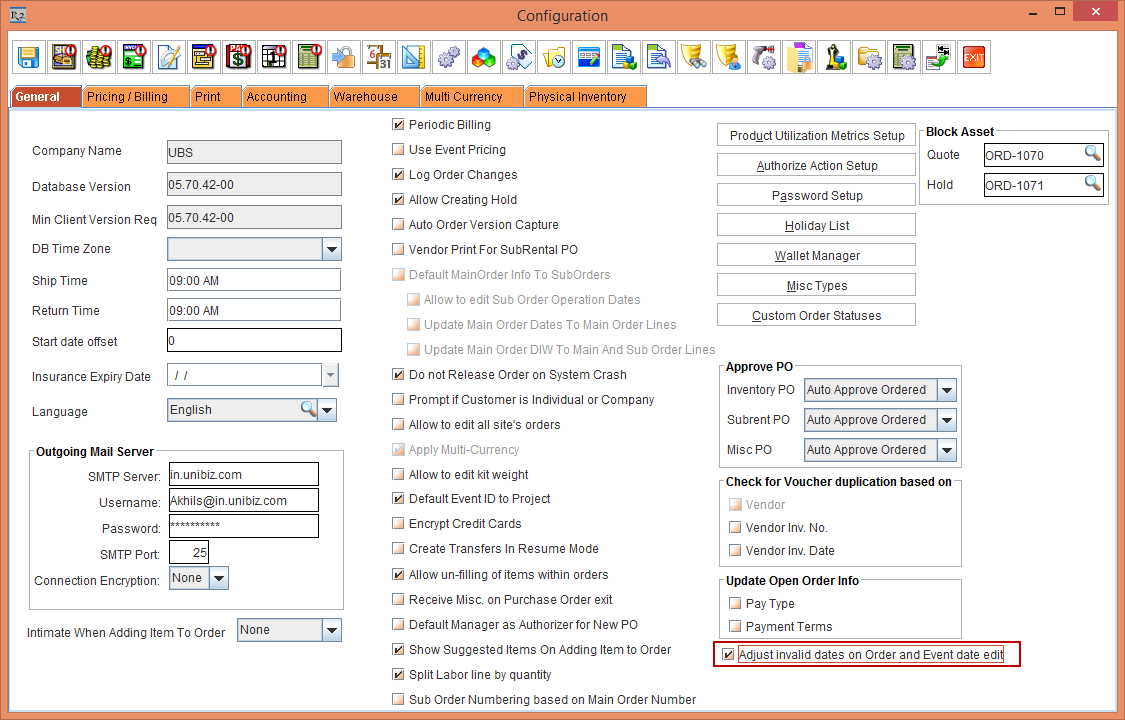
Figure 2.2 Configuration module > General tab > Adjust invalid dates on Order and Event date edit check box
Click OK.
The Adjust invalid dates on Order and Event date edit check box affects only the operation dates such as, the Prep Date and the Ship Date and not the Charge Dates.
Save and Exit the Configuration module.
Relaunch the R2 application.
Select the Items tab.
Create a Serial Item [NIKON D3400].
Save and Exit the Maintenance module.
Sample Workflow
Select the Account module. The Account window is displayed.
Tag a Company [NIKON INC.].
Create a Rental Reservation Order [ORD-1288] for 10 days duration with the Start Date [01-Dec-2018] Time [08:45 PM] and End Date [11-Dec-2018] Time [08:45 PM].
Add the Serial Item [NIKON D3200] with 1 Qty, as shown in Figure 2.3.

Figure 2.3 Rental Reservation Order [ORD-1288] with the Serial Item [NIKON D3200]
Select the Dates tab > click the Edit Dates button. The Order Dates window is displayed with the Dates, as shown in Figure 2.4.
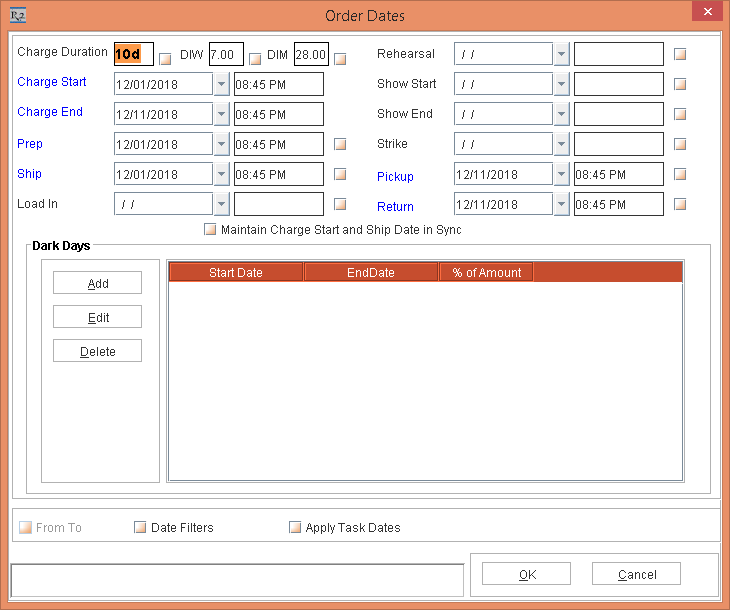
Figure 2.4 The Header Order Dates window displaying the Dates
Click OK.
Select the Order line [NIKON D3200] > Edit > Dates tab > Edit Dates button > OrderLine Dates window is displayed with the Dates, as shown in Figure 2.5.

Figure 2.5 The OrderLine Dates window displaying the Dates
Click Ok.
Select the Dates tab > click the Edit Dates button. The Order Dates window is displayed.
Modify the Prep Date [03-Dec-2018] Time [8.45 PM] and tab out. The Ship Date is automatically modified to [03-Dec-2018] Time [8.45 PM] highlighting in red color, as shown in Figure 2.6.
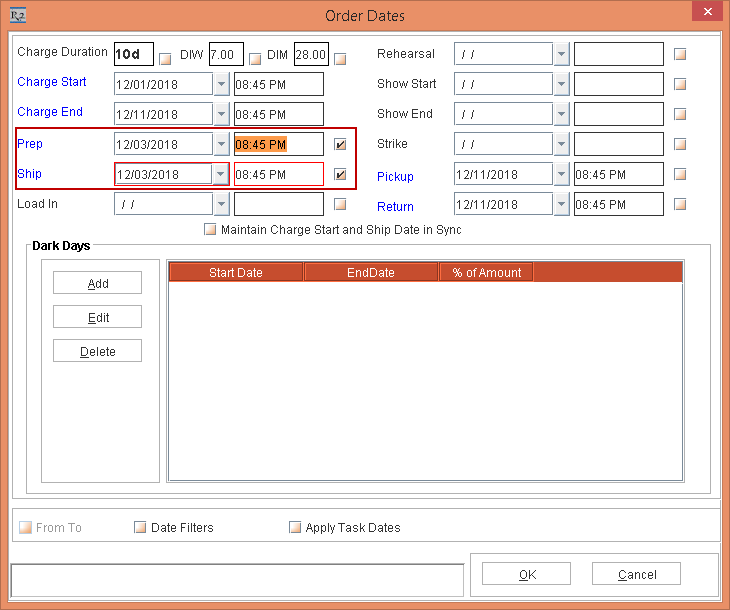
Figure 2.6 The Header Order Dates window displaying the modified Ship Date highlighted in red
Click OK.
Select the Order line [NIKON D3200] > Edit > Dates tab > Edit Dates button > OrderLine Dates window is displayed with the modified Prep Date [03-Dec-2018] Time [8.45 PM] and Ship Date [03-Dec-2018] Time [8.45 PM], as shown in Figure 2.7.
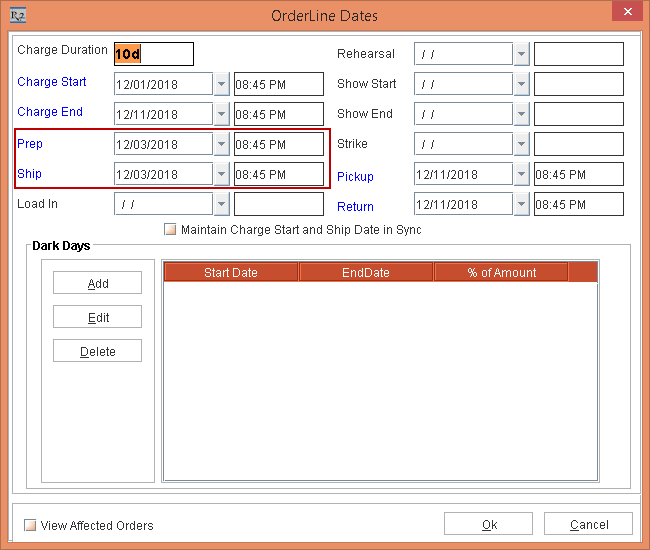
Figure 2.7 The OrderLine Dates window displaying the Dates
Click Ok.
Save and Exit the Order [ORD-1288].
The Adjust invalid dates on Order and Event date edit check box affects only the operation dates such as, the Prep Date, Ship Date, Load In, Rehearsal, Show Start, Show End, and Strike and not the Charge Dates.
The mentioned adjustment is a known issue while editing dates in Equipment Usage View window and Asset Usage View window in which you perform a right-click > select the Edit Order Dates or the Edit Order Line Dates options.
Synchronizing the Charge Date with the Ship Date
Prior to Version 06.00.04-00
Earlier in the Order Edit Dates window, when the Charge Start Date was modified the Ship Date remained unmodified and if the Ship Date was modified the Charge Start Date remained unmodified.
With Effect from Version 06.00.04-00
Now, in the Order Edit Dates window, the Charge Start Date and the Ship Date can be synchronized to maintain the Charge duration, when either of the dates are modified by selecting the Maintain Charge Start and Ship Date in Sync on date Edit check box in the Maintenance module > Employee Edit > Defaults ID Edit > Account tab > Orders tab > Dates tab, as shown in Figure 3.0.
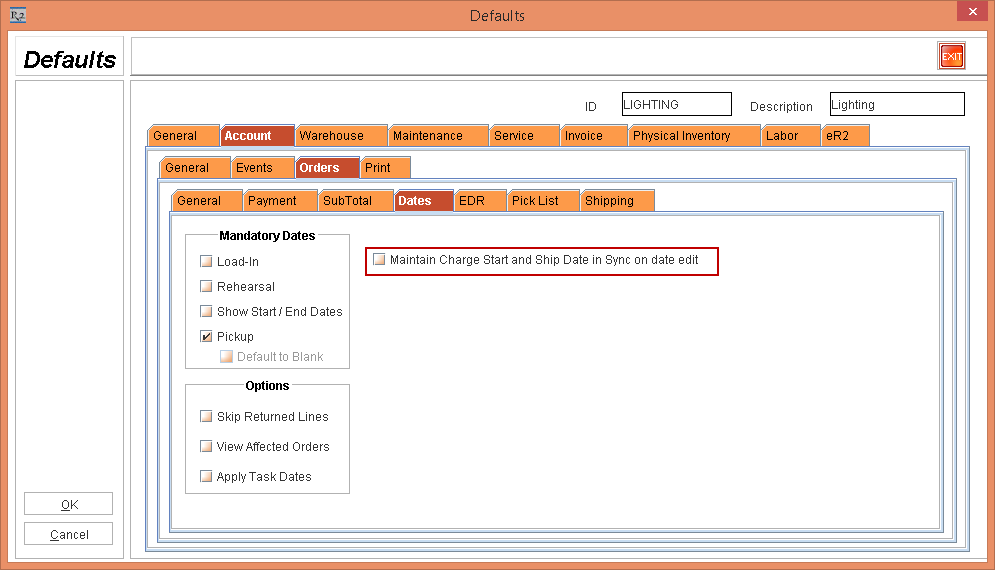
Figure 3.0 Maintain Charge Start and Ship Date in Sync on date Edit check box in the Employee Edit > Defaults ID Edit > Account tab > Orders tab > Dates tab
When the Maintain Charge Start and Ship Date in Sync on date Edit check box in the Maintenance module is selected, the settings are applicable to all the existing and upcoming Orders.
The same is applied to a specific Order header also, by selecting the Maintain Charge Start and Ship Date in Sync check box specific to the opened Order within the Dates tab > Edit Dates button > Order Dates window, as shown in Figure 3.1.
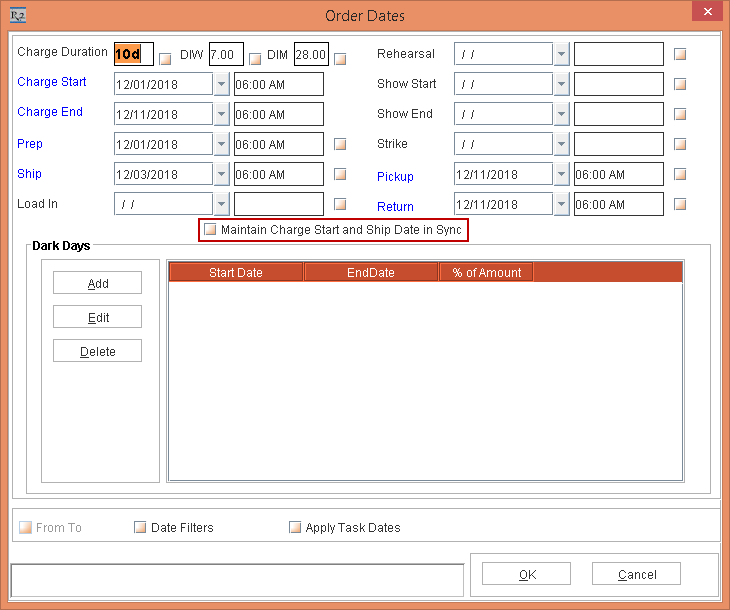
Figure 3.1 Maintain Charge Start and Ship Date in Sync check box specific to the opened Order Header
The same is applied to a specific Order line also, by selecting the Maintain Charge Start and Ship Date in Sync check box specific to the Order line > Edit > Dates tab > Edit Dates button > OrderLine Dates window, as shown in Figure 3.2.

Figure 3.2 Maintain Charge Start and Ship Date in Sync check box specific to the Order line
This feature is not applicable for an Event > Event Date Edit, Equipment Usage View window and Asset Usage View window, as they do not have Charge Dates.
If the Maintain Charge Start and Ship Date in Sync on date Edit check box is selected in the Maintenance module > Employee Edit > Defaults ID Edit > Account tab > Orders tab > Dates tab, then the Maintain Charge Start and Ship Date in Sync check box specific to the Order line will also appear selected by default.
The details are explained in the sample workflow given below:
Scenario I: Maintain Charge Start and Ship Date in Sync on date Edit check box selected in the Employee Edit and the Adjust invalid dates on Order and Event date edit check box not selected in the Configuration module > General tab.
Prerequisites
Select the Configuration module > General tab > clear the Adjust invalid dates on Order and Event date edit check box.
Save and Exit the Configuration module.
Relaunch the R2 application.
Select the Maintenance module > Employee Edit > Defaults ID Edit > Account tab > Orders tab > Dates tab.
Select the Maintain Charge Start and Ship Date in Sync check box, as shown in Figure 3.3.
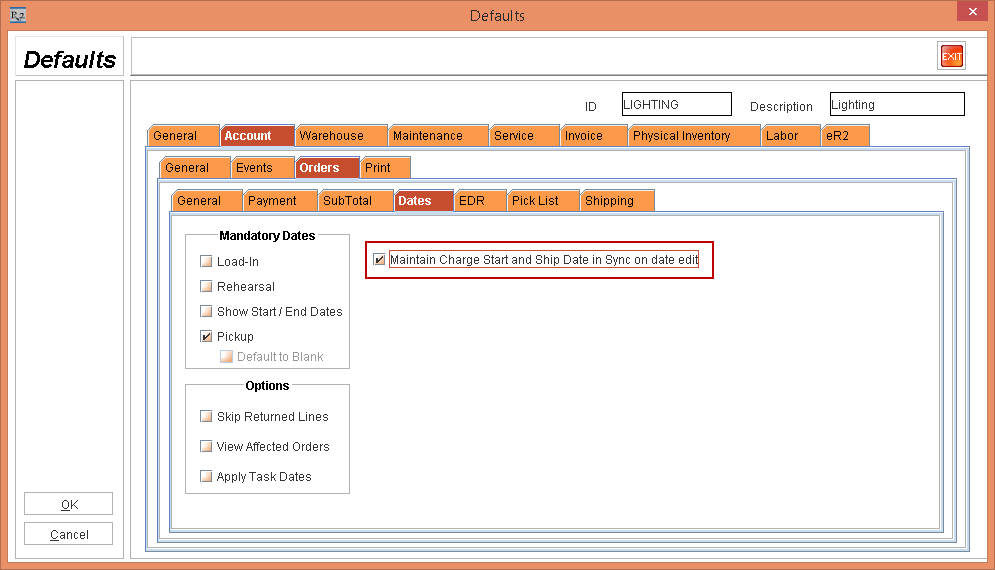
Figure 3.3 Maintenance module > Employee Edit > Defaults ID Edit > Account tab > Orders tab > Dates tab > Maintain Charge Start and Ship Date in Sync check box
When the Adjust invalid dates on Order and Event date edit check box is not selected in the Configuration module and if the Maintain Charge Start and Ship Date in Sync check box is selected in the Maintenance module, the Order Charge Start and the Ship Dates are only affected.
Save and Exit the Maintenance module.
Relaunch the R2 application.
Select the Items tab.
Create a Serial Item [NIKON Z7].
Save and Exit the Maintenance module.
Sample Workflow
Select the Account module. The Account window is displayed.
Tag a Company [NIKON INC.].
Create a Rental Reservation Order [ORD-1289] for 10 days duration with the Start Date [01-Dec-2018] Time [06:00 AM] and End Date [11-Dec-2018] Time [06:00 AM].
Add the Serial Item [NIKON Z7] with 1 Qty, as shown in Figure 3.4.
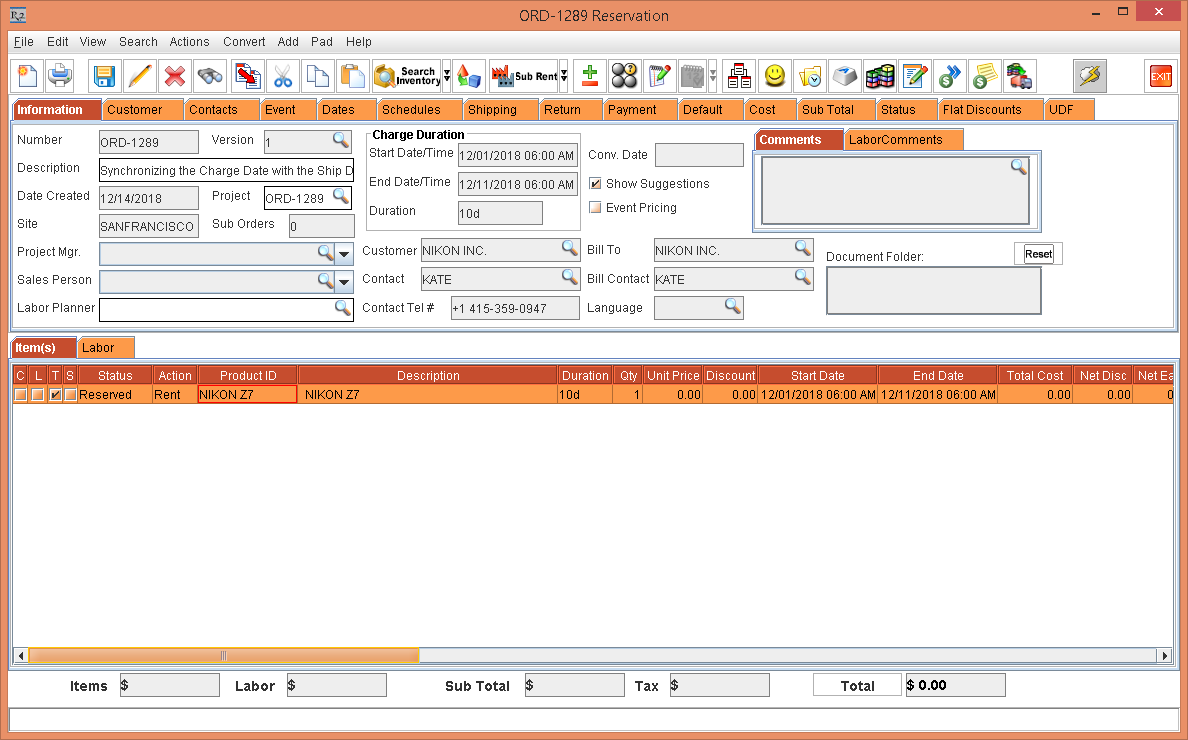
Figure 3.4 Rental Reservation Order [ORD-1289] with the Serial Item [NIKON Z7]
Select the Dates tab > click the Edit Dates button. The Order Dates window is displayed with the Dates, as shown in Figure 3.5.

Figure 3.5 The Header Order Dates window displaying the Dates
Click OK.
Select the Order line [NIKON Z7] > Edit > Dates tab > Edit Dates button > OrderLine Dates window is displayed with the Dates, as shown in Figure 3.6.
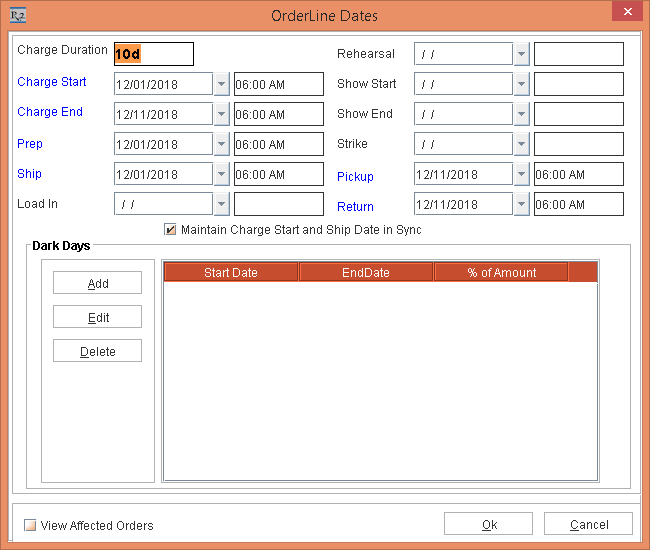
Figure 3.6 The OrderLine Dates window displaying the Dates
Click Ok.
Select the Dates tab > click the Edit Dates button. The Order Dates window is displayed.
Modify the Charge Start Date [03-Dec-2018] and tab out. The Ship Date is automatically modified to [03-Dec-2018] Time [06:00 AM] highlighting in red color. Also, the Charge End Date [13-Dec-2018] Time [06:00 AM] is also modified based on the Charge Duration [10d], as shown in Figure 3.7.
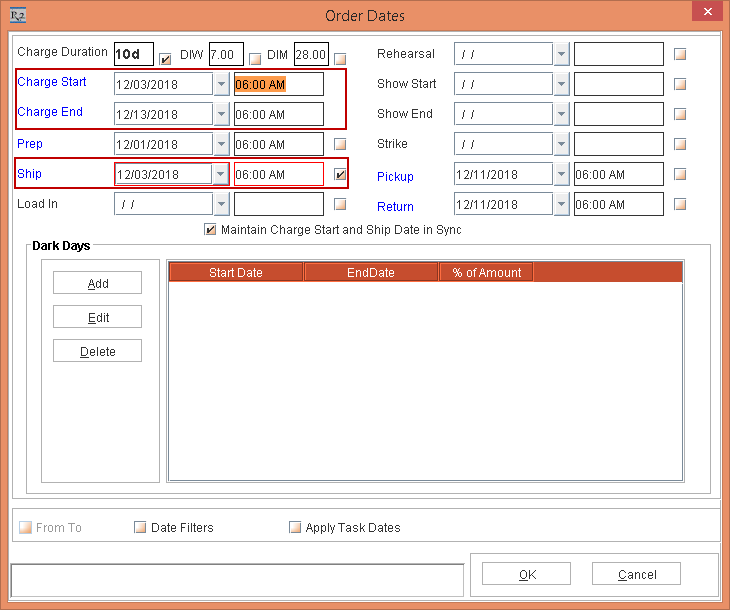
Figure 3.7 The Header Order Dates window displaying the modified Ship Date highlighted in red
Click OK.
Select the Order line [NIKON Z7] > Edit > Dates tab > Edit Dates button > OrderLine Dates window is displayed with the modified Charge Start Date [03-Dec-2018] Time [06:00 AM] , Ship Date [03-Dec-2018] Time [06:00 AM] , and Charge End Date [13-Dec-2018] Time [06:00 AM] based on the Charge Duration [10d], as shown in Figure 3.8.

Figure 3.8 The OrderLine Dates window displaying the modified Dates
Click Ok.
Save and Exit the Order [ORD-1289].
Scenario II: Maintain Charge Start and Ship Date in Sync on date Edit check box selected in the Employee Edit and the Adjust invalid dates on Order and Event date edit check box selected in the Configuration module > General tab.
Prerequisites
Select the Configuration module > General tab > select the Adjust invalid dates on Order and Event date edit check box.
Save and Exit the Configuration module.
Select the Maintenance module > Employee Edit > Defaults ID Edit > Account tab > Orders tab > Dates tab.
Select the Maintain Charge Start and Ship Date in Sync check box.
Save and Exit the Maintenance module.
Relaunch the R2 application.
Select the Items tab.
Create a Serial Item [NIKON Z7].
Save and Exit the Maintenance module.
Sample Workflow
Select the Account module. The Account window is displayed.
Tag a Company [NIKON INC.].
Create a Rental Reservation Order [ORD-1290] for 10 days duration with the Start Date [01-Dec-2018] Time [10.30 AM] and End Date [11-Dec-2018] Time [10:30 AM].
Add the Serial Item [NIKON Z7] with 1 Qty, as shown in Figure 3.9.
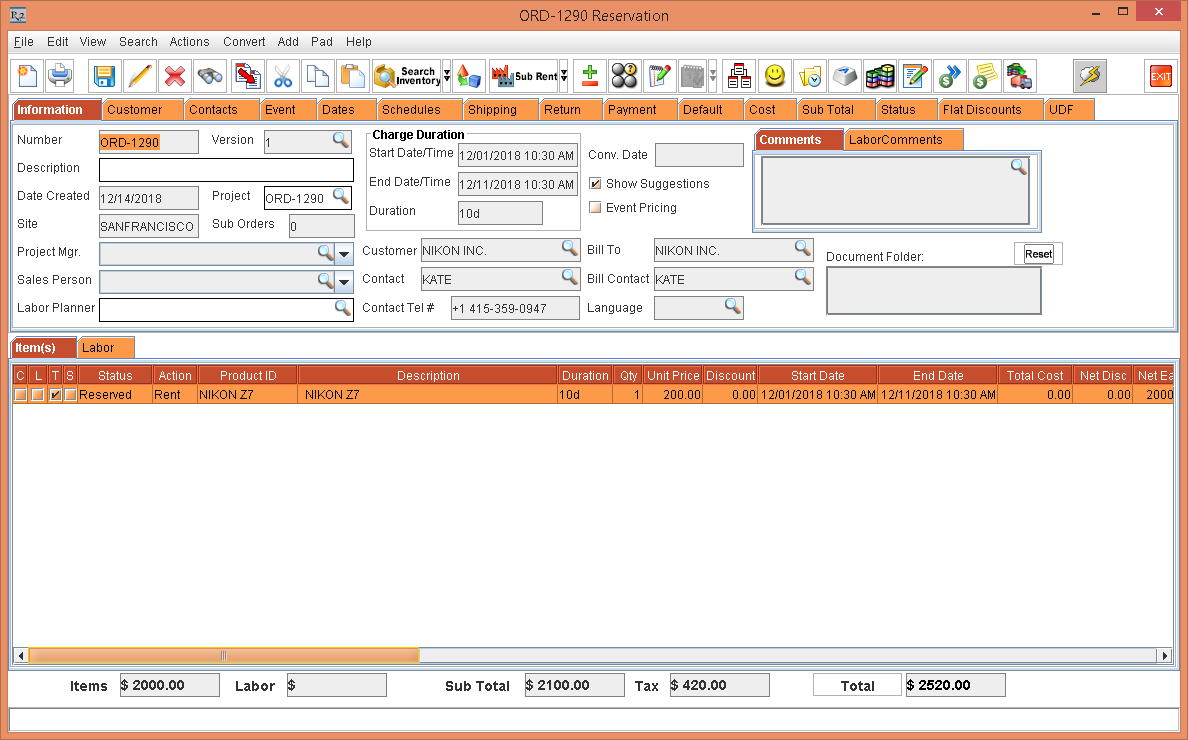
Figure 3.9 Rental Reservation Order [ORD-1290] with the Serial Item [NIKON Z7]
Select the Dates tab > click the Edit Dates button. The Order Dates window is displayed with the Dates, as shown in Figure 3.10.

Figure 3.10 The Header Order Dates window displaying the Dates
Click OK.
Select the Order line [NIKON Z7] > Edit > Dates tab > Edit Dates button > OrderLine Dates window is displayed with the Dates, as shown in Figure 3.11.

Figure 3.11 The OrderLine Dates window displaying the Dates
Click Ok.
Select the Dates tab > click the Edit Dates button. The Order Dates window is displayed.
Modify the Prep Start Date [03-Dec-2018] Time [10:30 AM] and tab out. The Ship Date is automatically modified to [03-Dec-2018] Time [10:30 AM] highlighting in red color, the Charge Start Date is also modified to [03-Dec-2018] Time [10:30 AM] highlighting in red color and, the Charge End Date [13-Dec-2018] Time [10:30 AM] is also modified based on the Charge Duration [10d], as shown in Figure 3.12.

Figure 3.12 The Header Order Dates window displaying the modified Dates highlighted in red
Click OK.
Select the Order line [NIKON Z7] > Edit > Dates tab > Edit Dates button > OrderLine Dates window is displayed with the modified Prep Start Date [03-Dec-2018] Time [10:30 AM], Ship Date [03-Dec-2018] Time [10:30 AM], Charge Start Date [03-Dec-2018] Time [10:30 AM] and, the Charge End Date [13-Dec-2018] Time [10:30 AM], as shown in Figure 3.13.
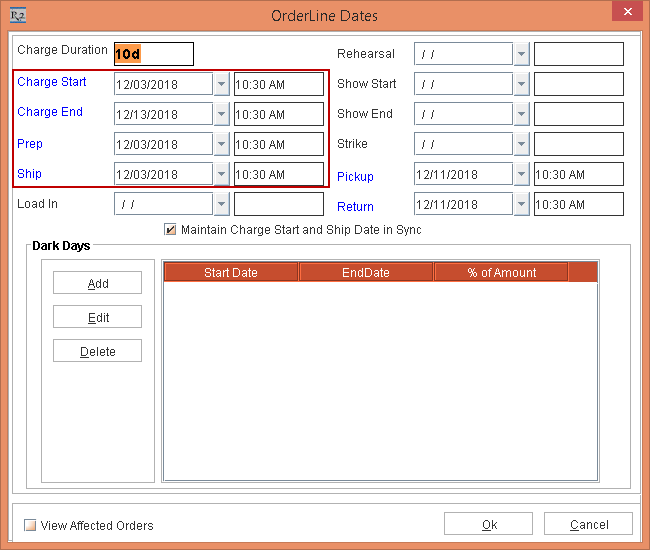
Figure 3.13 The OrderLine Dates window displaying the modified Dates
Click Ok.
Save and Exit the Order [ORD-1290].
Highlighting the automatically adjusted Dates in Red color
Prior to Version 06.00.04-00
Earlier during any alteration in the Dates, the system was never auto adjusting and highlighting the modified Dates in the Order Dates/ Event Dates tab.
With Effect from Version 06.00.04-00
Now, when the invalid dates are altered in the Order Dates/ Event Dates tab, the Charge Start Date or Ship Dates are automatically altered, displaying the altered Dates in the red color border. The user modified dates are displayed normally, as shown in Figure 4.0.
Further, when you click OK in the Order Dates/ Event Dates window, the system updates the Dates to lines. The modified Dates are always displayed highlighted in Red border although they are correct. The red borders get disappeared in the Order Dates/ Event Dates window when closed and reopened.
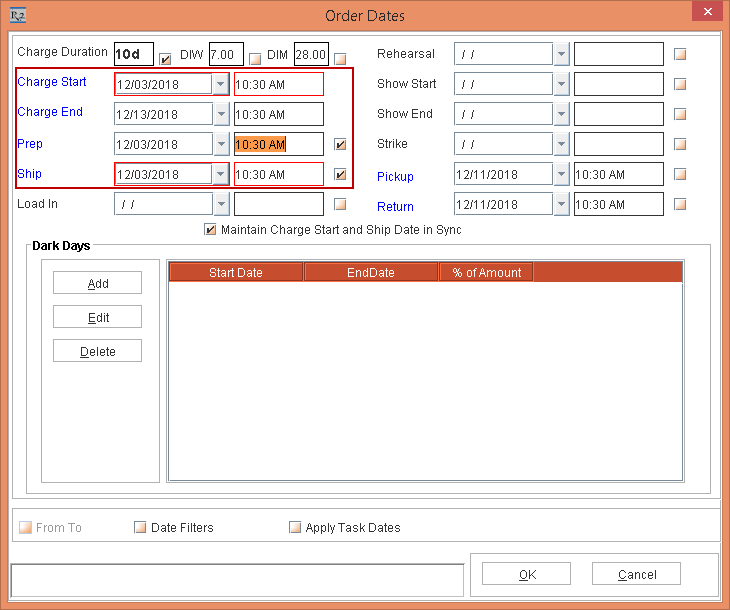
Figure 4.0 The Header Order Dates window displaying the modified Dates highlighted in red
If the Dates are incorrect the system will not update the dates to lines displaying a prompt with the message “R2_00817: Please Verify the Date(s), some are Invalid”
For Example: In the Order Dates window the Pickup Date [03-Dec-2018] Time [10:30 AM] and the Ship Date [03-Dec-2018] Time [10:30 AM] are the same. When you click OK, the system displays a prompt with the message "R2_00817:Please Verify the Date(s), some are Invalid," as shown in Figure 4.1.
To proceed further, you must modify the Pickup Date manually.

Figure 4.1 Prompt displays for the same Pickup Date and Ship Date