Tasks can be scheduled to Revert Availability of the items when the R2 session gets disconnected before the Order is saved. This feature is used to ensure that the availability of the item is updated correctly.
If a R2 session disconnects before an Order is saved, the Order details is lost but the availability of the item is affected in such scenarios the Revert Availability tasks helps user in reverting the availability of the item, this task can be scheduled on Daily, Hourly and Minute basis.
Steps to create the SQL and Batch files to Revert Availability of Disconnected Sessions
-
Creating SQL file for executing the clearundoactions procedure.
Create a ASCII file with extension .SQL (For example automation.sql) enter the below command lines and save the file.
exec clearundoactions
exit;
-
Creating a batch file for executing automation procedure.
Create a file with extension .Bat file with the following command line and save the file in the same folder where the .SQL file is stored.
Sqlplus username/password @connectstring @ [filename].sql
Step to do the Scheduling Automation procedure
-
To open Scheduled Tasks, click Start, click All Programs, point to Accessories, point to System Tools, and then click Scheduled Tasks.
-
Double-click Add Scheduled Task to start the Scheduled Task Wizard, and then click Next in the first dialog box.
-
The next dialog box displays a list of programs that are installed on your computer, either as part of the Windows operating system, or as a result of software installation.
-
Click Browse & locate the folder where .BAT file created in Step 2 is saved.
-
Select the file and click Open.
-
Enter a name for the new schedule, say Revert Disconnected Availability.
-
Select Daily as the Perform this task option and then click Next.
-
Specify the information about the day and time to run the task.
-
Select Start date for the new schedule and then click Next.
-
Type the name and password of the user who is associated with this task. Make sure that you choose a user with sufficient permissions to run the program. By default, the wizard selects the name of the user who is currently logged on.
-
Click Next to display the dialog box with information about the choices that you have made.
-
Select Open Advanced properties for this task (On selecting this option, Windows will display properties dialog box for the scheduled task when the create schedule wizard is closed).
-
Click Finish to close the wizard, and display the schedule properties dialog box.
-
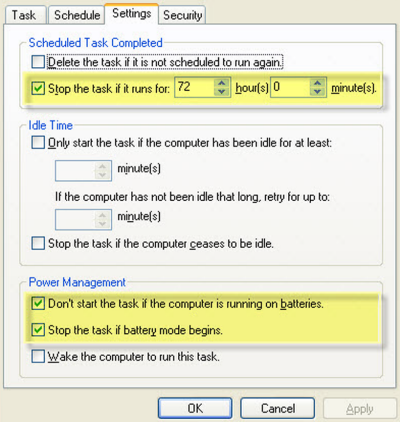
Click on the Settings tab.
-
De-select the options which are highlighted (as shown below).
-
Click OK to save & exit schedule configuration window.