Reference No: R2-78
Support has been provided to import the Tax Details in .CSV format into the R2 application.
The functionality is explained with a Sample Work Flow:
Prerequisites
-
Create a sample TaxImportDetails.csv file comprising of the details such as Zip Code, City Name, State Name, County Name, Item TaxGroup, Custom TaxGroup, Tax Rate, Tax Action, Tax ScheduleID, Tax Schedule Description, and Effective Date, as shown in below.

The shuffling of columns in the TaxImportDetails.csv is not supported. It is mandatory to adhere to the column sequence of the TaxImportDetails.csv file comprising of the details in the first row such as Zip Code, City Name, State Name, County Name, Item TaxGroup, Custom TaxGroup, Tax Rate, Tax Action, Tax ScheduleID, Tax Schedule Description, and Effective Date. The details mentioned in the first row is always ignored, as it is considered as the Header.
Also, you will not be intimated if the columns have been shuffled resulting in importing incorrect data in the Maintenance module > Misc tab > Taxes tab.
Sample Work Flow
-
Select the Maintenance module.
-
Click the Import Tax Details icon. The Import Tax Details window is displayed, as shown in Figure 2.0.

-
The Import Tax Details window displays the field options, as shown in Table 2.0:
Table 2.0 Import Tax Details
Field
|
Details
|
Description
|
|
User View |

|
Allows you to modify and Save the Import Tax Details window dimensions. |
|
Path |

|
Select the Path importable button to select the .CSV file for Tax Import. This is a mandatory field. |
|
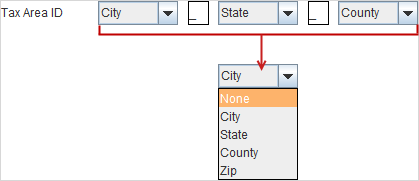
Options >Tax Area ID |
|
Select any one of the Tax Area ID drop-down option - City, State, County or Zip. NOTE: Any two of the Tax Area ID drop-down fields selection is mandatory. |
|
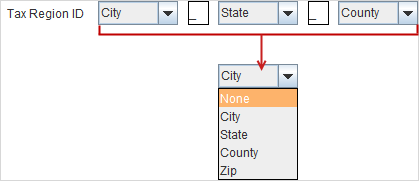
Options >Tax Region ID |
|
Select any one of the Tax Region ID drop-down option - City, State, County or Zip. NOTE: Any two of the Tax Region ID drop-down fields selection is mandatory. |
|
Tax Schedule ID |
|
Select either the Tax Schedule ID drop-down option or the Rate drop-down option.
NOTE:
|
|
Allow multiple Tax Schedule for a Tax Area |
|
When the Allow multiple Tax Schedule for a Tax Area check box is not selected following by clicking the Run button, the system validates for any entries in the .CSV file with the same City, State, County, Item Tax Group, Customer Tax Group, Action and different Tax Rates. If any such entries are found, the details of the entries are displayed inhibiting the file process. |
-
Select the fields in the Import Tax Details window, and click the Run button.
-
The system displays a prompt with the message "Tax Details imported successfully" as shown in Figure 2.1.

-
Click OK.
-
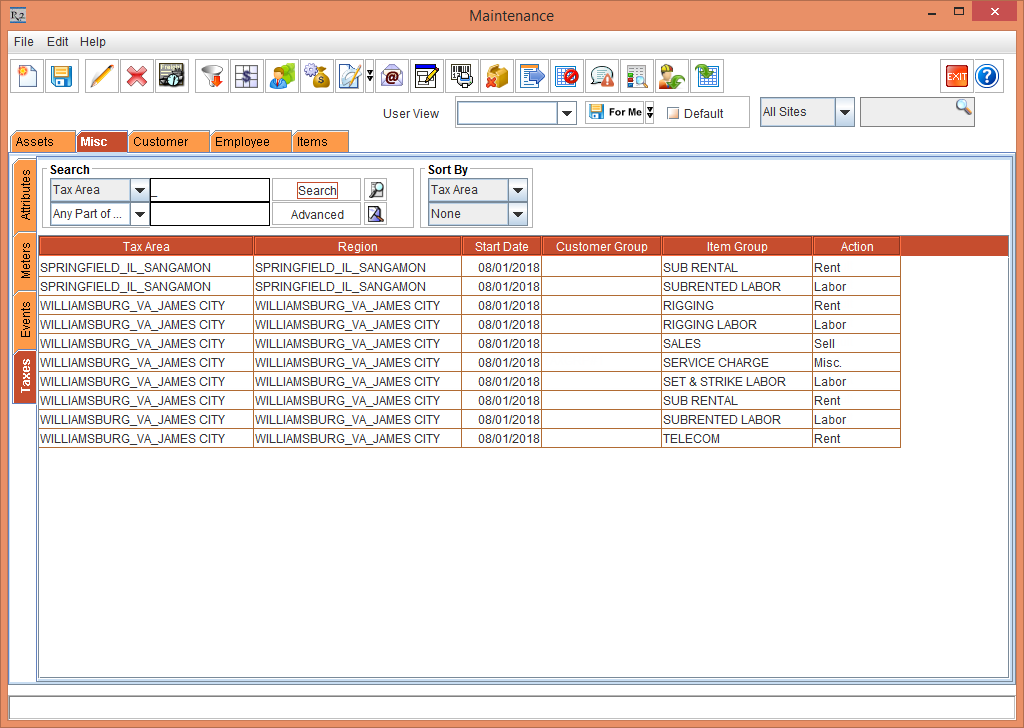
Select the Misc tab > Taxes tab to view all the imported Tax details, as shown in Figure 2.2.
-
The Figure 2.2 displays the column details such as Tax Area, Region, Start Date, Customer Group, Item Group, and Action.
-
The Column details displayed in Figure 2.2 is a combination of the columns from the Tax Import.csv, as explained in the below Table 2.1.
Table 2.1 R2 Column Details Explanation with the TaxImportDetails.csv Column Name Combinations
R2 Column Name
|
TaxImportDetails.csv Column Name Combinations
|
|
Tax Area |
The Tax Area column in the R2 application is the combination of City Name, State Name, and County Name from the CSV file. |
|
Region |
The Region column in the R2 application is the combination of City Name, State Name, and County Name from the CSV file. |
|
Start Date |
The Start Date column in the R2 application is the Effective Date from the CSV file. It is always defined in mm/dd/yyyy format. |
|
Customer Group |
The Customer Group column in the R2 application is the Customer TaxGroup from the CSV file. |
|
Item Group |
The Item Group column in the R2 application is the Item TaxGroup from the CSV file. |
|
Action |
The Action column in the R2 application is the Tax Action from the CSV file. |
-
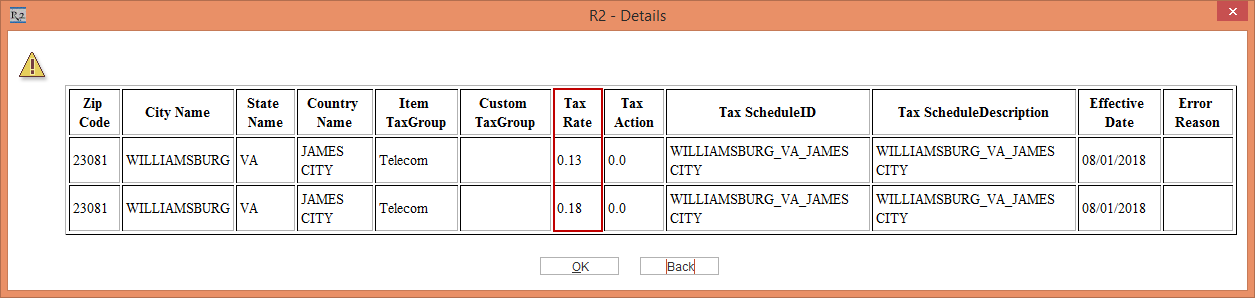
In the Tax Import.csv file, replicate one of the Tax line details by modifying the Tax Rate [0.18], as shown in figure 2.3.

-
Save the Tax Import.csv file.
-
Import the Tax Import.csv file by repeating the Steps from 1 to 4.
-
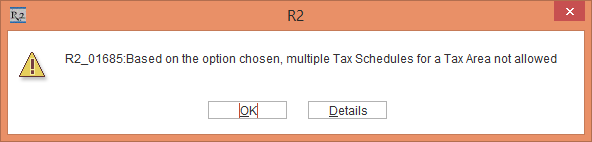
Click the Run button, a prompt with the error message "Based on the option chosen, multiple Tax Schedules for a Tax Area not allowed" is displayed with the OK and Details buttons, as shown in Figure 2.4.
-
Click the Details button. The details of the error message is displayed portraying the replica of Tax line details except different Tax Rate [0.18], as shown in Figure 2.5.