Table of Contents
R2 supports integrations with both Desktop versions:
-
QuickBooks Pro
-
QuickBooks Premier
-
QuickBooks Enterprise
As well as with QuickBooks Online.
This guide describes use of the QuickBooks Desktop Integration.
R2 integrates the following objects with QuickBooks:
-
Accounts Receivable (Invoices)
-
Cash and Credit Card Payments
-
Customers
-
Accounts Payable (PO Payments)
-
Vendors
-
Depreciation
R2 can receive the following information back from QuickBooks:
-
Payments to Invoices
Introduction
QuickBooks Accounting integration is accomplished thru a user-controlled Import/Export facility. The program is called R2QB2.EXE and resides in the \R2QB folder.
Pre-requisites to integrating R2 A/R and A/P documents into QuickBooks include:
Installation package
-
R2QB2.EXE
-
QBFC7_0installer.EXE
Data files from R2
The R2 posting files which are created during the R2 batch posting process:
-
A/R batches create the files Customer.CSV, Sales.CSV and General.CSV
-
A/P batches create the files Vendor.CSV and Purchase.CSV
Version History
1.1.0.25 18 February 2013
This version supports US, Canadian and UK market versions. UK market versions of QuickBooks process taxes in the same fashion as the Canadian market version of QuickBooks, that is, via Tax Codes, and not directly with the QuickBooks “Tax Item” or “Tax Group”.
1.1.0.26 4 November 2013
“Inventory Assembly”. This is a dangerous process to deploy without understanding the consequences. It is advised you seek counsel from UBS if you have Inventory items in QuickBooks.
1.1.0.27 20 November 2013
Class information passed from C/R2 will be loaded at the invoice header as well as the invoice line. The same is true of credit memos.
1.1.0.28/29 03 February 2014
-
Process Jobs (Boolean, default false) added to Settings. If true, job numbers are appended to customer name in invoice / credit memo / purchase / vendor credit integrations.
-
Project ID added to Purchases.csv in position 26 (for CR2 extracts, “Is Credit” moved from position 26 to position 27).
-
Project ID added to Sales.csv in position 35.
-
If Process Jobs is true and a Project ID is included in a purchases.csv record, a customer / job reference is added to expense line for the bill / vendor credit. If customer / job reference can’t be determined (either no such jobs exist or project id used by more than 1 customer in QB), the bill / vendor credit is not added to QB.
-
If Process Jobs is true and a Project ID is included in a sales.csv record, the Project ID is appended to the Customer ID in the invoice / credit memo. If the corresponding job hasn’t been entered into QB, the bill / credit memo won’t get added to QB.
When exporting from QuickBooks to R2, the Export1 and Export 2 files do not contain the Job number (using version 28, the import from R2 will fail because R2 can’t find the <customer:job>
1.1.0.30 25 February 2014
This one adds a customer job if it doesn’t already exist. Note: the customer job will take address information from the sales extract data; if the customer already exists, address info isn’t updated in the parent customer record. This shouldn’t be a problem if it’s in synch with the latest R2 customer data and that data was included in a customer extract. Also, a reminder that project ids must be unique across all customers in QuickBooks; if a job number gets recycled by another customer, the job won’t get added to QB; nor will the invoice / credit memo.
1.1.0.34 24 November 2014
“Salesperson” is no longer a mandatory integration field. R2 invoices imported into QuickBooks do not require a salesperson.
1.1.0.36 5 January 2015
New configuration setting, “Process Credit Memos”. Boolean: True or False, default is False. If set to False, then all records in the Purchase.CSV file will be treated as bills and the Credit Memo/Project ID field is ignored for collating records.
1.1.0.37 16 January 2015
Program has been configured to ignore zero quantity lines and assume they are tax lines rather than items. This also fixes a bug where invoices without tax are viewed as zero quantity lines, thereby causing them to fail to import.
Integration
To begin integrating, QuickBooks must first be open. Once it is open, you may run R2QB2.EXE. The following window will open:
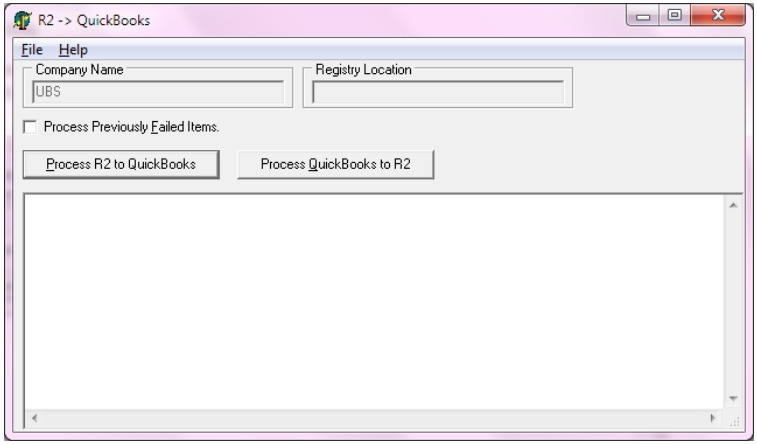
This program allows you to import the R2 invoices and vouchers into QuickBooks (Process R2 to QuickBooks) as well as export customer payments (Process QuickBooks to R2). Any failures to integrate will immediately appear on the screen in plain language defining the problem.
The following fields and functions are available from the main screen:
|
Field / Function |
Meaning |
|---|---|
|
Process R2 to QuickBooks |
Click on this to import R2 Receivable and Payable batches into QuickBooks. |
|
Process QuickBooks to R2 |
Click on this to export invoice payment information. This will create the files EXPORT1.tab and EXPORT2.tab which will be imported into R2. The processing status of each event, as well as any errors, will appear in the field. |
|
Process Previously Failed |
Click this checkbox, then click on Process R2 to QuickBooks if an event fails. However, before doing this, you must first correct the failure. |
|
Company Name |
This displays the QuickBooks company name the program is connected to. It is good practice to verify that this is the proper company before importing and exporting data for R2. |
|
Registry Location |
If using the optional “Registry Location” function, this will display the custom registry to which you are connected. More on this in the section below |
Registry Location
This function will be used when multiple users are connecting to the same QuickBooks machine to process R2 files, but connecting to different QuickBooks companies and accessing different folder structures.
-
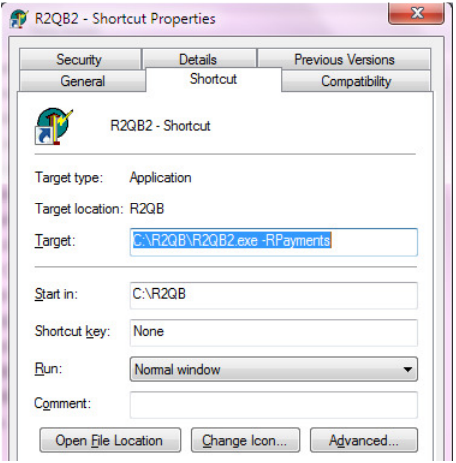
To begin, create a shortcut of the R2QB2.EXE file.
-
Right-click on the shortcut and select Properties.
-
In the “Target” field, add “–R” followed by the unique Registry name. In the example below, I’ve used “Payments” as the registry name.
-
Click on the Apply button, then the OK button.
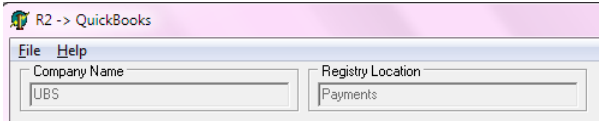
Once the registry name has been defined, you will open the R2QB2 program using the new shortcut you created. When this is open, note the “Registry Location” field is properly reflecting your selection:
With the program open, click on File → Settings and configure the unique file folders that this registry location will access. In this fashion different registry names can access different file folders.
Settings
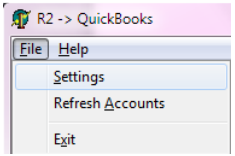
To access the settings area, click on the menu bar File → Settings:
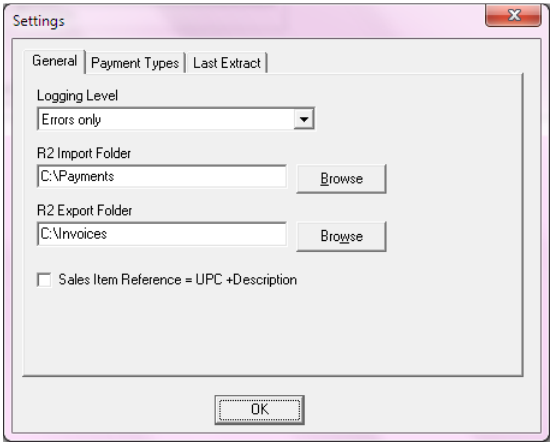
The following fields and functions are available from the General settings screen:
|
Field / Function |
Meaning |
|---|---|
|
Logging Level |
This allows you to view how much information is displayed on the main processing screen when importing or exporting from R2 and QuickBooks. The recommended setting is “Errors Only”. |
|
R2 Import Folder |
By default, the import folder will be C:\R2QB. Folders named Failed, Pending and Processed will be created once you open the R2QB2 program the first time. Incoming R2 posting files will be copied to the C:\R2QB\Pending folder. When clicking on the “Process R2 to QuickBooks button, it will read the files in the C:\R2QB\Pending folder. By changing the R2 Import Folder you tell the program where to look for the Failed, Pending and Processed folders. |
|
R2 Export Folder |
By default, the export folder will be C:\R2QB. Payments taken in QuickBooks will be exported from QuickBooks upon clicking the “Process QuickBooks to R2” button and will take the form of Export1.tab and Export2.tab files. These files will reside in C:\R2QB unless the R2 Export Folder is changed here. |
Class Processing
R2 now supports processing of Classes for QuickBooks chart of account segmentation. Classes are available in two ways:
-
By Site ID: The Site ID of each invoice will be used as the QuickBooks class when processing each invoice.
-
By Profit Center: The Profit Center, selectable on each order, will be used as the QuickBooks class when processing each invoice.
A pre-requisite to processing class data into QuickBooks is that the class must first exist. To add new classes to QuickBooks, click on the Lists menu → Class List. Primary classes and sub-classes can be setup from this area.
Now you will open R2QB2.EXE and configure it to process the classes. Click on the File menu → Settings:
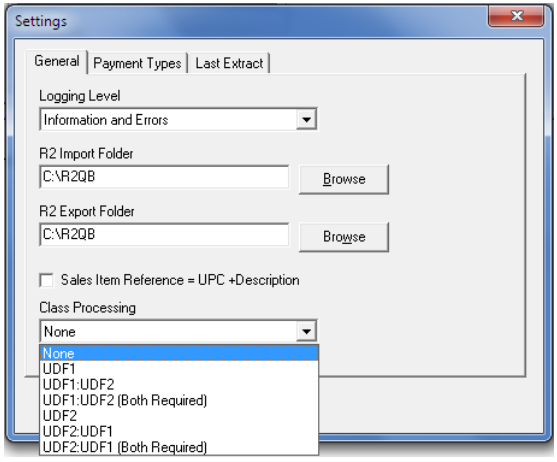
UDF means User Defined Field.
UDF1 is defined as the R2 Site ID
UDF2 is defined as R2 Profit Center
To process class transactions using Site ID only, select UDF1.
To process class transactions using Profit Center only, select UDF2.
You can utilize the other options from this menu to support the processing of sub-classes.
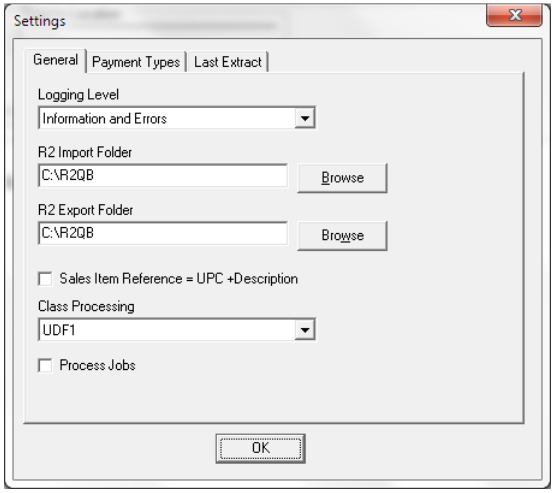
Process Jobs*
To take advantage of processing jobs from R2 into QuickBooks, you must first enable this functionality in the R2 to QuickBooks processor. To do this, open the Settings area click the Process Jobs checkbox:
IMPORTANT: the customer and job must first exist in QuickBooks else the invoice processing will fail. After adding the job to the customer in QuickBooks, you should see a representation similar to the example below where the red boxes are displaying the customer Job.
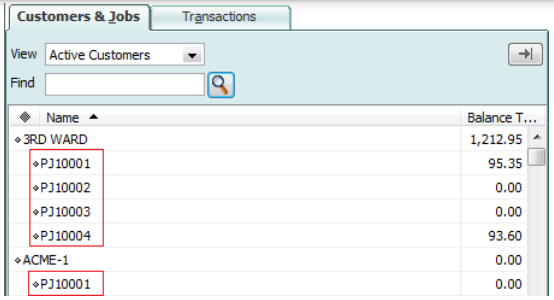
-
Refer to Appendix A below to see how to add Jobs to QuickBooks.
Payment Types
Payments taken in QuickBooks must be mapped to the names of the actual payments. To do this, open the Settings area and click on the Payment Types tab:
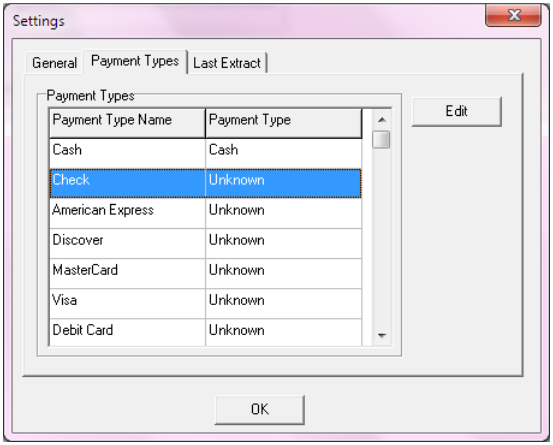
Double-click on each method of payment where the payment type is Unknown:
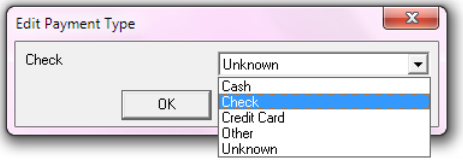
For each method of payment (Payment Type Name) select the appropriate Payment Type from the list. For example:
|
Payment Type Name |
Payment Type |
|---|---|
|
Cash |
Cash |
|
Check |
Check |
|
American Express |
Card |
|
Master Card |
Card |
|
Visa |
Card |
Help
Click the Help → About menu item for company and program information:
Appendix A
How to add JOBS to QuickBooks
Begin at the customer list.
Right-click on the customer you wish to create the JOB for.
Click on Add Job.
Enter the R2 Project ID in the QuickBooks Job Name field.
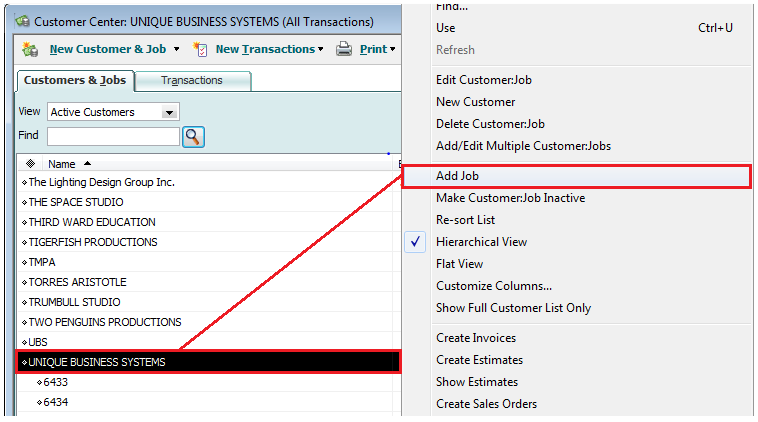
The R2 Project / QuickBooks Job relationship has been established.
You will see your R2 Projects/Jobs directly under the customer you’ve created them for.

Viewing Job information from a QuickBooks Vendor Bill.
Begin at the Vendor center.
Click on a Vendor and open a Bill
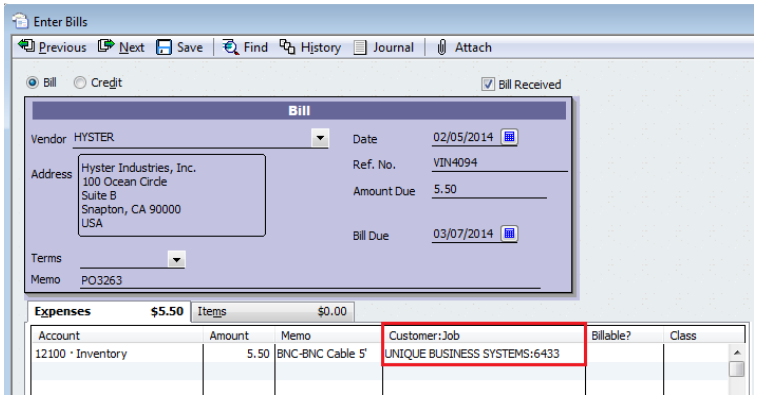
Jobs do not belong to vendors in the same way they belong to a customer. The job is only defined under a given customer. From a vendor bill, however, the Job may still be referenced. R2 sends the Project ID to QuickBooks and associates it with the Customer:Job that it finds in QuickBooks.
Troubleshooting Integrations
Error: There is an invalid reference to QuickBooks Payment Method “” in the Receive Payment.
Meaning: There is a payment method in R2 that is not setup in QuickBooks.
Resolution: In R2, begin in the Maintenance module and click on the Payment Setup button:
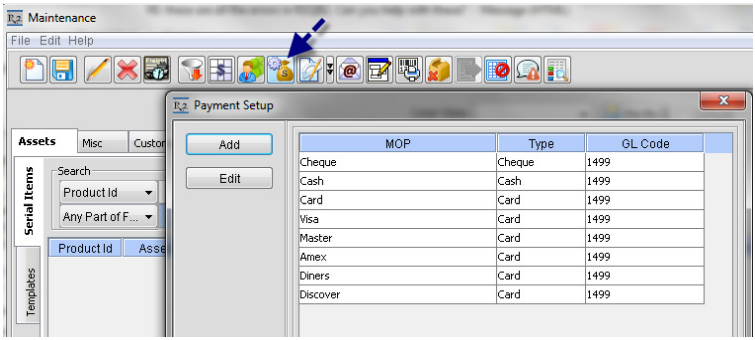
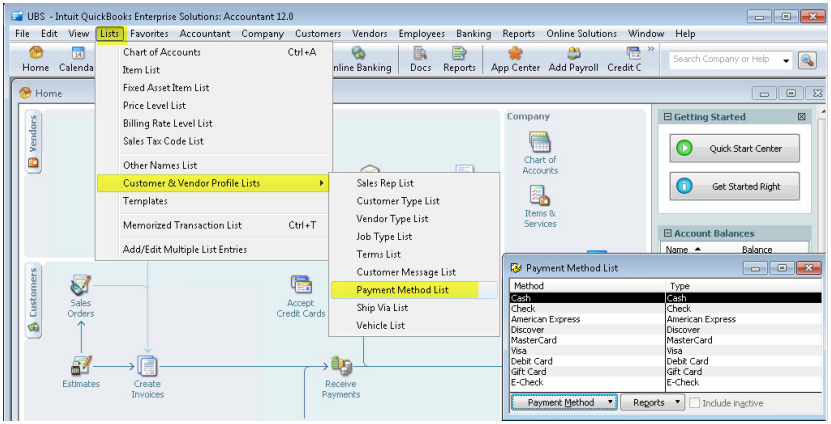
Then go to QuickBooks and make sure you have the same Payment Methods setup there, too:
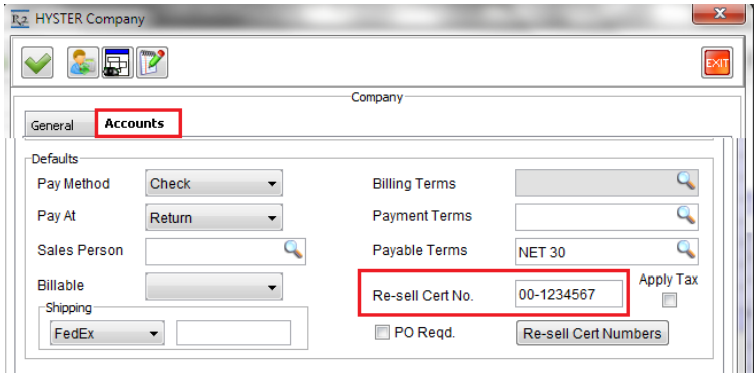
Error: The “vendor tax ident” field has an invalid value ‘572849’. QuickBooks error message: the correct format for a Federal Employer Identification Number (EIN) is ##-####### (2 numbers, a hyphen, followed by seven numbers).
Meaning: The Re-Sell Cert No. field on your R2 customer or vendor is not in the proper format.
Resolution: Edit the customer or vendor and change the Re-Sell Cert No. field on the Accounts tab to the correct format, or delete it temporarily if a valid format is not available so future integrations do not fail.
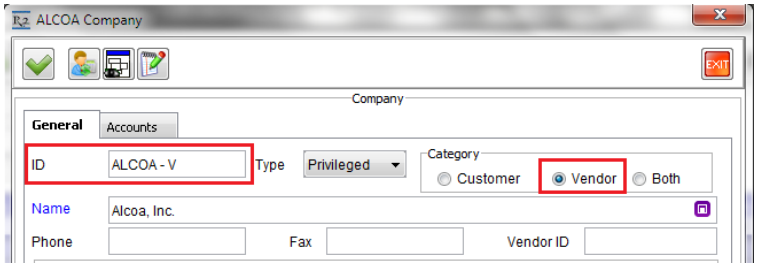
Error: The name “OFFICE MAX” of the list element is already in use.
Meaning: The vendor in R2 called OFFICE MAX already exists as a customer in QuickBooks with the same ID.
Resolution: R2 allows you to have one entity setup as both a customer and a vendor. However, QuickBooks does not allow you to have a customer and a vendor with the same ID. In such instances we usually recommend editing the R2 vendor and add a “- V” to the end of the ID field to keep it distinct from the customer of the same ID: