Reference No: R2-3520
Version No: 06.00.03-00
Prior to Version 06.00.03-00
Earlier the prompts displayed while validating the actions in Fill Order, Transfer Order and other windows in the R2 application did not comprise any "Apply this setting to all future scans in this session" check box. The action applied to the prompt was explicit to the selected Asset in the respective windows and was not applied to the upcoming Asset scans in the same session.
With Effect from Version 06.00.03-00
Now, support has been provided to skip the prompts by applying the same settings to all the future scans when scanned in the same session for various scenarios in PAT. The "Apply this setting to all future scans in this session" check box in all the prompts when enabled applies the same settings during all the future scans in the session.
The functionality is explained with a Sample Work Flow in the below mentioned Scenarios:
Scenario 1 - Support for Skipping the Prompts while Filling an Asset in ‘QC’ Status in the Rental Reservation Order
Support has been provided to skip the prompt displayed while scanning the Asset in QC Status in an Order from the Fill Order window.
Sample Workflow
-
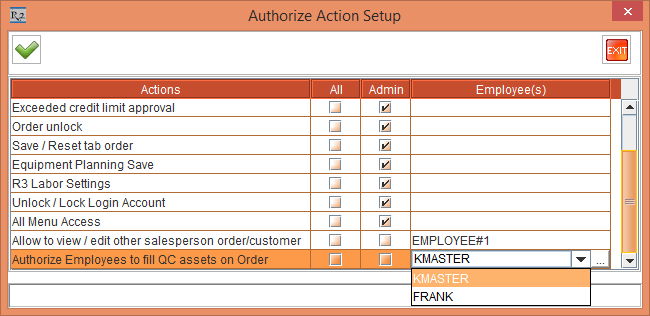
Select the Configuration module > General tab > click the Authorize Action Setup button. The Authorize Action Setup window is displayed. Select the Employees [KMASTER] and [FRANK] in the Authorize Employees To Fill Qc Assets on Order Action (do not select check-box for All or Admin) > click the OK button, as shown in Figure 1.0.
-
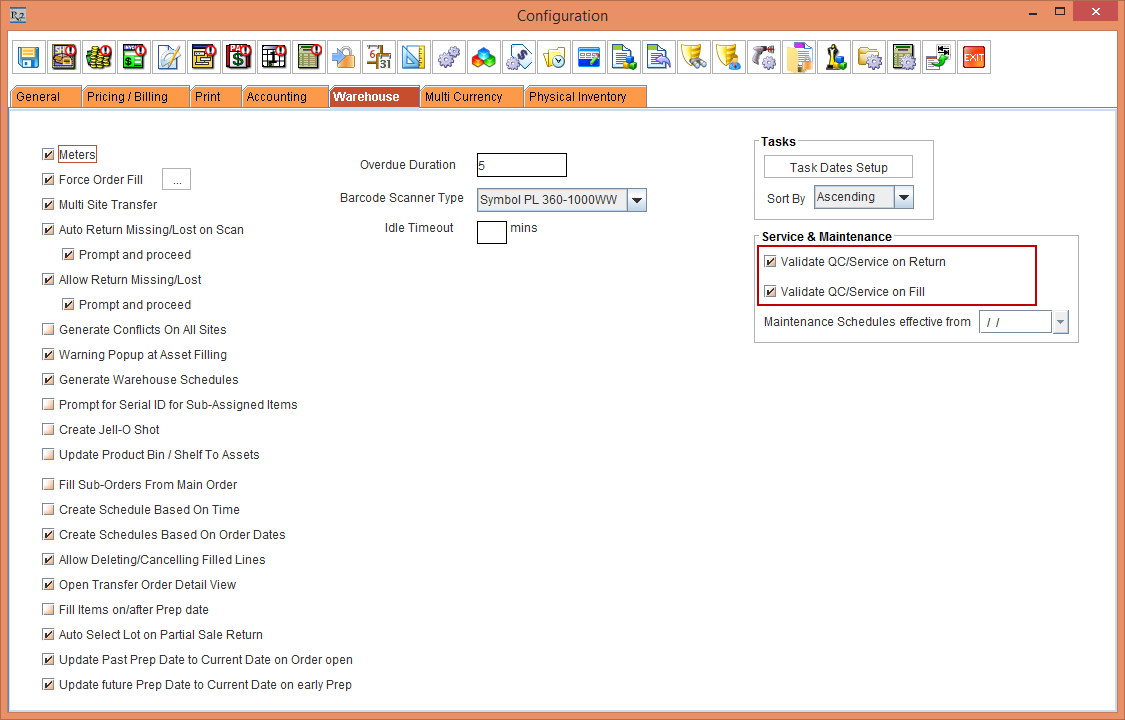
Select the Warehouse tab > select the check boxes Validate QC/Service on Return and Validate QC/Service on Fill, shown in Figure 1.1.
-
Save and exit the Configuration module.

-
Login to R2 application as Employee [JAMES] who is not the authorized to fill QC Assets on Orders.
-
Create a serial Item [CRANE#J].
-
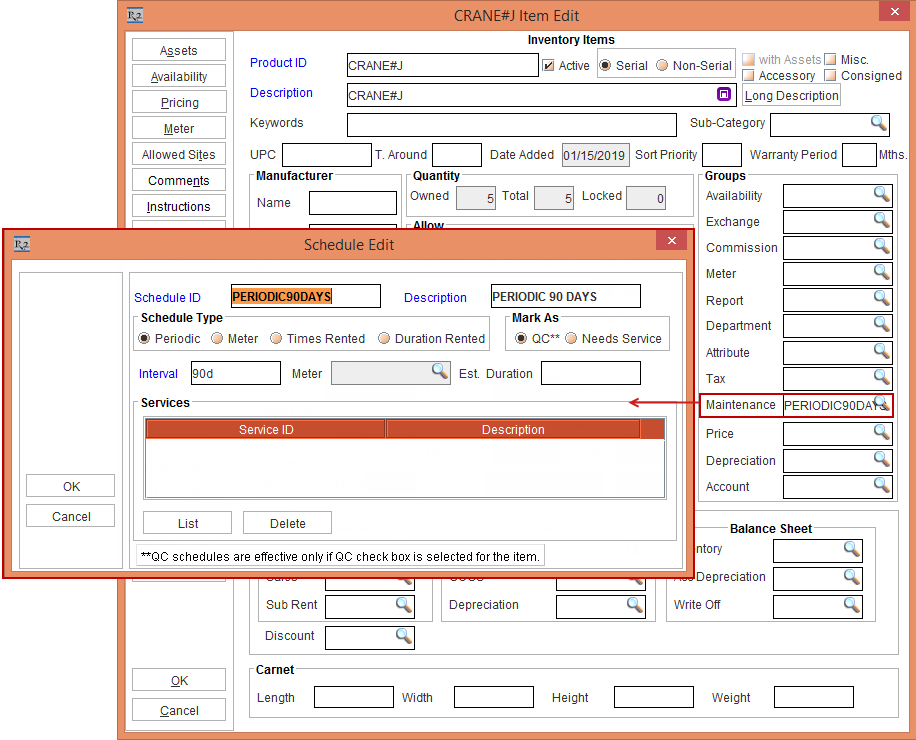
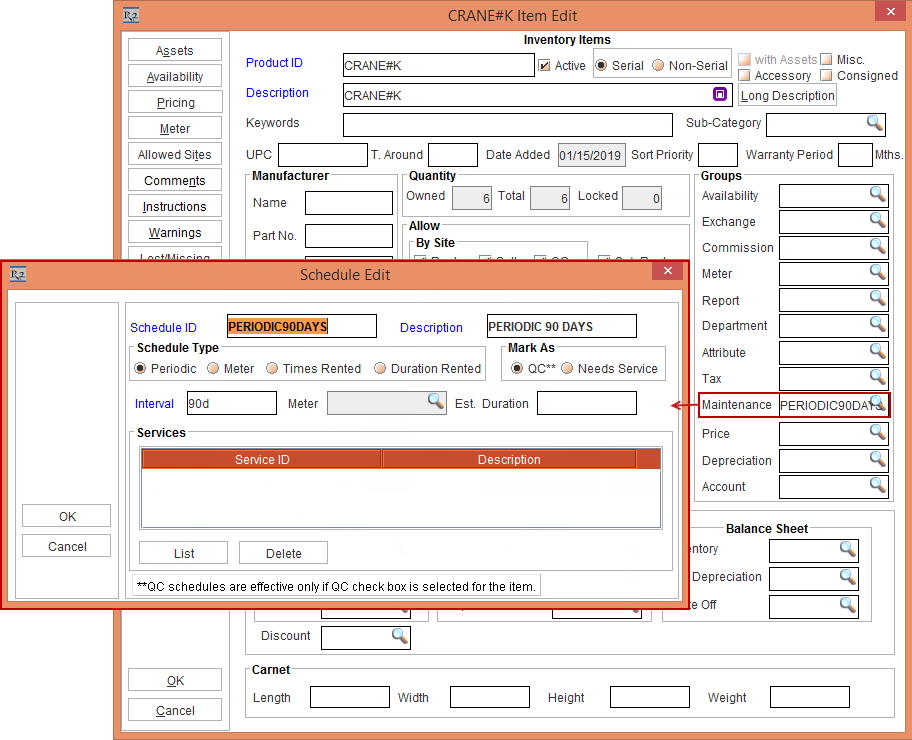
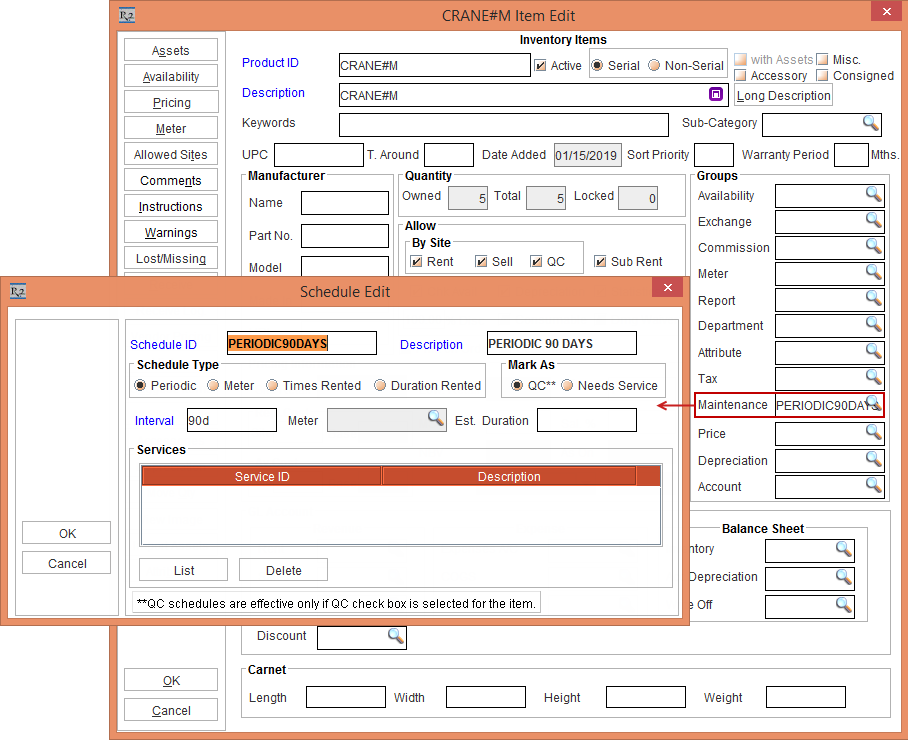
Tag Maintenance Group [PERIODIC90DAYS] with Maintenance Schedule Periodic 90Days to Item [CRANE#J] as shown in Figure 1.2
-
Receive the Assets [CRANE#J01] and [CRANE#J02] for [CRANE#J] on the Date [15-Jan-2019]. Based on Maintenance setup, the Asset is on QC on [15-April- 2019].
-
On the Date [15-April- 2019], open Service module and click Generate Needs Service button. The Assets [CRANE#J01] and [CRANE#J02]'s Status will be set as QC.
-
Reserve two quantity of [CRANE#J] on [ORD-1314] from [15-April- 2019] to [25-April- 2019].
-
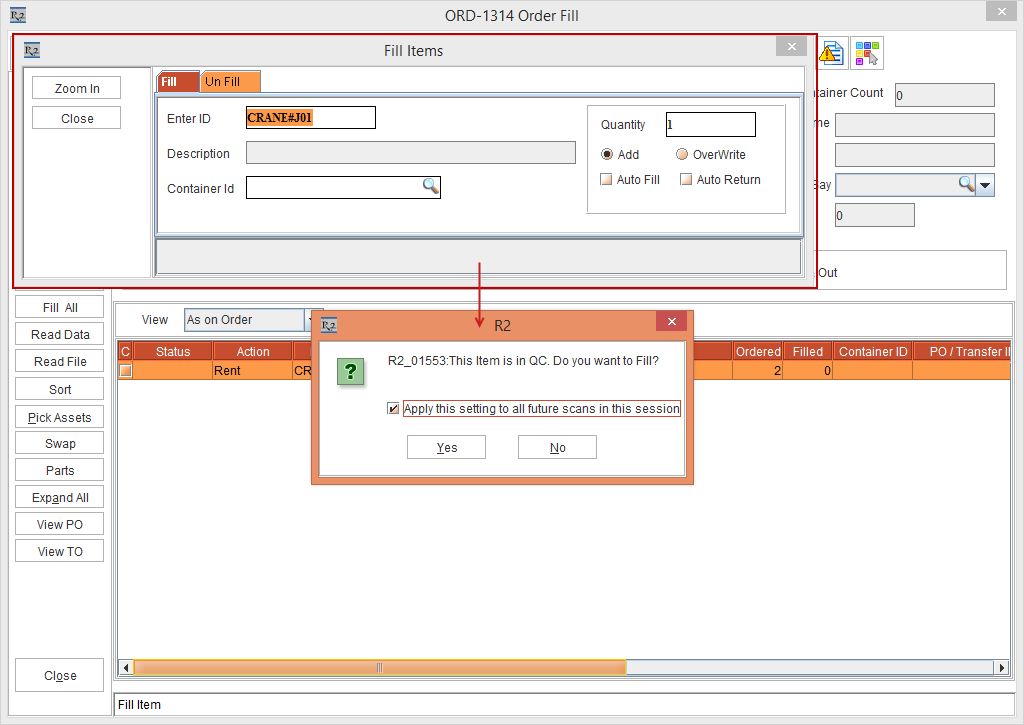
On the Date [15-April- 2019] open the Prep Task of [ORD-1314] and scan the Asset [CRANE#J01] that is in QC Status to fill it. The system displays the message, “R2_10533:This Item is in QC. Do you want to Fill?” with "Apply this setting to all future scans in this session" check box, as shown in the Figure 1.3.
i. Select Yes option to fill and provide authorized Employee’s credentials to Fill.
ii. Select No option to ignore the scan.
iii. Select the "Apply this setting to all future scans in this session" check box to apply the same settings during all the future scans in this session.
-
Select the "Apply this setting to all future scans in this session" check box and click the Yes button. The system displays the Approve Fill dialog box.
-
Enter the mandatory User ID or Employee name eligible to Fill the QC Asset, optional Password, and mandatory Remarks, as shown in the Figure 1.4.

When Close button is clicked, the system does not perform any operation in the Approve Fill dialog until the User ID, Password and Remarks are entered.
-
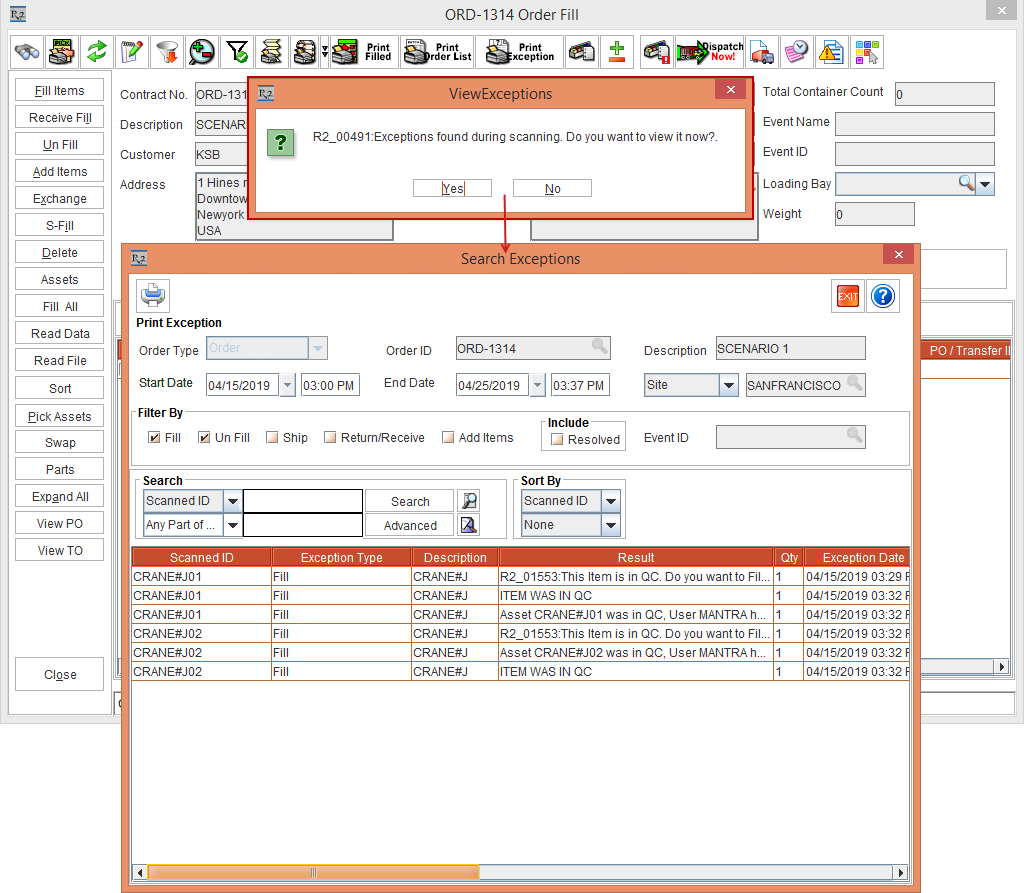
Click OK. The Asset [CRANE#J01] is filled on the Order [ORD-1314] displaying the Fill Items dialog box Status bar message "ITEM WAS IN QC. Item is Filled."
-
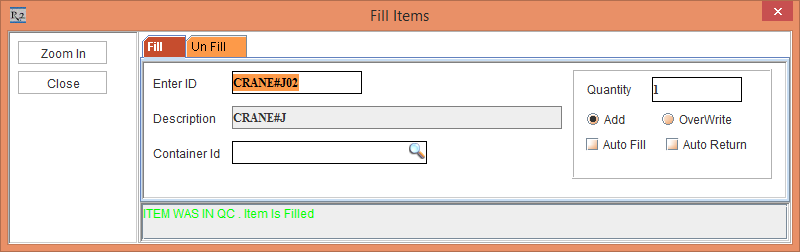
In the Fill Order window > Fill Items dialog box, scan the Asset [CRANE#J02] that is in QC Status to fill it.
-
The system does not display any prompts with messages, as the "Apply this setting to all future scans in this session" check box was selected during the scan of the Asset [CRANE#J01]. Hence, while scanning the Asset [CRANE#J02] in the same session, the system displays the Fill Items dialog box Status bar message "ITEM WAS IN QC. Item is Filled," as shown in Figure 1.5.
-
Close the Fill Items dialog box.
-
Close the Fill Order window. The system displays the ViewExceptions prompt with the message "R2_00491:Exceptions found during scanning. Do you want to view it now?" with Yes and No buttons.
-
Click Yes. The Search Exceptions window is displayed, as shown in Figure 1.6
-
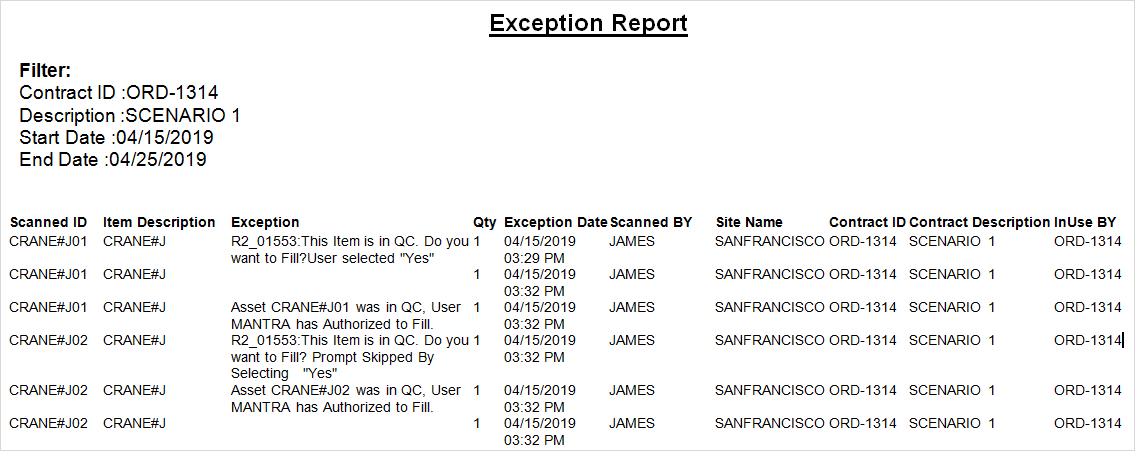
Click Print. The Exceptions are printed and displayed in MS Word format, as shown in Figure 1.7.
-
Ship the Assets [CRANE#J01] and [CRANE#J02]. The Status of the Assets [CRANE#J01] and [CRANE#J02] will be modified to Out.
Scenario IIa - Support for Skipping the Prompts while Filling an Asset in ‘QC’ Status in the Transfer Order
Support has been provided to skip the prompt displayed while scanning the Asset in QC Status from a Transfer Order window.
Sample Workflow
-
Select the Warehouse tab > select the check boxes Validate QC/Service on Return and Validate QC/Service on Fill, shown in Figure 2.0.
-
Save and exit the Configuration module.

-
Login to R2 application as Employee [JAMES].
-
Create a Serial Item [CRANE#K].
-
Tag Maintenance Group [PERIODIC90DAYS] with Maintenance Schedule Periodic 90Days to Item [CRANE#K], as shown in Figure 3.2.

-
Receive the Assets [CRANE#K01] and [CRANE#K02] for [CRANE#K] on the Date [15-Jan-2019]. Based on Maintenance setup, the Asset is on QC on [15-April- 2019].
-
On the Date [15-April- 2019], open Service module and click Generate Needs Service button. The Assets [CRANE#K01] and [CRANE#K02] Status will be set as QC.
-
Create a Transfer Order [TO-203] from [SANFRANCISCO] to [NEWYORK] with Prep, Ship and Receive dates as [15-April-2019].
-
Search and add the Serial Item [CRANE#K] with 2 Qty.
-
Click the Fill Items icon. The Transfer Fill dialog box is displayed.
-
Scan the Asset [CRANE#K01].
-
The system displays a prompt with the message "R2_01553: The Item is in QC. Do you want to Fill?" with "Apply this setting to all future scans in this session" check box and Yes and No buttons, as shown in Figure 2.2.
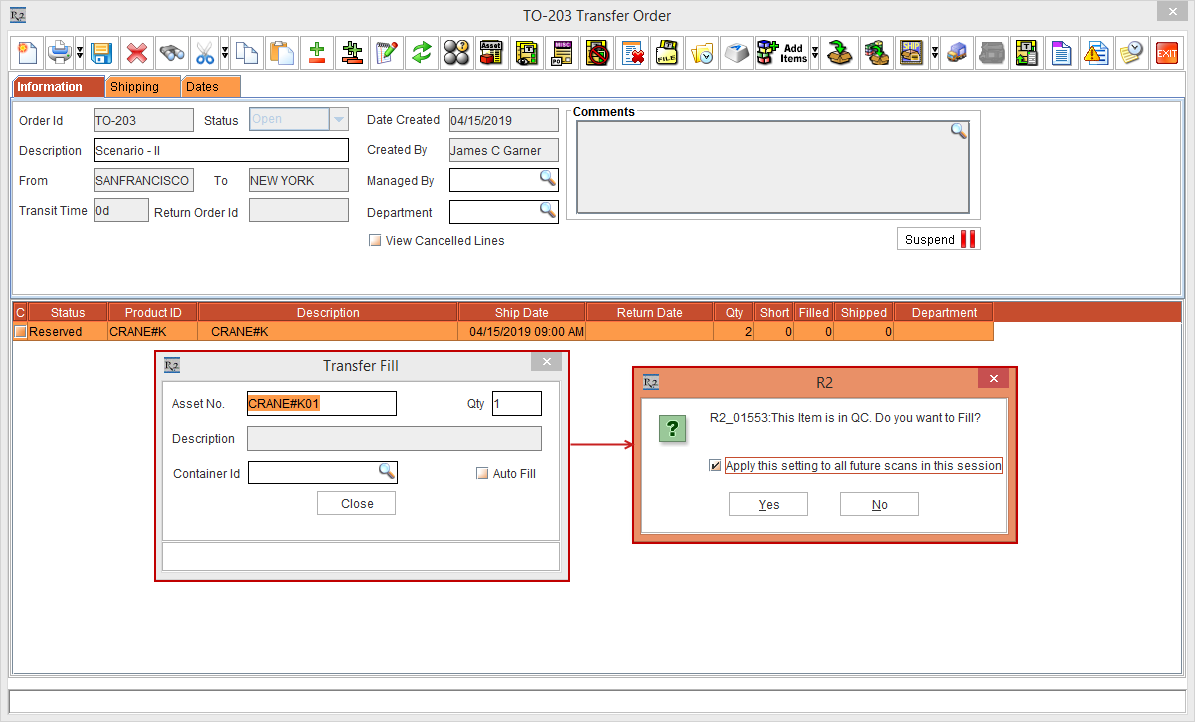
i. Select Yes option to Fill the Asset.
ii. Select No option to ignore the scan.
iii. Select the "Apply this setting to all future scans in this session" check box to apply the same settings during all the future scans in this session.
-
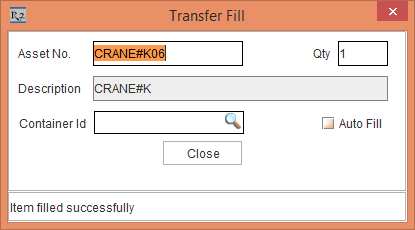
Select the "Apply this setting to all future scans in this session" check box and click the Yes button. The system displays the Status bar message "Item filled successfully" in the Transfer Fill dialog box.
-
In the Transfer Fill window, scan the Asset [CRANE#K02] that is in QC Status to fill it.
-
The system does not display any prompt with message, as the "Apply this setting to all future scans in this session" check box was selected during the scan of the Asset [CRANE#K01]. Hence, while scanning the Asset [CRANE#K02] in the same session, the system displays the Transfer Fill dialog box Status bar message"Item filled successfully" as shown in Figure 2.3.

-
Close the Transfer Fill dialog box. The system displays the Print Exception prompt with the message "R2_00134:Exceptions found during scanning. Do you want to view it now?" with Yes and No buttons.
-
Click Yes. The Print Type dialog box is displayed with the Exception and FullPrint radio buttons.
-
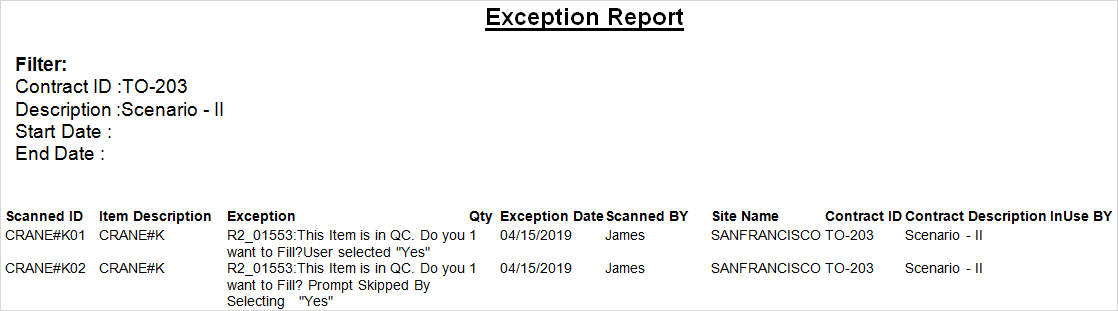
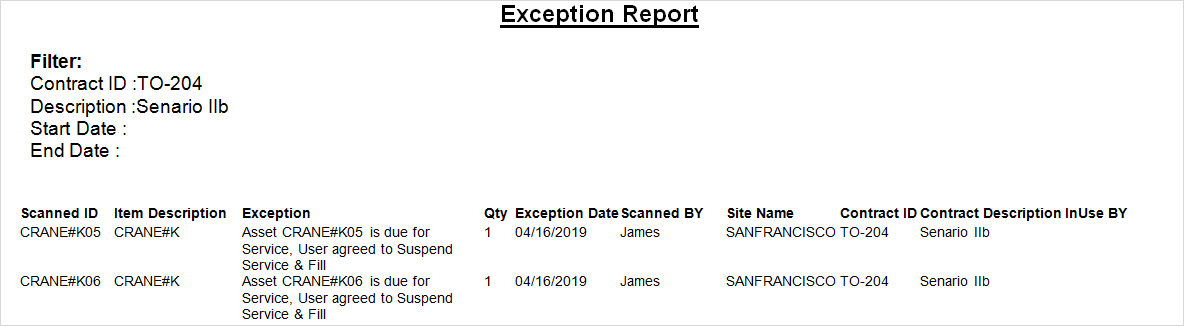
Click the Exception radio button and click OK. The Exceptions are printed and displayed in MS Word format, as shown in Figure 2.4.
-
The Status of the Item [CRANE#K] is modified to Filled in the Transfer Order [TO-203] and the Status of the Assets [CRANE#K01] and [CRANE#K02] will be modified to In Transfer.
Scenario IIb - Support for Skipping the Prompts while filling an Asset with expired Periodic Schedule in the Transfer Order
Support has been provided to skip the prompt displayed while scanning the Asset with the expired Periodic Schedule of 90 Days from the Transfer Order window.
Sample Workflow
-
Select the Configuration module > Warehouse tab > select the check boxes Validate QC/Service on Return and Validate QC/Service on Fill, shown in Figure 3.0.
-
Save and exit the Configuration module.
-
Login to R2 application as Employee [JAMES].
-
Create a Serial Item [CRANE#K].
-
Tag Maintenance Group [PERIODIC90DAYS] with Maintenance Schedule Periodic 90Days to Item [CRANE#K], as shown in Figure 3.1.
-
Receive the Assets [CRANE#K05] and [CRANE#K06] for [CRANE#K] on the Date [15-Jan-2019].
-
On the Date [16-April-2019], create a Transfer Order [TO-204] from [SANFRANCISCO] to [NEWYORK] with Prep, Ship and Receive dates as [16-April-2019].
-
Search and add the Serial Item [CRANE#K] with 2 Qty.
-
Click the Fill Items icon. The Transfer Fill dialog box is displayed.
-
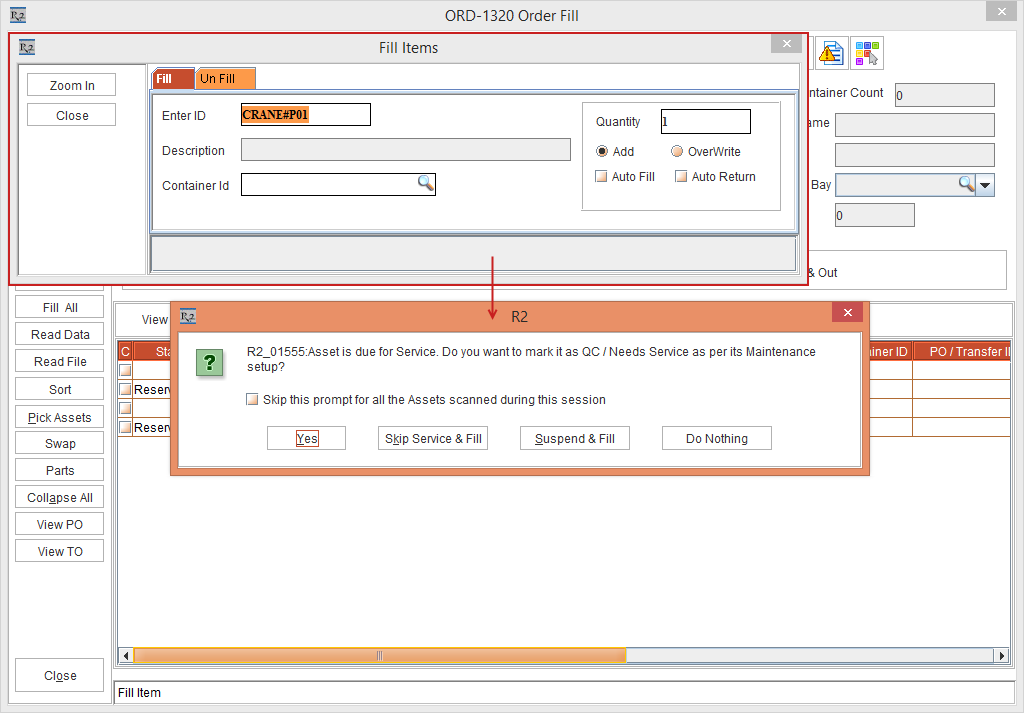
Scan the Asset [CRANE#K05]. The system displays a prompt with the message "R2_01555: Asset is due for Service. Do you want to mark it as QC / Needs Service as per its Maintenance setup?" with "Skip this prompt for all the Assets scanned during this session" check box and Yes, Skip Service & Fill, Suspend & Fill, and Do Nothing buttons, as shown in Figure 3.2.

i. Select Yes option to Fill the Asset.
ii. Select Skip Service & Fill option will skip the Service and fills the Asset .
iii. Select Suspend & Fill option will suspend the Service and fills the Asset.
iv. Select the Do Nothing option will not do anything to the Asset.
v. Select the "Skip this prompt for all the Assets scanned during this session" check box to skip the prompt for all the Assets in all the future scans in the same session.
-
Select the "Skip this prompt for all the Assets scanned during this session" check box and click the Suspend & Fill button. The system displays the Status bar message "Item filled successfully" in the Transfer Fill dialog box.
-
In the Transfer Fill window, scan the Asset [CRANE#K06].
-
The system does not display any prompt with message, as the "Skip this prompt for all the Assets scanned during this session" check box was selected during the scan of the Asset [CRANE#K05]. Hence, while scanning the Asset [CRANE#K06] in the same session, the system displays the Transfer Fill dialog box Status bar message "Item filled successfully" as shown in Figure 3.3.
-
Close the Transfer Fill dialog box. The system displays the Print Exception prompt with the message "R2_00134:Exceptions found during scanning. Do you want to view it now?" with Yes and No buttons.
-
Click Yes. The Print Type dialog box is displayed with the Exception and FullPrint radio buttons.
-
Click the Exception radio button and click OK. The Exceptions are printed and displayed in MS Word format, as shown in Figure 4.4.
-
The Status of the Item [CRANE#K] is modified to Filled in the Transfer Order [TO-204] and the Status of the Assets [CRANE#K05] and [CRANE#K06] will be modified to In Transfer.
-
Click Ship All to Ship all the Assets [CRANE#K05] and [CRANE#K06].
Scenario IIIa - Support for Skipping the Prompts for an Asset with expired Periodic Schedule in the Rental Reservation Order
Support has been provided to skip the prompt displayed while scanning the Asset with the expired Periodic Schedule of 90 Days from the Rental Reservation Order.
Sample Workflow
-
Select the Configuration module > Warehouse tab > select the check boxes Validate QC/Service on Return and Validate QC/Service on Fill, shown in Figure 4.0.
-
Save and exit the Configuration module.

-
Login to R2 application as Employee [JAMES] who is not the authorized to fill QC Assets on Orders.
-
Create a serial Item [CRANE#M].
-
Tag Maintenance Group [PERIODIC90DAYS] with Maintenance Schedule Periodic 90Days to Item [CRANE#M] as shown in Figure 4.1.
-
Receive the Assets [CRANE#M01] and [CRANE#M02] for [CRANE#M] on the Date [15-Jan-2019]. Based on Maintenance setup, the Asset is on QC on [15-April- 2019].
-
Reserve two quantity of [CRANE#M] on [ORD-1315] from [15-Jan- 2019] to [30-April- 2019].
-
On the Date [15-Jan-2019] open the Prep Task of [ORD-1315] and scan the Asset [CRANE#M01] to fill it. The system displays the message, “R2_10554:CRANE#M01 Asset's next Service is Due on 04/15/2019 and this falls before the Return Date. Do you want to continue filling?” with "Apply this setting to all future scans in this session" check box and Yes and No buttons, as shown in the Figure 4.2.
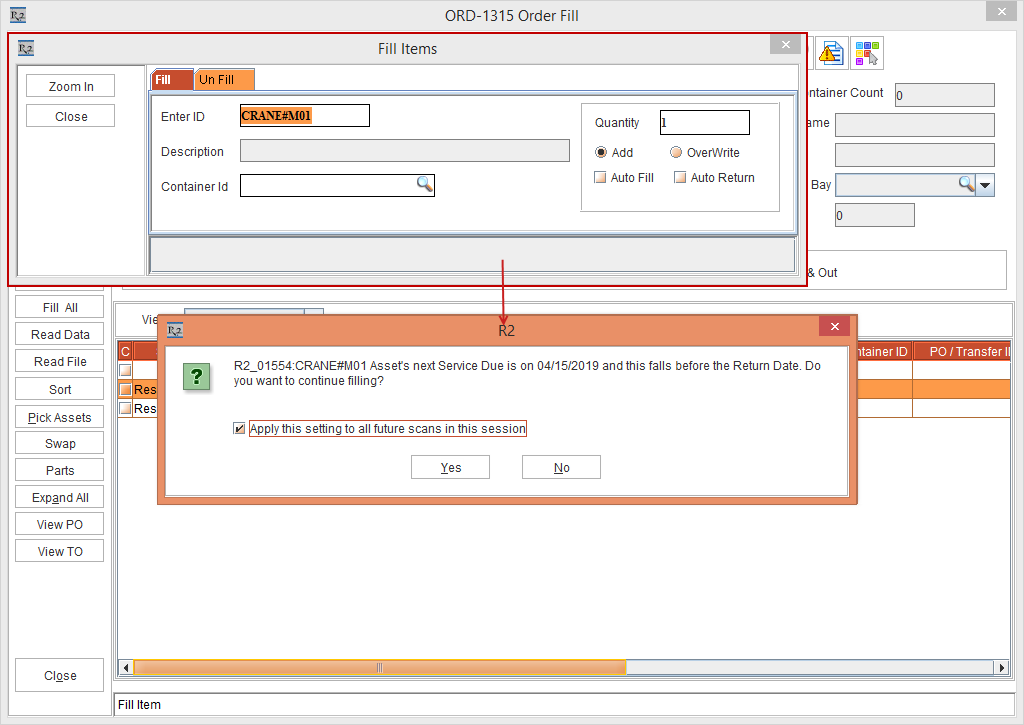
i. Select Yes option to Fill the Asset.
ii. Select No option to ignore the scan.
iii. Select the "Apply this setting to all future scans in this session" check box to apply the same settings during all the future scans in this session.
-
Select the "Apply this setting to all future scans in this session" check box and click the Yes button. The Asset [CRANE#M01] is filled on the Order [ORD-1315] displaying the Fill Items dialog box Status bar message "Item is Filled."
-
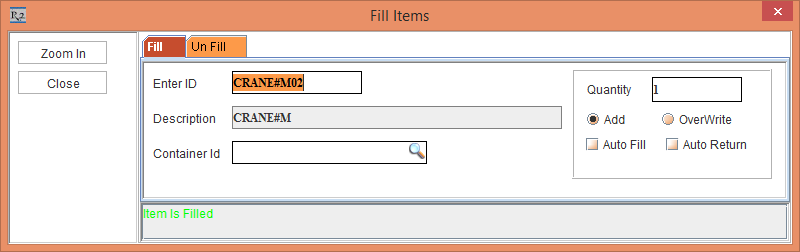
In the Fill Order window > Fill Items dialog box, scan the Asset [CRANE#M02] that is in QC Status to fill it.
-
The system does not display any prompts with messages, as the "Apply this setting to all future scans in this session" check box was selected during the scan of the Asset [CRANE#M01]. Hence, while scanning the Asset [CRANE#M02] in the same session, the system displays the Fill Items dialog box Status bar message "Item is Filled," as shown in Figure 4.3.
-
Close the Fill Items dialog box.
-
Close the Fill Order window. The system displays the ViewExceptions prompt with the message "R2_00491:Exceptions found during scanning. Do you want to view it now?" with Yes and No buttons.
-
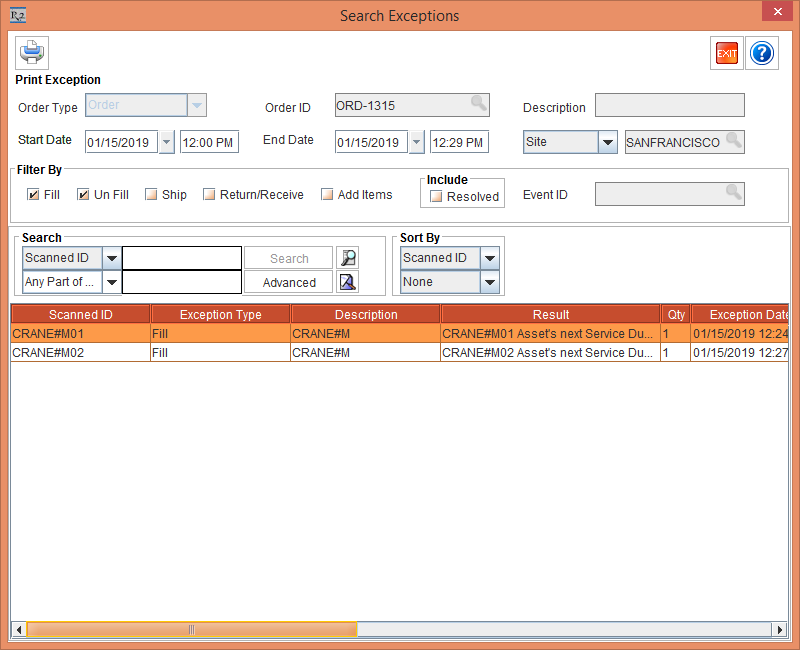
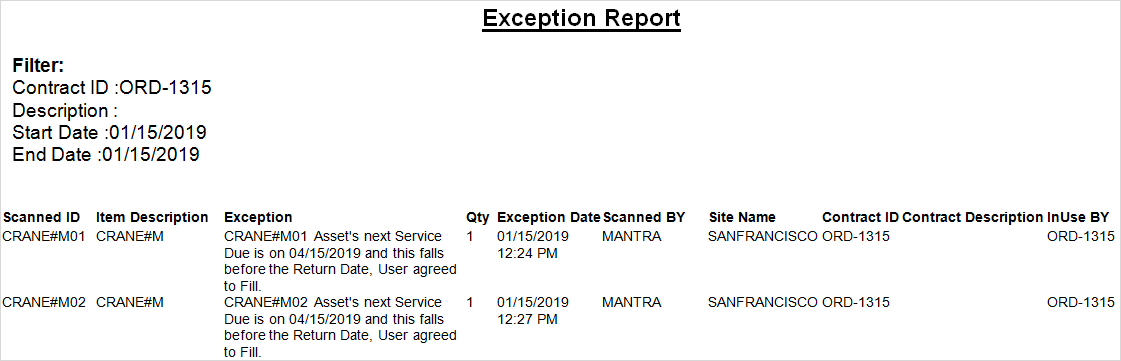
Click Yes. The Search Exceptions window is displayed, as shown in Figure 4.4
-
Click Print. The Exceptions are printed and displayed in MS Word format, as shown in Figure 4.5.
-
Ship the Assets [CRANE#M01] and [CRANE#M02]. The Status of the Assets [CRANE#M01] and [CRANE#M02] will be modified to Out.
Scenario IIIb - Support for Skipping the Prompts for an Asset with expired Periodic Schedule in the Linked Transfer Order
Support has been provided to skip the prompt displayed while scanning the Asset with the expired Periodic Schedule of 90 Days from the Linked Transfer Order.
Sample Workflow
-
Select the Configuration module > Warehouse tab > select the check boxes Validate QC/Service on Return and Validate QC/Service on Fill, shown in Figure 5.0.
-
Save and exit the Configuration module.

-
Login to R2 application as Employee [JAMES].
-
Select the Site [SANFRANCISCO].
-
Create a serial Item [CRANE#M].
-
Tag Maintenance Group [PERIODIC90DAYS] with Maintenance Schedule Periodic 90Days to Item [CRANE#M] as shown in Figure 5.1.

-
Receive the Assets [CRANE#M03] and [CRANE#M04] for [CRANE#M] on the Date [15-Jan-2019]. Based on Maintenance setup, the Asset is on QC on [15-April- 2019].
-
Create Order [ORD-1316] from [15-Jan- 2019] to [30-April- 2019].
-
Search and Add the Serial Item [CRANE#M] in 2 Qty. The Item Status is displayed as Not Available.
-
Select the Serial Item [CRANE#M] line > right-click > Assign > Assign dialog box > Transfer In radio button > Transfer Assign dialog box > User Assign radio button > Transfer Order dialog box > Create new Transfer Order radio button > OK.
-
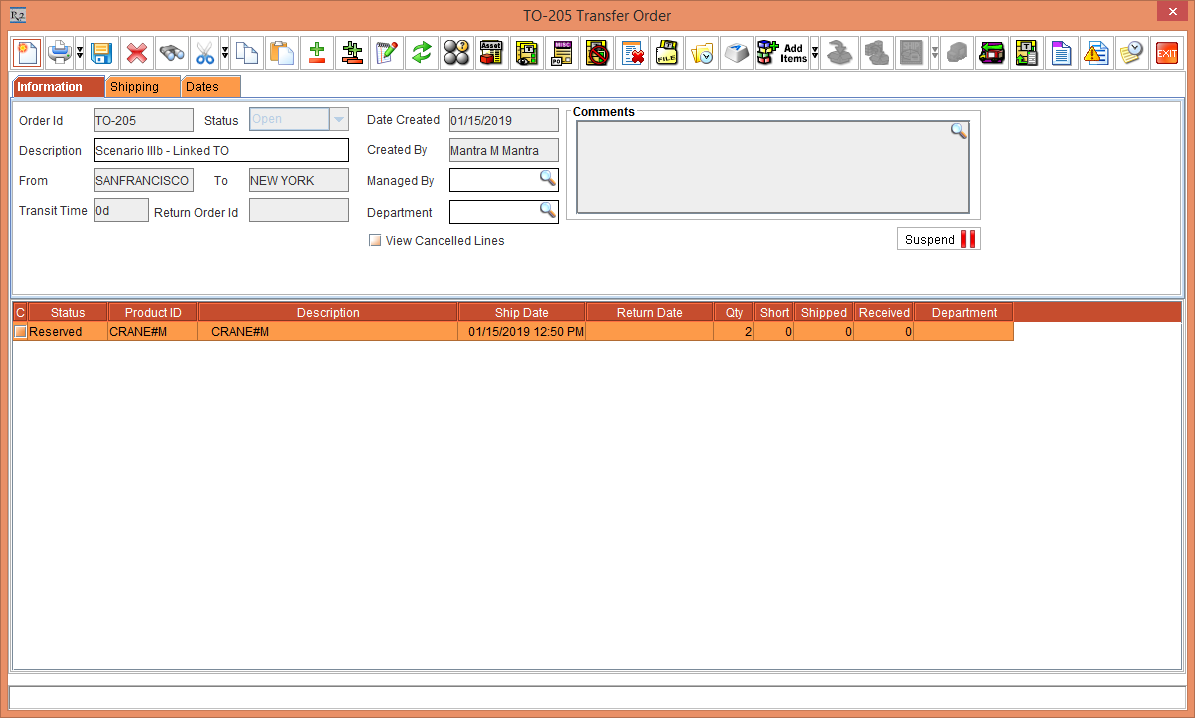
Create a Linked Transfer Order [TO-205], as shown in Figure 5.2.
-
Select the Shipping tab and select the Drop Ship check box. Save and Exit the Linked Transfer Order [TO-205] and Order [ORD-1316].
-
In the Site [SANFRANCISCO]. Search and open the Linked Transfer Order [TO-205].
-
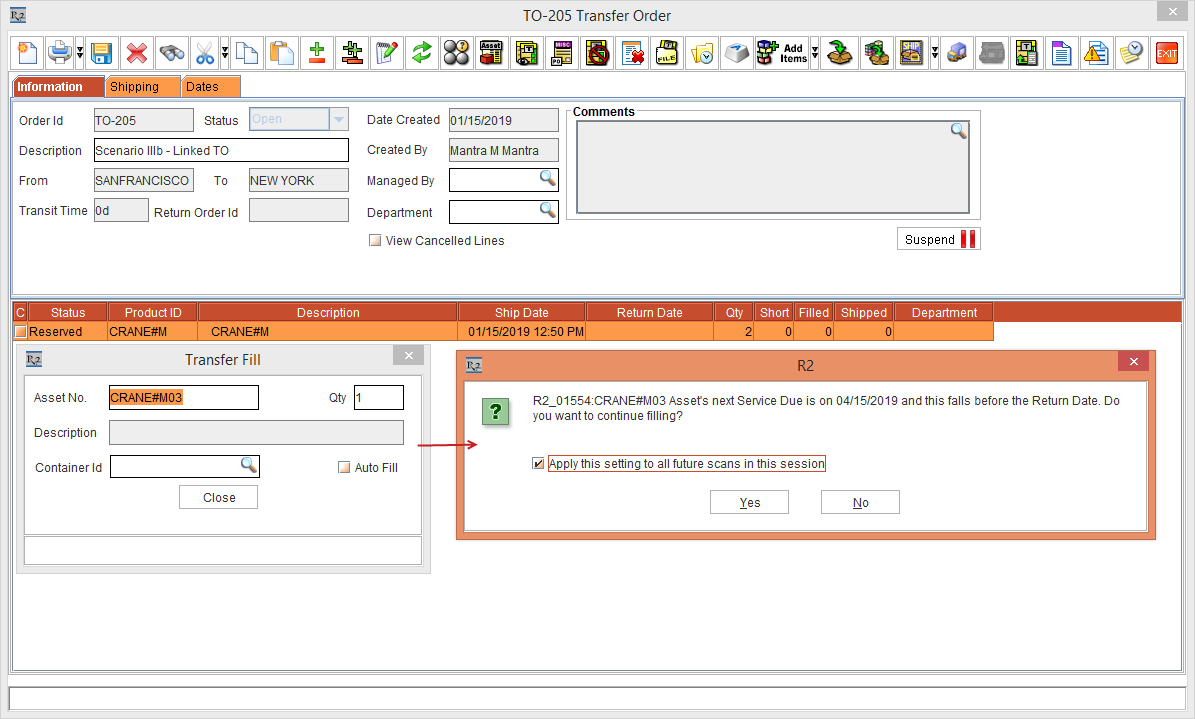
Click the Fill Items button. The Transfer Fill window is displayed.
-
Scan the Asset [CRANE#M03] to fill it. The system displays the message, “R2_10554:CRANE#M03 Asset's next Service is Due on 04/15/2019 and this falls before the Return Date. Do you want to continue filling?” with "Apply this setting to all future scans in this session" check box and Yes and No buttons, as shown in the Figure 5.3.
i. Select Yes option to Fill the Asset.
ii. Select No option to ignore the scan.
iii. Select the "Apply this setting to all future scans in this session" check box to apply the same settings during all the future scans in this session.
-
Select the "Apply this setting to all future scans in this session" check box and click the Yes button. The Asset [CRANE#M03] is filled displaying the Transfer Fill dialog box Status bar message "Item filled successfully."
-
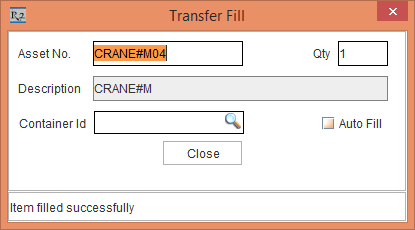
In the Transfer Fill window, scan the Asset [CRANE#M04].
-
The system does not display any prompt with message, as the "Apply this setting to all future scans in this session" check box was selected during the scan of the Asset [CRANE#M03]. Hence, while scanning the Asset [CRANE#M04] in the same session, the system displays the Transfer Fill dialog box Status bar message"Item filled successfully" as shown in Figure 5.4.
-
Close the Transfer Fill dialog box. The system displays the Print Exception prompt with the message "R2_00134:Exceptions found during scanning. Do you want to view it now?" with Yes and No buttons.
-
Click Yes. The Print Type dialog box is displayed with the Exception and FullPrint radio buttons.
-
Click the Exception radio button and click OK. The Exceptions are printed and displayed in MS Word format, as shown in Figure 5.5.
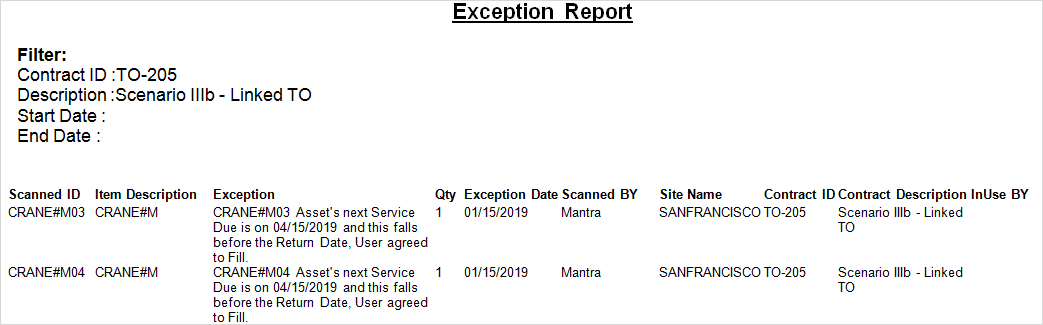
-
The Status of the Item [CRANE#M] is modified to Filled in the Linked Transfer Order [TO-205] and the Status of the Assets [CRANE#M03] and [CRANE#M04] will be modified to In Transfer.
-
Click Ship All to Ship all the Assets [CRANE#M03] and [CRANE#M04].
Scenario IVa - Change in Skip Service and Suspend buttons while Returning the Asset that is Due for Service in the Order
The Skip Service and Suspend buttons while Returning the Asset that is Due for Service in the Order has been modified to Skip Service & Return and Suspend & Return.
Sample Workflow
-
Select the Configuration module > Warehouse tab > select the check boxes Validate QC/Service on Return and Validate QC/Service on Fill, shown in Figure 6.0.
-
Save and exit the Configuration module.

-
Login to R2 application as Employee [JAMES].
-
Create a serial Item [CRANE#Q].
-
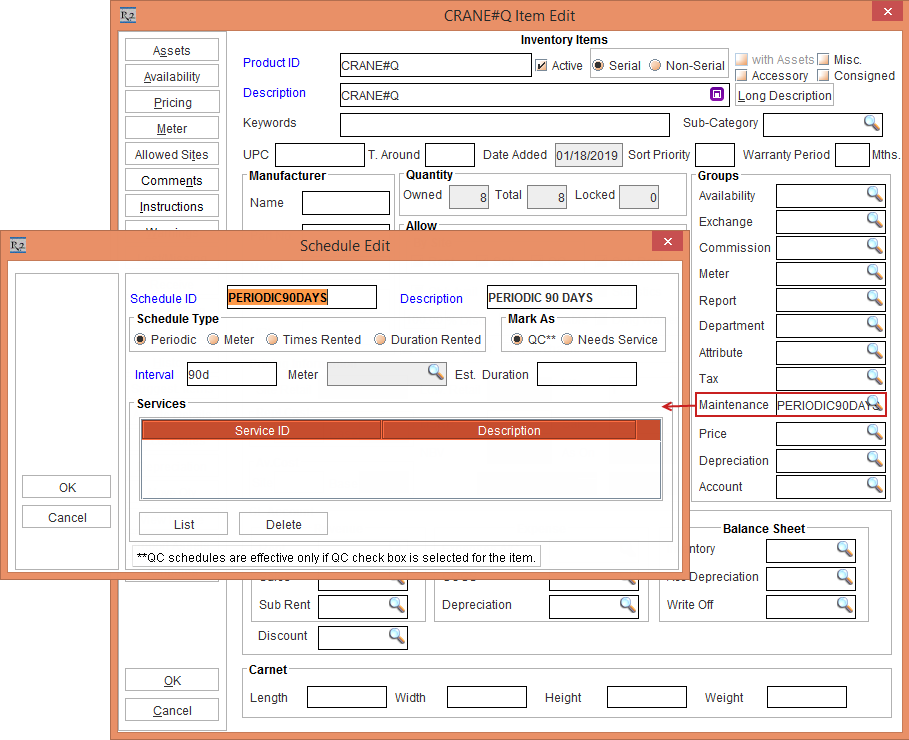
Tag Maintenance Group [PERIODIC90DAYS] with Maintenance Schedule Periodic 90Days to Item [CRANE#Q] as shown in Figure 8.1.

-
Receive the Assets [CRANE#Q01], [CRANE#Q02], and [CRANE#Q03] for [CRANE#Q] on the Date [17-Jan-2019]. Based on Maintenance setup.
-
Reserve two quantity of [CRANE#Q] on [ORD-1321] from [19-April- 2019] to [29-April- 2019].
-
On the Date [17-April- 2019] open the Prep Task of [ORD-1321] and scan the Asset [CRANE#Q01] to fill it. The system displays the message, “R2_10555:Asset is due for Service. Do you want to mark it as QC / Needs Service as per its Maintenance setup?” with "Skip this prompt for all the Assets scanned during this session" check box and Yes, Skip Service & Fill, Suspend & Fill, and Do Nothing buttons.
-
Select the "Skip this prompt for all the Assets scanned during this session" check box and click the Suspend & Fill button. The system displays the Status bar message "Item is filled" in the Fill Items dialog box.
-
In the Fill Order window > Fill Items dialog box, scan the Assets [CRANE#N02] and [CRANE#Q03].
-
The system does not display any prompts with messages, as the "Skip this prompt for all the Assets scanned during this session" check box was selected during the scan of the Asset [CRANE#N01]. Hence, while scanning the Asset [CRANE#N02] in the same session, the system displays the Fill Items dialog box Status bar message "Item is Filled"
-
Close the Fill Items dialog box.
-
Ship the Assets [CRANE#Q01], [CRANE#Q02], and [CRANE#Q03].
-
Close the Fill Order window. The system displays the ViewExceptions prompt with the message "R2_00491:Exceptions found during scanning. Do you want to view it now?" with Yes and No buttons.
-
Click Yes. The Search Exceptions window is displayed.
-
Click Print. The Exceptions are printed and displayed in MS Word format.
-
Exit the Search Exceptions window.
-
Select the View menu > Return Order option. The ORD-1321 Return Order window is displayed.
-
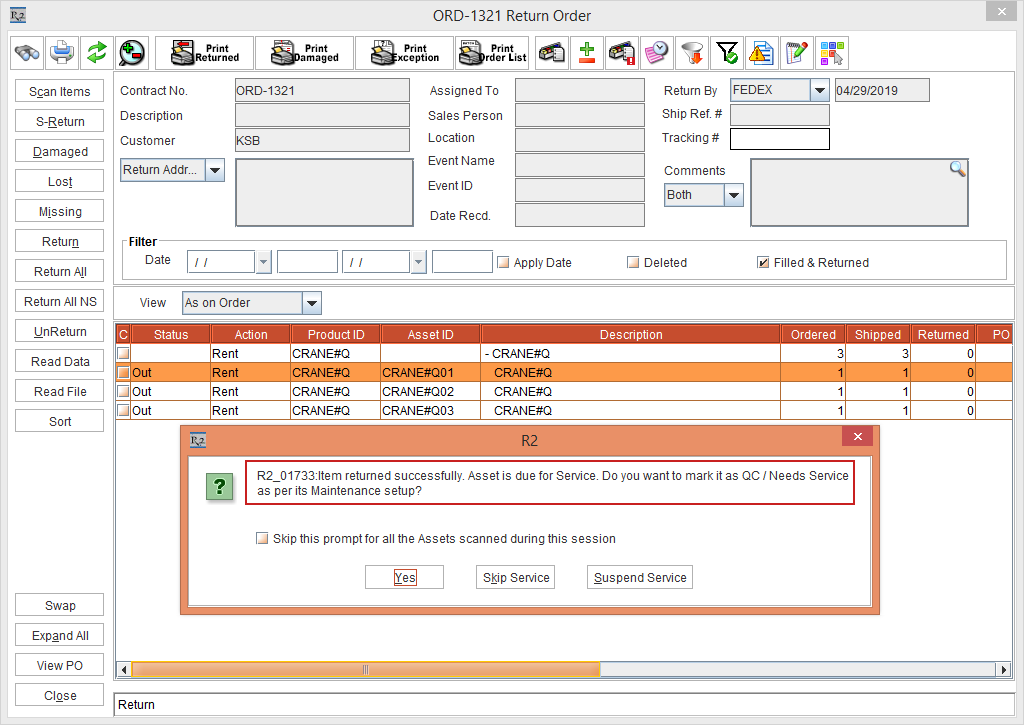
Select the Asset [CRANE#Q01] and click the Return button.
-
The system displays a prompt with the message "R2_01733:Item returned successfully. Asset is due for Service. Do you want to mark it as QC/Needs Service as per its Maintenance setup?" with the "Skip this prompt for all the Assets scanned during this session" check box and Yes, Skip Service and Suspend Service buttons, as shown in Figure 6.2.
-
Click Suspend Service. The Asset [CRANE#Q01] is modified to Return Status.
-
Click the Return All button. The system displays a prompt with the message "R2_00205:This will Return all Items, are you sure?" with Yes and No buttons.
-
Click Yes.
-
The system displays another prompt with the message "R2_01354:Some of the Asset(s) are due for Service as per Maintenance setup. Do you want to mark them as QC/Needs Service?" with Yes, Skip Service & Return, Suspend & Return, and Do Nothing buttons, as shown in Figure 6.3.
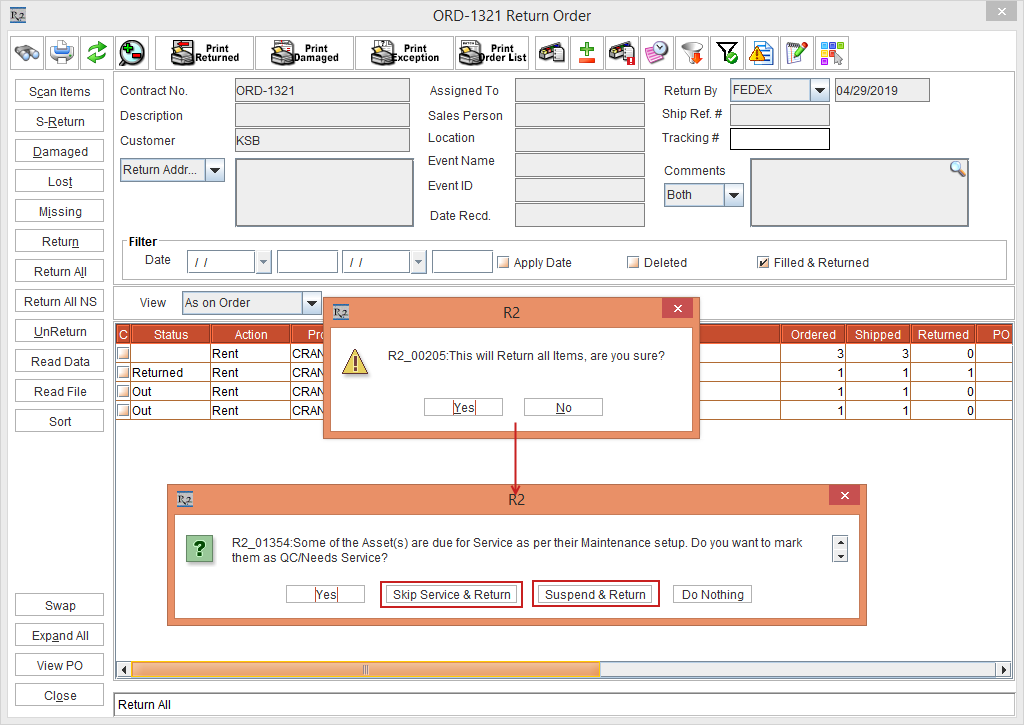
-
In the above prompt, the Skip Service and Suspend buttons have been modified to Skip Service & Return and Suspend & Return.
-
Click the Suspend & Return button. The Status of the Assets [CRANE#N01] and [CRANE#N02] is modified to Returned.
Scenario IVb - Change in Skip Service and Suspend buttons while Receiving the Asset that is Due for Service in the Transfer Order
The Skip Service and Suspend buttons while Receiving the Asset that is Due for Service in the Transfer Order has been modified to Skip Service & Receive and Suspend & Receive.
Sample Workflow
-
Select the Configuration module > Warehouse tab > select the check boxes Validate QC/Service on Return and Validate QC/Service on Fill, shown in Figure 7.0.
-
Save and exit the Configuration module.

-
Login to R2 application as Employee [JAMES] who is not the authorized to fill QC Assets on Orders.
-
Select the Site [SANFRANCISCO].
-
Create a serial Item [CRANE#Q].
-
Tag Maintenance Group [PERIODIC90DAYS] with Maintenance Schedule Periodic 90Days to Item [CRANE#Q] as shown in Figure 7.1.
-
Receive the Assets [CRANE#Q04], [CRANE#Q05], and [CRANE#Q06] for [CRANE#Q] on the Date [19-Jan-2019].
-
On the Date [19-April-2019], create a Transfer Order [TO-208] from [SANFRANCISCO] to [NEWYORK] with Prep, Ship and Receive dates as [17-April-2019].
-
Search and add the Serial Item [CRANE#Q] with 3 Qty.
-
Click the Fill Items icon. The Transfer Fill dialog box is displayed.
-
Scan the Asset [CRANE#Q04]. The system displays a prompt with the message "R2_01555:Asset is due for Service. Do you want to mark it as QC / Needs Service as per Maintenance setup?" with "Skip this prompt for all the Assets scanned during this session" check box and Yes, Skip Service & Fill, Suspend & Fill, and Do Nothing buttons.
-
Select the "Skip this prompt for all the Assets scanned during this session" check box and click the Suspend & Fill button. The system displays the Status bar message "Item filled successfully" in the Transfer Fill dialog box.
-
In the Transfer Fill window, scan the Assets[CRANE#Q05] and [CRANE#Q06].
-
The system does not display any prompt with message, as the "Skip this prompt for all the Assets scanned during this session" check box was selected during the scan of the Asset [CRANE#O03]. Hence, while scanning the Asset [CRANE#O04] in the same session, the system displays the Transfer Fill dialog box Status bar message "Item filled successfully"
-
Close the Transfer Fill dialog box. The system displays the Print Exception prompt with the message "R2_00134:Exceptions found during scanning. Do you want to view it now?" with Yes and No buttons.
-
Click Yes. The Print Type dialog box is displayed with the Exception and FullPrint radio buttons.
-
Click the Exception radio button and click OK. The Exceptions are printed and displayed in MS Word format.
-
The Status of the Item [CRANE#Q] is modified to Filled in the Transfer Order [TO-208] and the Status of the Assets [CRANE#O03] and [CRANE#O04] will be modified to In Transfer.
-
Click Ship All to Ship all the Assets [CRANE#Q04], [CRANE#Q05], and [CRANE#Q06] to the Site [NEWYORK].
-
Exit the Transfer Order [TO-208].
-
Select the Site [NEWYORK].
-
Open the Transfer Order [TO-208].
-
Click the Detail View button. The TO-208 Transfer Detail View window is displayed.
-
Click the Receive Item button. The Transfer Receive window is displayed.
-
Enter the Asset [CRANE#Q05] and press the Enter key using the Keyboard. The system displays a prompt with the message "R2_01734:Item received successfully. Asset is due for Service. Do you want to mark them as QC/Needs Service as per the Maintenance setup?" with the "Skip this prompt for all the Assets scanned during this session" check box and Yes, Skip Service and Suspend Service buttons, as shown in Figure 7.2.
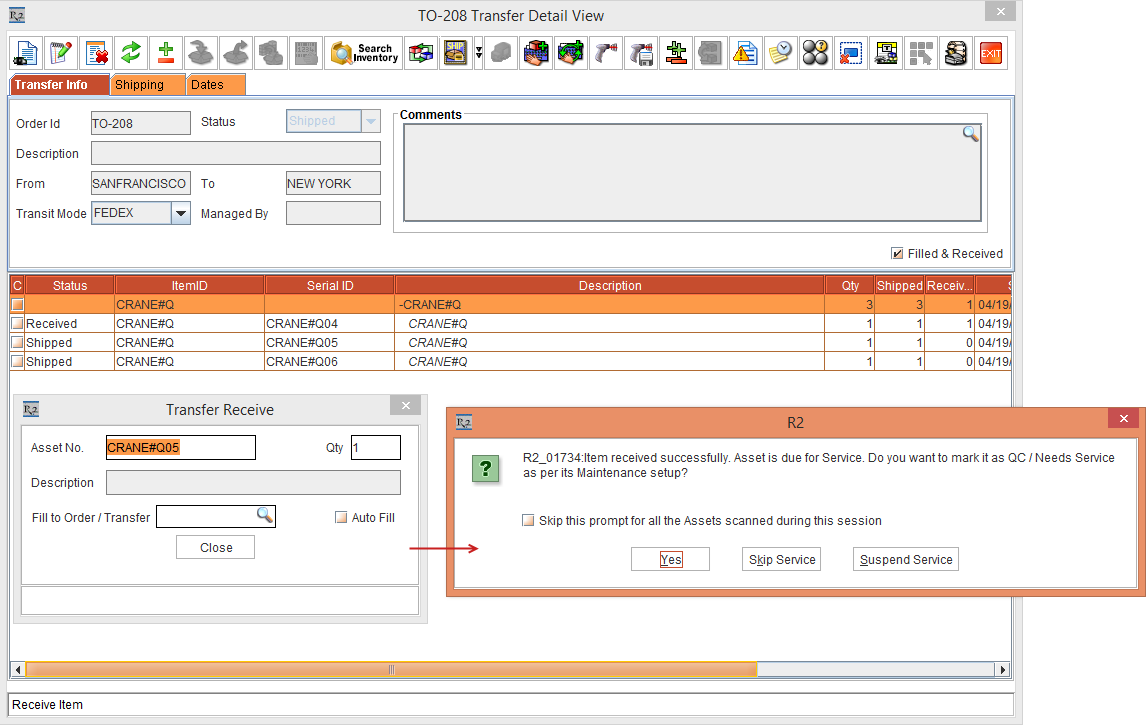
-
Click Suspend Service button.
-
Click the Receive All button. The system displays a prompt with the message "R2_01354:Some of the Asset(s) are due for Service as per Maintenance setup. Do you want to mark them as QC/Needs Service?" with Yes, Skip Service & Receive, Suspend & Receive, and Do Nothing buttons, as shown in Figure 7.3.
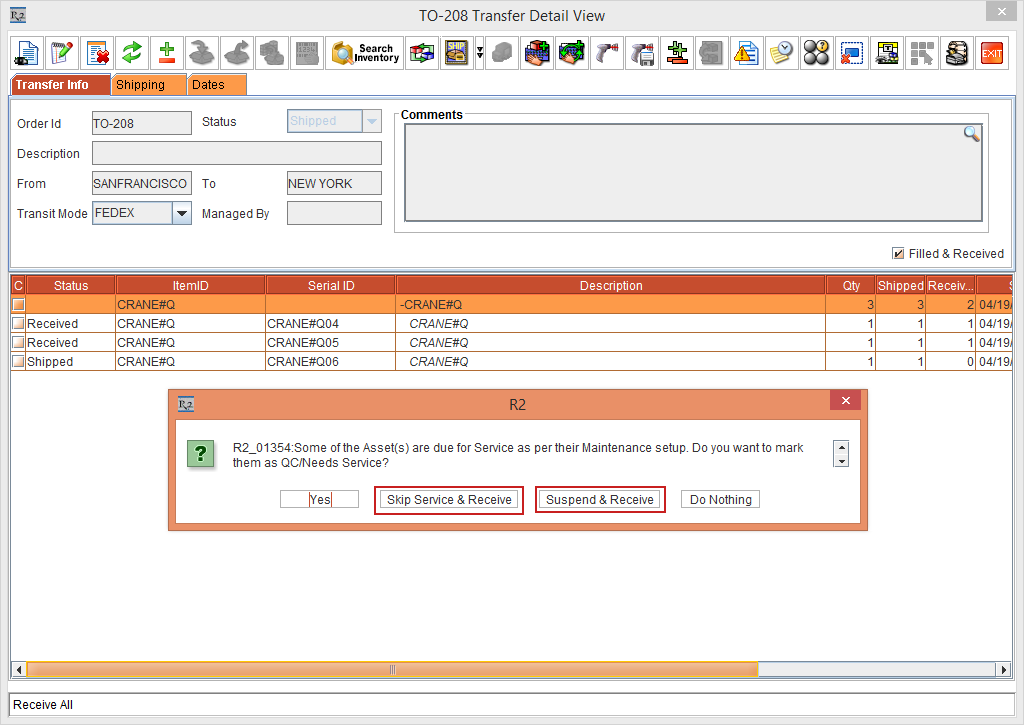
-
In the above prompt, the Skip Service and Suspend buttons have been modified to Skip Service & Receive and Suspend & Receive.
-
Click the Suspend & Receive button. The Status of the Assets [CRANE#Q05], and [CRANE#Q06] is modified to Received.
Scenario V - Multi-Language Support on Skip Prompt Messages in PAT
Multi-Language support has been provided to all the skip prompt messages in PAT.
Sample Workflow
-
Select the Warehouse tab > select the check boxes Validate QC/Service on Return and Validate QC/Service on Fill, shown in Figure 8.0
-
Save and exit the Configuration module.

-
Relaunch the R2 Application.
-
Select the Maintenance module > click the Multi-Language Messages button. The Multi-Language Captions window is displayed.
-
Select the MessageCode [R2_01555] with the Message Description "Asset is due for Service. Do you want to mark it as QC Needs Service as per its Maintenance setup?"
-
Enter the Description in the French column as [L'actif est dû pour le service. Voulez-vous le marquer comme QC Needs Service conformément à sa configuration de maintenance?], as shown in Figure 8.1.
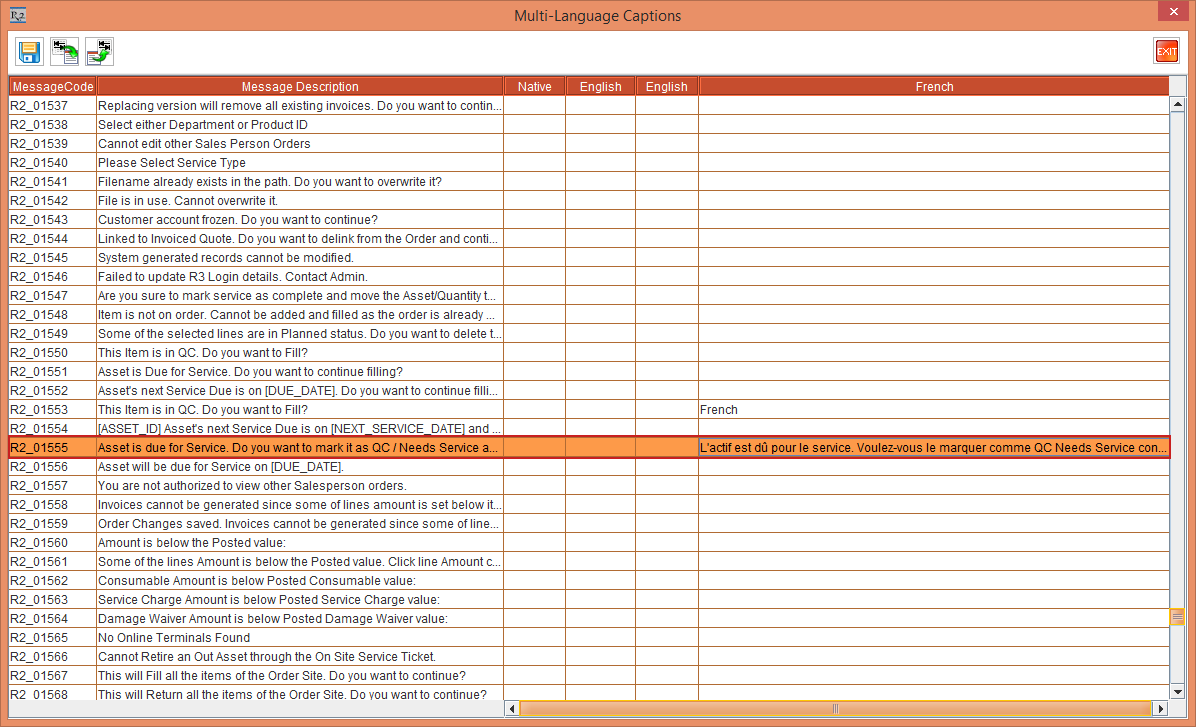
-
Save and Exit the Multi-Language Captions window.
-
Relaunch the R2 Application.
-
Create a serial Item [CRANE#P].
-
Tag Maintenance Group [PERIODIC90DAYS] with Maintenance Schedule Periodic 90Days to Item [CRANE#N], as shown in Figure 8.2.
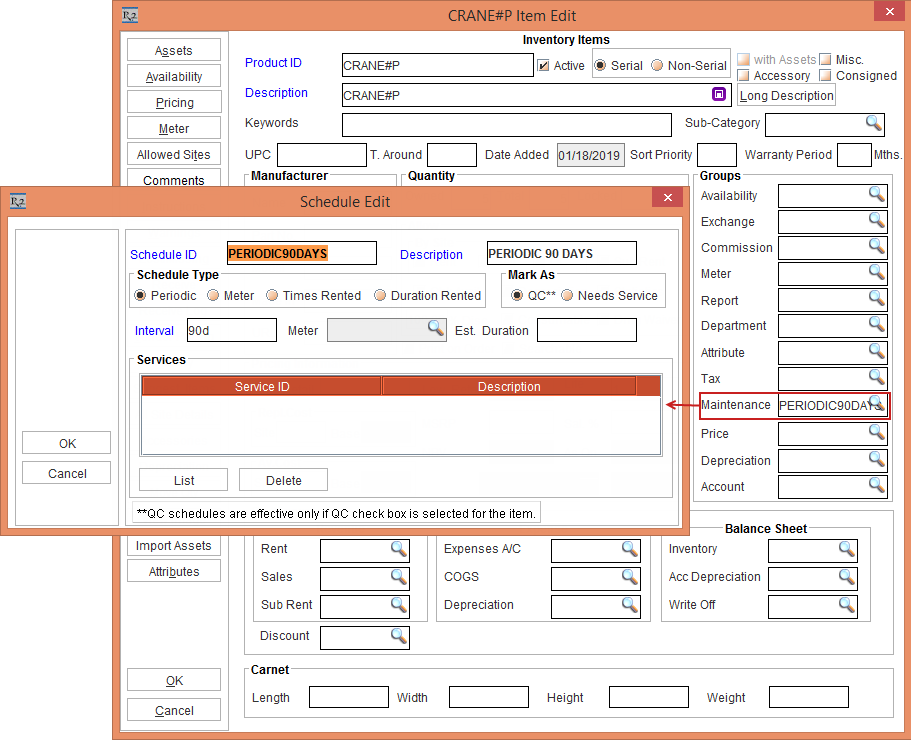
-
Receive the Assets [CRANE#P01] and [CRANE#P02] for [CRANE#P] on the Date [18-Jan-2019]. Based on Maintenance setup, the Asset is on QC on [18-April- 2019].
-
On the Date [19-April-2019], reserve two quantity of [CRANE#P] on [ORD-1319] from [19-April- 2019] to [29-April- 2019].
-
On the Date [19-April-2019] open the Prep Task of [ORD-1320] and scan the Asset [CRANE#P01] that is in QC Status to fill it. The system displays a prompt with the message, “R2_10555:Asset is due for Service. Do you want to mark it as QC Needs Service as per its Maintenance setup?" with the "Skip this prompt for all the Assets scanned during this session" check box with the Yes, Skip Service & Fill, Suspend & Fill, and Do Nothing buttons, as shown in the Figure 8.3.
Figure 8.3 System Prompts the Message for the Item in QC Status
i. Select Yes option to Fill the Asset.
ii. Select Skip Service & Fill option will skip the Service and fills the Asset .
iii. Select Suspend & Fill option will suspend the Service and fills the Asset.
iv. Select the Do Nothing option will not do anything to the Asset.
v. Select the "Skip this prompt for all the Assets scanned during this session" check box to skip the prompt for all the Assets in all the future scans in the same session.
-
Press the F8 button from the Keyboard. The Multi-Language Captions window is displayed. Enter a Description and enable the French column, by clicking the check box, as shown in Figure 8.4.
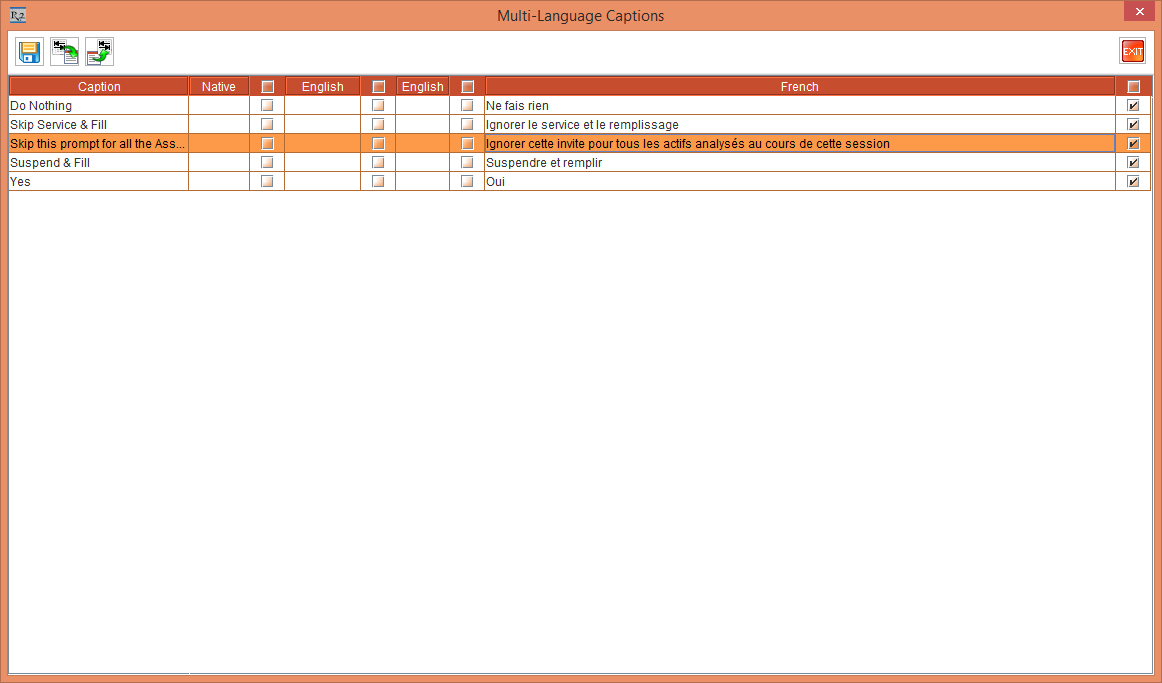
-
Click Save and Exit the Multi-Language Captions window.
-
Close the Fill Order window and Ship the Item [CRANE#P].
-
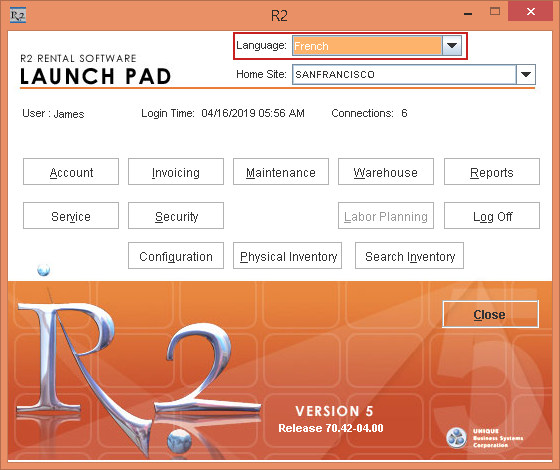
From the R2 Launchpad, select the Language drop-down as French, as shown in Figure 8.5.
-
Select the Account module. The Accounts window is displayed.
-
Select the Search Orders button > Search Orders window > Search and open the Order [ORD-1320].
-
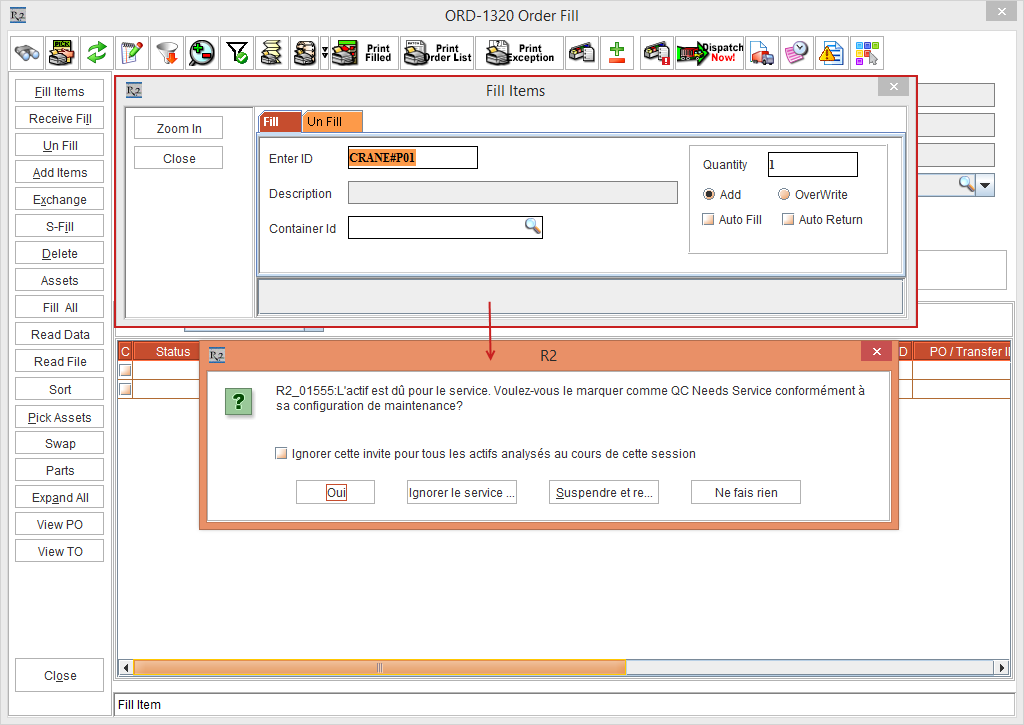
On the Date [18-April-2019] open the Prep Task of [ORD-1320] and scan the Asset [CRANE#P01].
-
The system displays a prompt with the Multi-Language Caption applied to the message “L'actif est dû pour le service. Voulez-vous le marquer comme QC Needs Service conformément à sa configuration de maintenance?" with "Ignorer cette invite pour tous les actifs analysés au cours de cette session" check box and [Oui], [Ignorer le service et le remplissage], [Suspendre et remplir], and [Ne fais rien] buttons, as shown in the Figure 8.6.
-
Select the "Ignorer cette invite pour tous les actifs analysés au cours de cette session" check box and click the Oui button.
-
Close the Fill Order window.
-
Save and Exit the Order [ORD-1320].
The Multi-Language support has been implemented for additional Prompts and Messages as follows:
-
Messages: The Multi-Language in the prompt messages is implemented by modifying the messages in the desired Language from the Maintenance module > click the Multi-Language Messages button > Multi-Language Captions window.
-
Skip Prompt Check Box Messages and Buttons: The Multi-Language in the Skip Prompt check box messages and the buttons in the prompt is implemented by modifying the messages in the desired Language from the Multi-Language Captions window that is displayed by pressing the F8 button from the Keyboard.
The below table briefs the Multi-Language implementation in the Prompts and Messages:
Table 1.0 Multi-Language implementation for Additional PAT Messages
|
Sl No. |
Messages |
|
|
R2_01735:Asset [ASSET_ID] is OUT on Order# [ORDER_ID] and will be Returned on [ORDER_LINE_END_DATE]. Would you like to Return and Fill? |
|
|
R2_01736:The Asset [ASSET_ID] is OUT on Order# [ORDER_ID] and is due for service, Do you want to Return and mark it as QC/Needs Service? |
|
|
R2_01737:Some of the Assets on Order [ORDER_ID] needs QC/Service. Do you want to ignore QC/Service and import? |
|
|
R2_01738:Order belongs to [ORDER_SITE] site. Do you want to return it to [WAREHOUSE_SITE] site? |
|
|
R2_01739:Product [PRODUCT_ID] belongs to [ORDER_SITE] site. Do you want to Return it to [WAREHOUSE_SITE] site? |
|
|
R2_01740:Asset [ASSET_ID] is [ASSET_STATUS] on Order [ORDER_ID]. The Asset needs QC/Service. Do you want to ignore QC/Service and fill? |
|
|
R2_01741:Asset [ASSET_ID] is [ASSET_STATUS]. The Asset needs QC/Service. Do you want to ignore QC/Service and fill? |
|
|
R2_01742:Asset [ASSET_ID] is in Repair status. Are you sure to transfer? |
|
|
R2_01743:Asset [ASSET_ID] is marked as Damaged. Are you sure to transfer? |
|
|
R2_01755:Return task planned to return on [PLANNED_SITE] site. Do you want to return it to [WAREHOUSE_SITE] site? |
|
|
R2_01756:Product [PRODUCT_ID] planned to return on [PLANNED_SITE] site. Do you want to Return it to [WAREHOUSE_SITE] site? |
|
|
R2_01757:Asset [ASSET_ID] is OffRent on Order# [ORDER_ID] [OFFRENT_LOCATION] and will be Returned on [ORDER_LINE_END_DATE]. Would you like to Return and Fill? |
|
|
R2_01758:The Asset [ASSET_ID] is Off Rent on Order# [ORDER_ID] [OFFRENT_LOCATION] and is due for service, Do you want to Return and mark it as QC/Needs Service? |
|
|
R2_01759:Order# [ORDER_ID] belongs to [ORDER_SITE] site. Do you want to Return the items to [WAREHOUSE_SITE] site? |
|
|
R2_01760:Some of the lines in the Order# [ORDER_ID] are not planned to return on [WAREHOUSE_SITE] site. Do you want to Return the items to [WAREHOUSE_SITE] site? |
|
|
R2_01761:Some assets do not belong to current site. Do you want to Return it to [WAREHOUSE_SITE] site? |