Reference No: 27542
Details
The Portable Appliance/Safety Testing functionality allows Asset’s status to be automatically marked to QC/Needs Service, once it satisfies the criterion as set in service Schedules added in the Maintenance Group tagged to Asset's parent Item.
Sample Workflow
The Portable Appliance/Safety Testing functionality is explained with a sample workflow.
-
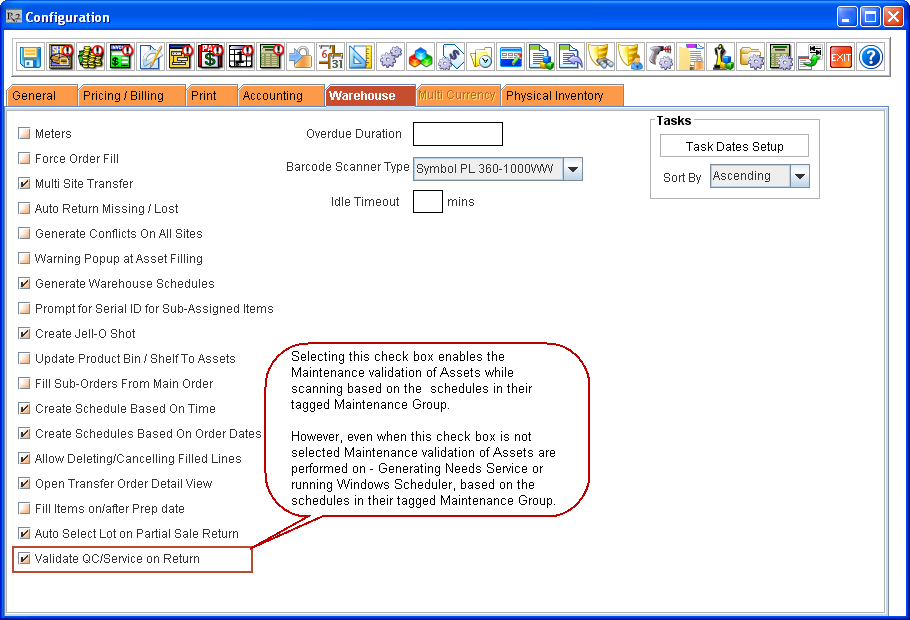
Select the Validate QC/Service on Return check box (in Configuration module > Warehouse tab) to enable the Maintenance validation of Assets while scanning, based on the schedules in their tagged Maintenance Group, during all Warehouse operations.
Notes regarding Validate QC/Service on Return check box
-
On upgrading R2, by default, this check box will be in cleared state. However, if any item exists with QC on Return (renamed as QC now) check box selected in Item edit, this check box will be set as selected on upgrading to this version.
-
Even when this check box is not selected, Maintenance validation of Assets are performed on - Generating Needs Service or running Windows Scheduler, based on the schedules in their tagged Maintenance Group.
-
By default, the system will have a built in Schedule named [QC ON RETURN] for tagging to Maintenance Groups, as shown in Figure 1.1.

Notes regarding built in Schedule
-
The built in Schedule will have Schedule Type as Times Rented with Interval as 1 and with Mark As set as QC. Users can tag this Schedule to Maintenance Groups and tag the Maintenance Group to Items.
-
The user will be able to modify only the selection of radio buttons within Mark As section and to add Services. They will not be able to modify the values in any other fields of the built in Schedule.
Details of Fields in Schedule Edit Dialog Box
|
Column Name |
Description |
|
Schedule ID |
The ID of the Schedule.
|
|
Schedule Description |
The description of the Schedule.
|
|
Schedule Type |
Type of the Schedule. The possible types are:
Built in Schedule will have Times Rented radio button selected. This cannot be modified for built in Schedule. |
|
Mark As |
The Service Category. Possible values are:
Built in Schedule will have Mark As set as QC. The user can modify the selection for Mark As section for built in Schedule.
Notes:
|
|
Interval |
The interval after which the Service gets triggered for Assets. This is based on selection within Schedule Type section.
|
|
Meter |
Search and tag a Meter Group here after selecting Meter within Schedule Type section.
|
|
Est. Duration |
Estimated duration of the service.
|
|
Services section |
Search and add Service Groups here to enable the service.
|
-
Create an Item [SONYALPHA5] on June 01, 2014 at Site [San Francisco], and receive few quantities of it.
-
Click the importable button in Groups > Maintenance field. The Maintenance Group window is displayed.
-
Click Add icon. The Schedules window is displayed.
-
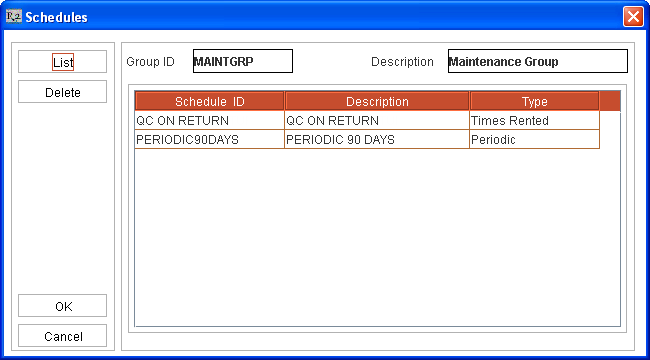
Enter following values for the new Maintenance Group as:
-
Group ID = MAINTGRP
-
Description = Maintenance Group
-
-
Click List button. The Schedule List window is displayed.
-
Double click on built in Schedule named [QC ON RETURN] listed here and click OK. This Schedule gets added to the Maintenance Group being created and gets listed in the Schedules window.
-
Click List button from Schedules window again. The Schedule List window is displayed.
-
Click Add button. The Schedule Edit window is displayed.
-
Create a new Schedule by entering following values in the fields of the Schedule Edit window, as shown in Figure 1.2.

-
Click OK button. The Schedule gets created and listed in Schedule List window.
-
Double click on the new Schedule listed in Schedule List window and click OK. This Schedule gets added to the Maintenance Group being created and gets listed in the Schedules window, as shown in Figure 1.3.
-
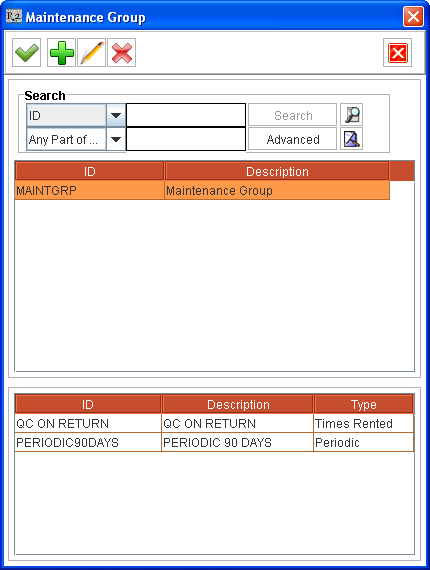
Click OK button. The Maintenance Group is created and is listed along with its Schedules in Maintenance Group window, as shown in Figure 1.4.
-
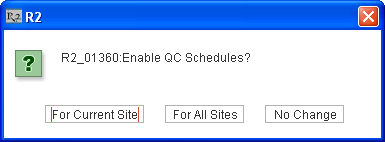
Double-click on the listed Maintenance Group named [MAINTGRP]. The system prompts with a message "Enable QC Schedules?", on newly tagging a Maintenance group having one or more Schedules with Mark As set as QC to Item Edit window > Groups > Maintenance field, as shown in Figure 1.5.
Notes regarding the message prompted
The system will prompt the message with three buttons - For Current Site and For All Sites and No Change (This doesn't happen on editing an already tagged Maintenance Group). On clicking:
-
For Current Site - The system will set QC check box as selected for the Item in the current site alone.
-
For All Sites - The system will set QC check box as selected for the Item in all sites.
-
No Change - The system won't newly set the QC check box as selected for the Item in any Sites. However, the system tags the Maintenance Group to the Item.
-
Click For All Sites button in the message prompt. The Maintenance Group [MAINTGRP] gets tagged to the Item [SONYALPHA5] and the QC check box gets selected for this Item for all Sites, as shown in Figure 1.6.
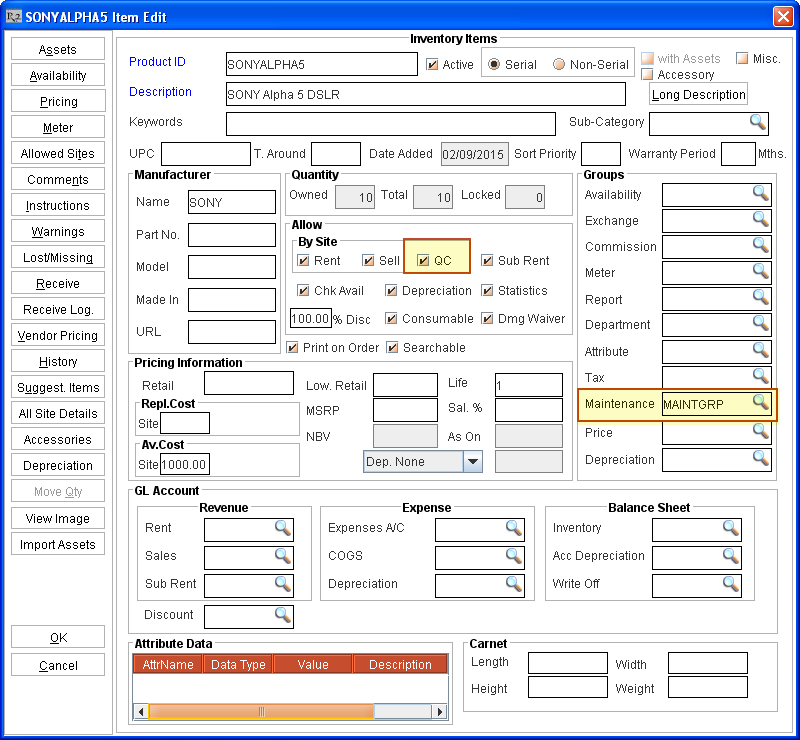
-
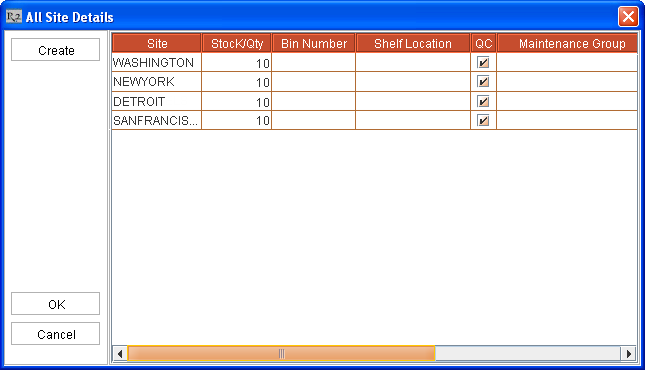
Click All Site Details button. The All Site Details window gets displayed listing all the Sites, as shown in Figure 1.7. The Maintenance validation for the Item based on condition in Schedules with Mark As set as QC will happen for the Item at the Sites with QC check box selected against them.
For example, QC check based on Schedules in tagged Maintenance Group [MAINTGRP] will happen for Item [SONYALPHA5] at Sites [NEWYORK], [WASHINGTON], [DETROIT] and [SAN FRANCISCO].
-
Option to tag Maintenance Group is provided at Site level for each Item in All Site Details dialog box, in Maintenance Group column. This column is added at the end, but is re-arranged here for ease of presentation.
-
New columns named Rent and Sell are also added to All Site Details window for Items. The selection of the check boxes under this column decides whether the Item is allowed for Renting/Selling in the listed Site.
-
Schedule a Windows Task Scheduler to schedule the periodic checking and marking of Assets’ Status to QC or Needs Service, on a day-to-day basis.
This scheduler is required to be run on a periodic basis to mark Assets, as QC/Needs Service, which satisfies service conditions set in tagged Maintenance Group’s Schedules which are based on Schedule Type as Periodic/Meter/Duration Rented/Times Rented.
-
The Assets of the Item [SONYALPHA5] gets their Status set to QC when the windows task scheduler runs on August 30, 2014. This is because the Item has completed 90 days without servicing. This satisfies the service condition as set in the tagged Maintenance Group’s Schedule named [PERIODIC90DAYS].
-
Now, try to ship the Assets of the Item [SONYALPHA5] whose Status set to QC, on orders.
System will not allow shipping them as the Assets are in QC. And this will be allowed only after bringing back the Assets’ status from QC to IN. -
Service the Assets of Item [SONYALPHA5] on September 01, 2014 by creating Service Tickets or by using Quick Service feature from Service module.
-
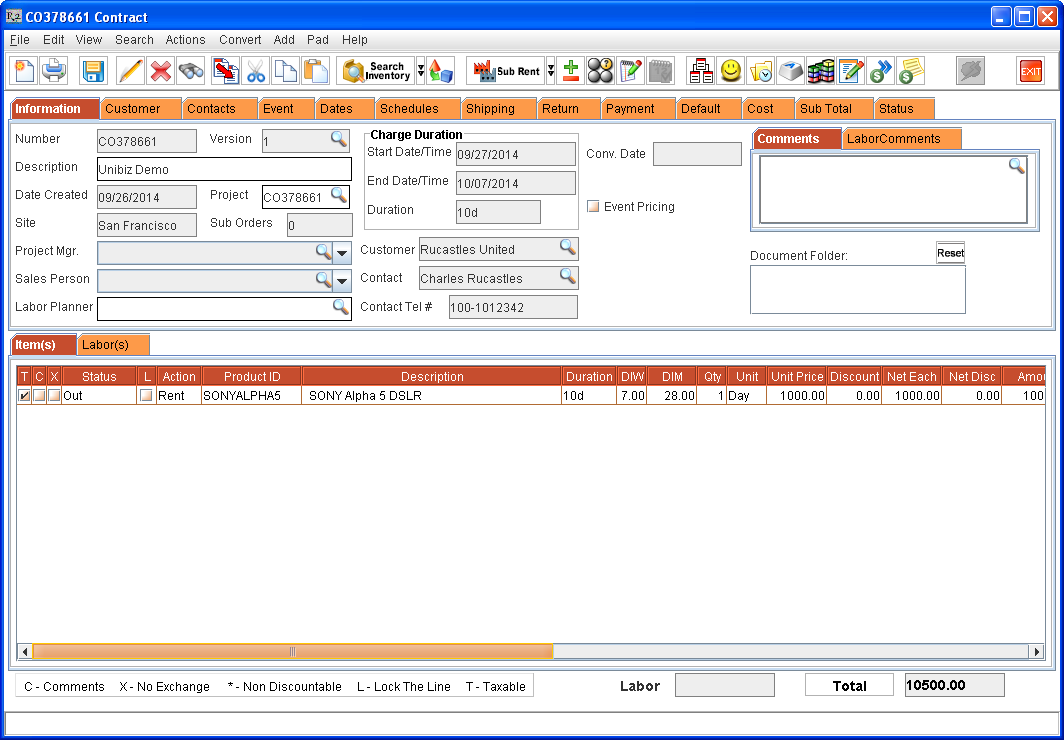
Create a Rental Reservation Order [CO378661] at Site [San Francisco] on September 26, 2014.
-
Add the item [SONYALPHA5] to Order [CO378661], fill and ship the Asset [SONYALPHA#1], as shown in Figure 1.8.
-
Generate the Equipment Delivery Receipt (EDR) print using [153800UI] for the Order [CO378661]. The EDR print gets generated, as shown in Figure 1.9.
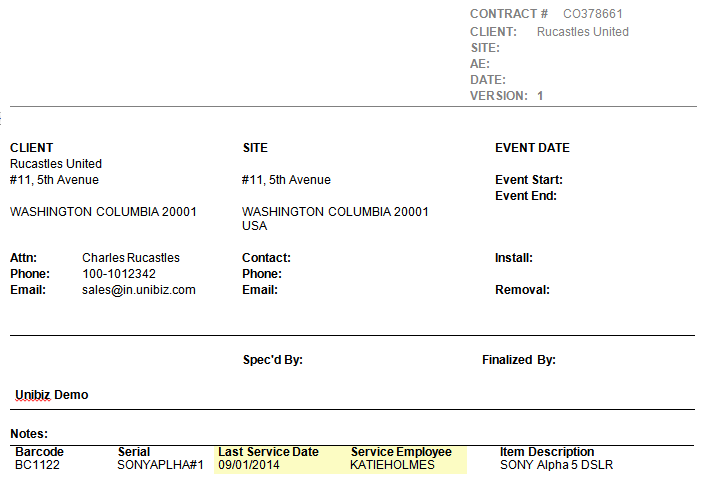
The EDR print will have details of the Assets present in the Order, their Last Service’s Date, and the Employee ID of the Employee who performed the Last Service of the Asset.
-
CID 67 - Prints the Last Service Date for the Asset.
-
CID 68 - Prints the Employee ID of the Employee who performed the Last Service.
The Last Service details get printed in the EDR print for an Asset if it is serviced by creating a Service Ticket or by performing Quick Service.
-
Access Return Order window of Order [CO378661] on October 07, 2014, and return the Asset [SONYALPHA#1].
The Asset received is due for service based on the tagged Maintenance group’s built in Schedule [QC ON RETURN] tagged to Asset’s parent Item with Times Rented interval as 1 and QC is selected for the Item [SONYALPHA5] and the Site [San Francisco] - the system displays the prompt message ”Asset is due for Service. Do you want to mark it as QC / Needs Service as per its Maintenance setup?” with Yes and No options, as shown in Figure 1.10.
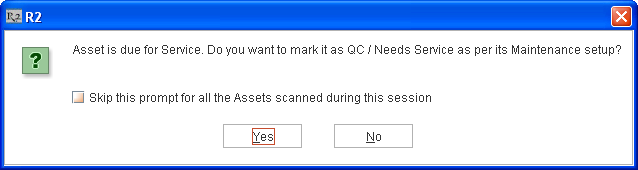
Yes - If Yes is selected the Asset will be marked as QC/Needs Service based on Schedule added to the Maintenance Group tagged to the Asset’s parent Item whose criteria is satisfied now.
-
No - If No is selected, the Asset will not be marked as QC or Needs Service.
-
If the Skip this prompt for all the Assets scanned during this session check box is selected - On scanning more Assets in the same session, the system will not display the prompt message. However, it will mark the Assets that are due for Service as QC / Needs Service, if Yes was selected and but will not be marked as QC or Needs Service, if No was selected.
If the user chooses to not perform the servicing of an Asset when the system prompts based on a currently satisfying service schedule by clicking No button then, the system starts considering the interval for the schedule from that point onwards.
For example,
-
Consider an Asset [SONYAX#1] which is tagged with a Maintenance Group which has added Schedules as:
-
[QC ON 5 RETURNS] - where Type is Times Rented with Interval as 5 and Mark As as QC.
-
[Periodic 120] - where Type is Periodic with Interval as 120 days and Mark As as QC.
-
Consider that this Asset is rented out on 5 Orders within a span of 100 days.
-
On returning this Asset on the 5th Order where it was rented out system prompts with the message ”Asset is due for Service. Do you want to mark it as QC / Needs Service as per its Maintenance setup?” with Yes and No options.
-
If the user chooses No, the system doesn't mark the Asset Status as QC based on [QC ON 5 RETURNS] schedule. When the user chooses to not perform a service. a closed Service Ticket is automatically created by the system for the satisfying schedules for which service is chosen not to be performed by the user.
-
The details of this can be viewed from Asset Status History as well as from Warehouse History windows.
-
An entry is made in these windows with Status as QC/Service Skipped and on viewing its Comments the details of the system generated Service Ticket's ID and satisfying Schedule IDs can be viewed.
-
The system now again starts monitoring the Asset based on this schedule, whose service is not perfomed from the beginning of the schedule's interval.
-
In this case since interval is 5, system again prompts the message ”Asset is due for Service. Do you want to mark it as QC / Needs Service as per its Maintenance setup?” based on [QC ON 5 RETURNS] schedule, on shipping and returning the Asset [SONYAX#1] from 10th Order where it gets rented out which is after 5 times after last time when the service was not performed.
-
However the choice of not performing of service based on the service condition getting satisfied for a Schedule doesn't affect other Schedules., In this case, the system still prompts the message ”Asset is due for Service. Do you want to mark it as QC / Needs Service as per its Maintenance setup?” based on [Periodic 120] schedule after 120 days.
Notes about Prompt Message Displayed for Asset that is due for Service while Returning the Asset using Return functionality
-
This message gets prompted on trying to scan Items for any Warehouse operations (Return and Exceptional Fill operations), provided the Validate QC/Service on Return check box (in Configuration module > Warehouse tab) is selected.
-
By default, the Skip this prompt for all the Assets scanned during this session check box will be in cleared state and the focus will be on Yes button.
-
This message prompt can be secured by applying security policies so as to restrict users from selecting either Yes or No options. On securing the:
-
Yes button - The message will be prompted but the user will be able to select only Skip this prompt for all the Assets scanned during this session check box and No button.
-
No button - The message will be prompted but the user will be able to select only Skip this prompt for all the Assets scanned during this session check box and Yes button.
-

Yes - If Yes is selected the Asset will be marked as QC/Needs Service based on Schedule added to the Maintenance Group tagged to the Asset’s parent Item whose criteria is satisfied now.
-
No - If No is selected, the Asset will not be marked as QC or Needs Service.
-
Cancel - Cancels the Return operation and the Items won’t be returned on the Order and won’t be marked as QC/Needs Service.
This message prompt can be secured by applying security policies to any 2 buttons. Doing so the message won't get prompted and system works as though user has selected the third option which is not secured.
-
Select the Skip prompt for all Assets due for Service scanned during this session check box in the prompt message and click OK button.
The system marks the Asset [SONYALPHA#1] as QC (as per Mark as > QC option selected in the built in Schedule dialog box for the Maintenance group tagged to the Asset’s parent Item). -
The system sets Asset Status as QC for the Asset returned on the Order which satisfies the service condition set in the tagged Maintenance Groups with built in Schedule.
-
The Assets [SONYALPHA#1] Status is set to QC. Assets with status set as QC can be filled / shipped on another Order only after servicing them. However, the Asset with status set as QC gets filled/shipped in Orders if Force Order Fill check box is selected in Configuration module > Warehouse tab.
-
Assets with Status as QC can be serviced by creating a Service Ticket or by Quick Service feature from Service module.
-
Assets with Service Status as Needs Service can be serviced by creating a Service Ticket for them.
-
The Assets with Service Status as Needs Service can still be filled / shipped on other Orders without servicing them. However, once Service Ticket is created, it cannot be filled / shipped.
-
Service the Asset [SONYALPHA#1] of Item [SONYALPHA5] by creating a Service Ticket or by using Quick Service feature from Service module.
Additional in Formation
-
The Portable Appliance/Safety Testing functionality is applicable only for Serial Item's Assets and is not applicable for Non-Serial Items.
-
While scanning, generating Needs Service, or running Windows Task Scheduler, all the Assets which satisfy service conditions set in their tagged Maintenance Groups’ Schedule based on Schedule Type as Periodic/Meter/Duration Rented/Times Rented are considered.
-
The Validate QC/Service on Return check box (in Configuration module > Warehouse tab) has to be selected for the Maintenance validation of Assets while scanning, based on the schedules in their tagged Maintenance Group, during all Warehouse operations.
-
The system prompts the user with a message on satisfying the service condition of Schedules with Mark As - QC only if the QC check box is set as selected in the Item Edit window and in All Site Details dialog box for the Site for the Asset’s parent Item.
-
However even without the QC check box selected, the system will prompt the user with a message on satisfying the service condition of Schedules with Mark As - Needs Service and sets the Asset's Service Status to Needs Service while returning, if due for Service, based on the Maintenance Group tagged to the Item for the Site.
-
The QC check box will be in cleared state, by default, on creating a new Item.
-
On trying to manually select the QC check box in the Item edit window of an Item, the system prompts "Do you want to change in all sites?” with Yes and No options.
-
Selecting Yes - Will set the QC check box as selected for all sites.
-
Selecting No - Will set the QC check box as selected only for the current site and remains unmodified in all the other sites.
-
QC check box selection in Item edit window and its selection in All Site Details dialog box for an Item on upgrading to this version of R2:
-
If QC on Return check box was set as selected for an Item for a Site (by selecting QC on Return check box in Item edit window and also against the Site listed in All Site Details window) before upgrading R2 to this version - The QC check box in Item edit window is set as selected for the Item and also the QC check box is set as selected in All Site Details dialog box for the Site, on upgrading R2 to this version.
-
If no Maintenance Group was tagged before upgrading R2 to this version - The system creates and tags a Maintenance Group named [QC ON RETURN] with a built-in Schedule named [QC ON RETURN] added to it. This built-in schedule will have Mark As set as QC with type as Times Rented and Interval as 1.
-
If a Maintenance Group was tagged to Item before upgrading R2 to this version - The system adds the built-in Schedule named [QC ON RETURN] with Mark As set as QC with type as Times Rented and Interval as 1 to the Maintenance Group tagged to the Item.
-
All existing Maintenance Schedules which are tagged to Item(s) whose QC on Return check box was not selected before upgrading, will have Mark As set as Needs Service on upgrading R2 to this version. This can be manually modified to Mark As > QC, if need be.
-
On newly tagging a Maintenance group having one or more Schedules with Mark As set as QC for an Item in its All Site Details window > Maintenance Group column against a listed Site - The system selects the QC check box in All Site Details window for that Site. (Note: This doesn't happen on editing an already tagged Maintenance Group)
-
Maintenance Validation for an Item based on setup in its All Site Details dialog box
Consider an Item [SONYALPHA5] for whom the Maintenance Group [MAINTGRP] is tagged in its Item Edit Window > Groups > Maintenance Field, as shown in Figure 2.0.
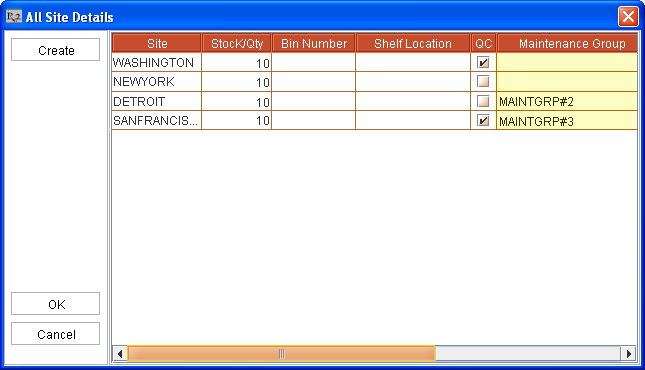
Table 2.0 Details of how of PAT/Safety Testing will happen for Item [SONYALPHA5] based on Maintenance Group tagged in its Item Edit Window > Groups > Maintenance field and also the setup made in its All Site Details Dialog Box
|
Site |
QC Check Box Status in All Site Details Dialog Box |
Maintenance Group tagged in All Site Details Dialog Box |
Remarks |
|
NEWYORK |
|
|
|
|
WASHINGTON |
|
|
|
|
DETROIT |
|
MAINTGRP#2 |
|
|
SAN FRANCISCO |
|
MAINTGRP#3 |
|
Maintenance validation based on Schedules with Mark As set as Needs Service - Is enabled for all Sites. This is because it is not dependant on the status of selection of the QC check box in Item edit window or in the All Site Details window.
-
Maintenance Validation for an Asset which satisfies Maintenance criteria based on its Owner Site, Current Site:
A. While Scanning: -
The Maintenance validation for an Asset which satisfies Maintenance criteria happens on scanning in Rental Orders/Transfer Orders only if the Validate QC/Service on Return check box is selected in Configuration module > Warehouse tab.
-
If Owner Site of the Asset is same as the Site to which Asset is getting returned/received - Asset will be marked as QC/Needs Service, based on the satisfying Service Schedule in the Maintenance Group considered.
-
In case of normal Transfer Orders:
-
On scanning in To Site (receiving site, For example [SITE-B] in a Transfer Order [TO#1] from [SITE-A] to [SITE-B]), if it is same as Owner Site of the Asset then - validation happens and Asset will be marked as QC/Needs Service, based on the satisfying Service Schedule in the Maintenance Group considered for the Site.
-
This happens only when Auto Ship/Receive check box is not selected in the Transfer Order [TO#1] while shipping it in the Transfer Order from its From Site [SITE-A].
-
If Auto Ship/Receive check box is later selected in the Transfer Order [TO#1] before receiving it in the To Site [SITE-B] (which is also Asset's Owner Site) of the Transfer Order then on trying to exit the Transfer Order [TO#1] system validates the Asset and on finding satisfying service schedules - prompts with an appropriate message.
-
If the Asset is T-Reserved on a Rental Order [RO#1] in Asset's Owner Site [SITE-B] (which is also the To Site of the linked Transfer Order [TO#2]) - On trying to scan the Asset from Order Fill window of the Rental Order [RO#1]:
-
When Drop-ship check box is selected in the linked Transfer Order [TO#2] - The system doesn't validate the Asset for Maintenance group based servicing as the Asset is not received at the Owner Site but will get directly shipped from the Transfer Order to the Customer location of the Rental Order.
-
When Drop-ship check box is not selected in the linked Transfer Order [TO#2] - System validates the Asset and on finding satisfying service schedules with Mark As set as QC - prompts with the message "The Asset <Asset ID> is in Transfer Order <Transfer Order ID>. The Asset needs QC. Do you want to ignore QC and fill?" with Yes and No options.
-
On selecting Yes - The system skips the service and receives the Asset on the linked Transfer Order [TO#2] and fills it in the Rental Order [RO#1].
-
On selecting No - The system doesn't receive the Asset in the Transfer Order [TO#2]. Its is also not filled in the linked Rental Order [RO#1] and its status remains as In-Transfer.
-
When the Asset is present in its Owner Site [SITE-B] itself and it is OUT on a Rental Order [RO#2], on trying to Fill it in a Transfer Order [TO#3] from this Site [SITE-B] to another Site [SITE-A]:
-
When Force Order Fill check box (Configuration module > Warehouse tab) is selected - System returns the Asset in the Rental Order [RO#2] and fills it in the Transfer Order [TO#3] without validating for Maintenance group based servicing.
-
When Force Order Fill check box (Configuration module > Warehouse tab) is not selected - System returns the Asset in the Rental Order [RO#2] and validates the Asset based on tagged Maintenance Group schedules while filling to the Transfer Order [TO#3]. On finding satisfying service schedules the system prompts with appropriate message.
-
In case of Inventory Transfer Orders:
-
After scanning in From Site (receiving site) [SITE-A] and receiving the Asset in its To Site [SITE-B] - the Asset's Owner Site and Current Site becomes same as the To Site [SITE-B] of the Transfer Order [TO#4]. On trying to exit from the Transfer Order [TO#4] after receiving the Asset in its To Site [SITE-B], validation happens and Asset will be marked as QC/Needs Service, based on the satisfying Service Schedule in the Maintenance Group considered for this Site [SITE-B] (To Site) based on QC check box selection and Maintenance Group tagged for [SITE-B] in All Site Details dialog box for this Item.
-
The Maintenance Schedules validated are based on the Maintenance Group tagged for the Owner Site in All Site Details. If Maintenance Group is not tagged for Owner Site in All Site Details, then it is considered from Item edit window.
B. While Generating Needs Service:
-
If Owner Site and Current Site of the Asset are same - Asset will be marked as QC, if the satisfying Service Schedule has Mark As is set as QC and if the QC check box is selected for the Item in this Site.
-
Even If Owner Site and Current Site of the Asset are not same - Asset will be marked as Needs Service, if the satisfying Service Schedule is set as Needs Service.
-
The Maintenance Schedules validated are based on the Maintenance Group tagged for the Owner Site in All Site Details. If Maintenance Group is not tagged for Owner Site in All Site Details, then it is considered from Item edit window
If more than one Service Schedule is satisfied, system first checks for the Schedule with QC option. If that is not successful then it will proceed with Schedule with Needs Service.
-
Maintenance validation for an asset while scanning an In-Transfer asset also above mentioned point based on Owner Site and Current Site is applicable and will be marked as QC/Needs Service accordingly.
-
The system will not allow the user to create Quick Service Ticket for an Asset which is already having a open Service Ticket. Instead it displays a message prompt as "Open Service Ticket exists for this Asset. Please complete it and proceed." with OK Button.
-
The system automatically creates a Service Ticket on performing Quick Service of an Asset.
-
The details of Services performed for an Asset can be viewed from the Asset Service History window (accessed from Asset edit window > Service button) of the Asset.
-
The details of any Service which is chosen by user as not to be performed for this Asset is also displayed here with Status as QC/Service Skipped. When the user chooses to not perform a service, a closed Service Ticket is automatically created by the system for the satisfying schedules. Additional details of this record (Service Ticket ID, and satisfied Schedule IDs) can be viewed by selecting this entry and clicking Comments icon and viewing its Comments.
-
The details of Quick Service get entered with Status as Quick Service. Additional details (Service Ticket ID, and satisfied Schedule IDs) can be viewed by selecting this entry and clicking Comments icon and viewing its Comments, as shown here.
-
Any Asset when marked as Lost/Missing while returning it on an Order will be set with status as Lost / Missing, but won’t have any effect on Asset’s Service Status even if it satisfies the criterion set in tagged Maintenance Group. However, while returning the Lost / Missing Assets, it will prompt for marking the assets as QC/Needs Service based on the satisfying Maintenance Schedules.
-
When an Out Asset is marked as Damaged on Order:
-
With Return to Inventory and Create Service Ticket options selected, system will create Service Ticket for the selected Asset with Damaged flag selected.
-
However, if Return to Inventory is selected and Create Service Ticket is not selected, system will prompt to mark the Asset as QC/Needs Service if it satisfies any Service Schedule at the time. But if no satisfying Service Schedule is found, it sets it as Damaged with Service Status as Needs Service.
-
If Return to Inventory is not selected, it will not prompt to mark the asset to QC/Needs Service, rather it sets the Service Status as Needs Service and marks it as Damaged.
-
On returning Assets by Batch Return from the Warehouse module also, the prompt message ”Asset is due for Service and will be marked as QC/Needs Service based on its Maintenance Group” will be displayed if the Asset is due for service based on the Schedule added to the Maintenance Group tagged to the Asset’s parent Item and same would be marked as QC/Needs Service as per Maintenance Group.
-
A windows task scheduler can be used to schedule the periodic checking and marking of Assets’ Status to QC or Needs Service.
The functionality of marking of Assets as QC or Needs Service based on the Maintenance Group can also be achieved by scheduling a batch file in Windows Task Scheduler instead of manually clicking on the Service > Generate Needs Service flag. If the batch file is scheduled on the Windows Task Scheduler, it does not need user intervention. It will run as per the recurrence settings chosen while scheduling the task on the windows task scheduler.
-
On clicking on the Service > Generate Needs Service or on running the equivalent program through Windows Task Scheduler
-
The Asset Status will be set as QC, if the satisfying criterion in the Maintenance Group has Mark As set to QC instead of marking the Service Status as Needs Service. The check for Schedules with Mark As set as QC will be performed only if the QC check box is selected for the Item for the Site.
-
If the satisfying criterion in the Maintenance Group has Mark As set to Needs Service, Asset’s Service Status will be set to Needs Service.
-
The system validates the Assets based on their tagged Maintenance Groups’ Schedules during exceptional Filling scenarios also, as explained below:
-
While filling an Asset on an Order/Transfer Order that is Out on a different Order:
-
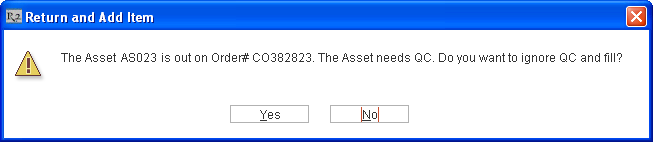
Fill and Ship the Asset [AS023] on Order [CO382823] or on Transfer Order. The Asset Status will be Out. The Asset’s parent Item is tagged with Maintenance group’s built-in Schedule QC ON RETURN and has QC as selected.
-
Now, try filling the Asset [SONYALPHA#1] on another Order [CO378682] or on Transfer Order. The prompt message ”The Asset <Asset ID> is OUT on Order <Order ID>. The Asset needs QC. Do you want to ignore QC and fill?” is displayed with Yes and No options, as shown in Figure 2.1.
-
Clicking Yes - The system Returns the Asset from its existing Order [CO382823] and fills it on Order [CO388682].The status bar message ”Item was Out on Order CO382823 and returned and filled” will be displayed.
-
Clicking No - The system exits from the prompt message and does not perform any action.
Notes regarding Message Prompted while filling an Asset on an Order/Transfer Order that is Out on a different Order.
-
If the Force Order Fill check box in Configuration module > Warehouse tab is selected, then the system works as before. Irrespective of whether the Asset is due for service or not (based on the Schedule added to the Maintenance Group tagged to the Asset’s parent Item), the Asset will be returned from its existing Order and filled on the new Order.
-
This is also applicable while performing Batch Fill from Warehouse module.
-
By default, the focus will be on No button.
-
While filling a Lost/Missing Asset on an Order:
-
Select Auto Return Missing/Lost check box in Configuration module > Warehouse tab.
-
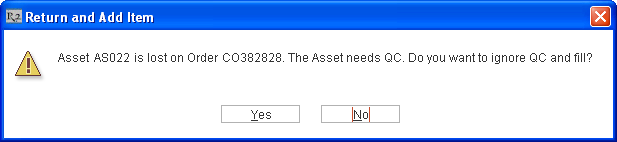
Fill and Ship the Asset [AS022] on Order [CO382828]. The Asset Status is Out. The Asset’s parent Item is tagged with Maintenance group’s built-in Schedule QC ON RETURN and has QC as selected.
-
Mark the Asset [AS022] as Lost from the Return Order window.
-
Now, try filling the Asset [AS022] on another Order [CO378689]. The prompt message ”Asset <Asset ID> is lost on Order <Order ID>. The Asset needs QC. Do you want to ignore QC and fill?” with Yes and No options is displayed, as shown in Figure 2.2.
-
Clicking Yes - the system returns the Asset from its existing Order [CO382828] and fills it on the new Order [CO378689].
-
Clicking No - The system exits from the prompt message and does not perform any action
Notes regarding Message Prompted while filling a Lost/Missing Asset on an Order.
-
This message gets prompted for the Missing Assets also.
-
This message gets prompted also while performing Batch Fill from Warehouse module.
-
When Auto Return Missing/Lost check box in Configuration module > Warehouse tab is in cleared state, system will not display the above prompt and will not fill the Asset. It will display the status bar message as ”This Item is LOST, mark it as IN to use”
-
By default, the focus will be on No button.
-
While performing Ship Items from Order:
-
Fill and Ship Some Assets [AS#1], [AS#2], [BS#32] and [BS#41] on an Order [CO392828].
The Assets’ [AS#1], [AS#2] parent Item is tagged with Maintenance group which has built-in Schedule QC ON RETURN tagged to it and which has Mark As selected as QC. While Assets [BS#32] and [BS#41] are not tagged with any Maintenance group nor is the QC check box selected. -
Create another Order [CO392829] and Ship Items from Order [CO392828] using the Ship Items from Order feature in Order Fill window. The prompt message ”Some of the Assets on Order <Order ID> need QC. Do you want to ignore QC and import?” is displayed with Yes and No options, as shown in Figure 2.3.

-
Clicking Yes - the system will return all OUT items from its existing order and import to the new Order.
-
Clicking No - The system exits from the prompt message and does not perform any action.
-
While trying to Un-return a QC Item:
-
Fill and Ship the Asset [AS020] on Order [CO382829]. The Asset’s parent Item is tagged with Maintenance group which has built-in Schedule QC ON RETURN tagged to it and which has Mark As selected as QC.
-
Return the Asset [AS020]. The Asset is marked as QC as it fulfills the criterion to be marked as QC on Return as per the tagged Maintenance group.
-
Try to un-return the Asset. The system displays the message ”Item is in QC. Cannot Un-return.”
All the above mentioned exceptions are applicable even while returning Items through Read Data or Read File. On using Read Data or Read File functionality, the system will mark the Assets satisfying their Maintenance criteria as QC/Needs Service without prompting the user.
-
While resolving Physical Inventory Discrepancy, if an Out Asset is adjusted as IN, on completing the Physical Inventory, the Asset gets returned on Order and is marked as QC/Needs Service based on the satisfying Service Schedule at the time of completing the physical inventory..
-
Currently the Portable Appliance/Safety Testing functionality (explained in this topic) is not supported for Serial Kits and its child items.
-
Non-serial Kit’s child Items get validated like normal Items based on the Maintenance Group tagged to the respective Item, in its Item edit window.
-
Assets which are already marked as QC or Sold won’t be validated to check if they satisfy Maintenance conditions as per their tagged Maintenance Groups.
-
The following Reports are supported for generating details of Assets satisfying Maintenance criteria:
-
Rep_OrderAssetSchedule (Report for the Assets expected to be Returned for the day and satisfying the Maintenance criteria) - This is a function based report that can be run as a custom report. This details of the Report's columns are provided in Table 2.1.
Table 2.1 Report Column Details
|
Column Name |
Description |
|
RETURNDATE |
Items with return date with this date and satisfy any maintenance schedule as on this date. |
|
ASSETID |
The ID of the Asset. |
|
STATUS |
Status of Asset on the Order (OUT / OVERDUE).
|
|
SCHEDULEID |
The ID of the first schedule tagged to the Asset whose service condition is satisfied.
|
|
SCHEDULETYPE |
Type of the Schedule. Possible values are:
|
|
SCHEDULEINTERVAL |
The Interval of the Schedule whose service condition is satisfied for the Asset. |
|
SCHEDULEMARKAS |
The Mark As option set in the Schedule whose service condition is satisfied for the Asset. Possible values are:
|
|
ORDERID |
The Order on which the Asset is currently in Out / In-transfer / Overdue. |
|
ORDERDESCRIPTION |
The Description of the Order. |
|
ORDERSITE |
The Site where the Order is created. |
-
Rep_AssetQCNeedServiceView (Report for the Assets which are QC / Needs Service by Order) - The assets which are currently in QC / Needs Service will be extracted in this report. This details of the Report's columns are provided in Table 2.2
Table 22 Report Column Details
|
Column Name |
Description |
|
ASSETID |
The ID of the Asset which is either marked as QC or Needs Service. |
|
ORDERID |
The Order on which the Asset is last used where the Asset satisfied its service Schedule criteria and is marked as QC/Needs Service. |
|
ORDERSITEID |
The ID of the Site where the Order is created. |
|
MARKEDAS |
The Asset is marked as QC/Needs Service based on the Mark As option set in the Schedule whose service condition is satisfied for the Asset. Possible values are:
|
|
MARKEDONDATE |
The date when the Asset is marked as QC/Needs Service. |
|
MARKEDBY |
The ID of the Employee who marked the Asset as QC/Needs Service. |
-
Rep_MaintenanceScheduleLog - This report provides the list of Assets which are in Out/Missing/Lost/In-Transfer/Filled/Repair/QC/Sold status but has satisfying maintenance schedules as per the date and time the report is run and as such could not be serviced. The details of the Report's columns are provided in Table 2.3.
Table 2.3 Report Column Details
|
Column Name |
Description |
|
ASSETID |
The ID of the Asset which has satisfying maintenance schedules but could not be marked as QC/Needs Service raising an Exception. |
|
CURRENTASSETSTATUS |
The current Status of the Asset at the time of generating this report. |
|
ASSETSTATUSCONFLICT |
The Status of the Asset which resulted in the Asset being unable to be marked as QC/Needs Service. |
|
SCHEDULEID |
The ID of the first schedule tagged to the Asset whose service condition is satisfied. |
|
SCHEDULETYPE |
Type of the Schedule. Possible values are:
|
|
SCHEDULEINTERVAL |
The Interval of the Schedule whose service condition is satisfied for the Asset. |
|
MARKTYPE |
The Mark As option set in the Schedule whose service condition is satisfied for the Asset. Possible values are:
|
|
CONTRACTID |
The ID of the Rental Order or Transfer Order where the Asset is used resulting in the exception. |
|
CONTRACTDESCRIPTION |
The Description of the Rental Order or the Transfer Order. |
|
SITEID |
The Site ID of the Rental Order's Site or Transfer Order's To Site's ID. |
Setting Up and Running a Windows Task Scheduler
A Windows Task Scheduler can be setup for the periodic checking of whether any Assets have satisfied the service conditions from their tagged Maintenance Group, as explained below. If one or more Assets satisfy the service criteria then:
-
The Asset Status will be set as QC, if the satisfying Schedule in the tagged Maintenance Group has Mark As set to QC instead of marking the Service Status as Needs Service and also Damaged flag will be left unmodified. The check for Schedules with Mark As set as QC will be performed only if the QC check box is selected for the Item for the Site.
-
If the satisfying Schedule in the Maintenance Group has Mark As set to Needs Service, Asset’s Service Status will be set to Needs Service.
For detailed in Formation on how and when an Asset's Status/Service Status gets set to QC/Needs Service, refer the Additional in Formation section in this topic.
Configuring Oracle Client Installation and path in the Operating system
Setting up the Windows Task Scheduler consists of the following steps.
-
Creating SQL file for executing the procedure named PatAutomation.sql
-
Creating a Batch file for executing the automation procedure
-
Scheduling Windows Task Scheduler for executing the batch file.
Step 1 - Creating SQL file for executing the procedure named PatAutomation.sql - Details
Create a ASCII file with extension .sql (For example PatAutomation.sql) enter the below command lines and save the file.
exec generateneedservice ('<UserName>',<date for which this sql procedure should be run>);
exit;
For example, to connect with Username = MANTRA and for current system date, setup the command in the ASCII file as:
exec generateneedservice ('MANTRA',sysdate);
exit;
Step 2 - Creating a Batch file for executing the automation procedure - Details
Create a file with extension .bat (For example PatAutomation.bat) with the following command lines and save the file in the same folder where the .sql file named PatAutomation.sql is stored.
sqlplus username/password @connect string @ [filename including its entire path in the system].sql
User name, Password and Connect string represents the key values for connecting to the oracle database. @ [filename].sql represents the name of the .sql file created in Step 1.
For example:
sqlplus qcstagv56/qcstagv56@r2c @D:\pat\PatAutomation.sql
Step 3 - Scheduling Windows Task Scheduler for executing the batch file - Details
-
To open Scheduled Tasks, click Start > All Programs > Accessories > System Tools > Scheduled Tasks. The Scheduled Tasks window is displayed.
-
Double-click the Add Scheduled Task icon. The Scheduled Task Wizard is displayed.
-
Click Next button. The dialog box displays a list of programs that are installed on your computer, either as part of the Windows operating system, or as a result of software installations.
-
Click Browse button. Go to the folder where PatAutomation.bat file is created and stored in Step 2. For example, go to D:\pat\ folder
-
Select the PatAutomation.bat file and click Open button.
-
Enter an appropriate name for the new schedule being created. For example, name it as PatAutomation
-
Select Daily as the option for the Perform this task and then click Next button.
-
Enter the time when this Windows Task Scheduler should start running in Start Time field. For example, enter current system time as Start Time.
-
Select Every Day as the option for the Perform this task.
-
Enter the date when this Windows Task Scheduler should start running in Start Date field. For example, enter current system time as Start Date and click Next button.
-
Type the name and password of the user who is associated with this task.
-
Make sure that you choose a user with sufficient permissions to run the program.
-
By default, the wizard selects the name of the user who is currently logged on.
-
Click Next button to display the dialog box with in Formation about the choices that you have made.
-
Select Open Advanced properties for this task when i click Finish check box (On selecting this option, Windows will display properties dialog box for the scheduled task when the Schedule Task Wizard is closed).
-
Click Finish button to close the Schedule Task Wizard. The Schedule Properties dialog box is displayed.
-
Click on the Settings tab and set it up as shown below.

-
Click OK to save the Windows Task Scheduler for PatAutomation and exit schedule configuration window.
The Windows Task Scheduler is now successfully setup to perform periodic checking of whether any Assets have satisfied the service conditions from their tagged Maintenance Group or not.