Reference No: 29465
Details
As the Equipment moves in and out of the Warehouse frequently, with clients present, the following topics will highlight the way some of the PAT Testing is done:
User is notified when Asset's PAT Effective Date to expire on or before Order's Return Date
When filling an Order, the user is prompted when an Asset’s PAT Test Effective Date will expire on or before the Order’s Return Date.
The PAT related settings are required to be done in Configuration Module and Site Edit window. This is, as shown in the Figure 1.0, Figure 1.1 and Figure 1.2.
The prerequisites are as follows:
-
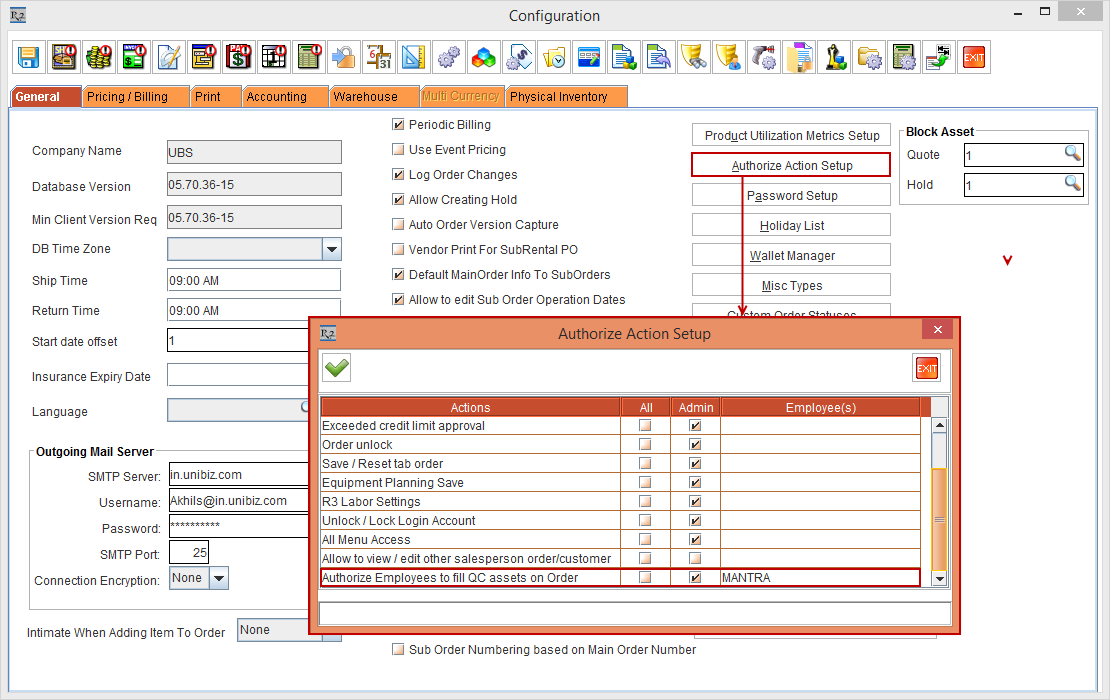
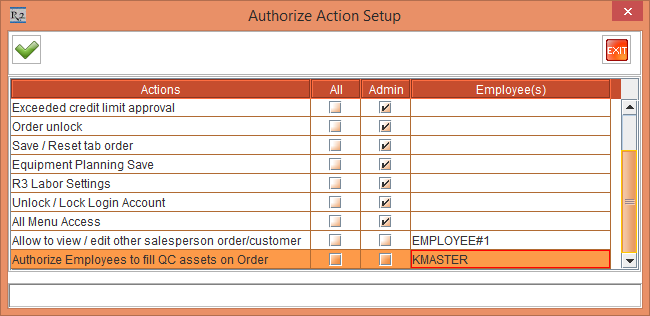
Select the Configuration module > General tab > click the Authorize Action Setup button. The Authorize Action Setup window is displayed. Select the Employee [MANTRA] in the Authorize Employees to fill QC Assets on Order Action > click the OK button.

-
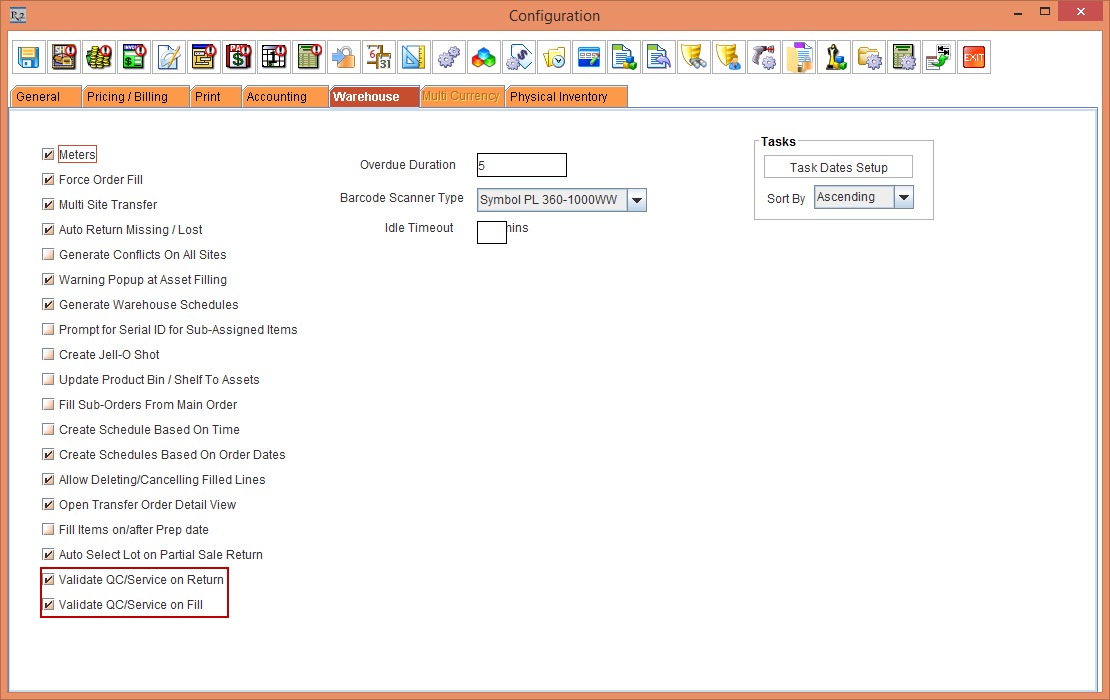
Select the Warehouse tab > select the check-boxes Validate QC/Service on Return and Validate QC/Service on Fill. This is as shown in Figure 1.1. Save and exit Configuration module.

-
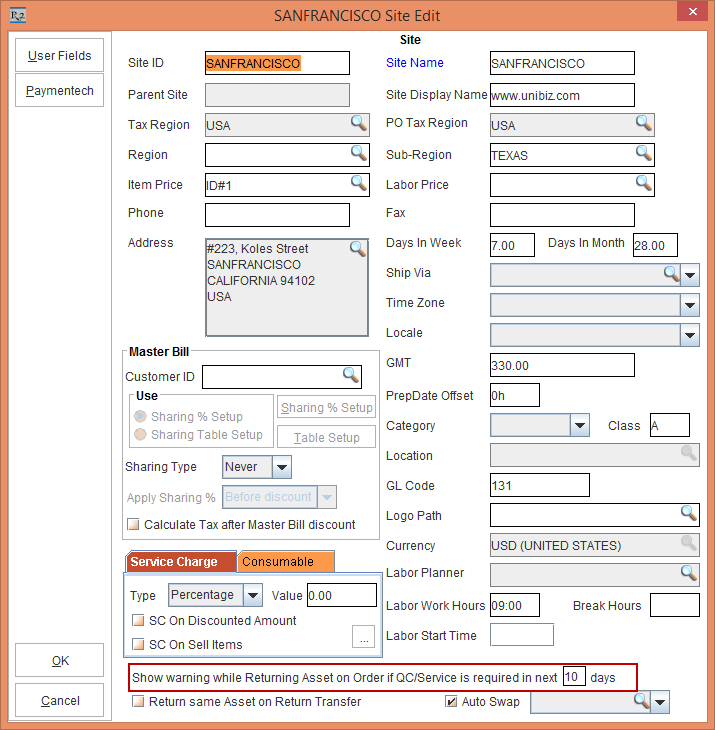
Select the Maintenance module > Employee tab > Site > select the Site [SANFRANCISCO]. Enter 10 in the Show Warning On Return If QC/Service Is Required In Next Days field. This is as show in the Figure 1.2.

Asset's PAT Test effective date is not expired as of today but will expire on or before Order’s Return Date
The following sample workflow displays the Asset's PAT Test effective date is not expired as of today but will expire on or before Order’s Return Date.
Sample Workflow
-
Create a Serial Item [CRANE#1].
-
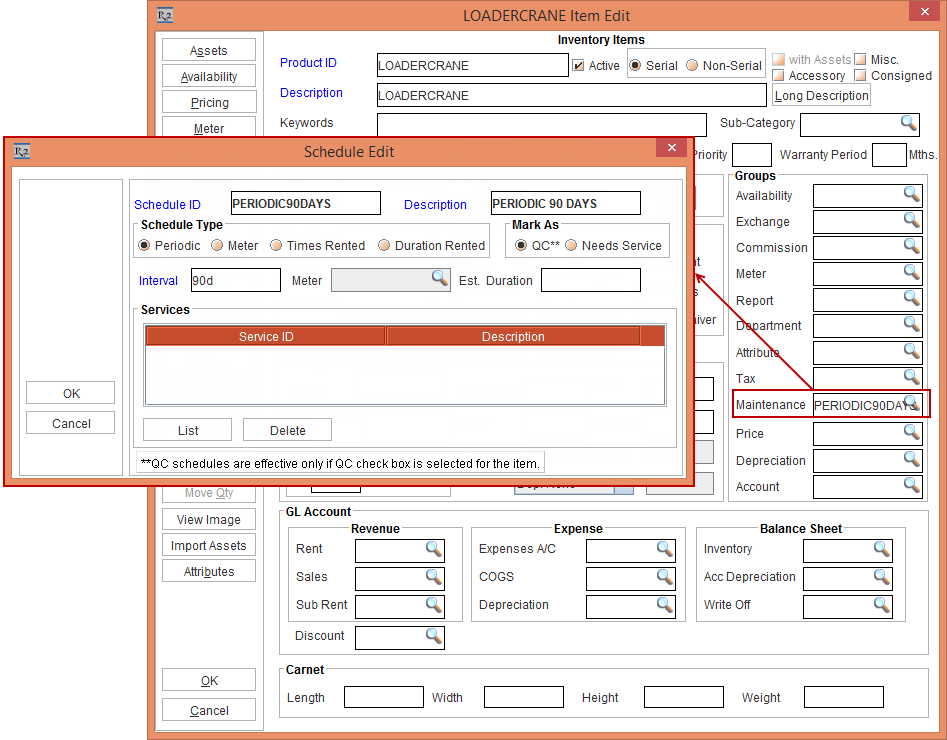
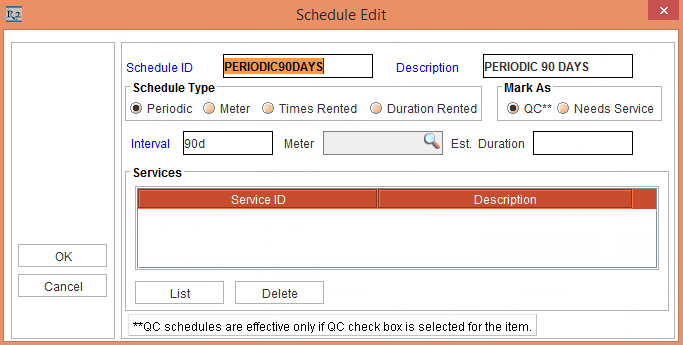
Tag a Maintenance Group [PERIODIC90DAYS] with Maintenance Schedule Periodic 90Days to Item [CRANE#1].

-
Receive an Asset [CRANE_ASSET#1] for [CRANE#1] on 1 - March - 2017. Based on Maintenance Setup the asset will be on QC on 30 - May - 2017.
-
Create a Rental Reservation Order [ORD-1053] from 20 - May - 2017 to 20 - June - 2017.
-
Add the Item [CRANE#1] of 1 Qty on [ORD-1053].
-
On 20 - May - 2017, open the Prep Task of [ORDER#1] and scan the Asset [CRANE_ASSET#1] to fill it. The system displays the prompt , as shown in the Figure 1.4

a) If you choose the Yes button, the asset will be filled.
b) If you choose the No button, filling will be skipped. The No button can be secured, if this action is not preferred to be chosen.
-
In this case, click the Yes button > click the Close button. The Order Fill dialog as shown here. Click the Yes button. > the Charge Ship Dates dialog is displayed. Click the OK button.
-
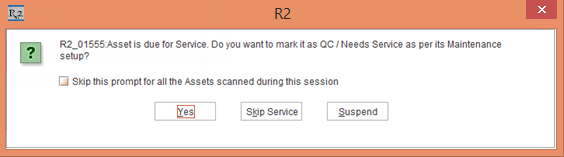
On the 20 - June - 2017, the Return Date of the Order, open the Return Task of the Order [ORD-1053] and scan the Asset [CRANE_ASSET#1] to return. The system displays the prompt, as shown in the Figure 1.5. The system displays the message as, “Asset is due for Service. Do you want to mark it as QC/Needs Service as per its Maintenance Setup?”

-
Click the Yes button. The Asset [CRANE_ASSET#1] Status is marked as QC.
If you choose Skip Service, the system will skip current Service Due and consider it for next Service Due only . The Skip Service button can be secured to avoid skipping current Service Due.
And, if you choose Suspend button, the system will suspend the Service for that Warehouse operation and return the Asset.
-
Create and complete the Service Ticket of [CRANE_ASSET#1] either by Quick Service Ticket or Normal Service Ticket to bring the Asset to IN Status.
PAT Test Effective Date of the Asset is Expired as of Today and is in QC Status
The following sample workflow displays the Asset's PAT Test effective date is expired as of today and is in QC Status.
Sample Workflow
-
Create a Serial Item [CRANE#2].
-
Tag a Maintenance Group [PERIODIC90DAYS] with Maintenance Schedule Periodic 90Days to Item [CRANE#2]. This is , as shown in Figure 1.6.

-
Receive an Asset [CRANEASSET#2] for [CRANE#2] on 1 - March - 2017.
-
Create a Rental Reservation Order [ORD-1134] from 31 - May - 2017 to 20 - June - 2017.
-
Add the Item [CRANE#2] to the Rental Reservation Order [ORD-1134]. Do not Generate Needs Service.
-
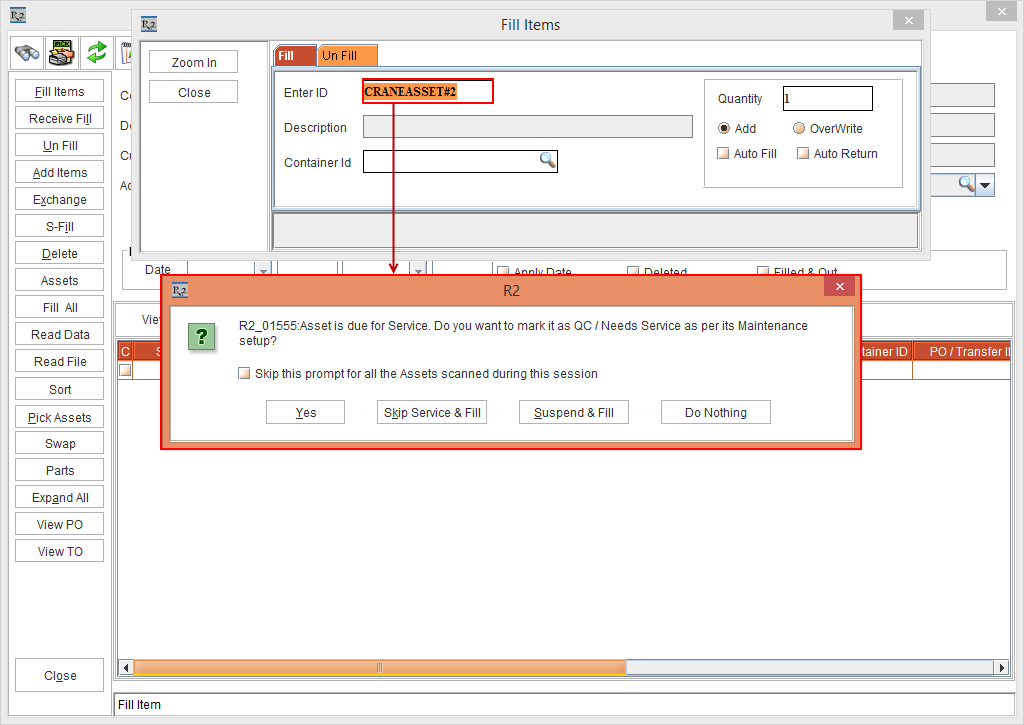
On 31 - May - 2017 open the Prep Task of [ORD-1134] and scan [CRANEASSET#2] to fill it. The system displays the message as, “Asset is due for Service. Do you want to mark it as QC/Needs Service as per its Maintenance Setup?”. This is, as shown in the Figure 1.7.
-
Exceptions are written when Skip Service & Fill or Suspend & Fill button is selected.
-
If the Skip this prompt for all the Assets scanned during this session radio button is selected > select a button (Skip Service & Fill or Suspend & Fill), then Exceptions are written for all the selected Assets in the View Exceptions window.
-
If the Skip this prompt for all the Assets scanned during this session radio button is not selected and the following steps are performed, the system displays Exceptions in the View Exceptions window as shown below:
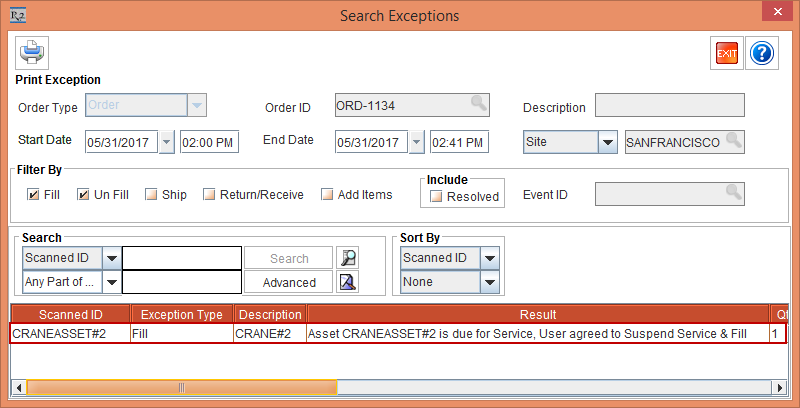
a. When Suspend & Fill button is selected, the system suspends the Service and fills the Asset and Exceptions are generated. Click the Close button of the Fill Items window. A dialog to View Exceptions is displayed saying, "R2_00491 : Exceptions found during scanning. Do you want to view it now?" > click the Yes button. The Search Exceptions window is displayed as shown in the Figure 1.8. Unfill the Asset [CRANEASSET#2].
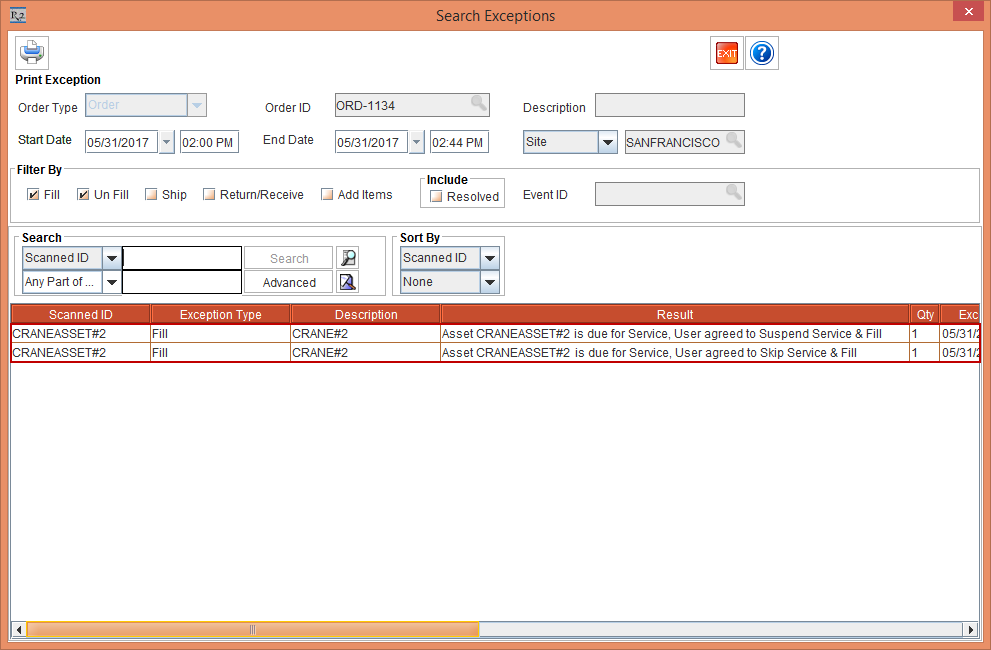
b. When Skip Service & Fill button is selected, the system skips the Service and fills the Asset > click the Close button of the Fill Items window. A dialog to View Exceptions is displayed saying, "R2_00491 : Exceptions found during scanning. Do you want to view it now?" > click the Yes button. The Search Exceptions window is displayed, as shown in the Figure 1.9. Unfill the Asset [CRANEASSET#2].
-
In this case, click the Yes button.
-
If you choose Yes button, the Asset is filled.
-
If you choose Skip Service & Fill button, the system will skip current Service Due and consider it for the next Service Due and fill it on the current Order. The Skip Service & Fill button can be secured to avoid normal users from filling any Asset which is found to be due for Service.
-
If you choose Suspend & Fill button, the system will not create Skip Service and fills the Asset.
-
The Asset [CRANEASSET#2] will be marked as QC and it will not fill the Asset [CRANEASSET#2].
-
Create and complete the Service Ticket either by Quick Service Ticket or Normal Service Ticket to bring the Asset to IN Status.
PAT Validation upon using the option Fill & Dispatch option for the Asset is Expired as of Today
The following sample workflow displays the Asset's PAT Test effective date is expired as of today and is in QC Status.
Sample Workflow
-
Create a Serial Item [CRANE#2].
-
Tag a Maintenance Group [PERIODIC90DAYS] with Maintenance Schedule Periodic 90Days to Item [CRANE#2]. This is , as shown in Figure 1.10.

-
Receive an Asset [CRANE_ASSET#03] for [CRANE#2] on 1 - March - 2017.
-
Create a Rental Reservation Order [CO424420] from 31 - May - 2017 to 20 - June - 2017.
-
Add the Item [CRANE#2] to the Rental Reservation Order [CO424420]. Do not Generate Needs Service.
-
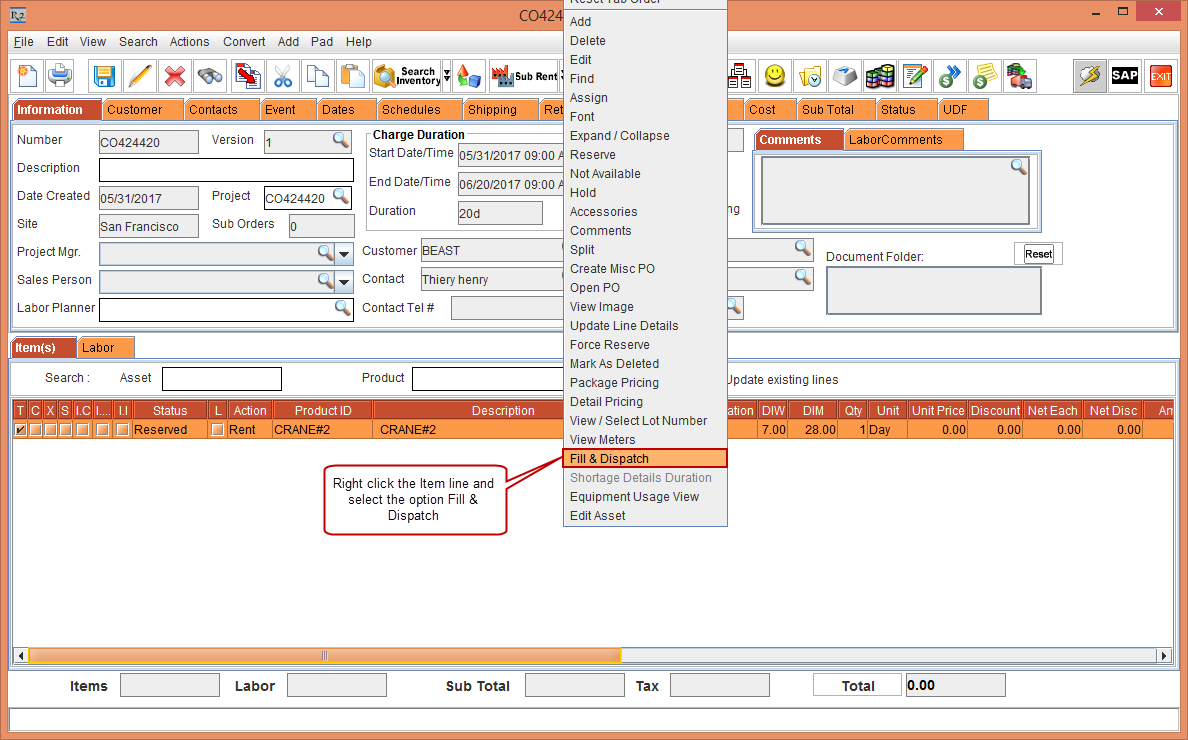
Right click and select the Fill & Dispatch option, as shown in the Figure 1.11.
The Serial Items window is displayed.
-
In the Serial Items window, select the Fill & Dispatch check box for the Asset [CRANE_ASSET#03].
-
The system displays the dialog, as shown in the Figure 1.12.
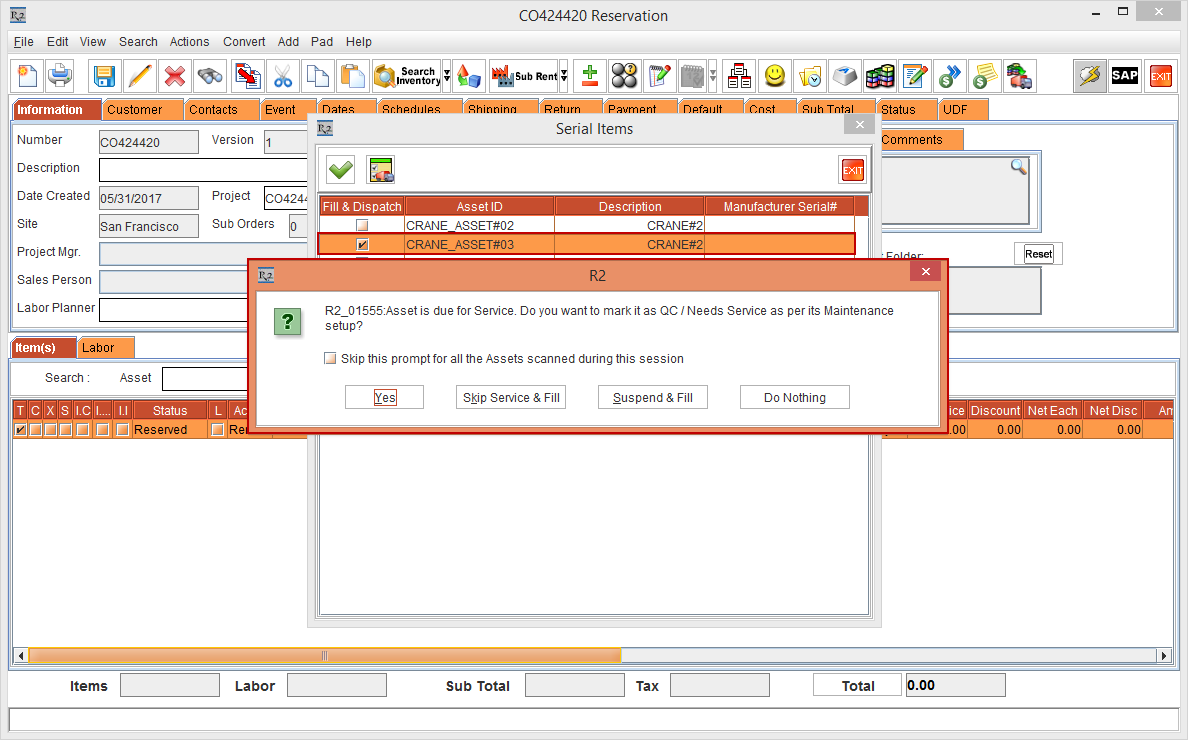
-
Click the Yes button (if any other option is selected, it will have the same functionality as explained in the previous scenario).
-
The Asset [CRANE_ASSET#03] will be marked as QC and it will not fill the Asset [CRANE_ASSET#03].
-
Create and complete the Service Ticket either by Quick Service Ticket or Normal Service Ticket to bring the Asset to IN Status.
Override Option Assignable to Specific Employees (Or Security Group) to Bypass the Need to Conduct a ‘Quick Service’ Record on an Asset to Clear the QC Status
An Override option assigned to specific Employees or Security Group to bypass the need to perform a Quick Service record on an Asset to clear the QC status is provided.
The option ensures that the PAT Test Maintenance Group meter doesn’t reset. Overriding also allows the Asset to be Filled or dispatched to the Order. And, upon next return, the Maintenance group will be triggered again.
Sample Workflow
-
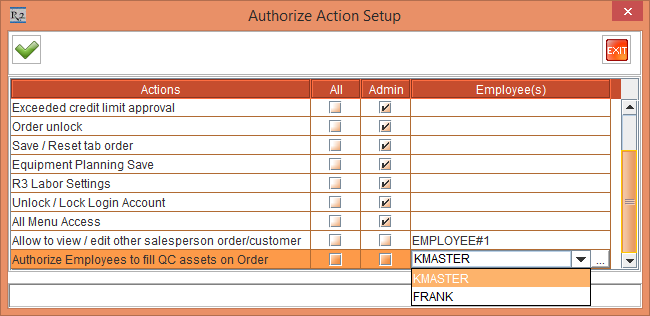
Select the Configuration module > General tab > click the Authorize Action Setup button. The Authorize Action Setup window is displayed. Select the Employees [KMASTER] and [FRANK] in the Authorize Employees To Fill Qc Assets on Order Action (do not select check-box for All or Admin) > click the OK button.
-
Select the Warehouse tab > select the check-boxes Validate QC/Service on Return and Validate QC/Service on Fill. This is as shown in Figure 2.1. Save and exit Configuration module.

-
Login to R2 as Employee [JAMES] who is not authorized fill QC Assets on Orders.
-
Create a serial Item [CRANE#3].
-
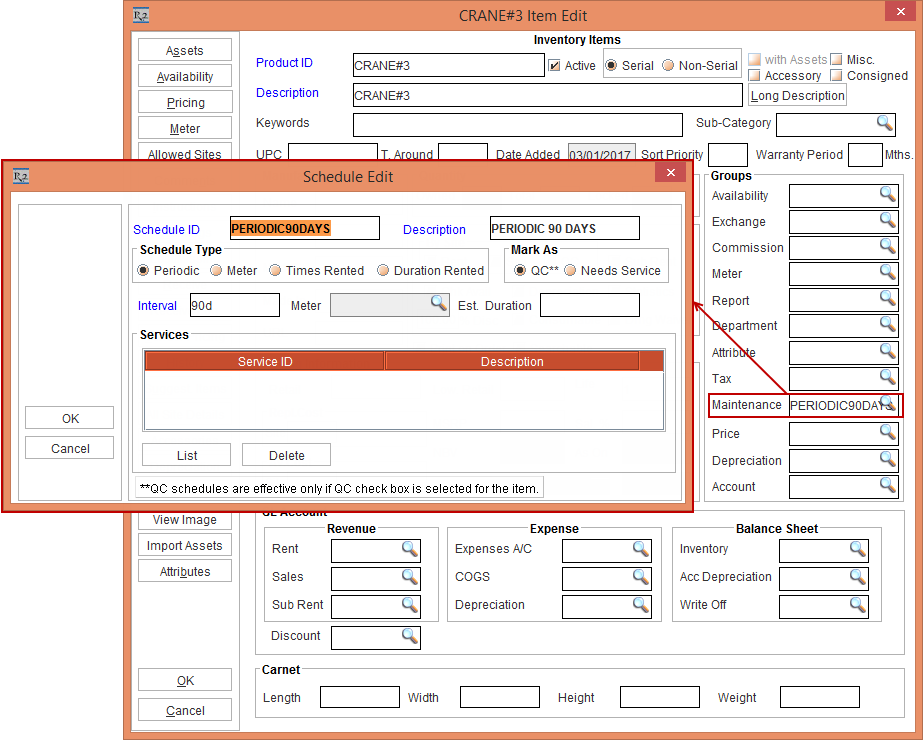
Tag Maintenance Group [PERIODIC90DAYS] with Maintenance Schedule Periodic 90Days to Item [CRANE#3] , as shown in Figure 2.2.
-
Receive Asset [CRANEASSET#3] and [CRANEASSET#4] for [CRANE#3] on 1 - March - 2017. Based on Maintenance setup the asset is on QC on 30 - May - 2017.
-
On 29 - May - 2017, open Service module and click Generate Needs Service button. The Assets [CRANEASSETT#3] and [CRANEASSET#4]'s Status will be set as QC.
-
Reserve two quantity of [CRANE#3] on [ORD-1058] from 30 - May - 2017 to 10 - June - 2017.
-
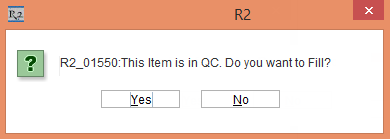
On 30 - May - 2017 open the Prep Task of [ORD-1058] and scan [CRANEASSETT#3] which is in QC Status to fill it. The system displays the message, “This Item is in QC. Do you want to Fill?”, as shown in the Figure 2.3.

-
Select Yes option to fill and provide authorized Employee’s credentials to Fill.
-
Select No option to ignore the scan.
-
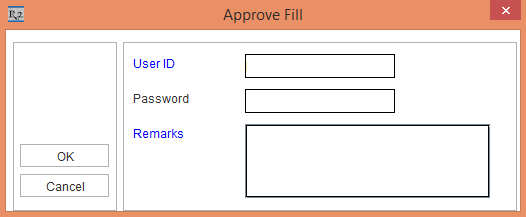
Click the Yes button. The system displays the Approve Fill dialog and Employee who is eligible to Fill QC Asset enters his or her credentials with Remarks, as shown in the Figure 2.4.
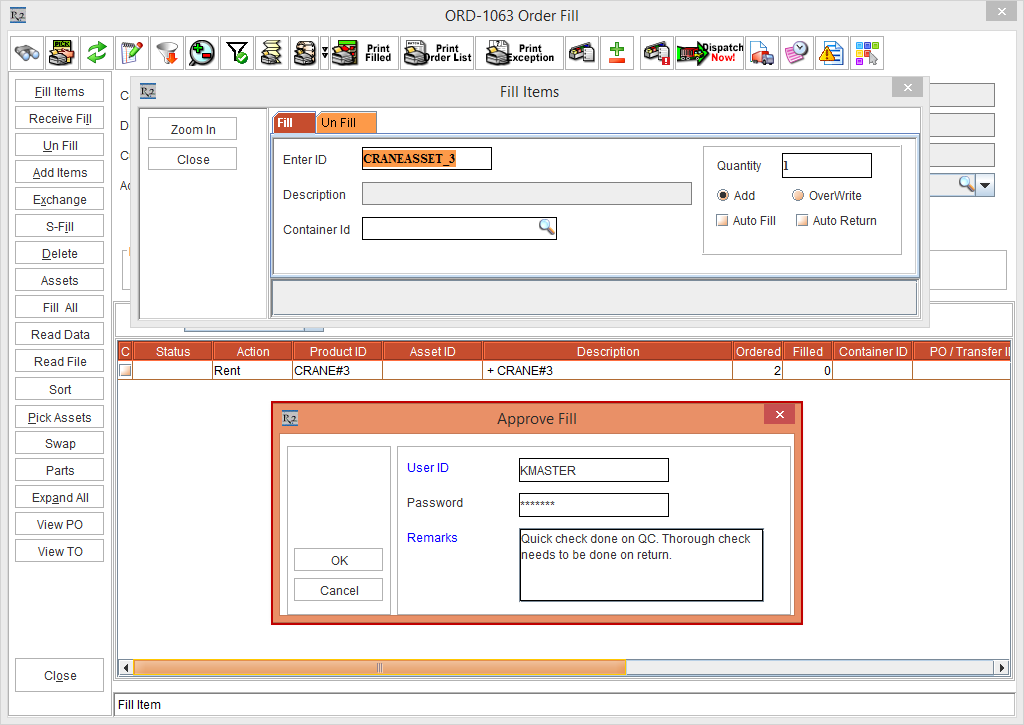
When Close button is clicked, the system does not perform any operation in the Approve Fill dialog until the User ID, Password and Remarks are entered.
-
Click the OK button. The Asset [CRANEASSETT#3] is filled on the Order [ORD-1058] > dispatch it.
-
Log in as Employee [JAMES], who is eligible for dispatching QC Assets.
-
Open Prep Task of [ORD-1058] and scan [CRANEASSET#4] to fill it. The system displays a message, “This Item is in QC. Do you want to Fill?”.
-
Click the Yes button. The system displays the Remarks dialog. This is, as shown in the Figure 2.5.
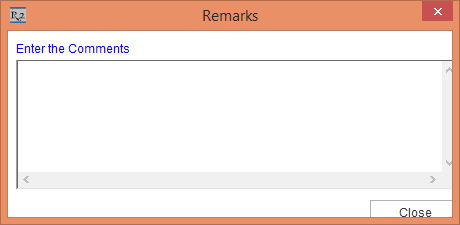
-
Enter the remarks and close the dialog. The Remarks entered can be seen in the Asset Usage History.
Return the Asset [CRANEASSETT#3] and [CRANEASSET#4] on 10 - June - 2017. The system displays the message, “Asset is due for Service. Do you want to mark it as QC/Needs Service as per its Maintenance Setup?” , as shown in Figure 2.6.
-
Click the Yes button to mark the Assets [CRANEASSET#3] and [CRANEASSET#4] as QC.
If you choose Skip Service button, the system will skip current Service Due and consider it for next Service Due only. The Skip Service button can be secured to avoid skipping current Service Due. And, if you choose Suspend button, the system will suspend the Service for that Warehouse operation and return the Asset.
-
Create and complete the Service Ticket either by Quick Service Ticket or Normal Service Ticket to bring the Assets to IN Status.
When Returning an Order, the user is prompted if the Asset has an expiring PAT Test Effective Date within the next ‘x’ days
When an Asset's Expiring PAT Effective Date is within next 'x' days, the user is notified by a prompt while returning the Asset in the Order.
The following sample workflow will displays how the prompt is displayed for an Asset's expiring PAT Effective Date.
Sample Workflow
-
Select the Configuration module > the Warehouse tab > select the check-boxes Validate QC/Service on Return and Validate QC/Service on Fill. This is, as shown in Figure 3.0. Save and exit Configuration module.

-
Select the Maintenance module > Employee tab > Site > select the Site [SANFRANCISCO]. Enter 10 in the Show Warning On Return If QC/Service Is Required In Next Days field. This is as show in the Figure 3.1.

-
Create a Serial Item [TOWERCRANE].
-
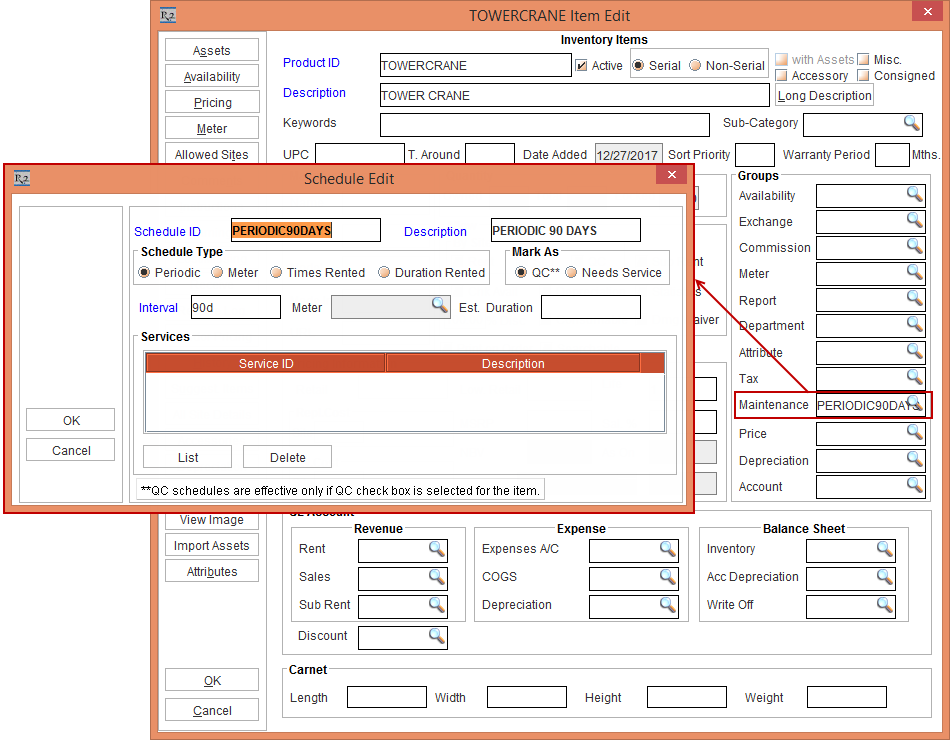
Tag Maintenance Group [PERIODIC90DAYS] with Maintenance Schedule Periodic 90Days to Item [TOWERCRANE] , as shown in the Figure 3.2.
-
Receive Asset [TOWERCRANE#1] for [CRANE#5] on 01 - March - 2017 in Site [SANFRANCISCO]. Based on Maintenance setup the Asset is on QC on 30 - May - 2017.
-
Create a Rental Reservation Order [ORD-1064]from 01 - May - 2017 to 20 - May - 2017.
-
Add the Item [TOWERCRANE] with Qty as 1.
-
On 01 - May - 2017, open the Prep Task of [ORD-1064] and scan [TOWERCRANE#1] and fill it. It gets filled successfully. Now, dispatch the Asset filled.
-
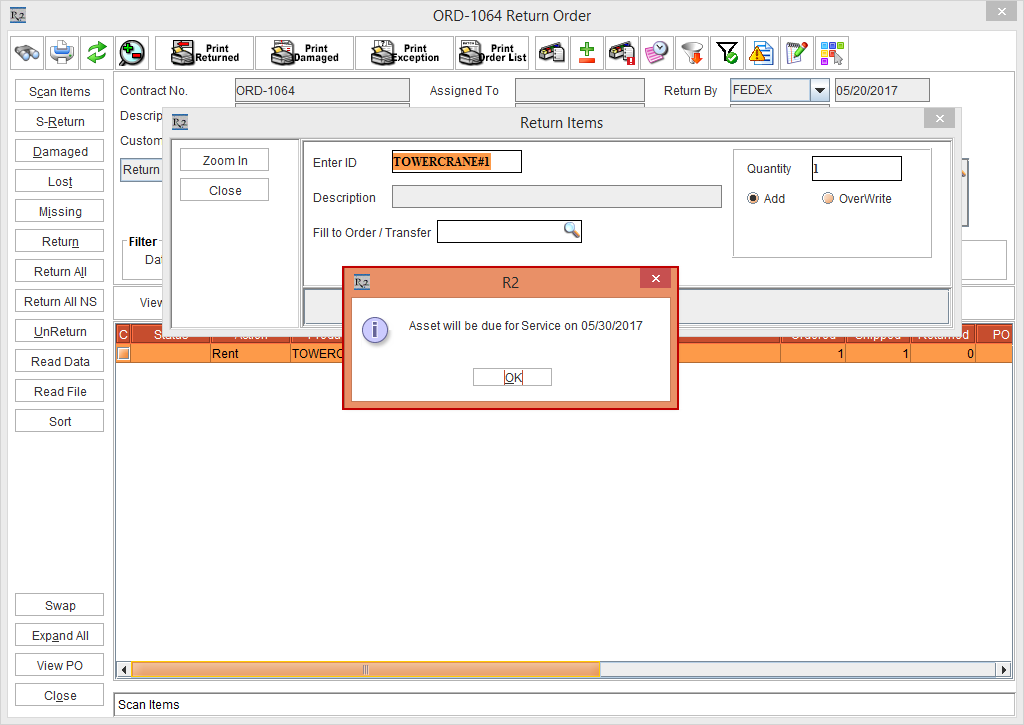
On 20 - May - 2017 which is the Return Date of the Order, open the Return Task of the Order [ORD-1064] and scan [TOWERCRANE#1] to return. Since the Asset [TOWERCRANE#1] needs a service in next 9 days based on its Maintenance settings of the Site [SANFRANCISCO] and the field Show Warning on Return if QC/Service is required in next __ days is set as 10 Days, the system displays the alert message as “Asset will be due for Service on 30th May 2017.” This is, as shown in the Figure 3.3.
-
Click the OK button.
-
The Asset [TOWERCRANE#1] will be returned on Order and its Status will be IN.
-
The Asset [TOWERCRANE#1] will be marked as QC when Generate Needs Service action is performed on 30 - May - 2017 or later or when user tries to fill it on Order.
Support for Being Able to Transfer Assets That Has an Expired PAT Test Effective Period from One Site to Another
While transferring Assets from Site to Site that have an expired PAT Test effective period, the system does not stop any user from being able to do so.
This is explained in the sample workflow below:
Sample Workflow
-
Create an Item [LOADERCRANE] and tag Maintenance Group for Periodic 90 Days.
-
Receive Assets [LOADERCRANE#1] and [LOADERCRANE#2] for [LOADERCRANE] on 1 - March - 2017. Based on Maintenance setup the asset should be on QC on 30 - May - 2017.
-
Select the Configuration module > General tab > click the Authorize Action Setup button. The Authorize Action Setup window is displayed. Select the Employee [MANTRA] in the Authorize Employees To Fill Qc Assets on Order Action > click the OK button.

-
Select the Configuration module > the Warehouse tab > select the check-boxes Validate QC/Service on Return and Validate QC/Service on Fill. This is, as shown in Figure 4.1. Save and exit Configuration module.
-
Select the Maintenance module > Employee tab > Site > select the Site [SANFRANCISCO]. Enter 10 in the Show Warning On Return If QC/Service Is Required In Next Days field. This is as show in the Figure 4.2. Similarly, set it as 10 for the Site [NEWYORK].
-
Create a Serial Item [LOADERCRANE].
-
Tag Maintenance Group [PERIODIC90DAYS] with Maintenance Schedule Periodic 90Days to Item [LOADERCRANE] as shown in the Figure 4.3.
-
Receive Asset [LOADERCRANE#1] and [LOADERCRANE#2] for [LOADERCRANE] on 01 - March - 2017 in Site [SANFRANCISCO]. Based on Maintenance setup the Asset is on QC on 30 - May - 2017.
-
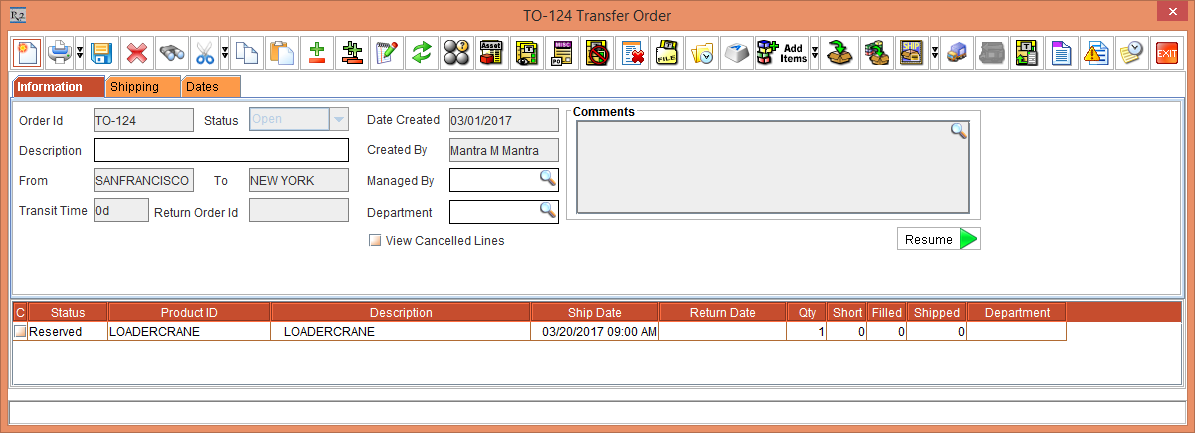
Create a Transfer Order [TO-124] from [SANFRANCISCO] to [NEWYORK] with Prep, Ship and Receive dates as 20 - May - 2017.
-
Receive 1 Qty of the Item [LOADERCRANE]. This is, as shown in the Figure 4.4.
-
On the 20 - May - 2017, open the Prep Task of [TO-124] and scan [LOADERCRANE#1] and fill it. It gets filled successfully > now, dispatch the Asset [LOADERCRANE#1] and receive it to [NEWYORK]. It will be received successfully to [NEWYORK] as IN status successfully.
-
On the 30 - May - 2017, select the Service module > click Generate Needs Service button. The Assets [LOADERCRANE#1] and [LOADERCRANE#2]'s Status will be QC according to the Maintenance settings.
-
On 31 - May - 2017, create a Transfer Order [TO-125] from [SANFRANCISCO] to [NEWYORK] with Prep, Ship and Receive dates as 31 - May - 2017.
-
On 31 - May - 2017, open the Prep Task of [TO-125] and scan [LOADERCRANE#2] to fill it. The system fills the Asset [LOADERCRANE#2] on Transfer Order even though when it is in QC Status.
-
Dispatch the filled [LOADERCRANE#2] on [TO-125] and receive it to [NEWYORK]. It will be received to [NEWYORK] as IN status. The system displays the message, “Asset is due for Service. Do you want to mark it as QC/Needs Service as per its Maintenance Setup?”, click the Yes button.
-
Create an Order [ORDER#8] in [NEWYORK] and reserve [LOADERCRANE] from 01 - June - 2017 to 10 - June - 2017.
-
Open the Prep Task of [ORDER#8] on 01 - June - 2017 and scan [LOADERCRANE#2] to fill it. The system displays the message, “Asset is due for Service. Do you want to mark it as QC/Needs Service as per its Maintenance Setup?”, as shown in the Figure 4.5.

-
Click the Yes button.
-
The Asset [LOADERCRANE#2] will be marked as QC.
-
Create and complete the Service Ticket of Asset [LOADERCRANE#2] either by Quick Service Ticket or Normal Service Ticket to bring the Asset to IN Status.
Fill the Asset in Transfer Order Having the Drop ship and Auto Ship / Receive Options Selected
The following sample workflow displays Asset being filled in the Transfer Order.
Sample Workflow 1 - Fill the Asset in Transfer Order Having the Drop ship and Auto Ship / Receive Options Selected:
Prerequisites:
-
Select the Configuration module > General tab > click the Authorize Action Setup button. The Authorize Action Setup window is displayed. Select the Employee [MANTRA] in the Authorize Employees To Fill Qc Assets on Order Action > click the OK button.
-
Select the Warehouse tab > select the check-boxes Validate QC/Service on Return and Validate QC/Service on Fill. This is as shown in Figure 4.7. Save and exit Configuration module.

-
Login R2 in the Site [NEWYORK].
-
Create an Item [CRANE#1] and receive 10 Qty.
-
Tag the Maintenance Group [PERIODIC90DAYS] with Maintenance Schedule Periodic 90Days to Item [CRANE#1].
-
Receive Asset [CRANEASSET##1] for [CRANE#1] on 1 - March - 2017. Based on Maintenance setup the Asset will be on QC on 30 - May - 2017.
-
Mark the Asset [CRANEASSET#9], [CRANEASSET#10] as QC.
Steps
-
Login to R2 from Site [SANFRANCISCO].
-
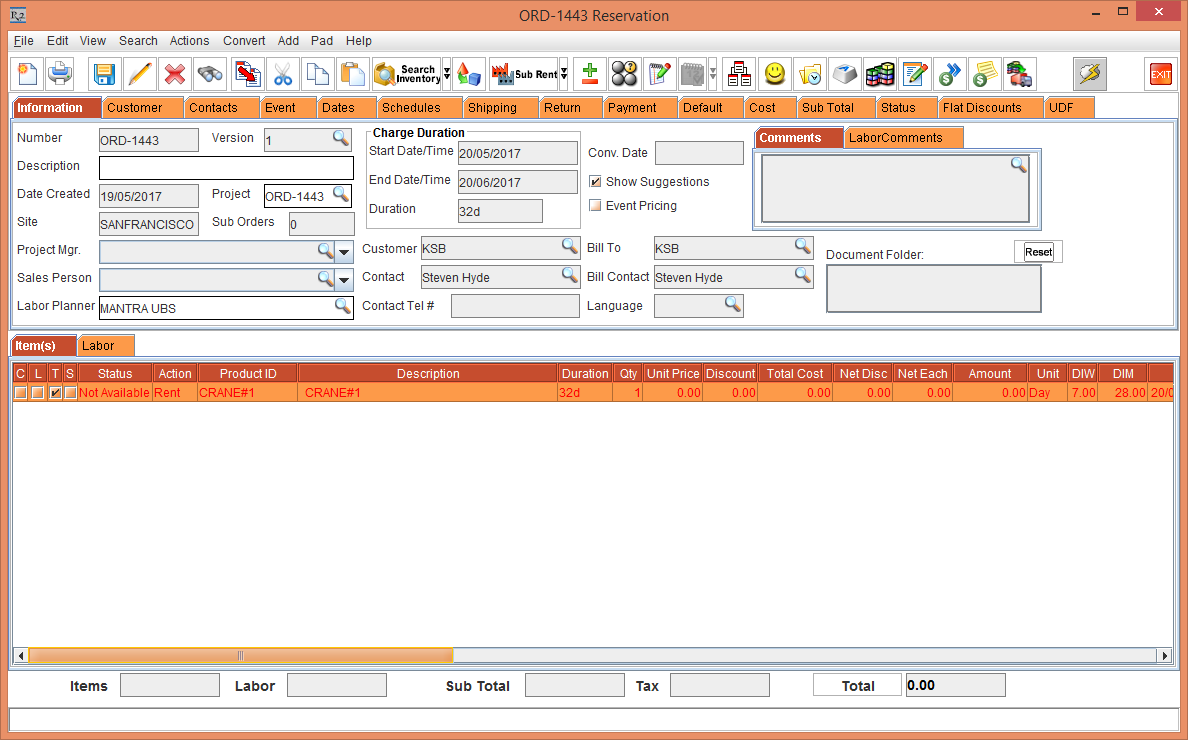
Create a Rental Reservation Order [ORD-1443] from 20 - May - 2017 to 20 - June - 2017.
-
Add the Item [CRANE#1] in [ORDER#1]. It will be Not Available. This is, as shown in the Figure 4.8.

-
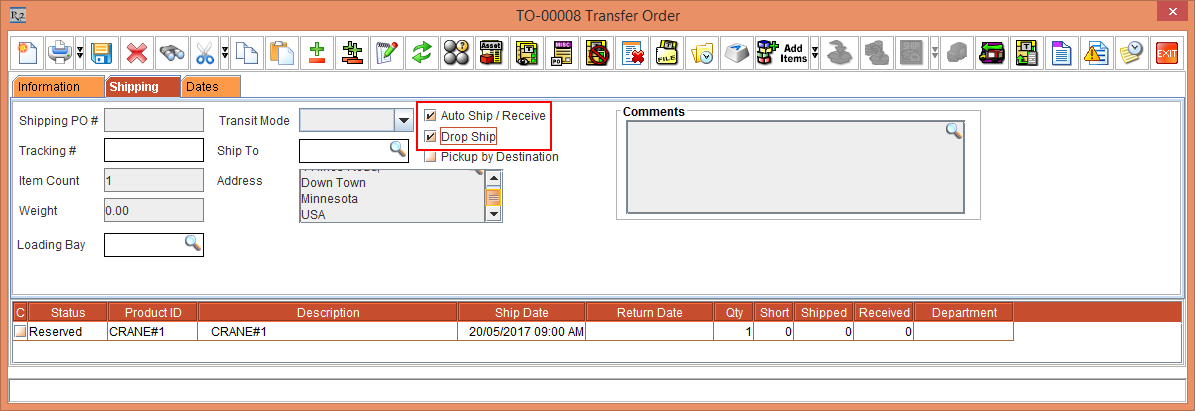
Right click the Item [CRANE#1] > Assign > Transfer In > User Assign > Create new Transfer Order [TO-00008]. In the Transfer Order [TO-00008] > Shipping tab > select the Auto Ship / Receive and Drop Ship check-boxes. This is, as shown in the Figure 4.9.
-
On 20 - May - 2017 open the Transfer Order [TO-00008] in the Site [NEWYORK]. Fill the Asset [CRANEASSET##1]. The system displays a message as, “R2_015154:CRANEASSET##1 Asset’s next Service Due is on 30/05/2017 and this falls before the Return Date. Do you want to continue filling?”. This is shown in the Figure 4.10.
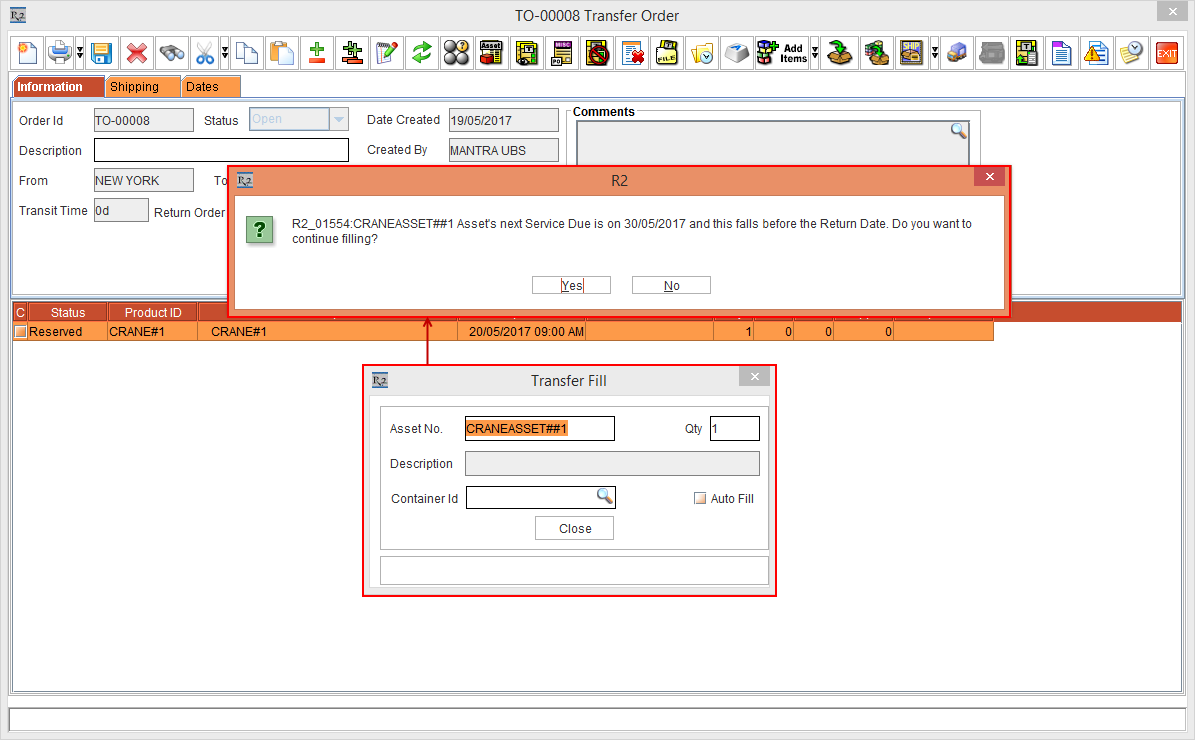
If you choose Yes button, the Asset is filled.
If you choose No button, filling will be skipped. The No button can be secured, if this action is not preferred to be chosen.
-
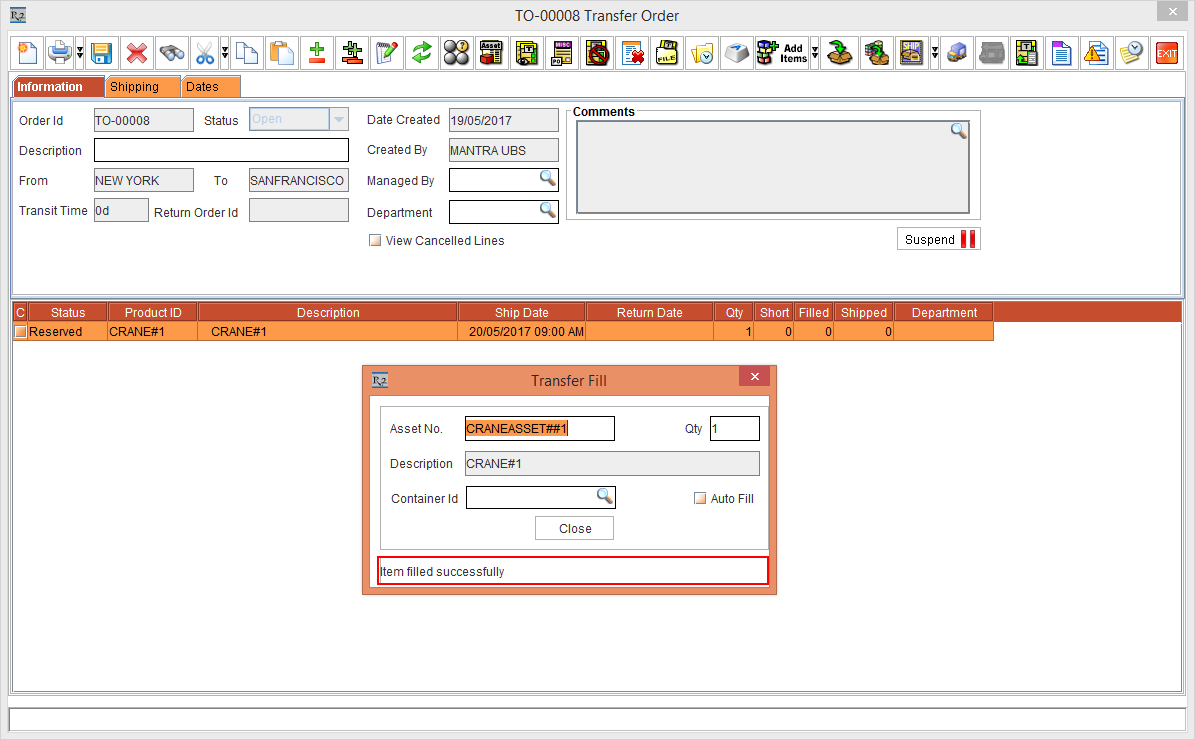
Click the Yes button. The Asset is filled. This is shown in the Figure 4.11.
Sample Workflow 2 - Fill the Asset in Transfer Order Having the Drop ship and Auto Ship / Receive Options Selected:
-
Create an Item [HEAVYDUTYCRANE] and receive some stock
-
Receive Asset [HEAVYDUTYCRANE#1] for [HEAVYDUTYCRANE] on 1 - March - 2017. Based on Maintenance setup the asset should be on QC on 30 - May - 2017.
-
Login to R2 from the Site [SANFRANCISCO].
-
Create a Rental Reservation Order [ORD-1445] from 20 - May - 2017 to 20 - June - 2017.
-
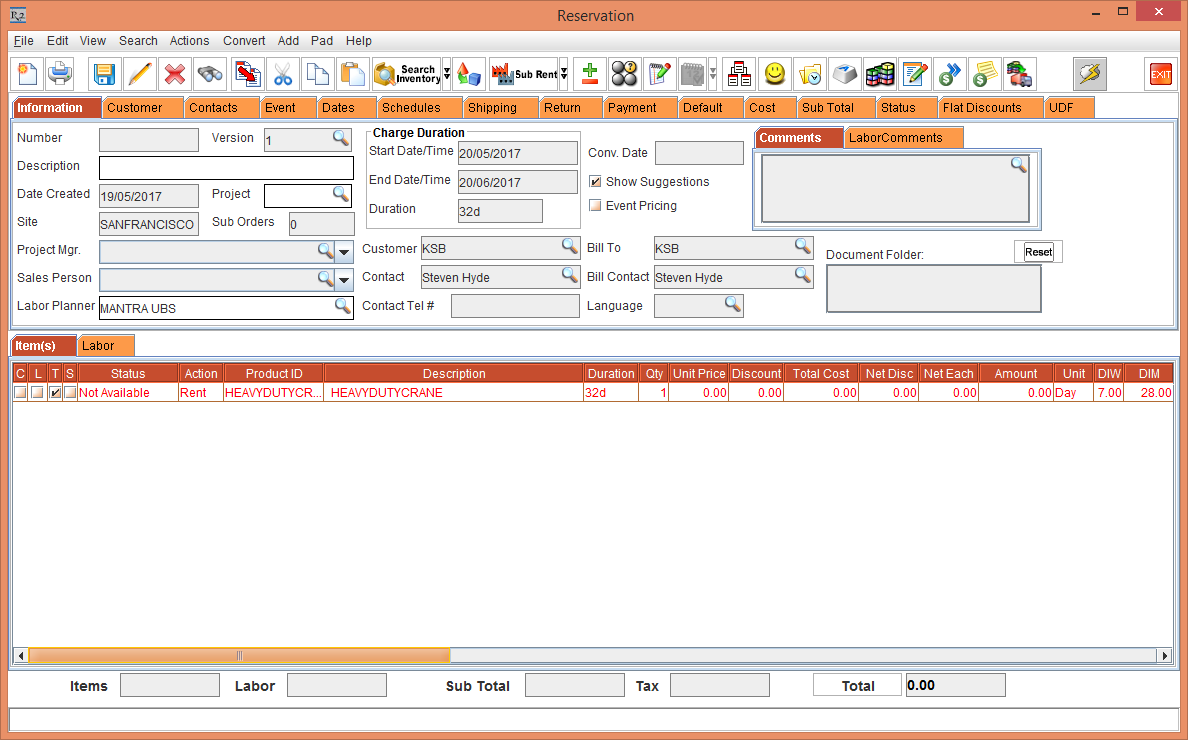
Add the Item [HEAVYDUTYCRANE] to the Order [ORD-1445]. It will be Not Available. This is shown in the Figure 4.12.
-
Right click the Item [HEAVYDUTYCRANE] > Assign > Transfer In > User Assign > Create new Transfer Order [TO-00010]. In the Transfer Order [TO-00010] > Shipping tab > select the Auto Ship / Receive and Drop Ship check-boxes.
-
In the Site [NEWYORK], on 20 - May - 2017 open the Transfer Order [TO-00010] and scan the Asset [HEAVYDUTYCRANE_1] to fill it. The system displays the message as, “Asset is due for Service. Do you want to mark it as QC/Needs Service as per its Maintenance Setup?”. This is, as shown in the Figure 4.13.
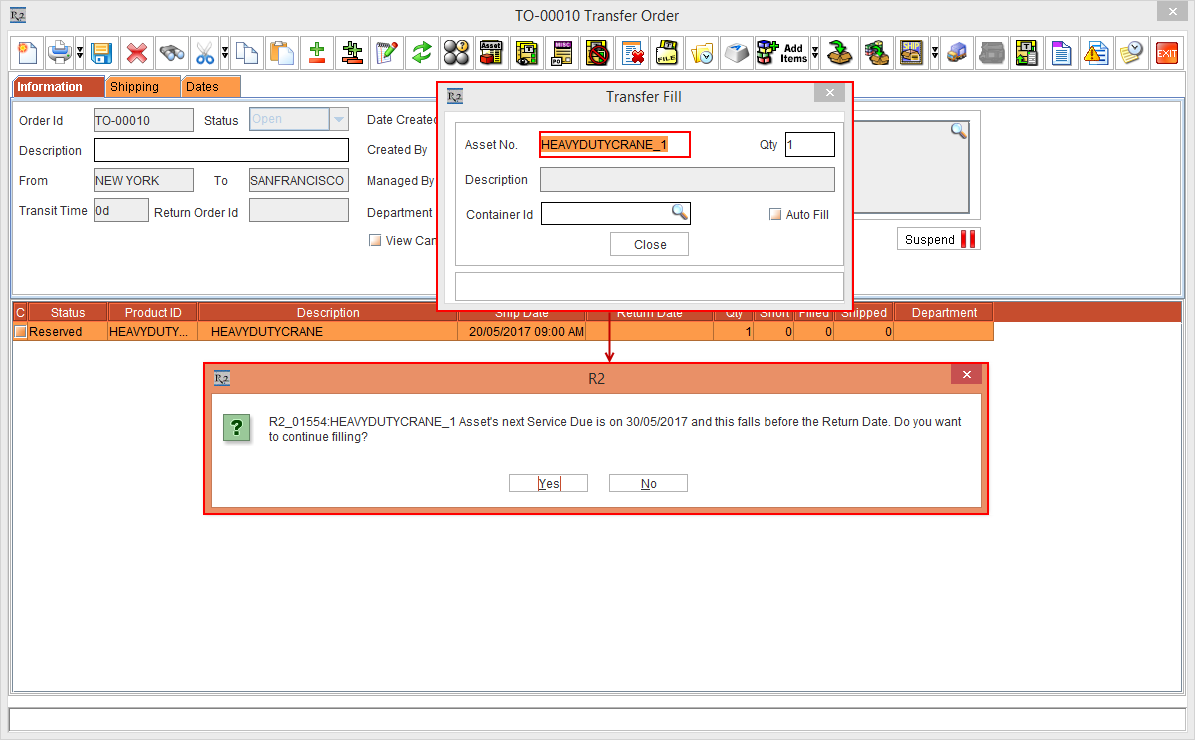
If you choose No, the system not fill the Asset.
-
In this workflow click the Yes button.
The Item is filled successfully, as shown in the Figure 4.14.
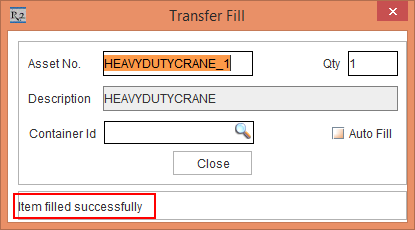
The Asset [HEAVYDUTYCRANE_1] status will be marked as Filled.
The following sample workflows 3 and 4 describe about the Scenarios for filling a QC Item
Scenario for filling the Asset by a un-authorized Employee for filling QC Item is as follows:
Sample Workflow 3
-
Login with [MANTRA].
-
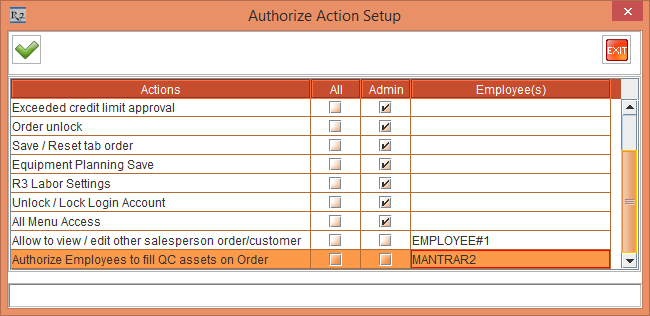
Select the Configuration module > General tab > click the Authorize Action Setup button. The Authorize Action Setup window is displayed. Select the Employee [MANTRAR2] in the Authorize Employees To Fill Qc Assets on Order Action > click the OK button.
-
Create an Item [CARRYDECKCRANE] in [SANFRANCISCO].
-
Receive Asset [CARRYDECKCRANE#1] for [CARRYDECKCRANE] on 1 - March - 2017. Based on Maintenance setup the asset should be on QC on 29 - May - 2017.
-
Login to R2 as [KMASTER] (un-authorised Employee) from the Site [SANFRANCISCO].
-
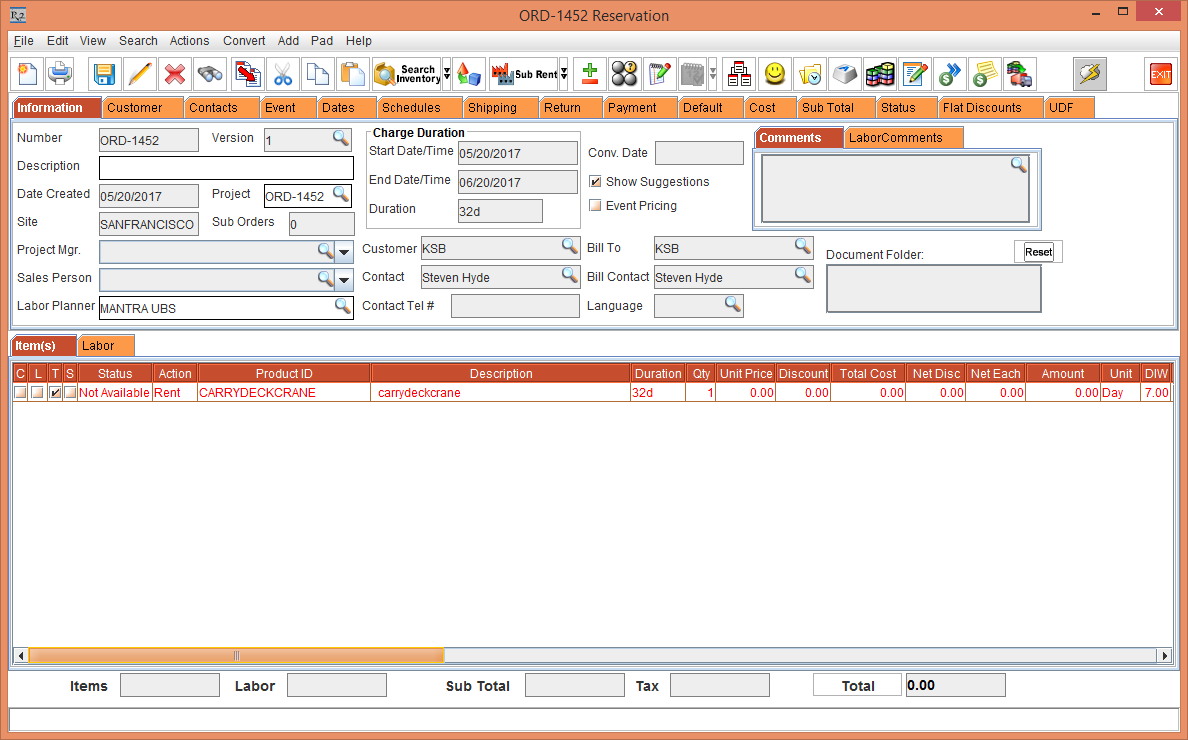
Create a Rental Reservation Order [ORD-1452] from 20 - May - 2017 to 20 - June - 2017.
-
Add the Item [CARRYDECKCRANE] to the Order [ORD-1452]. It will be Not Available. This is, as shown in the Figure 4.16.
-
Right click the Item [CARRYDECKCRANE] > Assign > Transfer In > User Assign > Create new Transfer Order [TO-00012]. In the Transfer Order [TO-00012] > Shipping tab > select the Auto Ship / Receive and Drop Ship check-boxes.
-
Open the Transfer Order [TO-00011] in Site [NEWYORK] and scan the Asset [CARRYDECKCRANE_01]. The system displays the message with user ID, Password and Remarks since [EMP#1] is not authorized for filling QC Item. This is, as shown in the Figure 4.17.
When Close button is clicked, the system does not perform any operation in the Approve Fill dialog until the User ID, Password and Remarks are entered.
-
Enter the valid User Id, Password that is tagged in Configuration (that is for, [MANTRA]) and enter the Remarks - the Item gets filled.
Sample Workflow 4
Scenario for filling the Asset by an authorized Employee for filling QC Item is as follows:
-
Select the Configuration module > General tab > click the Authorize Action Setup button. The Authorize Action Setup window is displayed. Select the Employee [KMASTER] in the Authorize Employees To Fill Qc Assets on Order Action > click the OK button. This is, as shown in Figure 4.18.
-
Login to R2 as [KMASTER] from the Site [SANFRANCISCO].
-
Create a Rental Reservation Order [ORD-1443] from 20 - May - 2017 to 20 - June - 2017.
-
Add the Item [CRANE#1] to the Order [ORDER#1]. It will be Not Available, as shown in Figure 4.19.

-
Right click the Item [CRANE#1] > Assign > Transfer In > User Assign > Create new Transfer Order [TRANSFERORDER#1]. In the Transfer Order [TRANSFERORDER#1] > Shipping tab > select the Auto Ship / Receive and Drop Ship check-boxes.
-
Open the Transfer Order [TRANSFERORDER#1] in the Site [NEWYORK] and scan the asset [CRANEASSET#9]. The system displays the Remarks dialog as in Figure 4.20.

-
Enter the Remarks > the Item is filled.
If the Drop Ship check-box has been selected and Item line is linked to the Order - only Validation happens.
Fill the Asset in Transfer Order Having the Drop ship and Auto Ship / Receive Options Not Selected
The following sample workflow will describe how the Asset is filled in the Transfer Order having Drop Ship and Auto Ship / Receive options not being selected.
Prerequisites:
-
Select the Warehouse tab > select the check-boxes Validate QC/Service on Return and Validate QC/Service on Fill. Save and exit Configuration module.
-
Launch the Application with Site [NEWYORK].
-
Create an Item [CRANE#1] and receive 10 Qty.
-
Tag the Maintenance Group [PERIODIC90DAYS] with Maintenance Schedule Periodic 90Days to Item [CRANE#1].
-
Receive Asset [CRANEASSET#1] for [CRANE#1] on 1 - March - 2017. Based on Maintenance setup the Asset will be on QC on 30 - May - 2017.
-
Mark the Asset [CRANEASSET#9], [CRANEASSET#10] as QC.
Steps
-
Login to R2 with [KMASTER] from the Site [SANFRANCISCO].
-
Create a Rental Reservation Order [ORD-1443] from 20 - May - 2017 to 20 - June - 2017.
-
Add the Item [CRANE#1] in the Order [ORD-1443]. It will be Not Available. This is shown in Figure 4.21.

-
Right click the Item [CRANE#1] > Assign > Transfer In > User Assign > Create new Transfer Order [TRANSFERORDER#1]. In the Transfer Order [TRANSFERORDER#1] > Shipping tab > do not select the Auto Ship / Receive and Drop Ship check-boxes.
-
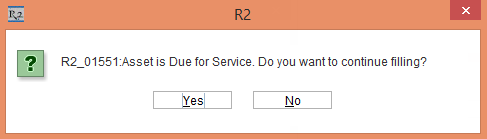
On 29 - May - 2017, open the Transfer Order [TRANSFERORDER#1] in the Site [NEWYORK] > Scan Fill the Asset [CRANEASSET#1] to fill it. The system displays the message, "Asset is Due for Service. Do you want to continue filling?”. If you click the No button, no operation is performed. This is, as shown in the Figure 4.22.
-
Click the Yes button. The Item is filled.
The behavior will be same even in case of independent Transfer Order (Site to Site) which is not linked to Order also.
The Scenario for filling a QC Item
Steps
-
Login to R2 from the Site [SANFRANCISCO].
-
Create a Rental Reservation Order [ORDER#1] from 20 - May - 2017 to 20 - June - 2017.
-
Add the Item [CRANE#1] in the Order [ORDER#1]. It will be Not Available. This is, as shown in the Figure 4.23.
-
Right click the Item [CRANE#1] > Assign > Transfer In > User Assign > Create new Transfer Order [TRANSFERORDER#1]. In the Transfer Order [TRANSFERORDER#1] > Shipping tab > do not select the Auto Ship / Receive and Drop Ship check-boxes.
-
Open the Transfer Order [TRANSFERORDER#1] in the Site [NEWYORK] and scan the Asset [CRANEASSET#9]. The system displays a message, "This Item is in QC. Do you want to continue filling?”. If you select the No button, no operation is performed. This is, as shown in the Figure 4.24.
-
Click the Yes button. The Item is filled.
-
When the Drop Ship option is selected and the line which is going to get filled is linked to the Order, then the PAT Validation happens.
-
When the Drop Ship option is not selected or the line which is going to get filled is not linked to the Order, then the PAT Validation will happen but the prompts will be displayed whether to continue to Fill the Item or not.
-
In Transfer order where Dropship option is not been selected, whether linked to Order or not , the Employee Authorization prompt for filling the QC Asset will not be displayed; even if he is not authorized to fill QC Asset
Automate the process of recoding a positive PAT Test from the ‘PAT Test Results Table’ to the R2 system
Support has been given to automate the process of re-coding a positive PAT Test from the PAT Test Results Table to the R2 system.
An equipment moves in and out of the Warehouse frequently, with clients present. Thus, the automation of positive PAT Test results needs to be synchronized with R2 as frequently as possible. There is a PAT Test Results Table that records the following:
-
PREUF_ID (Primary Key)
-
ARTICLE_ID (SKU)
-
DEVICE_ID (Serial IID)
-
BARCODE (Serial ID)
-
CHECKDATE (Date/Time of PAT Test Entry)
-
VALIDATION (-1 = passed test / 0 = failed test)
-
TESTER_ID (testing machine ID)
-
PRUEFER (employee name, but not from R2 database)
Setting File R2PATIntegrate.ini
A file named R2PATIntegrate.ini is to be created in the R2's installation folder, Mantra. This file will be having the following parameters as displayed in the Table 5.0:
Table 5.0 Parameters in R2PATIntegrate.ini
|
Parameter Name |
Sample Parameter Value |
Remarks |
|
CreateQuickServiceTicketPath |
U:\PATTestResultsImporttoR2\PATQuickService.CSV |
This is the path of the file which is exported from PAT Test Database with details of the PAT Test results to be imported to R2. This parameter will be used by the R2 program to create Quick Service Ticket for all the passed PAT Tests. |
|
IntegrationEmployeeID |
Mantra |
This is the ID of the Employee who performs the PAT Testing to R2 integration. |
The sample R2PATIntegrate.ini file is displayed in the Figure 5.0.

CreatePATService for Passed PAT Tests in R2 Automatically
-
The program CreatePATService can be executed either from the Command Prompt or a Batch file. It can be scheduled to be run at regular intervals using Windows Task Scheduler.
-
The integration gets performed by Employee mentioned in the IntegrationEmployeeID parameter. If this is not mentioned in the R2PATIntegrate.ini file, the integration is performed by the default Employee named Mantra M Mantra.
Format of the R2PATIntegrate.ini file to be imported to R2
-
CSV-Format with separator as Semicolon (;).
-
In text fields the semicolon needs be replaced with a Comma (,).
-
The last field of any row should be completed with a Semicolon (;).
Executing CreatePATService Program
The CreatePATService program can be used to create Quick Service Tickets for passed PAT Tests in R2.
There are two ways in which the CreatePATService program can be performed. They are as following:
-
Executing from Command Prompt
-
Scheduling the program using the Windows Task Scheduler
Executing from Command Prompt
Access the command prompt and direct it to the directory to where R2 is installed. Then type in the following command:
“<path where Java is installed>\bin\java.exe” CreatePATService
The program can be executed in one of the following ways:
-
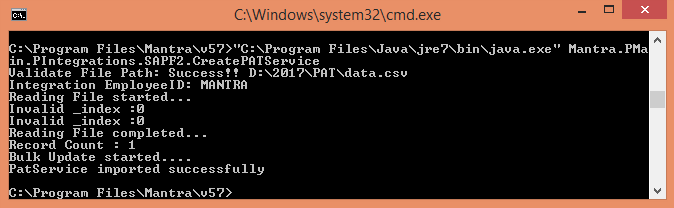
"C:\Program Files\Java\jre7\bin\java.exe" Mantra.PMain.PIntegrations.SAPF2.CreatePATService
The system creates the Quick Service Ticket for passed PAT results in R2 by fetching the integration file from the path set for CreateQuickServiceTicketPath parameter (which is the default parameter for this program) in R2PATIntegrate.ini file. This is, as shown in the Figure 5.1.

The Pat Service Import Success message is displayed in the Command Prompt as displayed in the Figure 5.2.1.
-
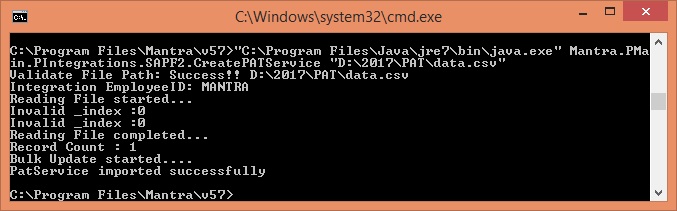
"C:\Program Files\Java\jre7\bin\java.exe" Mantra.PMain.PIntegrations.SAPF2.CreatePATService "D:\2017\PAT\data.csv"
The system creates the Quick Service Ticket for passed PAT results in R2 by fetching the integration file from the path provided. This is, as shown in the Figure 5.2.

The Pat Service Import Success message is displayed in the Command Prompt as displayed in the Figure 5.2.1.
Scheduling the program using the Windows Task Scheduler
The steps for scheduling the periodic execution of the CreatePATServiceprogram using Windows Task Scheduler are:
-
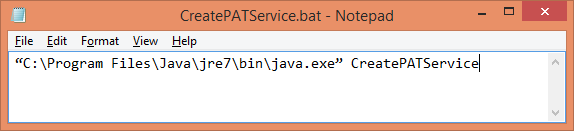
Create a Batch file with the program CreatePATService and provide appropriate parameters. The various ways of providing the program within the Batch file are:
-
“C:\Program Files\Java\jre7\bin\java.exe” CreatePATService
The system creates the Quick Service Ticket for passed PAT results in R2 by fetching the integration file from the path set for CreatePATService parameter (which is the default parameter for this program) in R2PATIntegrate.ini file. This is as shown in the Figure 5.3.
-
“C:\Program Files\Java\jre7\bin\java.exe” CreatePATService “U:\PATTestResultsImporttoR2\PATQuickService.CSV”
The system creates the Quick Service Ticket for passed PAT results in R2 by fetching the integration file from the path provided. This is, as shown in the Figure 5.4.

-
Using the Windows Task Scheduler setup a Windows Task. Set the interval to run the task as once every 2 minutes. That is, it will execute the CreatePATService program. The system accesses the integration file from the path provided and creates the Quick Service Ticket for passed PAT results in R2 once every 2 minutes.
Sample Workflow
-
Create a serial Item [CRANE#1] and [CRANE#2].
-
Create Maintenance Group [PERIODIC90DAYS] with Maintenance Schedule Periodic90Days.
-
Tag the Maintenance Group [PERIODIC90DAYS] to the Items [CRANE#1] and [CRANE#2]. This is, as shown in the Figure 5.6 and Figure 5.7.


-
Receive the Assets [CRANE#1-1] and [CRANE#1-2] for the Item [CRANE#1] on 01 - March - 2017 in Site [SITE#1] > receive Assets [CRANE#2-1] and [CRANE#2-2] for [CRANE#2] on 10 - March - 2017 in Site [SITE#1]. Based on Maintenance setup the assets [CRANE#1-1] and [CRANE#1-2] will be on QC on 29 - May - 2017. The Assets [CRANE#2-1] and [CRANE#2-2] for [CRANE#2] will be on QC on 08 - June - 2017.
-
On the 30 - May - 2017, select the Service module > Generate Needs Service. The Assets [CRANE#1-1] and [CRANE#1-2]'s Status will be flagged as QC based on Maintenance settings.
-
On 31 - May - 2017, perform the PAT Test for the Assets [CRANE#1-1], [CRANE#1-2] and [CRANE#2-1] on PAT Testing apparatus. The results are recorded as below in the PAT Test Results Table of PAT Tester database.
Table 5.1 PAT Test Results Table
|
PREUF_ID
|
ARTICLE_ID
|
DEVICE_ID
|
BARCODE
|
CHECKDATE
|
VALIDATION
|
TESTER_ID
|
PRUEFER
|
|
145287 |
CRANE#1 |
98955332 |
CRANE#1-1 |
03/27/2017 02:00 PM |
-1 |
PAT1001 |
George Niculescu |
|
145288 |
CRANE#1 |
98955333 |
CRANE#1-2 |
03/27/2017 02:30 PM |
0 |
PAT1001 |
George Niculescu |
|
145289 |
CRANE#2 |
98955334 |
CRANE#2-1 |
03/27/2017 03:00 PM |
-1 |
PAT1002 |
Gerrard Jenner |
-
Export this table data into the PATQuickService.CSV file (.csv) format with Semicolon (;) separator and place the file in the CreateQuickServiceTicketPath configured in R2PATIntegrate.ini file.
-
Execute the CreatePATService procedure to read the PATQuickService.CSV file content placed in CreateQuickServiceTicketPath and create Quick Service Ticket for the passed PAT tests. In this case, system will create Quick Service Ticket for [CRANE#1-1], [CRANE#2-1] as shown below and ignore the failed PAT test entry for [CRANE#1-2].
-
The Status of Asset [CRANE#1-1] will be marked as IN from QC. The system writes the expired Service Schedule ID - PERIODIC90DAYS to the Service History of the Asset [CRANE#1-1] and consider the service as done for the schedule for this period. For the Asset [CRANE#1-2], since there are no expired Service Schedule, it would create the Quick Service Ticket but no Service Schedule will be affected.
Field Mapping - PAT Testing to R2
The field mapping of PAT to R2 is explained in the Table 5.2. Additional in Formation pertaining to this table is provided below.
-
The ASSETID will exist in R2.
-
The ASSETID will not be in Repair status.
-
The log file will be created if there are any errors and warnings while loading the PAT Testing results to R2. The PatTestTransaction table stores all the data which is processed and the PatTestTransHistory Table stores the errors that appear while processing the data.
-
The PAT Test Data provided to R2 through PAT Integration file will be recorded as PAT Integration History.
-
The R2 PAT Integration program will ignore the record with same Primary Key (PREUF_ID), if it has been processed by R2 once.
-
Since no in Formation about the Service Schedule ID of the Asset is provided in the .csv file, the R2 PAT Testing Integration program verifies if there are any Service Schedule expired while creating Quick Service Ticket and if there are any it considers those expired Service Schedules as done for the cycle.
The PAT Testing to R2 Field Mappings are listed in the following Table 5.2.
Table 5.2 PAT Testing to R2 Field Mappings
|
|
From ARRI
|
|
Corresponding R2 Field that will be mapped for an Individual Customer
|
|
|
PAT Field
|
PAT Data Type
|
Description |
||
|
1 |
PREUF_ID |
NUMBER |
Primary Key |
Not mapped to any field of R2, but stored as PAT Testing Integration History in R2 Database. |
|
2 |
ARTICLE_ID |
VARCHAR2(16) |
SKU |
R2 Product ID to which ASSETID belongs to and for which PAT Testing is performed. |
|
3 |
DEVICE_ID |
NUMBER |
Serial IID |
Mapped to R2's Serial IID |
|
4 |
BARCODE |
VARCHAR2(20) |
Serial ID |
R2 ASSET ID for which PAT Testing is performed and for which Quick Service Ticket has to be created in R2 through PAT Testing integration program. If multiple barcodes are on the physical asset, R2 evaluates both Primary Asset ID and Additional Asset ID for the Serial IID to ensure the record can be written to the Asset within R2 |
|
5 |
CHECKDATE |
DATE |
Date/Time of PAT Test Entry |
Date/Time of PAT Test performed on PAT apparatus for ASSET ID. This is mapped to Service Ticket Created Date/Time in R2, Service Ticket Completed Date/Time. |
|
6 |
VALIDATION |
VARCHAR2(20) |
-1 = passed test /
|
Quick Service Ticket will be created in R2 corresponding to that.
|
|
7 |
TESTER_ID |
VARCHAR2(20) |
testing machine ID |
Not mapped to any field of R2, but stored as PAT Testing Integration History in R2 Database. |
|
8 |
PRUEFER |
VARCHAR2(35) |
employee name,
|
Not mapped to any field of R2, but stored as PAT Testing Integration History in R2 Database. |
To understand how PAT Testing worked before, click here.
To know more about Exceptions In PAT Testing, click here.
To know more about Changes in Site Edit window, Approve Fill Dialog and Asset Due For Service Dialog, click here.