Create a Sale Order.
Click SearchInventory button> Items. The SearchItems window is displayed. Search and find the sale order, click on its line to select it.
Click View / Select Lot Number ![]()
Figure 1.5 Accessing View / Select Lot Number Window from Search Items Window
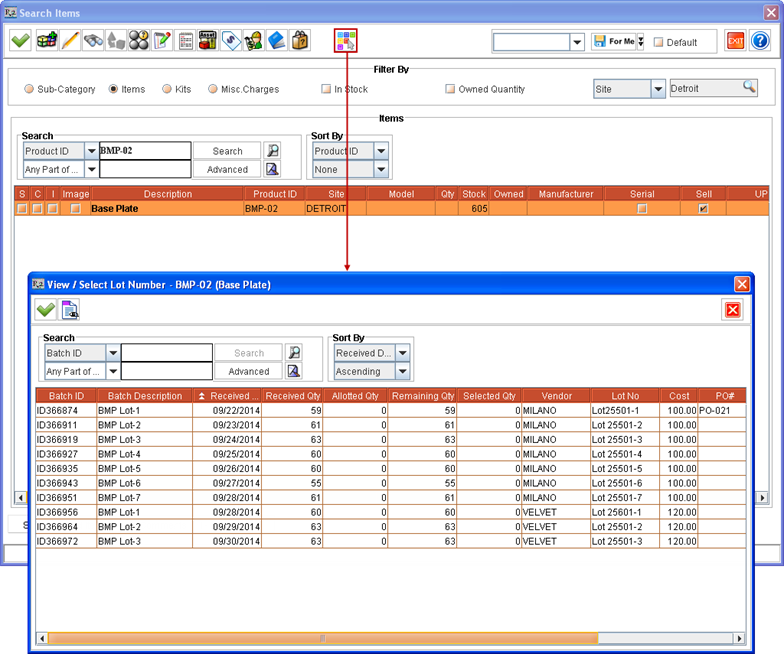
The View / Select Lot Number window is displayed only if the selected Item is a Non-serial Item. On adding Non-serial Items with Lots allotted, they get added to Rental/Sale Order with Action
as Sell. Allotting can also be done from Receive lines listed for the Item without any Lot related information.
If the Lots are allotted to Non-serial Items which are not sellable then, on adding to Order, the allotted quantity of the Item gets added to the Order but without any Lots allotted. The system displays an appropriate message with details in this case.
The Lot can also be selected for an Item without entering any quantity under Qty column in Search Items window. The number of quantity of the Item for which Lot is allotted gets selected as the Item's quantity in Search Items window on exiting View / Select Lot Number window.
The View / Select Lot Number window can also be accessed from Order > Search Inventory window by clicking Select Lot icon. This action displays the View / Select Lot Number window, when the Search Inventory window is accessed from anywhere in the system. However, the Item(s) selection and their Lot allotting works only when Search Inventory window is accessed from within an Order.
While allotting Lot Numbers to Items, the Lots received in Order Site alone are displayed for allotting.
Enter the quantity of Item to be allotted from various Lots of the Item, by entering appropriate values against Lot rows under Qty column. The entered quantity in Qty column can't be more than what is displayed under Remaining Qty column for the same Lot.
When the View / Select Lot Number window is opened from Search Items window after selecting an Item - for allotting Lots of Item before adding them to Order then:
The quantity that can be allotted against one or more Lots listed is limited only by the Lots' Remaining Qty and is not limited by the quantity selected in Search Items window before accessing the View / Select Lot Number window. For example, if 2 quantity of Item [BMP-02] was selected in Search Items window and View / Select Lot Number window is accessed. Then the user can choose to perform Lot allotment in one of the following ways:
The 2 quantities of Item can be allotted from one or more listed Lots.
Partial Allotment - Can allot less than 2 quantities from one or more listed Lots. For example, if Lots are allotted for 1 quantity then the 2 quantities of Item [BMP-01] will get added to Order but only 1 quantity will have Lot allotted.
More Allotment - Can choose to allot more than 2 quantities from one or more Lots. For example, 4 quantities can be allotted. The 4 quantities of Item [BMP-01] will get added to the Order with Lots allotted.
Choose the Item quantity from the listed Lots by entering the appropriate quantity against them under the Qty column, as shown in Figure 1.6.
Figure 1.6 Selecting Lot of Non-serial Sell Item [BMP-02] while adding to Sale Order (from Search Items Window)

Quantity can be allotted from one or more listed Lots in the View / Select Lot Number window by:
Double-clicking on a Lot's line - System allots one quantity from the Lot.
Entering quantity to be allotted against listed Lot's line under Selected Qty column - Entered quantity gets allotted from that Lot. This quantity cannot be more than the quantity remaining to be allotted from the Lot, as listed under Remaining Qty column.
Table 1.7 Details of Columns in View / Select Lot Number Window accessed from Search Items Window
|
Column Name |
Description |
|
Batch ID |
Batch ID of received Lot of Item, as generated by the system on receiving. |
|
Batch Description |
Batch Description of received Batch of Items, as provided by the user. |
|
Received Date |
Date when the Lot of Items is received. |
|
Received Qty. |
Quantity of Item that was received in the Lot. |
|
Allotted Qty. |
Total Quantity of Item that is already allotted from this Lot to different sell lines across one or more Rental or Sale Orders. |
|
Remaining Qty. |
Quantity remaining in this Lot, which can be used for allotting against item quantity which is yet to be allotted to Lots from various sell lines of Orders. |
|
Selected Qty. |
This column can be used to enter a quantity against a listed Lot thereby allotting that much quantity from that Lot to the sell Item line of this Order from where the View / Select Lot Number window is accessed. The quantity entered under this column for a Lot cannot be more than its remaining quantity to be allotted, as displayed under Remaining Qty. column. |
|
Vendor |
Vendor Name assigned while receiving the batch. It is defaulted from the Purchase Order, if Scan Items window is accessed from a Purchase Order. Else it can be chosen in the Scan Items window, if need be. |
|
Lot No. |
The Lot Number of the Lot of Items received in a Batch. |
|
Cost |
Cost of this Lot of Items, as provided while receiving. |
|
PO# |
ID of the Purchase Order in which this Lot is received, if it is received using a Purchase Order. |
|
Expiry Date |
The Expiry Date as set after receiving the Lot of Item in the Scan Items window/Receive Batch window. This is for information purpose only. The system will allow selling an Item even if the Lot in which it is received has crossed its Expiry Date. |
|
Lot Details |
This column displays the extra information about the Lot of Item as entered after receiving it in Scan Items window. |
Click Select ![]()
Click Yes. Items get allotted from selected Lots and the View / Select Lot Number window is closed.
On allotting Lots for an Item (or modifying existing allotment) from View / Select Lot Number and clicking OK icon, system prompts with the message "R2_01338:Adding Items with Lot Numbers allocated will save the Order." with Yes and No options.
Clicking Yes - This saves the Lot allotted to quantities of the Item and will close the View / Select Lot Number window.
If Yes is selected after allotting Lots for an Item then, the system won't prompt this message on allotting Lots for other Items, when View / Select Lot Number window is accessed from same instance of Search Items window.
Clicking No - This closes the message prompt and the View / Select Lot Number window remains open for further modifications in Lot allotment. Clicking OK icon from View / Select Lot Number window again prompts the same message.
Click View / Select Lot Number ![]()
Figure 1.7 Quantity Allotted from Lots by accessing View / Select Lot Number Window from Search Items Window
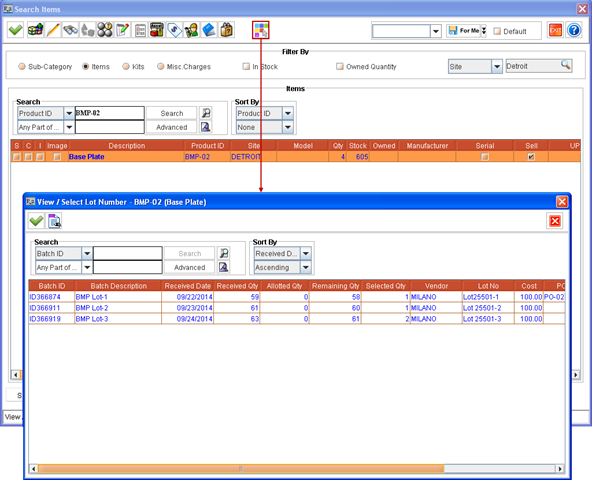
Table 1.8 Details of Quantity Allotted from Lots by accessing View / Select Lot Number Window from Search Items Window
|
Vendor Name |
Batch ID |
Quantity |
Cost |
Allotted Qty |
|
Milano |
ID366874 |
59 |
100$ |
1 |
|
|
ID366911 |
61 |
100$ |
1 |
|
|
ID366919 |
63 |
100$ |
2 |
Click Select ![]()
Lot(s) can be allotted to one Item at a time from View / Select Lot Number window accessed from Search Items window > Select Lot icon.
After finishing Lot allotment for an Item, the View / Select Lot Number window can be accessed again and Lot(s) can be allotted for another Item, selected from same instance of Search Items window.
On clicking Search Items window > Select icon after all Lot allotments for multiple Items The total selected quantity of such Items get added to the Order. If the system is unable to allot Lot(s) for one or more of the Items added to the Order, then the system will prompt a message with details of all Items' IDs whose Lot allotment failed. However such Items selected quantity will get added to the Order without their Lot(s) being allotted. Their Lots can be allotted from View / Select Lot Number window accessed from within the Order (by selecting the added Item line and right-click > View /Select Lot Number command).