Per Diem is fixed amount. It is usually decided/defined for each role/position separately.
Travel expenses are usually at actual. But sometimes it may be a limitation defined for each role/position.
For example: Per Diem for a Jr. Cameraman can 100, but for Asst. Director can be 500.
Similarly, Travel for Jr. Cameraman may allow Non-AC train ticket, while for Asst. Director may allow Economy Class Air ticket.
You can view the following two tabs here.
Travel tab
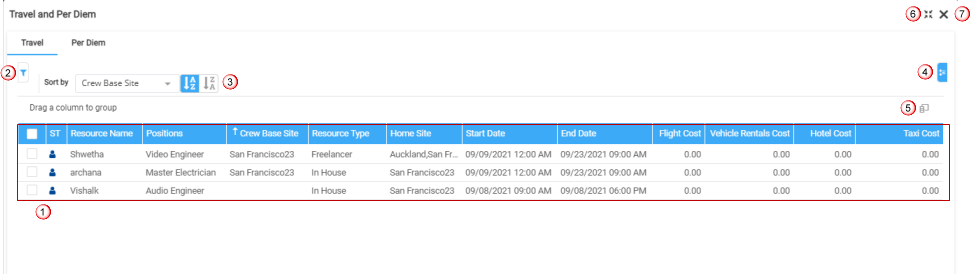
To add Travel Costs to the position, click Travel and Per-Diem in title tool bar.
Travel tab is displayed by default and you may add travel cost for the positions by clicking inside the Travel cost columns (Flight/Vehicle/Hotel/Taxi).
Travel cost may be synced back into R2 for billing
-
Records: Displays the travel records for the booking lines. Want to know more on grids?
-
Filter: To filter the records based on the specific criteria.
-
Sort: To sort the records based on the column name displayed in the grid.
-
Hide sort bar: Hides the sort bar and gives you enough space for displaying the records.
-
Column chooser:
-
Expand: To view the 'Travel and Per Diem' page in full window.
-
Exit: Closes the window
|
Column |
Description |
|
ST (status) |
Booking line status |
|
Positions |
Position added on the Order |
|
Resource name |
Resource assigned to the booking line |
|
Resource type |
Type of the resource assigned to the booking line |
|
Crew Base site |
Resource Base Site |
|
Home site |
Home Site of the resource |
|
Start Date |
Start date of the booking line |
|
End Date |
End date of the booking line |
|
Flight Cost |
Enter the Flight Cost |
|
Vehicle Rentals Cost |
Enter the Vehicle Rental Cost |
|
Hotel Cost |
Enter the Hotel cost |
|
Taxi Cost |
Enter the Taxi cost |
Per Diem
From Travel and Per-Diem window, select the Per-Diem tab to enter Per-Diem details.

-
Records: Displays the Per Diem records for the booking lines. Want to know more on grids?
-
Filter: To filter the records based on the specific criteria.
-
Sort: To sort the records based on the column name displayed in the grid.
-
Hide sort bar: Hides the sort bar and gives you enough space for displaying the records.
-
Column chooser:
-
Per Diem Schedule: To create the per diem schedule. How to create Per Diem schedule?
-
Expand: To view the 'Travel and Per Diem' page in full window.
-
Exit: Closes the window
|
Column |
Description |
|
ST (status) |
Booking line status |
|
Positions |
Position added on the Order |
|
Resource name |
Resource assigned to the booking line |
|
Resource type |
Type of the resource assigned to the booking line |
|
Crew Base site |
Resource Base Site |
|
Home site |
Home Site of the resource |
|
Start Date |
Start date of the booking line |
|
End Date |
End date of the booking line |
|
Per Diem Start Date |
Displays Per Diem Start Date |
|
Per Diem End Date |
Displays Per Diem End Date |
|
Per Diem Schedule |
Indicates if the Per Diem is already created or not. |
|
Rate |
Displays the rate details |
|
Days |
Total number of days |
|
Amount |
Displays the amount based on the rate entered. |
|
Paid Amount |
If the details are entered, then the paid amount will be the sum of amounts exported to pay extract otherwise the amount will be extracted to pay extract. |
Per Diem Cost Setup
Before you begin to schedule the per diem, make sure you set the Per Diem settings.
To do this,
-
Go to Dashboard, click Main menu.
-
Select Configuration and then Per-Diem Management.

-
In Configuration window, click Create button.
-
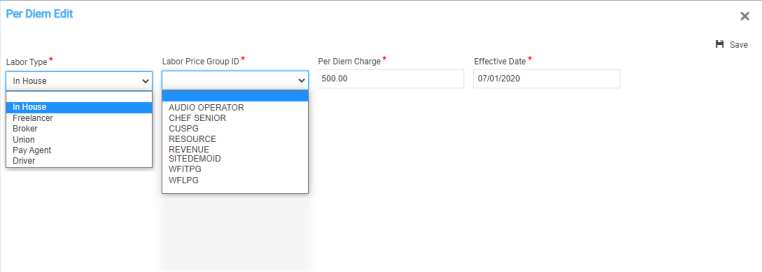
In the 'Per Diem edit' window,
-
you can define per diem charges for specific resource type (In House, Freelancer, Union etc.,). We can also identify if per diem charges differ based on position by using the Labour Price Group.
-
While entering the Per diem charges on the planning order, if the Resource is 'In House' and belongs to 'Chief Senior' group, system automatically pulls the rate from settings, based on the Start date of the Booking line.
-
-
To enter Per Diem scheduling for the Order,
-
Open Planning Order, click the Travel and Per Diem button.
-
Click Per Diem tab.
-
Click Per Diem schedule button.
-

-
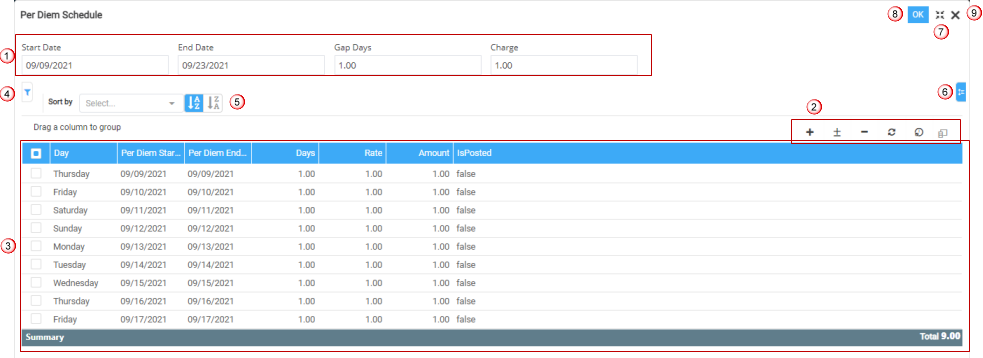
In the 'Per-Diem Scheduling' window, the predefined data displays as shown below.
-
Pre Defined data: The start date, end date, gap days, and charge are automatically populated based on booking line information. However, the line details can be edited by making changes to the following fields and select the Generate icon to accept the changes for the lines.
-
The start and end date for the per-diem
-
The per-diem rate
-
Any gap days where no per-diem is accrued
-
For Example: Start date is on 6th Dec 2018 and End date is 18th Dec 2018. if user key in (Gap in Days) as 7, Period will be 6th Dec 2018 to 12th Dec 2018 – 7 Days. 13th Dec 2018 to 18th Dec 2018 – 6 Days. While adjusting the Gap Days if exceed the End date it will update the End date in the last period.
-
Actions: This helps in generating the records.
-
Add: Create per diem schedule by manually adding the line using '+' button. It adds a new schedule line. Start date will be last Date( Highest End date) + 1 and End date will be Gap Days + Start date.
-
Append Additional lines: Add additional schedule to existing lines with new Start date and End date.
-
Delete: Deletes the line.
-
Re-Generate: Delete all lines in the Per diem schedule and add new lines with the Start date, End date, Gap (Days), and Charge.
-
Re-configure: This updates the New Start Date and New End date without changing the Charge (Amount will be calculated based on the new Dates). If the End Date is more, system adds additional lines with the charge defined from the header. If the End date is less, system removes the lines that are more than the End Date.
-
-
Records: Displays the Per Diem records for each line.
-
Filter: To filter the records based on the specific criteria.
-
Sort by: To sort the records based on the column name displayed in the grid.
-
Hide sort bar: Hides the sort bar and gives you enough space for displaying the records.
-
Expand:To view the window in full screen.
-
OK: Saves the data.
-
Exit: Closes the window