Whenever a Labor Booking Line gets confirmed, the system will automatically create a Purchase Order for it in the backend. And once the Planning Order is saved and refreshed, the Purchase Order' ID will be displayed in the same Booking Line.
Please reach out to our Sales team at sales@unibiz.com to request a demo of this feature or to get this feature enabled.
Sample Workflow
Let us try and do a hands-on. Follow the steps below.
-
Create a Planning Order
-
Add one or more Labor Booking Lines.
-
Assign resource to it.
-
Have the status of Booking Line change to ‘Confirmed’.
-
Either manually change the status of the Booking Line to ‘Confirmed’.
-
Or, have the added resource respond to Confirmation Request through mail or R2 Labor notification.
-
-
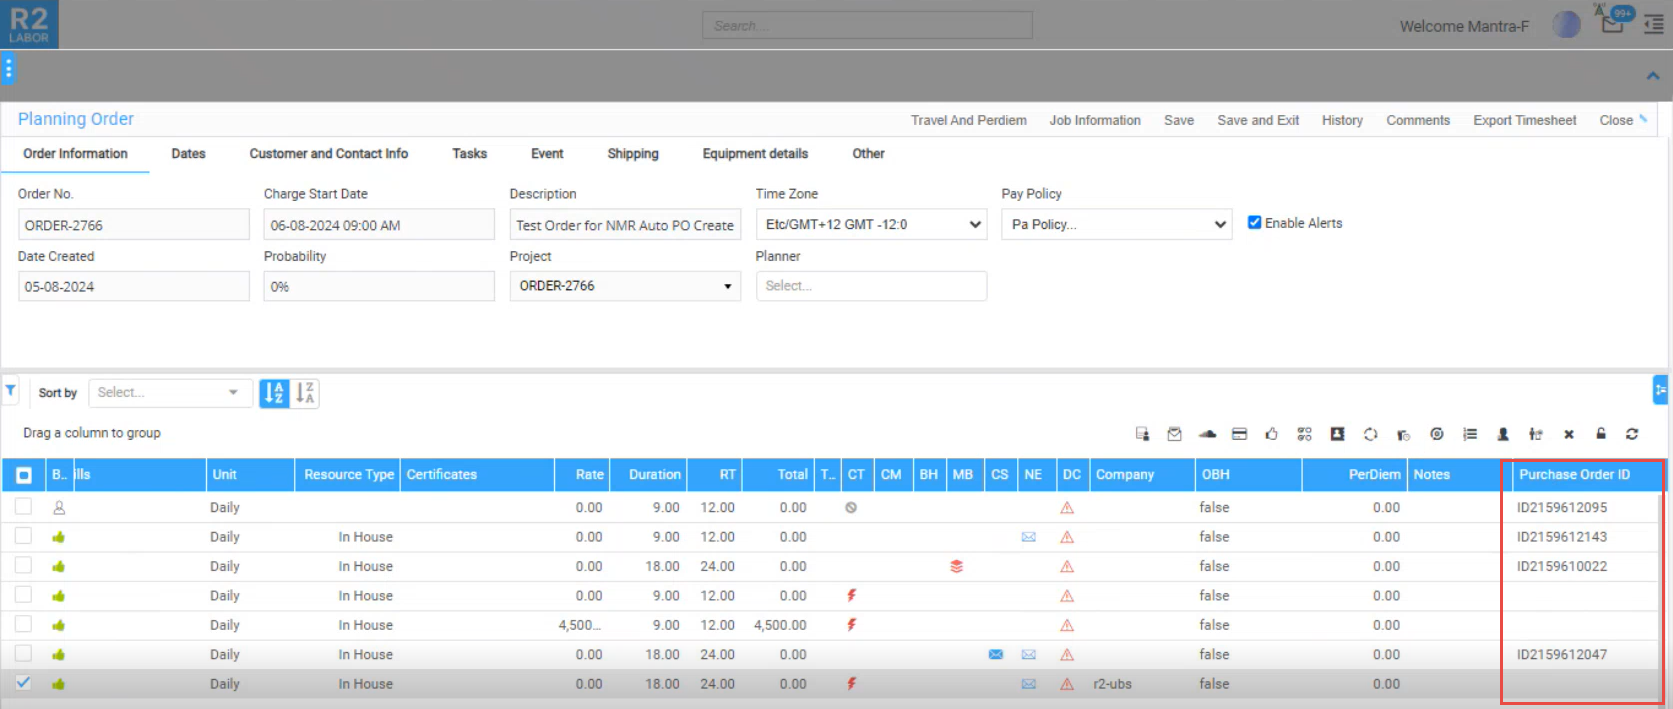
Save the Planning Order. Refresh/Re-open Planning Order.
In the Planning Order window, if you scroll on the Booking Line to the right side, the concerned Booking Line is now populated with Purchase Order ID.
The PO which will be created will have the following details populated automatically.
-
Type: Misc
-
Vendor: Derived from booking line company
-
Profit Center / Project: From R2 Order linked the Planning Order
-
Tax Region: Blank
-
Tax Flag: False
-
PO Description: <OrderID>-<Vendor Name> for Union/Broker/Pay Agent, <OrderID>-<Resource Name> for Freelancer
-
Line Description: Booking line Position description
-
Quantity: 1
-
Price: Booking Line’s total amount
-
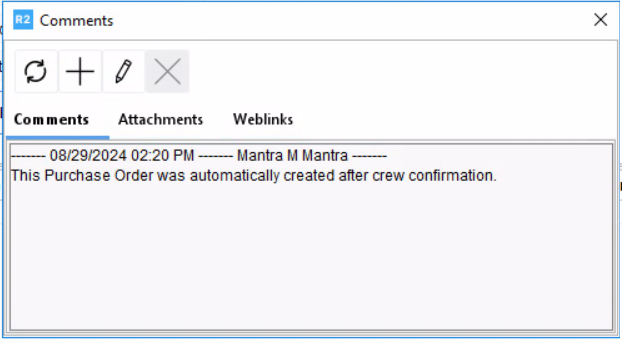
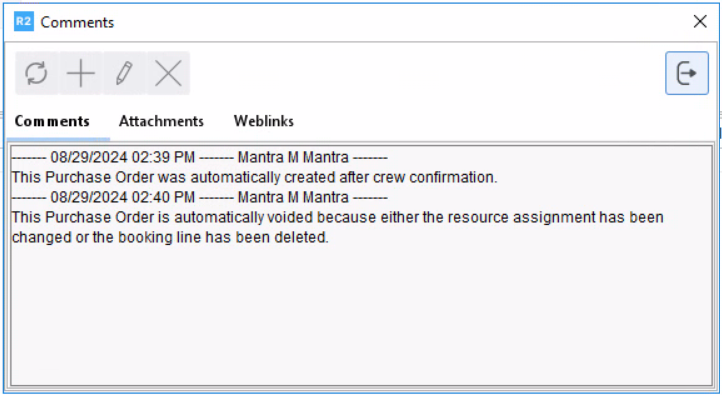
Header In House Comment: “This Purchase Order was automatically created after crew confirmation.”
-
Line Comment: “This line was automatically added after crew confirmation.”
Automatic PO creation happens irrespective of the means the booking line is confirmed. Here are different ways a booking line can be marked as Confirmed:
-
R2 Labor Planning Order
-
Whiteboard
-
LaborMate / Web Portal Crew Acceptance
-
Email confirmation
Viewing the generated Purchase Order ID
A column ‘Purchase Order ID’ in the Planning Order Window > Booking line grid shows the Purchase Order created for that line.
However, it can also be view under Booking Details when you are on Graphical Scheduling view and Whiteboard view of the Bookings on Planning Orders.
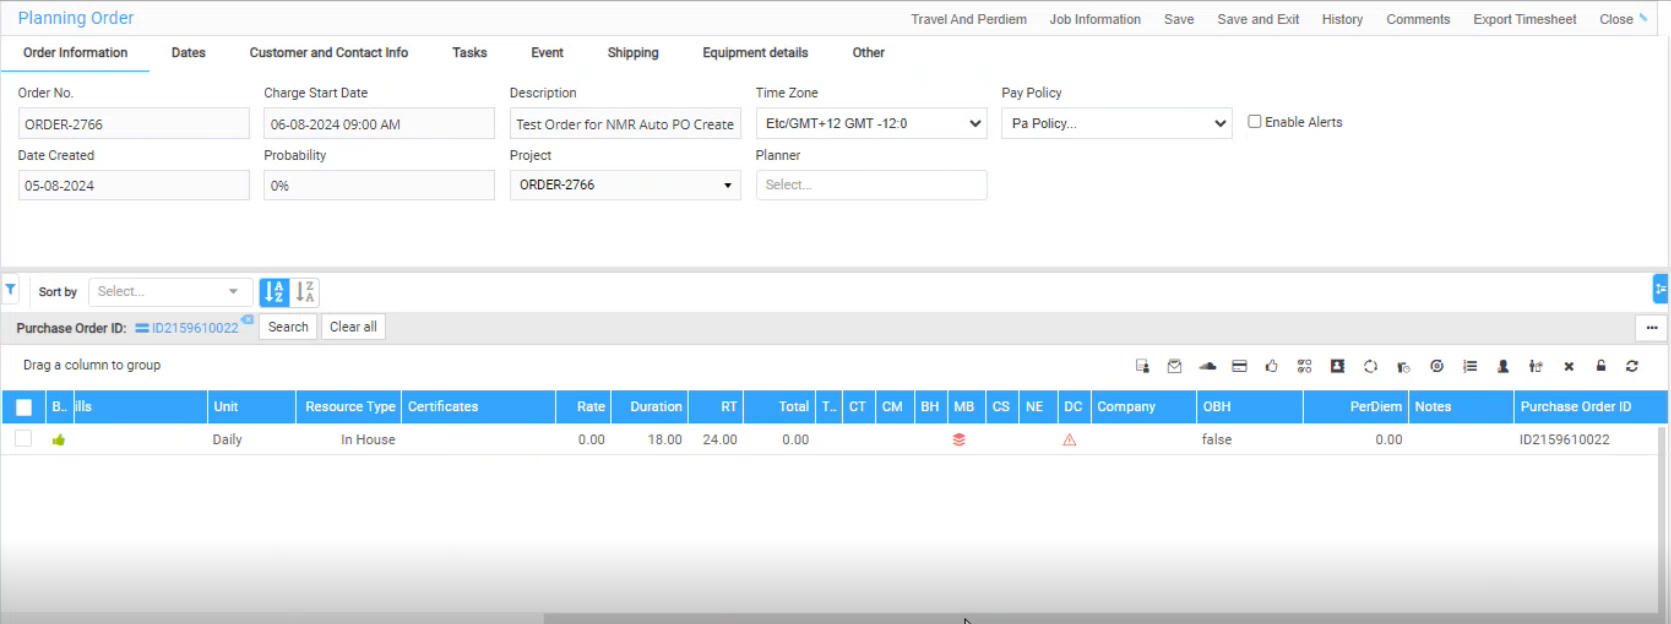
Viewing the ‘Purchase Order ID’ in Planning Order
You can see the Purchase Order ID created for the respective booking line within Labor Planning Order. See the illustration below.
Viewing the ‘Purchase Order ID’ in Whiteboard
To view the Purchase Order ID in WB (Whiteboard) view, follow the steps below.
-
Select the required Planning Orders from Planning Order search screen and open the Whiteboard view.
-
Then go to the specific Booking Line, and click on the ‘Details’

-
A pop-up window will slide out to display the Booking Details. The field ‘Purchase Order ID’ in this pop-up will display the Purchase Order ID created for the respective booking line. Refer the illustration below.
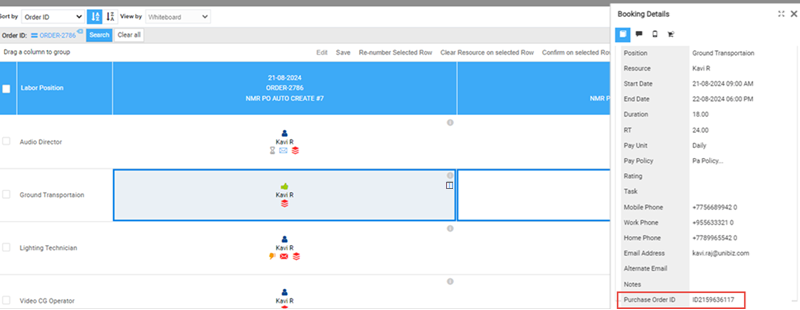
Purchase Order ID field displayed in Whiteboard view
Viewing the ‘Purchase Order ID’ in Graphical Scheduling
To view the PO ID in GS (Graphical Scheduling) view, follow the steps below.
-
Select the required Planning Orders from Planning Order search screen and open the Graphical Scheduling view.
-
Then right click on the specific Booking Line, and click on the ‘View’ menu

-
A pop-up window will slide out to display the Booking Details. The field ‘Purchase Order ID’ in this pop-up will display the Purchase Order ID created for the respective booking line. Refer the illustration below.
.png?cb=8dbf7570be12e98111bd38707cf8d728)
System consolidates the POs created for same order
System automatically consolidates the Purchase Orders created for the booking lines based on the below mentioned rules.
-
Union / Broker / Pay Agent Vendors
→ One PO per Vendor per Order (all booking lines for that vendor are grouped). -
In-House / Freelancer Resources
→ One PO per Vendor–Resource pair per Order. -
Free-Form Resources
→ If Vendor is set and Resource Type is Blank, treated as Broker and creates one PO per Vendor per Order.
→ If Vendor is set and Resource Type = Freelancer, create one PO per Vendor per Booking Line (no merging), because the system cannot reliably identify the same physical person when only free-text names are entered.
→ If Vendor is set and Resource Type = Union/Broker/Pay Agent, creates one PO per Vendor per Order.
→ Refer to section Handling Free Form Resources During Auto PO Creation for more details on free-form resources.
Amending of lines to exiting Purchase Orders
When the booking lines are confirmed by different means system finds if already the Purchase Order exists on the same order-vendor-resource and amends if exists based on the below said rules.
-
Only New and Approved status POs are eligible for amending.
-
If the eligible PO for update is under Approved status:
-
Appends the line to the PO,
-
Change PO status to New,
-
Add comment: “PO status changed from Approved to New due to new confirmed booking line appended.”
-
-
Amendment when more than one eligible PO exists:
-
Adds the line to the New status PO with earliest Required Date. When no New status PO is found but multiple Approved status POs are found, it adds to the Approved PO with earliest Required Date.
-
-
PO Required Date is always set as the earliest required date among all lines associated with that PO.
Sharing the created PO ID to a recipient via an E-mail
As a Planner or Project Manager, you may want to send the Purchase Order ID of the booking line to the assigned resource or any other recipient.
Sample Workflow
-
In Planning Order, go to the Booking Line, of which you want to share the PO ID.
-
Click the

-
The ‘Send Message’ pop-up window will slide-out on the right-hand side.
Know the steps how to send message here
-
From the Send Message pop-up select the appropriate Template.
-
Ensure that you have setup the selected message template setup with the tag ##BOOKINGLINEPURCHASEORDERID## to include PO ID in the message body.
Message templates for Send Message feature can be setup under R2 Labor > Profile Details > Settings > Email Templates > Booking Line Send Message. Settings restricted to Administrator user profiles only.
-
Click ‘Send’ to complete.
PO ID gets Voided when Booking Line is modified
As we already know, creating and tagging a PO ID to a Booking Line is aligned with its confirmation. The workflow also works in the reverse direction.
The Purchase Order line will get automatically marked as Cancelled, whenever any of the following actions happens on the Booking Line (after it has already been confirmed and PO has been created), any of the following may occur:
-
The assigned resource to the Booking Line has been changed/cleared.
-
The Booking Line has been permanently deleted.
In such scenario, once the Planning Order is Saved and Refreshed or Re-opened, the PO ID column now shows as ‘blank’. The earlier tagged PO ID is no longer visible in the designated field. Post cancelling the PO line automatically, it will also mark the PO as Voided if there are no other valid lines on the PO exist. Otherwise, it will mark the PO status as New, if it is in Open/Approved/Received statuses.
If you mark the PO as void from within the R2 Core application, then also the PO ID column shows as ‘blank’. The earlier tagged PO ID is no longer visible in the designated field.
Handling of Conflicts while voiding a PO
A conflict can arise if either the PO is left open (in use) by any user, or the Linked PO line has received/vouchered quantity.
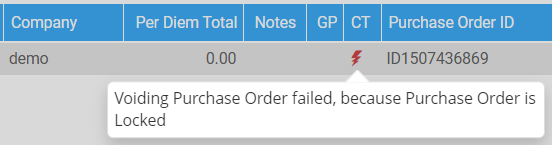
In such scenario, the conflict is indicated in the CT column of the booking line, by showing a thunderbolt icon. If you click on the Icon it shows the reason behind the conflict in a pop-up message. See below for example:
You can clear the Thunder Bolt icon by using “Clear Conflict” icon/function.
If cancelling of the PO line fails due any of the reasons said above when trying to clearing/changing the resource, system will proceed to the clear/change action but previously generated PO ID will be retained as is. User can know the conflicts reason through the CT column thunder bolt icon and take the necessary actions manually.
If cancelling of the PO line fails due to any reasons said above, when trying to delete the booking line, system will revert the delete action on the booking line.
Auto update comments in Purchase Order
When it gets created
-
Let’s say, you had an Order [Ord-X8950} created within R2.
-
Later you added a resource to it in R2Labor. And you had the resource get confirmed.
-
So, automatically, a PO [ID-L1507435519] gets created. The same PO ID is reflected in Booking Line in R2Labor.
-
Now, if we open the same PO in R2, and click on ‘In-House Comments’ button, the following window is displayed.
When it gets voided
System writes a non-printable comment in the Purchase Order > Information tab > In House comments.
Using the PO ID as a filter parameter
You can use the PO ID field as a filter option at two levels:
-
To search amongst all Planning Orders, for any matching Planning Order Booking Line having the PO ID.
-
To search within one specific Planning Order, for any matching Planning Order Booking Line having the PO ID.
Search amongst all Planning Orders
Planning > Order Search > Filters, a filter criterion is provided.
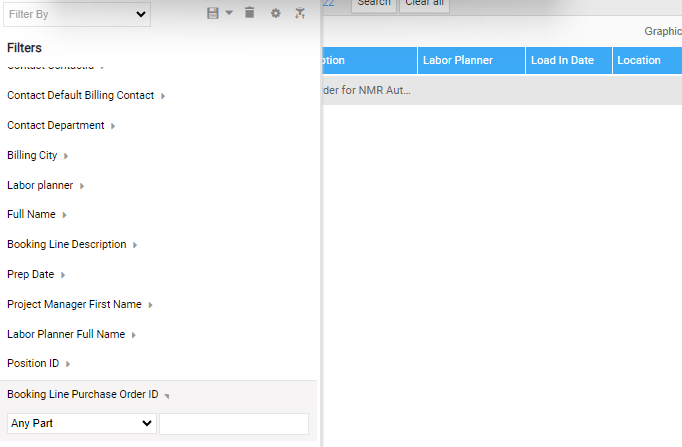
Using this, you will be able to search for all the Planning Order(s) having any booking lines with respective PO ID. This will help you in identifying the Planning Order associated with the PO ID.
Search within one specific Planning Order
Planning Order > Booking lines grid > Filters, a filter criterion is provided.
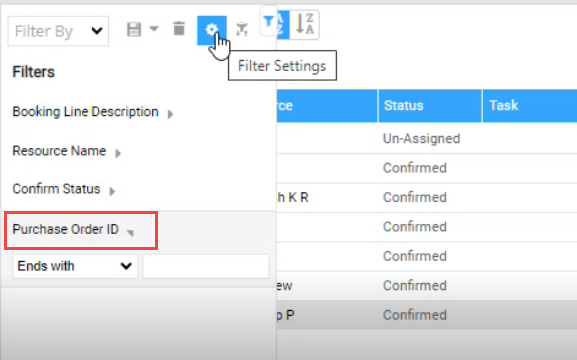
Using this, you will be able to search within a specific Planning Order(s) having any booking lines with respective PO ID. This will help you in identifying the Booking Lines(s) associated with the PO ID.
Handling Free Form Resources During Auto PO Creation
Overview:
When you assign a free form resource to a booking line and confirm it, the system automatically creates a Purchase Order (PO), provided a company is tagged on the booking line.
To ensure auto PO creation happens, always tag the Company on the booking line before confirming it.
Sample Workflow
Follow these steps to correctly create a PO for a free form resource.
-
Create a new R2 Order.
-
Add one or more Labor Positions.
-
Navigate to R2 Labor.
-
In the Main Menu, click Orders.
-
Open the R2 Order you created.
-
The Planning Order page opens.
-
-
In the order grid, assign Company to the booking lines.
Make sure the company is tagged before assigning the free form resource to the line since the PO uses this reference as the vendor for it.
-
Click the Resource field for that booking line.
-
Manually type-in the resource name on the booking line (Free Form Resource) and tab out. Don’t select from list of resource cards existing in the system.
-
Choose the correct Resource Type (for example, Freelancer or Broker).
For freelancers, each confirmed booking line creates separate PO.
For other resource types like Union/Broker/Pay Agent/Blank, booking lines using the same vendor will be grouped under a single PO.
-
Change the booking line status to Confirmed.
-
Click Save, then Refresh or Reopen the Planning Order.
-
Scroll right in the Booking Line grid.
-
Check the Purchase Order ID column.
-
Confirm that a PO ID has been generated for the line.
If no PO appears, make sure that a Company is tagged on the booking line.
After the PO Is Created
-
Once a PO is created for a booking line with a free form resource:
-
You cannot change the Company.
-
If you edit the free form resource name, the system keeps the same PO and automatically adds a comment to the PO line showing the name change.
-
-
If you change the Resource Type after PO creation:
-
Changing from Freelancer → Broker keeps the PO as is.
-
The system does not merge it with other Broker POs, even for the same vendor.
-
-
If you clear the resource from the booking line:
-
The system cancels the PO line and voids the PO if no other valid lines remain.
-