With a simple tap, you can easily clock in at the start of your day and clock out when you're finished.
The streamlined clock in/out feature ensures your time is recorded accurately and effortlessly, whether you're beginning or ending your shift.
These time logs will be visible to the Planner when creating timesheets.
Access Points
You can Clock In/Out from following ways:
-
Dashboard > Current> Clock In/Out button in the job tile
-
Dashboard > Current > View All> Clock In/Out button in the job tile
-
Dashboard >

-
Calendar > Tap on Current date job > Job Details> Clock In/Out button
How to clock In/Out
-
Access Clock In window
-
Open your current job and open the Clock In window using any of the method mentioned above.
-
The system will display the current date and time.
-
By default,
-
Clock In/Clock Out button will be enabled 2 hours before the scheduled start time and up to 12 hours after the scheduled end time. However, this can be configured via Labor settings. Know more…
-
Geo-fencing is disabled for Clock In/Clock Out. Administrators can enable it to restrict attendance actions within a defined radius around the job site. Know more…
-
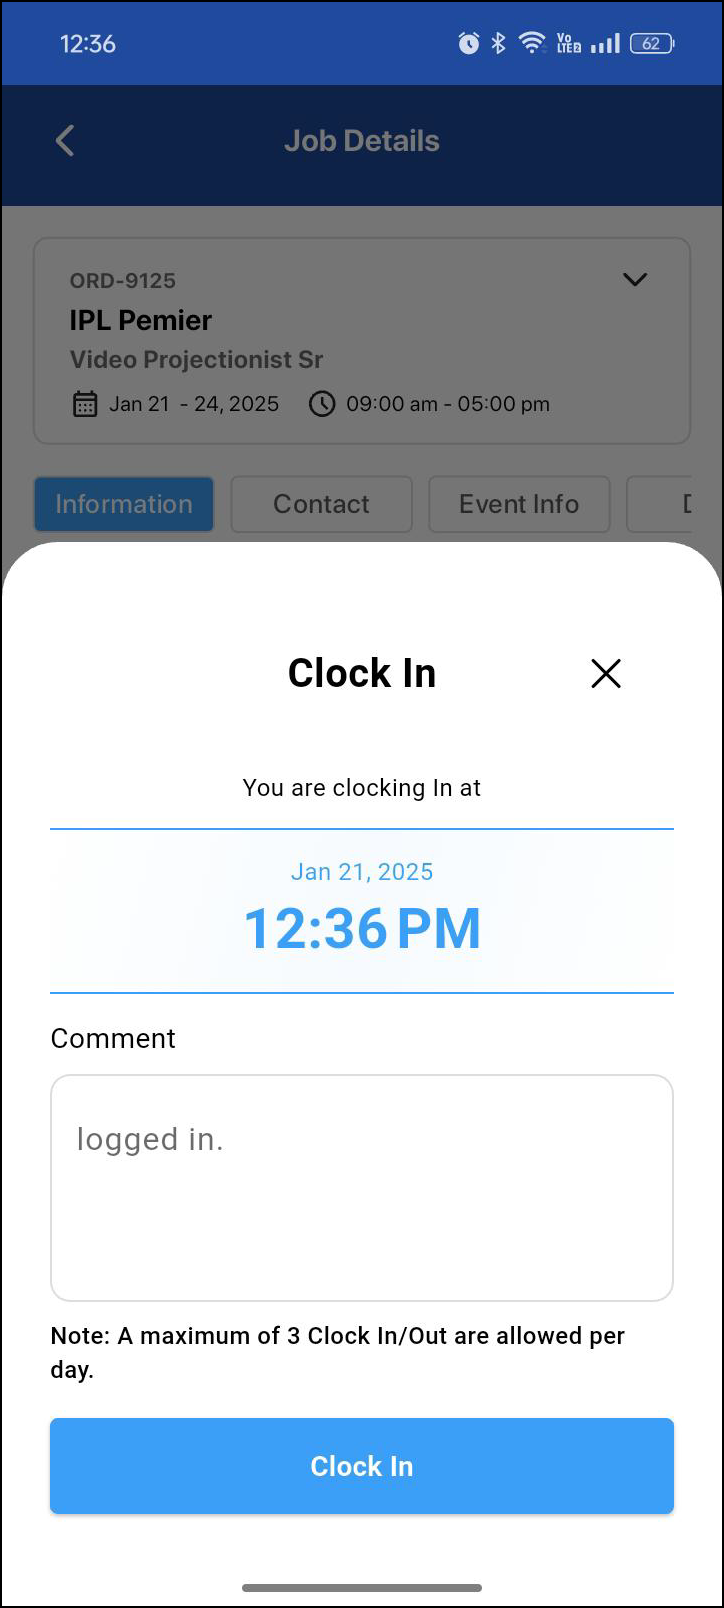
Clock In Process
-
Review the displayed date and time.
-
Add any necessary comments in the provided field (optional).
-
Select the "Clock In" button to start your work session.
-
-
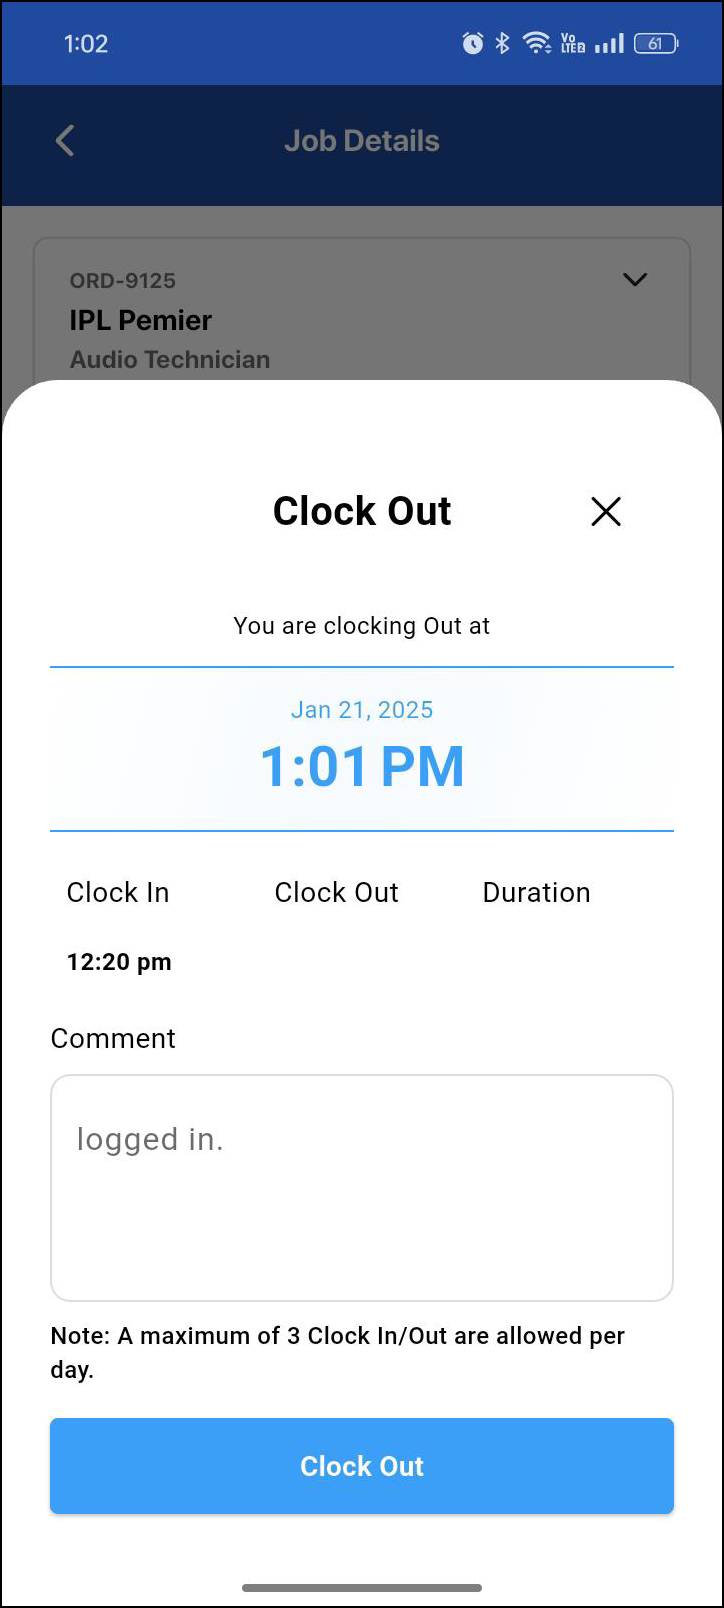
Managing breaks / Clock Out
-
To take breaks in between your job or to close your day, you must clock out. To do that,
-
Return to Current Job screen.
-
Select the Clock In/Out button. The screen will now show a "Clock Out" option with current time as shown below.
-
Tap "Clock Out".
-
-
-
Time log
-
After clocking out, the system displays time log showing:
-
Your Clock In time
-
Your Clock Out time
-
Total duration worked
-
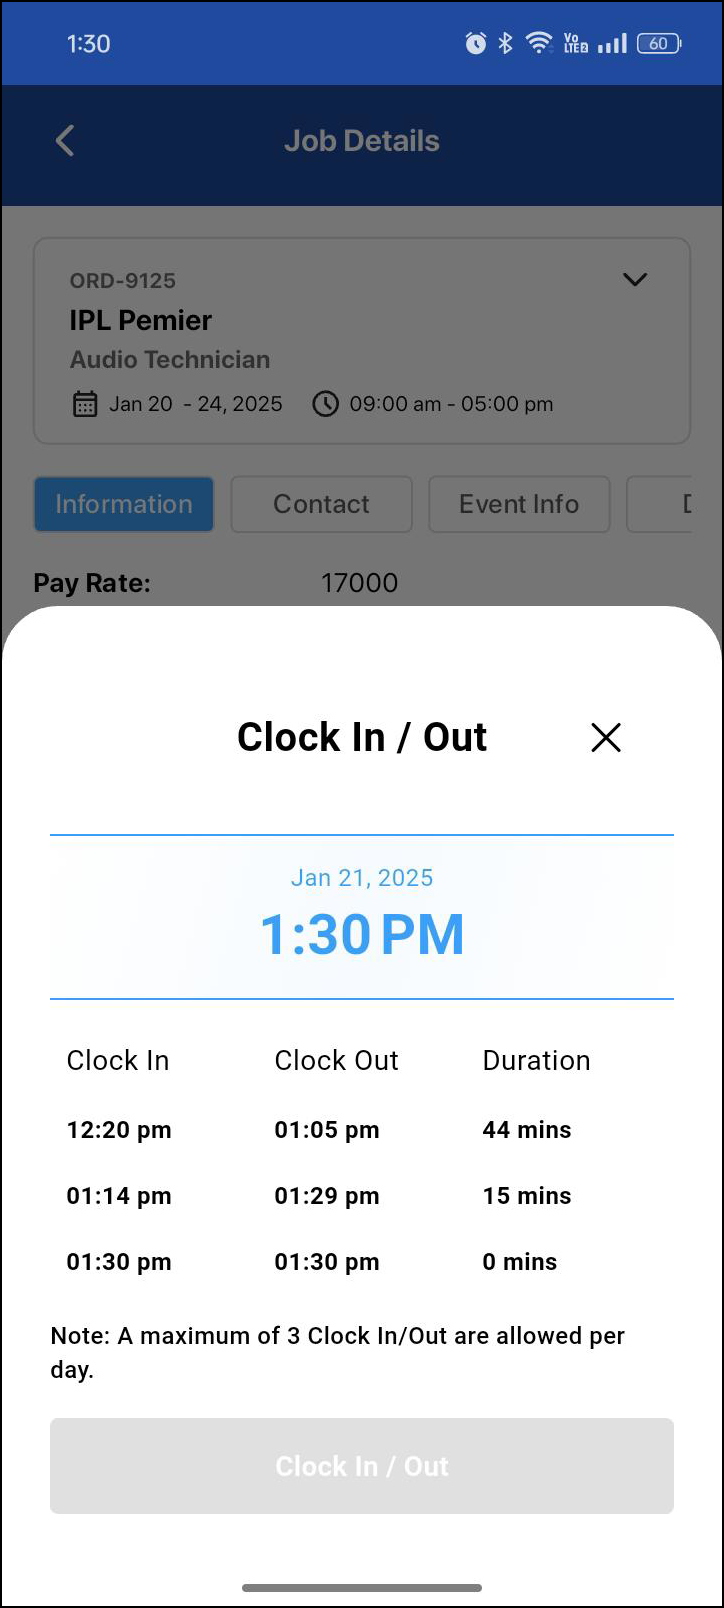
There is a daily limit of 3 Clock In/Out cycles. Once this limit is reached, the Clock In function will be automatically disabled for the remaining of the day.
Configurable Clock In/Out Time Window
The allowed clock-in and clock-out window can be customized based on organizational policies. This replaces the default of 2 hours before job start and 12 hours after job end.
Configuration Setup
Administrators can configure the window under:
R2 Labor > Settings > Configuration > Clock In/Out
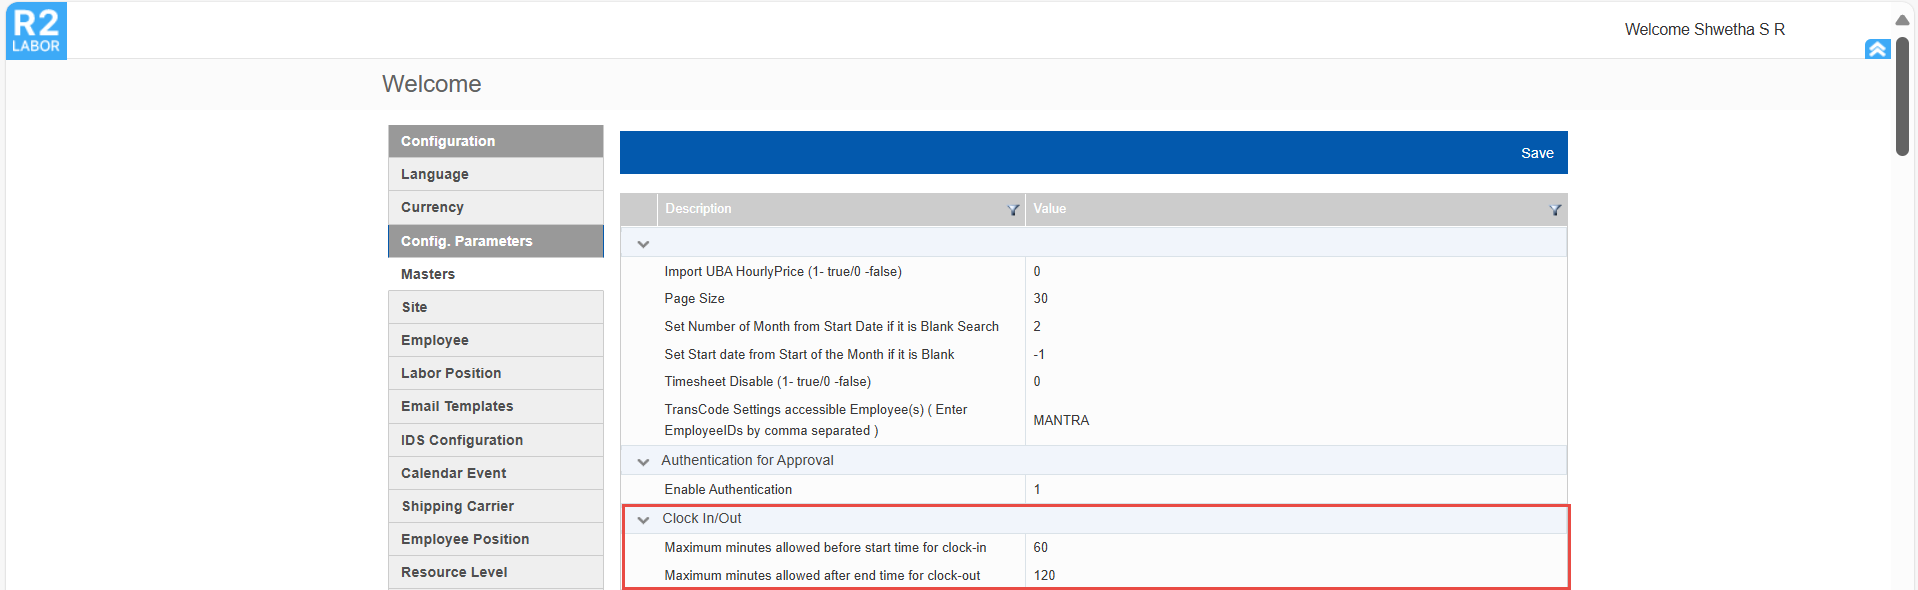
Maximum Minutes Allowed Before Shift Start (Clock-in)
-
Defines how early crew can clock in.
-
Default = 120 minutes.
Maximum Minutes Allowed After Shift End (Clock-out)
-
Defines how late crew can clock out.
-
Default = 720 minutes.
Special Cases:
-
Setting either value to 0 enforces strict shift timing:
-
Before Start = 0 → Clock in only at or after shift start. No early clock-ins allowed.
-
After End = 0 → Clock out only at or before shift end. No late clock-outs allowed.
-
-
Invalid or non-integer values default to 0.
-
No maximum limit is enforced — values can be set as high as needed.
-
Recommendation:
The valid value aligned with the LaborMate app workflow is 1440 minutes (24 hours), as clock-in/out actions are based on the booking lines or job’s Estimated Work Time (EWT) that matches the device date and time.
Geofencing Configuration for Clock In/Out
Geo-fencing restricts clock-in and clock-out actions to a defined geographic area around the job site. The job site location is derived from the shipping location in R2 which is also shown in job details section.
This ensures crew members can only record attendance when physically present at the authorized location.
Geo-fencing uses a virtual boundary (“geofence”) around a point location. When a user’s device moves in or out of this boundary, the system validates the location before allowing attendance actions.
How to enable?
Activate geofencing capabilities by subscribing to the Google Places API and configure it within R2 Labor. This unlocks precise, location-based workforce management.
Configuration Setup
After subscribing to the Google Places API, configure geofencing under:
R2 Labor → Settings → Configuration → Geofence for Clock In/Out
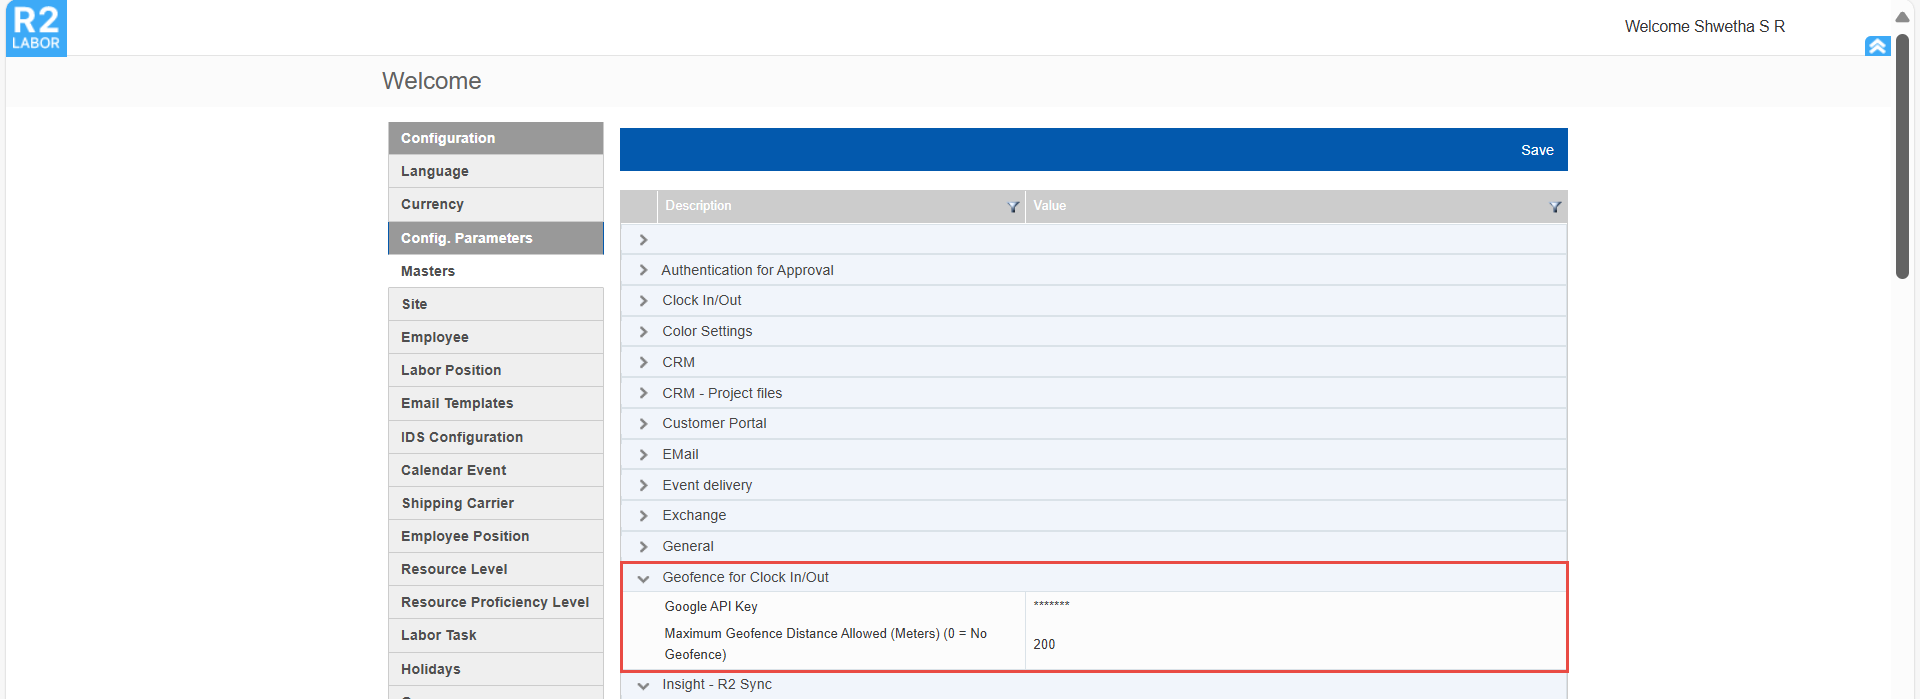
|
Settings |
Description |
Default |
|
Google API Key |
Field to store the Google Maps/Location API key. Required to enable geofencing for accurate location detection and map visualization. |
Blank (required for activation) |
|
Maximum Geofence Distance Allowed (Meters) 0 (No geofence) |
Defines the maximum radius around the job site within which clock-in/out is permitted. |
0 (No geofence enforced) |
Invalid or non-numeric values for Maximum Geofence Distance default to 0.
How it works
-
During Clock In/Out, the app checks the user’s device location against the configured geofence.
-
If the device is outside the permitted radius:
-
Clock-in/out is blocked.
-
A clear error message is displayed as shown below
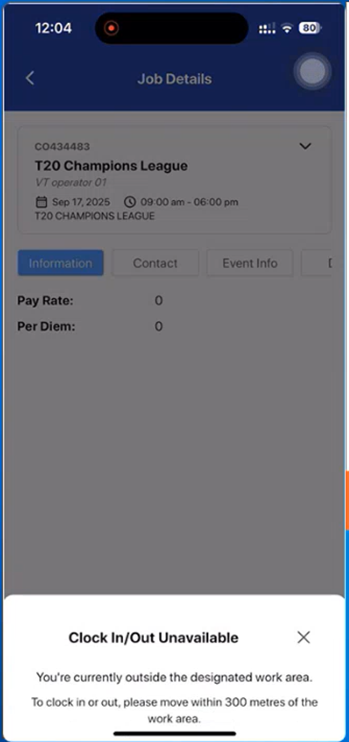
Figure 3.1: Error when device is outside designated area
-
-
If location services of the device are disabled, the app prompts the user to enable them before retrying.
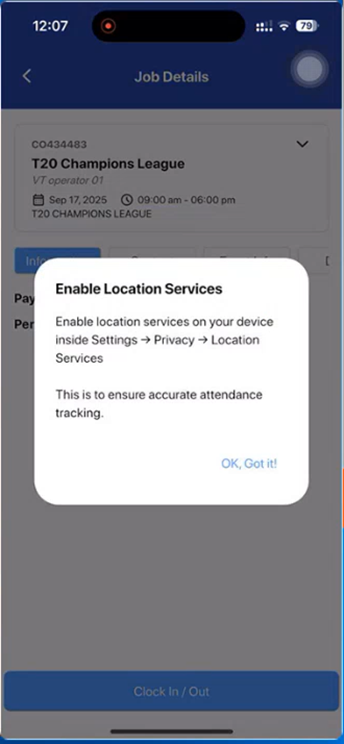
Figure 3.2: Error when device location is disabled -
If location services of the app are disabled, the app prompts the user to enable them before retrying.
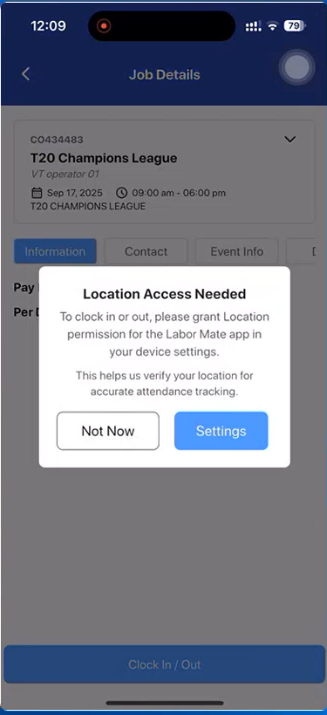
Figure 3.3: Error when location is disabled on app