Reference No: 29560
Details
Support for Equipment Pool or E-Pool is provided to track the availability in the Sub-Region level and reserve the equipment by pool. The pool reservation is implemented for all the Equipment within the Sub-Region. The details are explained in the sample workflow given below:
Prerequisites
Configuration Settings
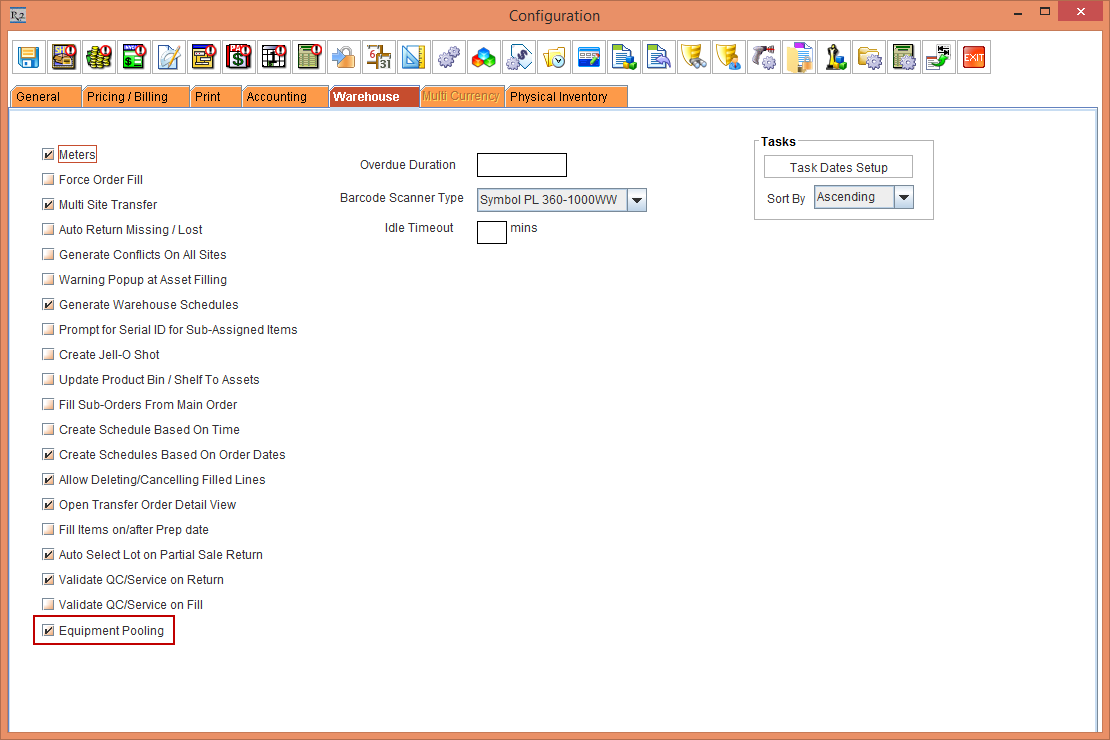
Enable E-Pool by performing the below configurations from the Warehouse tab of the Configuration module.
Configuration Module
Enable E-Pool from the Warehouse tab of the Configuration module by following the below steps:
-
Select the Configuration module > Warehouse tab.
-
Select the Equipment Pooling check box, as shown in Figure 1.0.
-
Save and Exit the Configuration module.
-
Relaunch the R2 application.
The Equipment Pooling check box in the Configuration module and the Maintenance module cannot be unselected once any E-Pool actions are performed.
Enable E-Pool at Sub-Region
After enabling E-Pool in the Configuration module, you must also enable E-Pool from the Sub-Region level of the Maintenance module by following the below steps:
-
Select the Maintenance module > Employee tab > Site tab.
-
Create five Sites [BERLIN], [BUDAPEST], [COLOGNE], [MUNICH], and [PARIS] and tag the Sub-Region [ML EUROPE] for all the Sites.
-
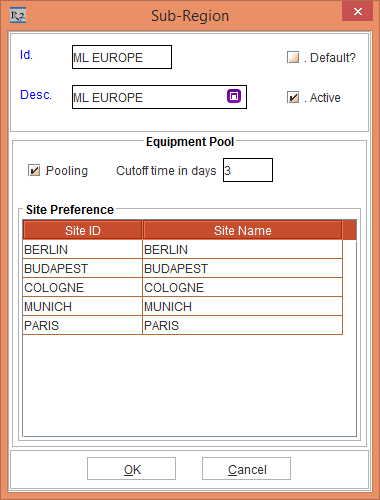
Edit the Site [BERLIN] > click the Sub-Region importable button. The Group List window is displayed.
-
Edit the Sub-Region [ML EUROPE]. The Sub-Region window with the E-Pool Configuration fields is displayed, as shown in Figure 1.1.
-
The details of the E-Pool configuration fields in the Sub-Region window are explained in the below table:
Table 1.0 Sub-Region window displaying the E-Pool Configuration fields
|
Field |
Description |
|
Id. |
Displays the ID of the Sub-Region opened for edit to perform the E-Pool configuration. |
|
Default? |
Optionally, select the Default check box to make the new Sub-Region as default one. |
|
Desc. |
Displays the description of the Sub-Region opened for edit to perform the E-Pool configuration. |
|
Active |
Select the Active check box to make the new Sub-Region as an active one. |
|
Equipment Pool |
|
|
Pooling |
Select the Pooling check box. The Pooling check box when selected displays all the Sites tagged to the Sub-Region [ML EUROPE] enabling you to edit or rearrange the order of the Site preference within the Sub-Region [ML EUROPE]. This is called as Sub-Region level Site Preference. NOTE:
|
|
Cutoff time in days |
Enter the Cutoff time in days [3]. In the Order, the Item Status is displayed as Pool or Reserved depending on the number of days defined here and the order creation date. The default Cutoff time in days is displayed as 0 or 1 and can be modified as per the requirement.
NOTE: The Cutoff time in days field is enabled only when you select the Equipment Pooling check box in the Configuration module > Warehouse tab. |
|
Site Preference |
|
|
Site ID |
Displays the Site ID tagged to the Sub-Region [ML EUROPE]. |
|
Site Name |
Displays the Site Name of the Site ID tagged to the Sub-Region [ML EUROPE]. |
-
Enable Pooling at the Sub-Region level first and then enable the E-Pool SetUp at the Site level.
-
You can rearrange the order of the Site Preference in the Sub-Region Level within the Sub-Region window, by dragging and dropping the Site ID.
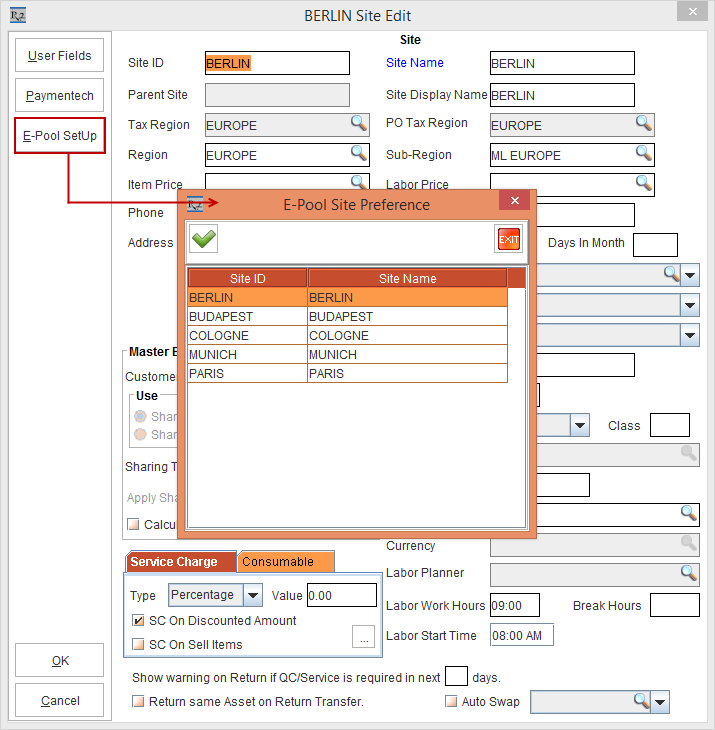
Set Site Level Site Preference
You can set the Site Preference at the Site Level by setting the Site Preference from the Maintenance module by following the below steps:
-
Select the Maintenance module > Employee tab > Site tab.
-
Edit the Site [BERLIN] > click the E-Pool SetUp button. The E-Pool Site Preference window is displayed, as shown in Figure 1.2.
-
The E-Pool Site Preference is displayed as [BERLIN], [BUDAPEST], [COLOGNE], [MUNICH], and [PARIS].
-
You can rearrange the order of the Site Preference in the Site Level within the E-Pool Site Preference window, by dragging and dropping the Site ID.
-
The Order of Sites displayed in the E-Pool Site Preference window is displayed with respect to the Site ID opened for Edit followed by the Site Preference order in the Sub-Region level.
For Example:
If you try to edit the Site Level Site Preference from the Site [BERLIN], and if you click the E-Pool SetUp button, the E-Pool Site Preference window displays the Site [BERLIN] first followed by Order of Site Preference as chosen in the Sub-Region level within the Group List window.
-
Click OK.
Creating Items
-
Select the Maintenance module > Items tab.
-
Create the Serial Items [LG STAR], [LG LED], [LG PC], [LG STYLUS], [LG WM], [LG Q6], and [LG VOLT].
-
Enter the Weight [10.00] for the Serial Item [LG STAR].
-
Create the Non-Serial Items [LG STAR-NS] and [LG WM-NS].
-
Receive the Serial Items [LG STAR] [LG LED] and [LG WM] with 6 Qty each in the Sites [BERLIN], [BUDAPEST], [COLOGNE], [MUNICH], and [PARIS] by clicking the Site Importable button within the Maintenance window.
-
Save and Exit the Maintenance module.
Sample Workflow
After Cutoff time in days
The below sample workflow explains the Order With Drop-Ship and Order Without Drop-Ship.
Order With Drop-Ship
-
Set the System Date as [09-May-2018].
-
Login to the R2 application with the Site [PARIS].
-
Select the Account module. The Account window is displayed.
-
Tag a Company [LG].
-
Click the Reservation icon. The Order in Formation dialog box is displayed.
-
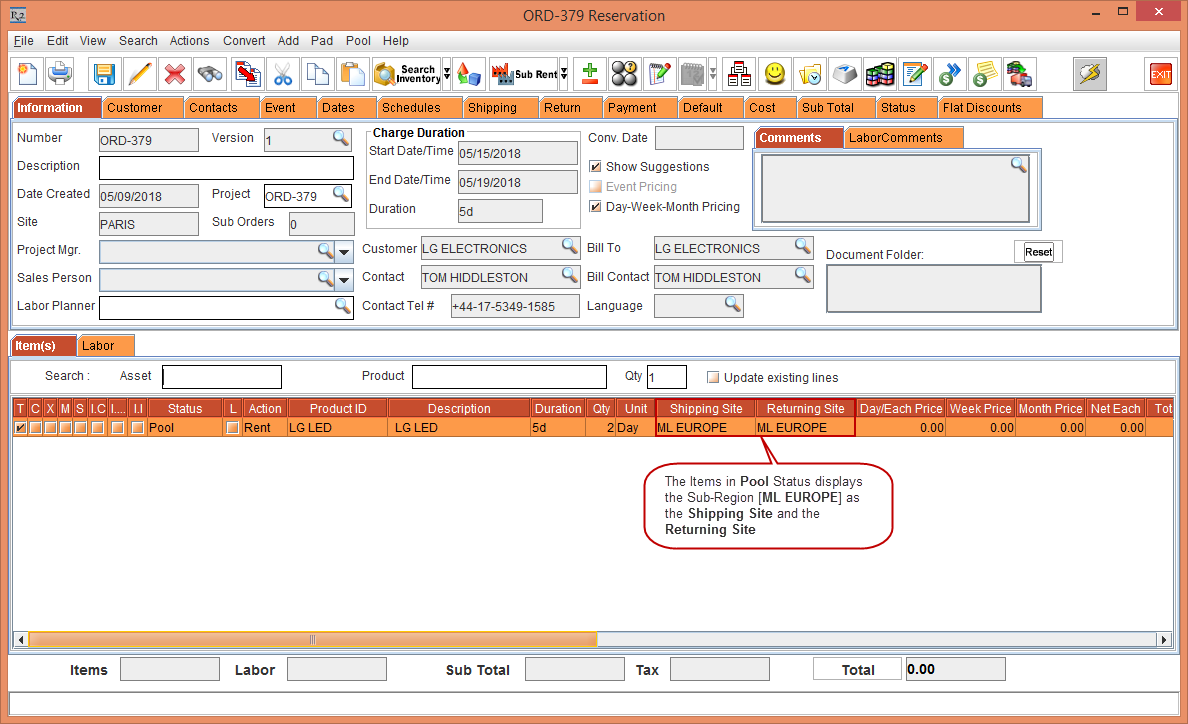
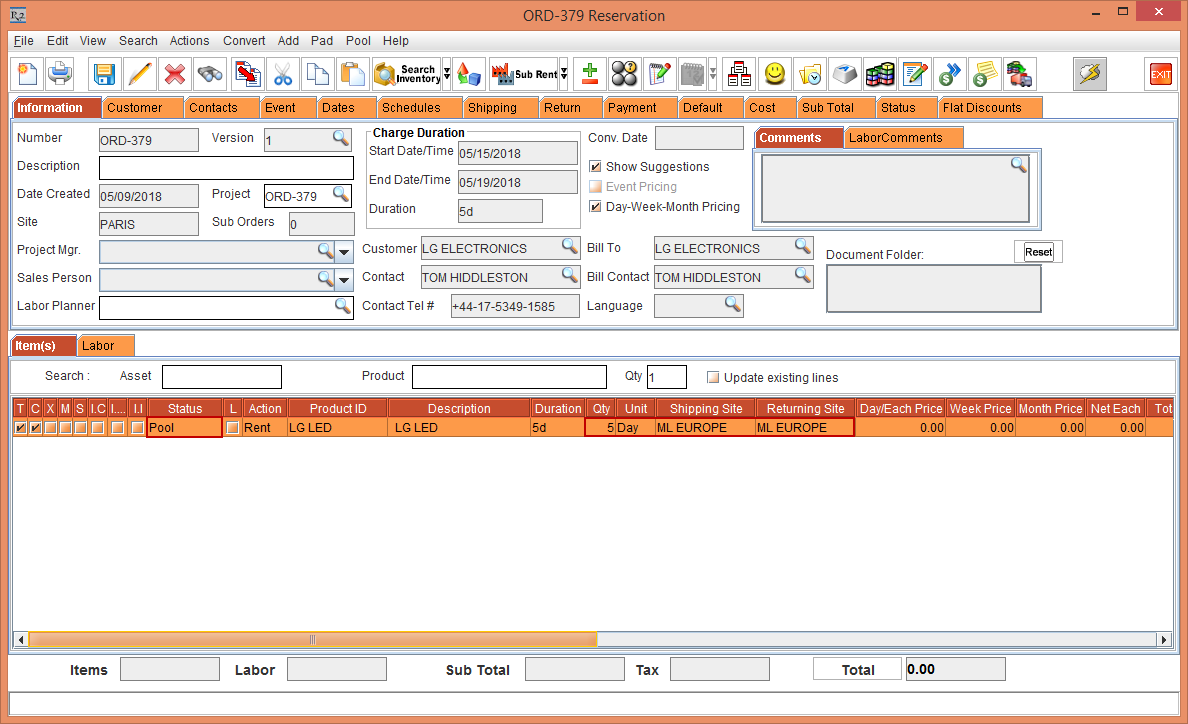
Create a Rental Reservation Order [ORD-379] for 5 days duration with the Start Date [15-May-2018], Start Time [09:00 AM] and End Date [19-May-2018] End Time [09:00 AM]. Click the Search Item icon. The Search Items window is displayed.
-
Search and add the Serial Item [LG LED] with 2 Qty. The Status of the Serial Item [LG LED] is displayed as Pool with the Shipping Site [ML EUROPE] and Returning Site [ML EUROPE], as shown in Figure 2.0.
The Shipping Site and the Returning Site is displayed as [ML EUROPE] which is the Sub-Region ID, due to the Cutoff time in days [3] in the Sub-Region window.
-
Select the Item line and click the Availability icon. The Availability - LG LED window is displayed with the default drop-down as SubRegion [ML EUROPE], as shown in Figure 2.1.
When the Equipment Pooling check box is enabled at the Sub Region, the Availability window displays the SubRegion as the default drop-down.
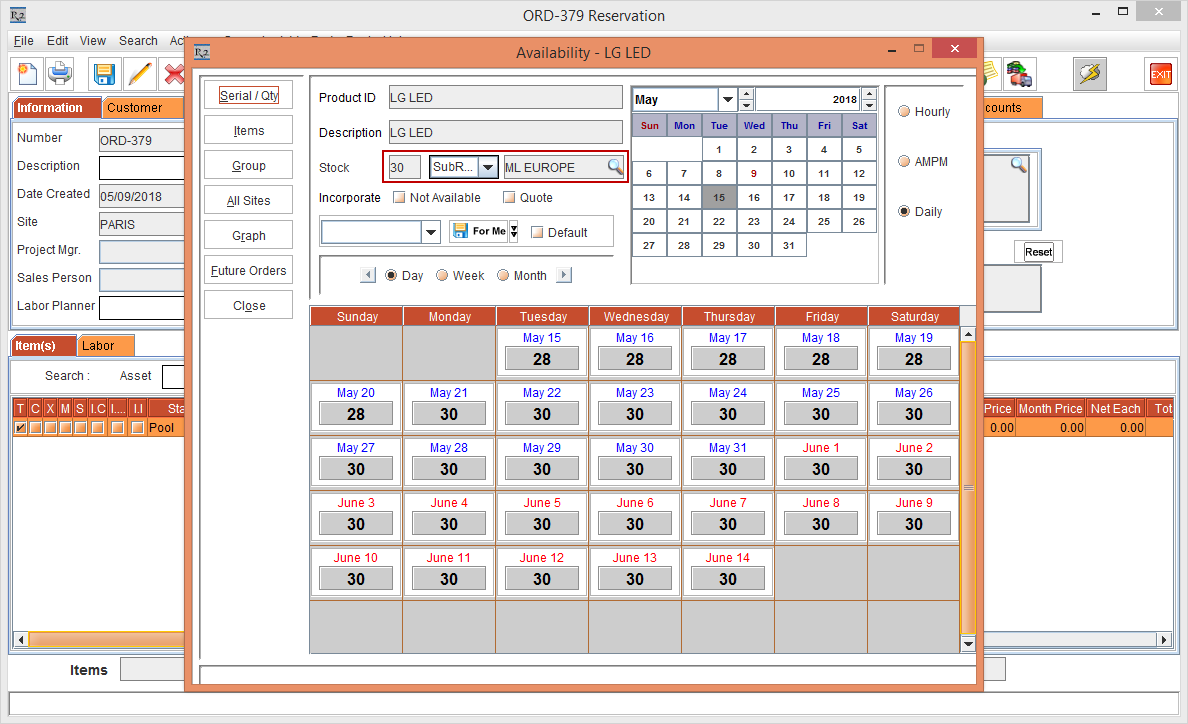
-
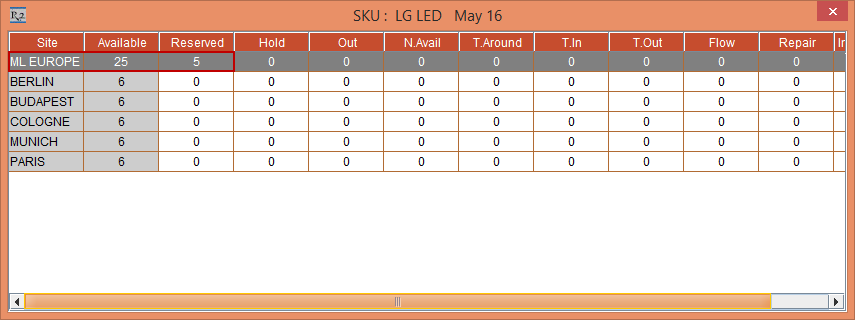
Click on the Date [16-May -2018] in the Calendar to view the availability, distribution, and usage of the Serial Item [LG LED] within the Sub-Region and the Sites allocated to the Sub-Region, as shown in Figure 2.2.

-
Exit the Availability - LG LED window.
-
Modify the Serial Item [LG LED] Qty to 31.
-
The Serial Item [LG LED] line Status with 30 Qty. is displayed as Pool with the Shipping Site and Returning Site as the Sub-Region [ML EUROPE] and the Serial Item [LG LED] line Status with 1 Qty. is displayed as Not Available with the Shipping Site and Returning Site as the Sub-Region [ML EUROPE], as shown in Figure 2.3.
-
Delete the Serial Item [LG LED] line with Not Available Status and 1 Qty. displaying the Shipping Site and Returning Site as the Sub-Region [ML EUROPE].
Pool Menu
The Pool menu is included in the Orders enabling you to perform the following actions:
Site Preference
The Site Preference option in the Pool menu displays the E-Pool Site Preference window displaying the Order level Site Preference defined at the Site level in the E-Pool SetUp window.
-
In the Rental Reservation Order [ORD-379], select the Pool menu > Site Preference option. The E-Pool Site Preference window is displayed exhibiting the Order level Site Preference, as shown in Figure 2.4.
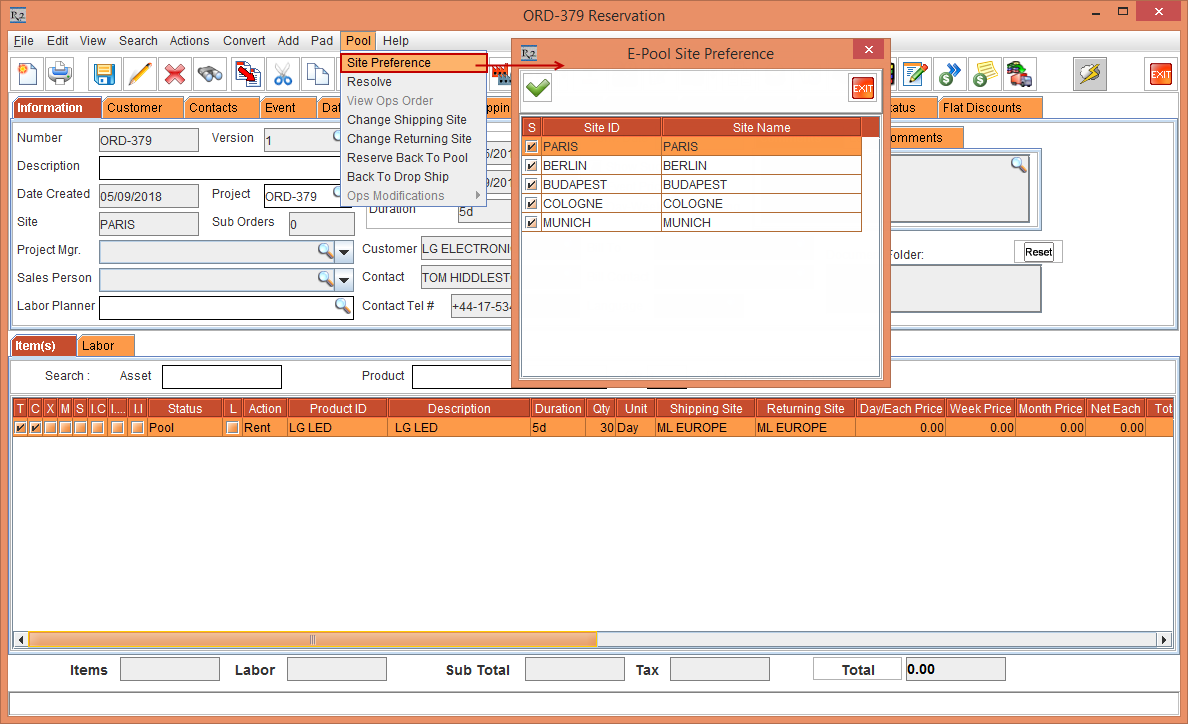
-
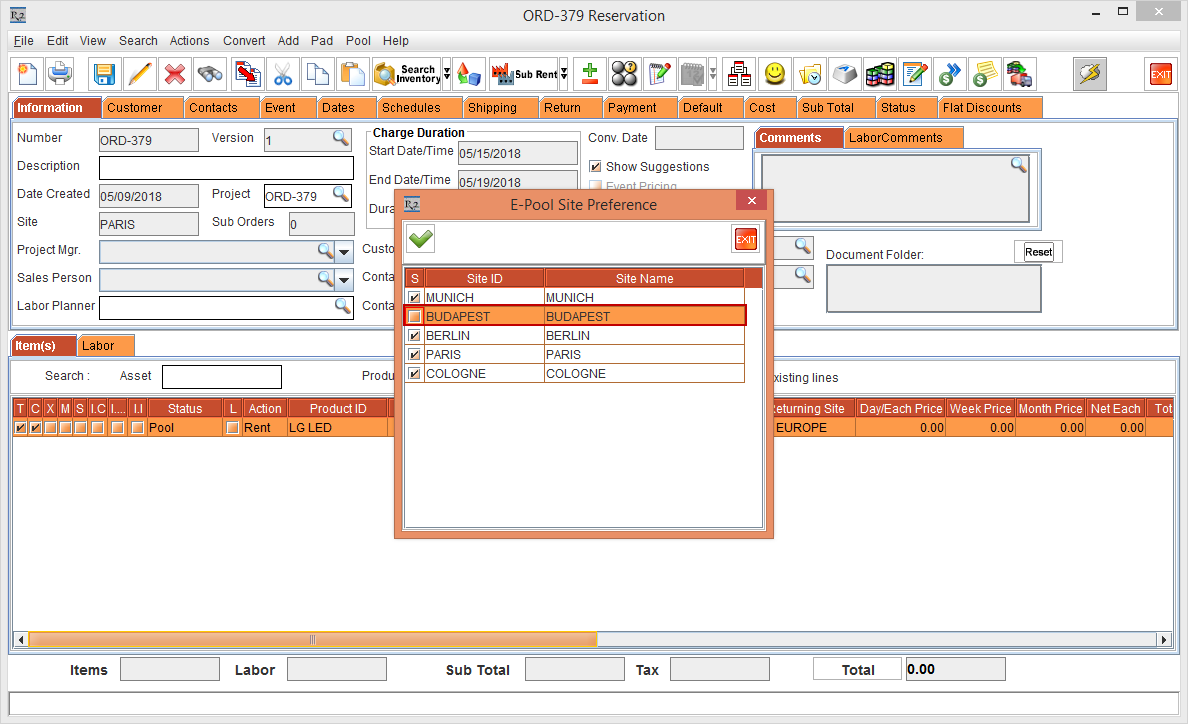
Modify the Order level Site Preference to [MUNICH], [BUDAPEST], [BERLIN], [PARIS], and [COLOGNE] and clear the Site [BUDAPEST] check box so that no Item quantity is assigned to stock available the Site [BUDAPEST], as shown in Figure 2.5.
The above modified order level site preference is applicable only for the Order [ORD-379].
-
Click OK.
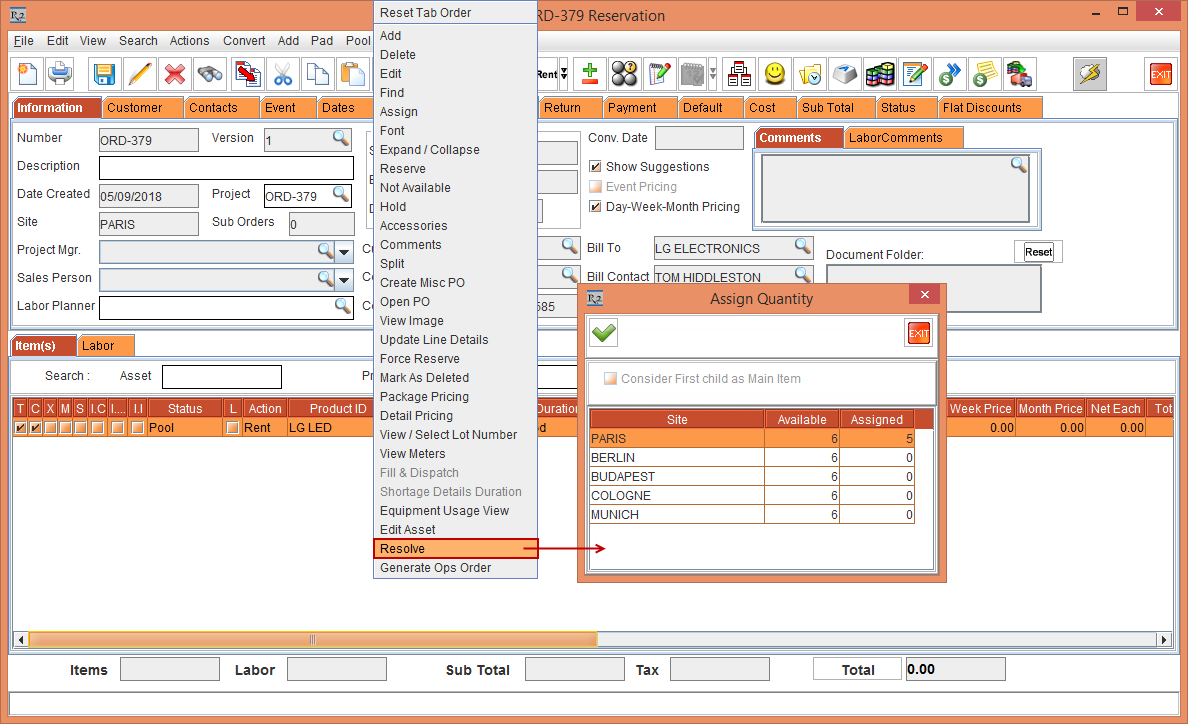
Resolve
The Item [LG LED] blocked at the Pool level must now be blocked at the Site level by resolving the Item at the Order Header level or at the Line level.
Header Resolve
The below steps allows resolve at the Order Header level.
-
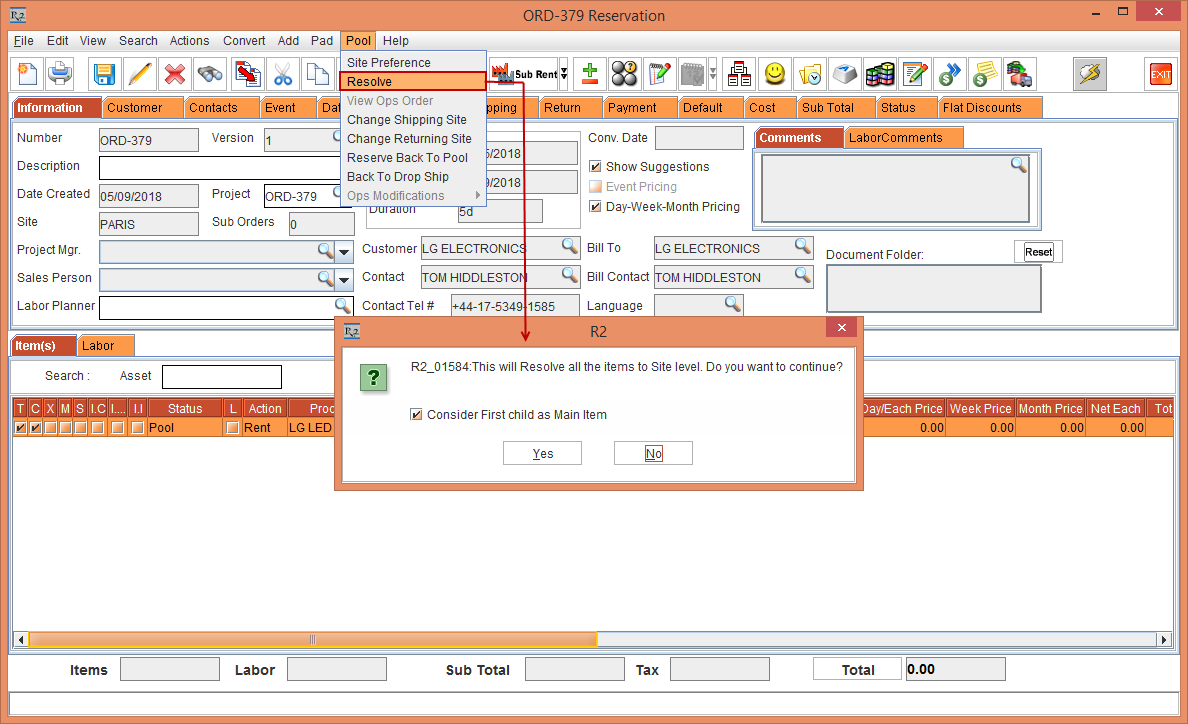
In the Rental Reservation Order [ORD-379], select the Item line [LG LED] with 30 Qty and select the Pool menu > Resolve option.
-
The System displays a prompt with a message "This will Resolve all the Items to Site level. Do you want to continue?" with a Yes and No buttons, as shown in Figure 2.6.
-
Click Yes.
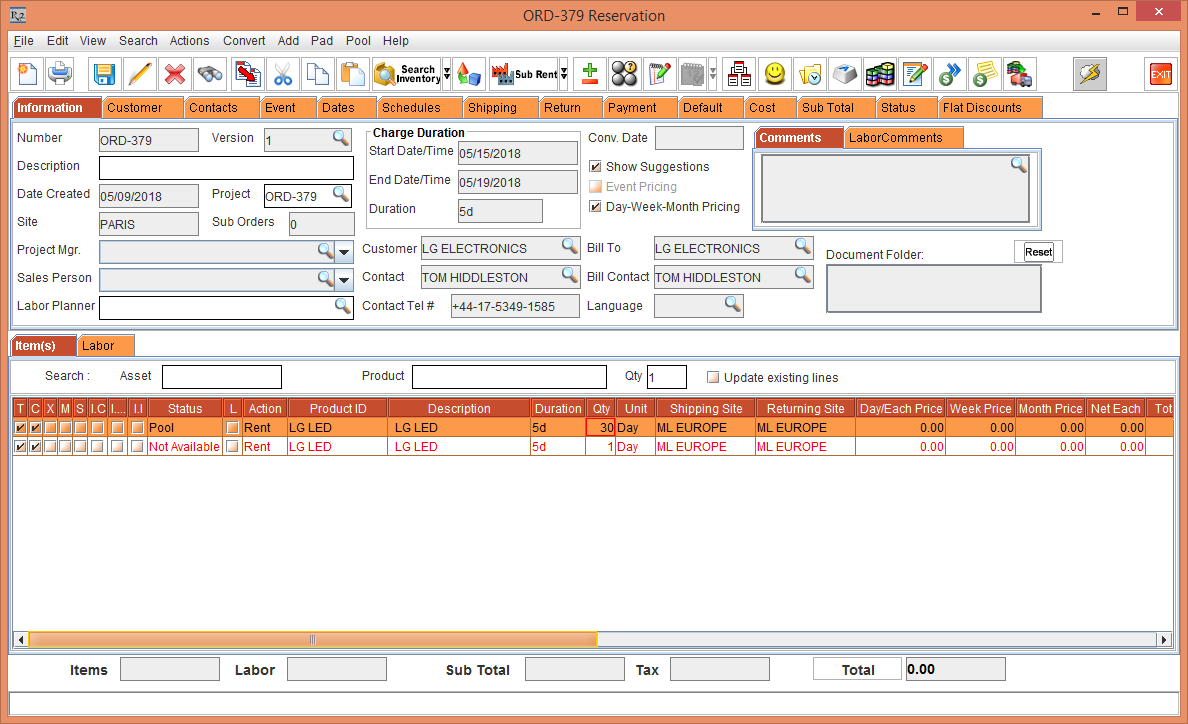
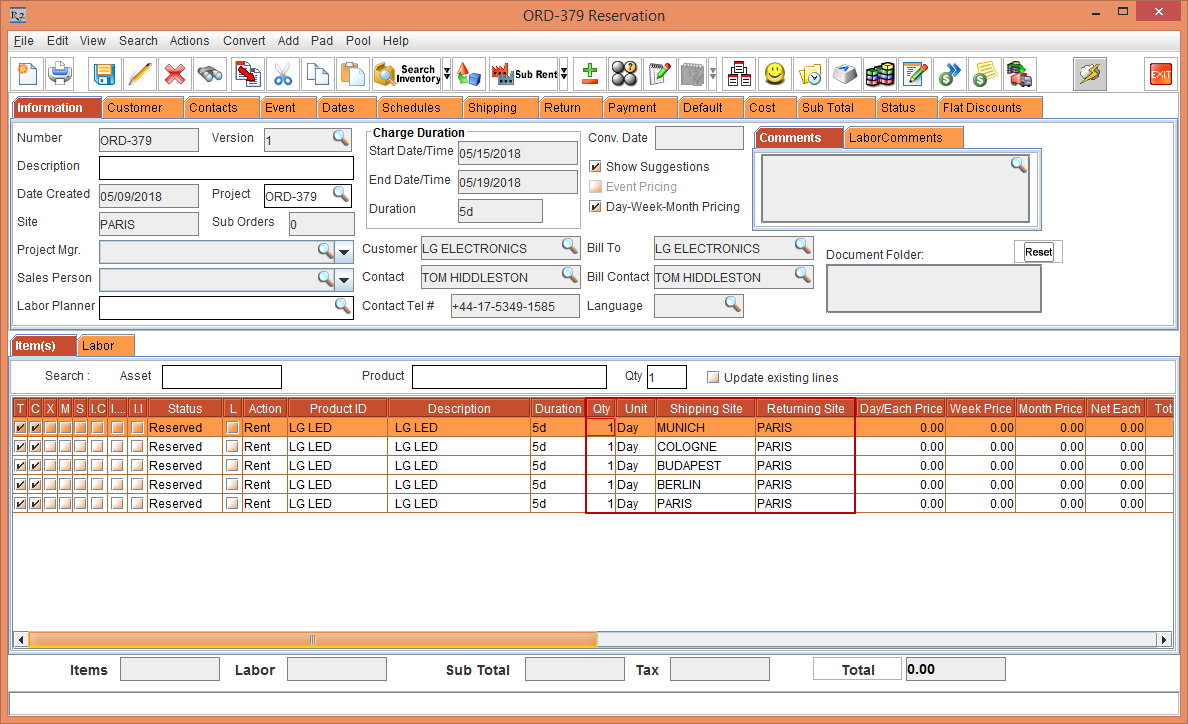
-
The Item [LG LED] gets resolved based on the defined Order Header level Site Preference in the E-Pool Site Preference window. The Order [ORD-379] displays the Item [LG LED] distribution, as shown in the Figure 2.7.
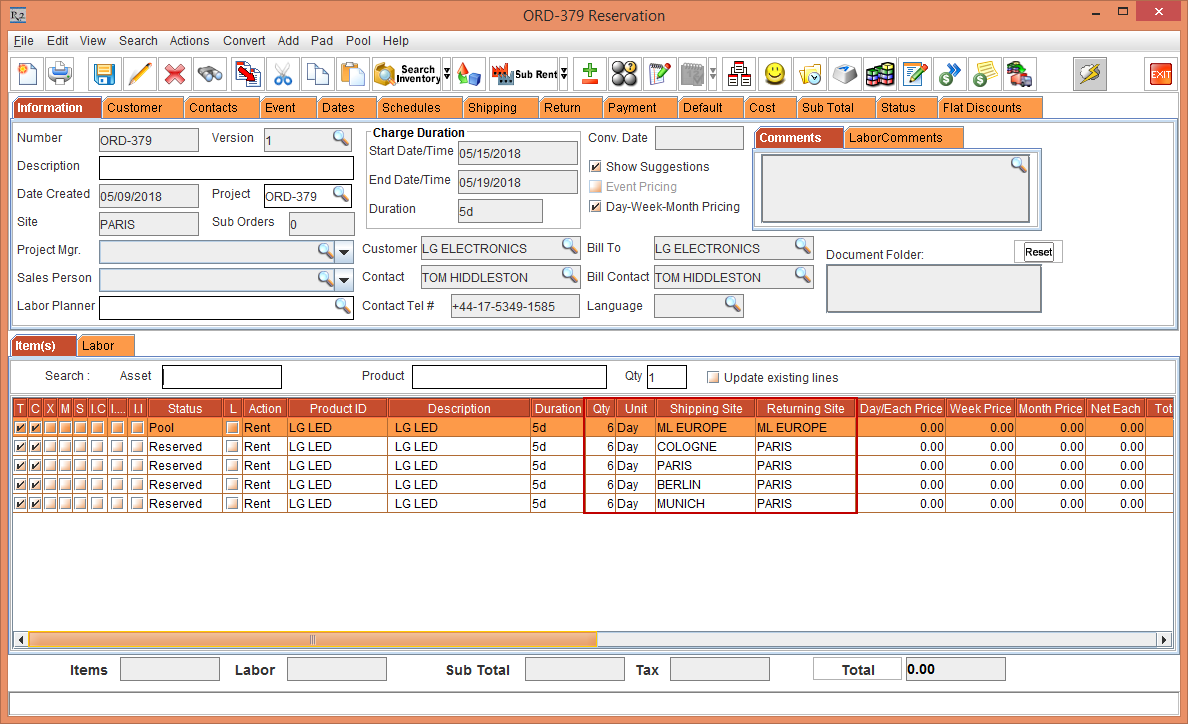
-
In the Order [ORD-379] the Serial Item [LG LED] with 30 Qty is assigned and distributed at different Site levels, as shown in the below Table 2.0.
Table 2.0 Sub-Region window displaying the E-Pool Configuration fields
|
Shipping Site |
Quantity |
Status |
|
ML EUROPE |
6 |
Pool |
|
COLOGNE |
6 |
Reserved |
|
PARIS |
6 |
Reserved |
|
BERLIN |
6 |
Reserved |
|
MUNICH |
6 |
Reserved |
-
From the above Figure 2.7 and Table 2.0, it is noticed that from the 30 Item Qty, 24 Item Qty is assigned to various Sites modifying the Status to Reserved. Whereas 6 Item Qty is assigned to the Sub-Region [ML EUROPE]. Although the 6 item Qty is not available in any of the Sites the Item line Status is not displayed as Not Available instead it is displayed as Pool, as the stock is still available at the Pool level.
-
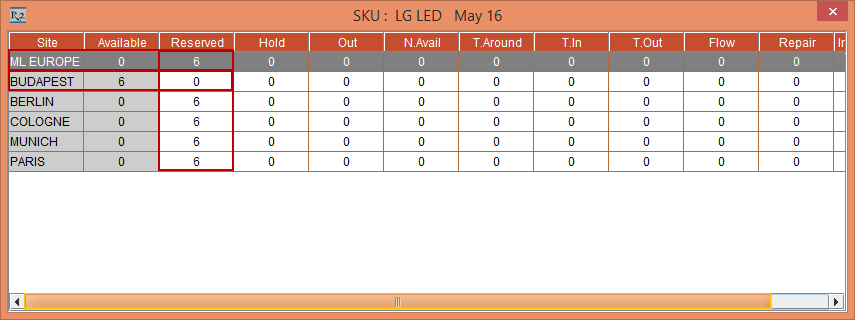
Select the Item line in Pool Status and click the Availability icon. The Availability - LG LED window is displayed.
-
Click on the Date [16-May -2018] in the Calendar to view the availability of the Serial Item [LG LED].
-
The Available column at the Sub-Region [ML EUROPE] displays as [0] whereas the Reserved column displays as [6]. The Reserved column at the various Site levels is displayed as [24] except for the Site [BUDAPEST] displaying as [0], as the Site [BUDAPEST] check box is not selected in the Pool menu > Site Preference option > E-Pool Site Preference window, as shown in Figure 2.5.
-
Exit the Availability window.
Line Resolve
The Item [LG LED] blocked at the Pool level or the Sub-Region level can now be blocked at the Site level by performing a Line level Resolve. The below steps allows you to block the Item at the Site level.
Scenario 1
-
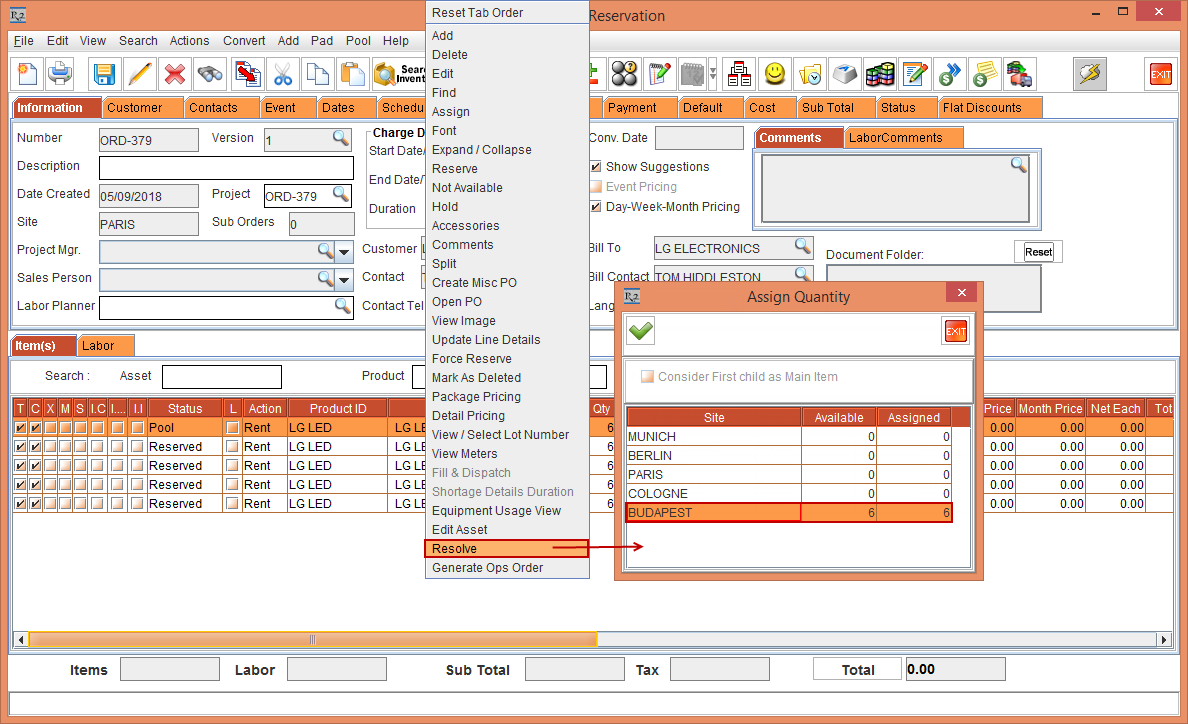
In the Rental Reservation Order [ORD-379], select the Serial Item [LG LED] with the Pool Status > right-click > Resolve option. The Assign Quantity window is displayed with the modified Site Preference that is reflected and is applicable only to the current Order [ORD-379].
The Site [BUDAPEST] that was cleared at the Pool menu > Site Preference option > E-Pool Site Preference window displays at the end in the Assign Quantity window. -
Select the Site [BUDAPEST] comprising of 6 Item Qty, as shown in Figure 2.9.
-
Click OK. The Serial Item [LG LED] in Pool Status and 6 Item Qty is modified to Reserved Status with the Shipping Site [BUDAPEST] and the Returning Site [PARIS], as shown in Figure 2.10.

Irrespective of the Shipping Site and the Returning Site, while generating the Invoice, Revenue, and Payments only the Order Site is considered for any billing.
-
Select all the Item lines by clicking [CTRL+A] using the Keyboard > Select the Pool menu > Reserve Back To Pool option. The system displays a prompt with the message "Do you want to Reserve Back to Pool for the selected lines?" with a Yes and No buttons, as shown in Figure 2.11.
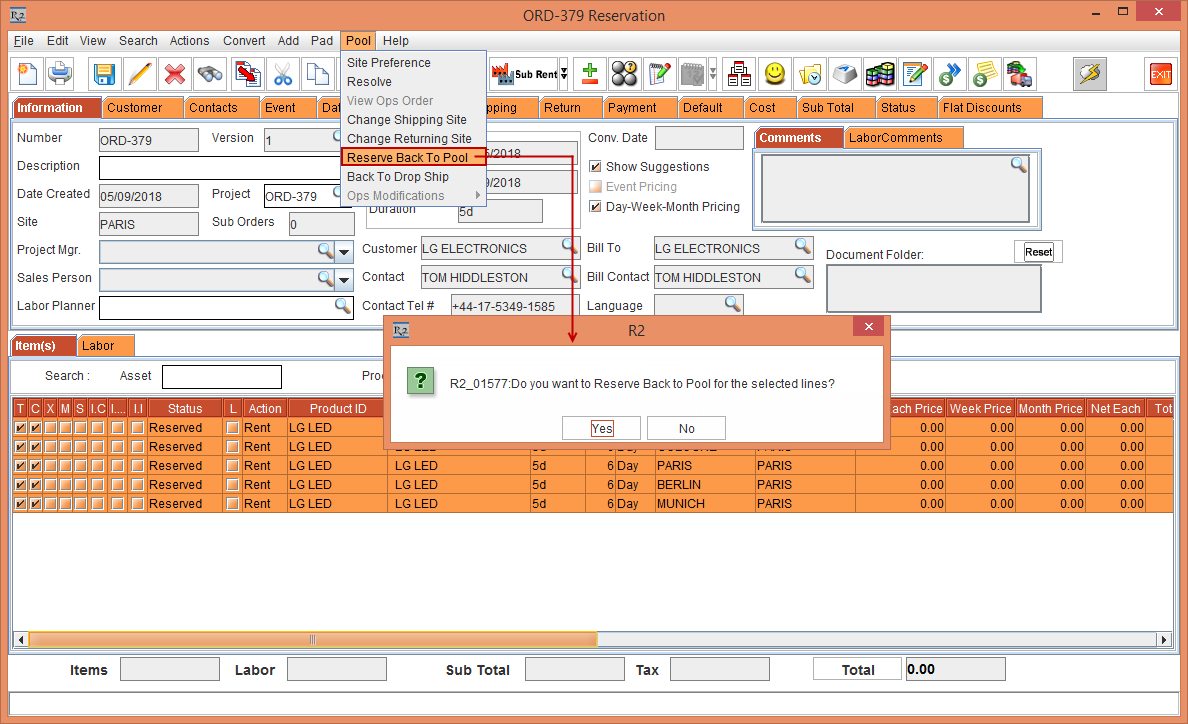
-
Select Yes. The six Item lines with 6 Qty each in Reserved Status gets merged to a single Item line displaying as 30 Qty and modified Item Status to Pool. The Shipping Site and Returning Site is modified to the Sub-Region [ML EUROPE], as shown in Figure 2.12

Scenario 2
-
In the Rental Reservation Order [ORD-379], select the Pool menu > Site Preference option > E-Pool Site Preference window.
-
Select the Site [BUDAPEST] check box. Reset the Order level Site preference to [PARIS], [BERLIN], [BUDAPEST], [COLOGNE], and [MUNICH].
-
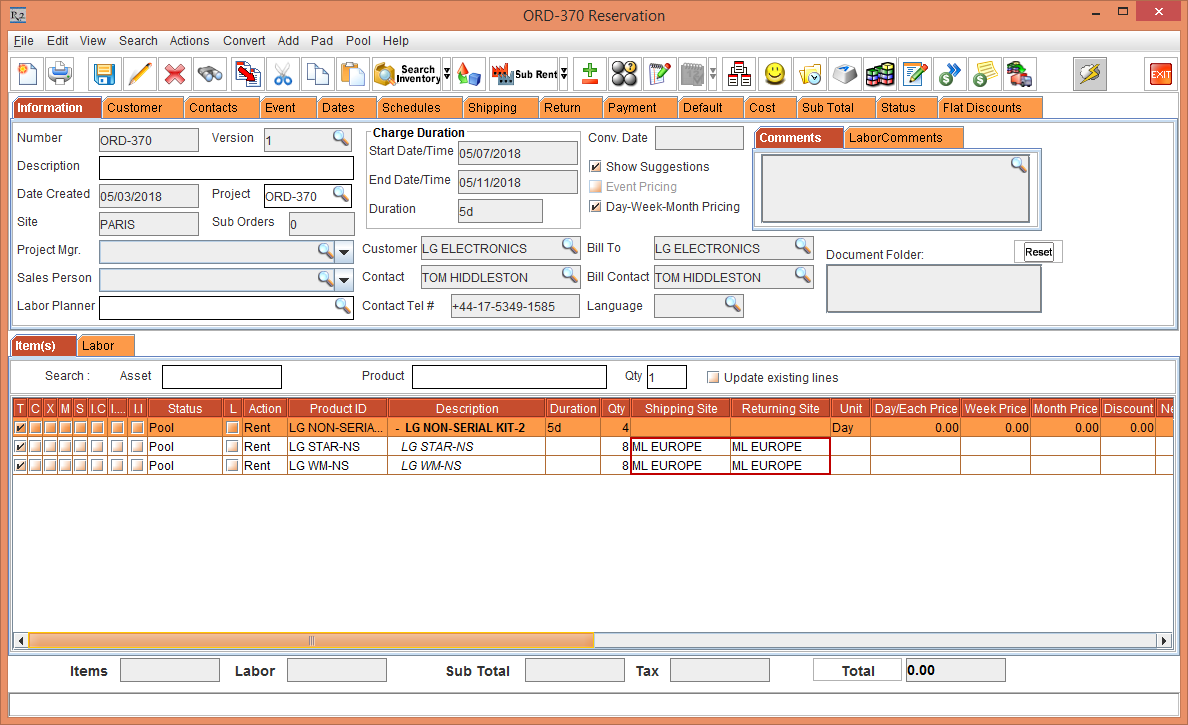
Modify the Serial Item [LG LED] Qty to 5, as shown in Figure 2.13.

-
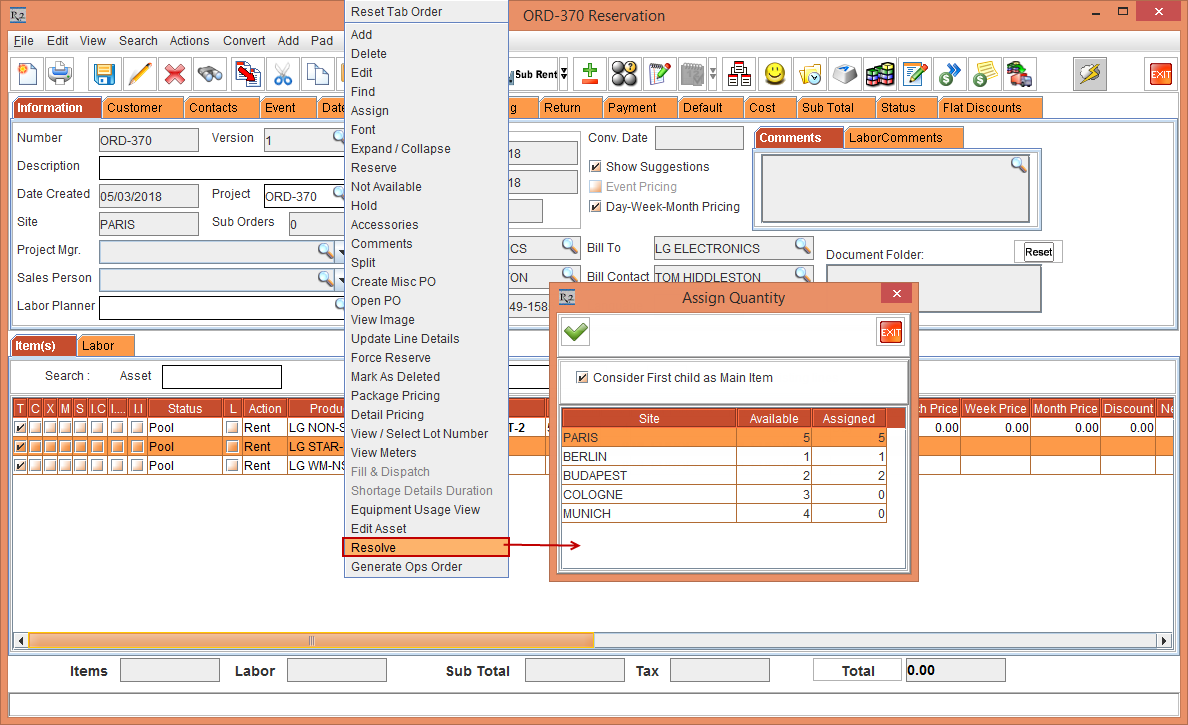
Select the Item [LG LED] line, right-click and select the Resolve option. The Assign Quantity window is displayed with the Order Site [PARIS] first followed by the order of Sites in the Site level Site Preference [BERLIN], [BUDAPEST], [COLOGNE], and [MUNICH], as shown in Figure 2.14.
-
The Assign Quantity window displays the Item distribution and availability of the Item quantity within the Sites tagged to the Sub-Region, allowing you to Assign the Item quantity depending on the Available quantity in each of the desired Site. If the entered Assigned quantity exceeds the Available quantity, the assigned Item quantity gets auto adjusted within all the Sites.
-
Assign 1 Item Qty to each of the Site [PARIS], [BERLIN], [BUDAPEST], [COLOGNE], and [MUNICH]. Click OK.
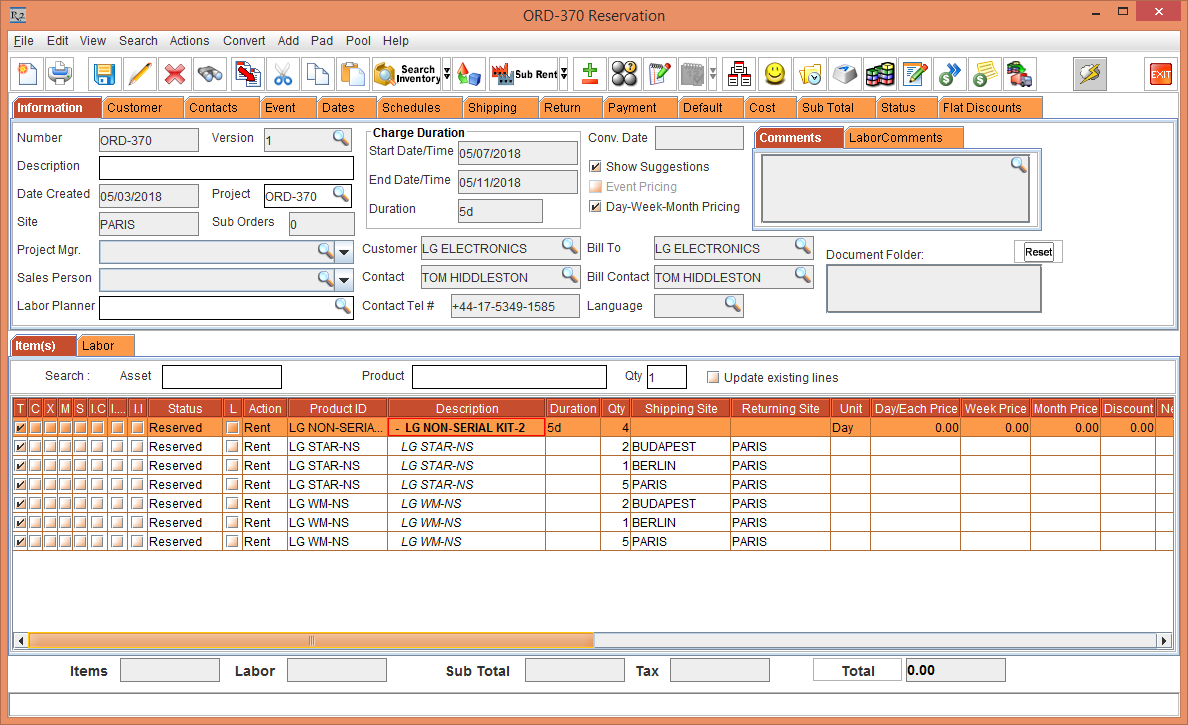
-
The Serial Item [LG LED] line Status with 5 Qty. is equally distributed displaying with 1 Item Qty to all the Sites.
-
The Shipping Sites for each of the Item line is displayed as [PARIS], [BERLIN], [BUDAPEST], [COLOGNE], and [MUNICH] with the Order Site as the Returning Site [PARIS] and the Status modified to Reserved, as shown in Figure 2.15.
-
Exit the Rental Reservation Order [ORD-379] window.
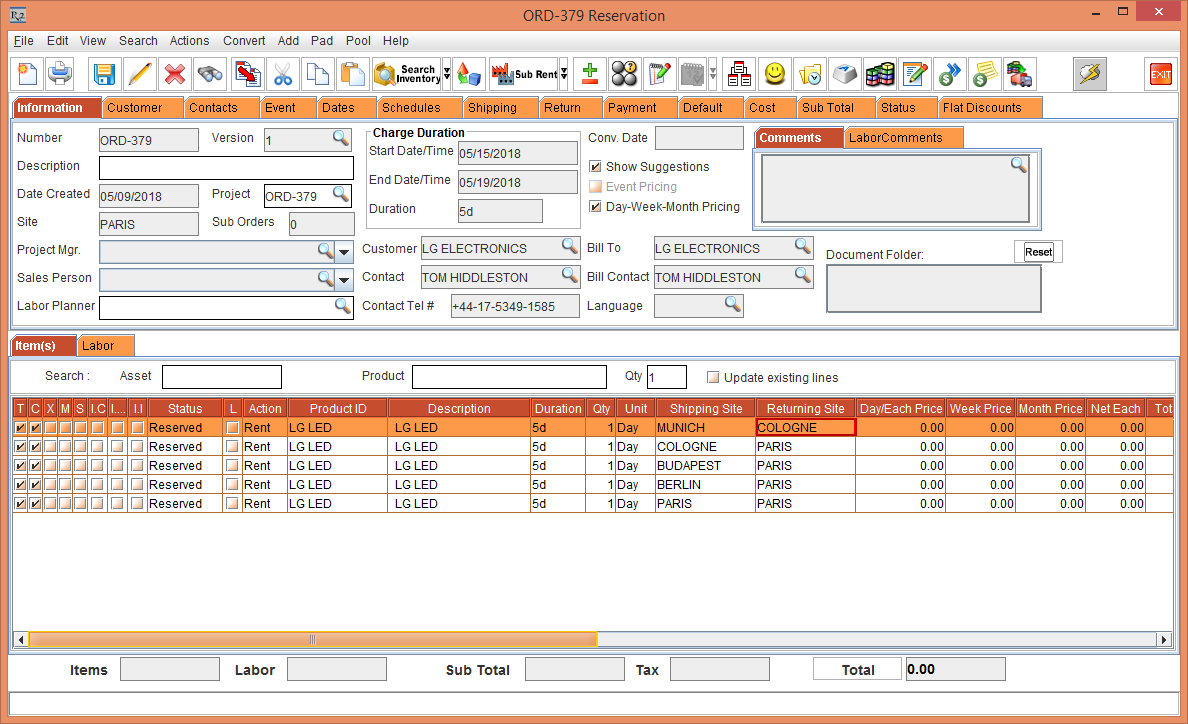
Changing the Shipping Site and Returning Site
Scenario 1: Modifying Shipping and Returning Site at the Item Line level
You can modify the Shipping Site and Returning Site in the Item lines as required by following the below steps:
-
In the Rental Reservation Order [ORD-379], the Shipping Sites for each of the Item line is displayed as [PARIS], [BERLIN], [BUDAPEST], [COLOGNE], and [MUNICH] with the Order Site as the Returning Site [PARIS] and the Status modified to Reserved, as shown in Figure 2.15.
-
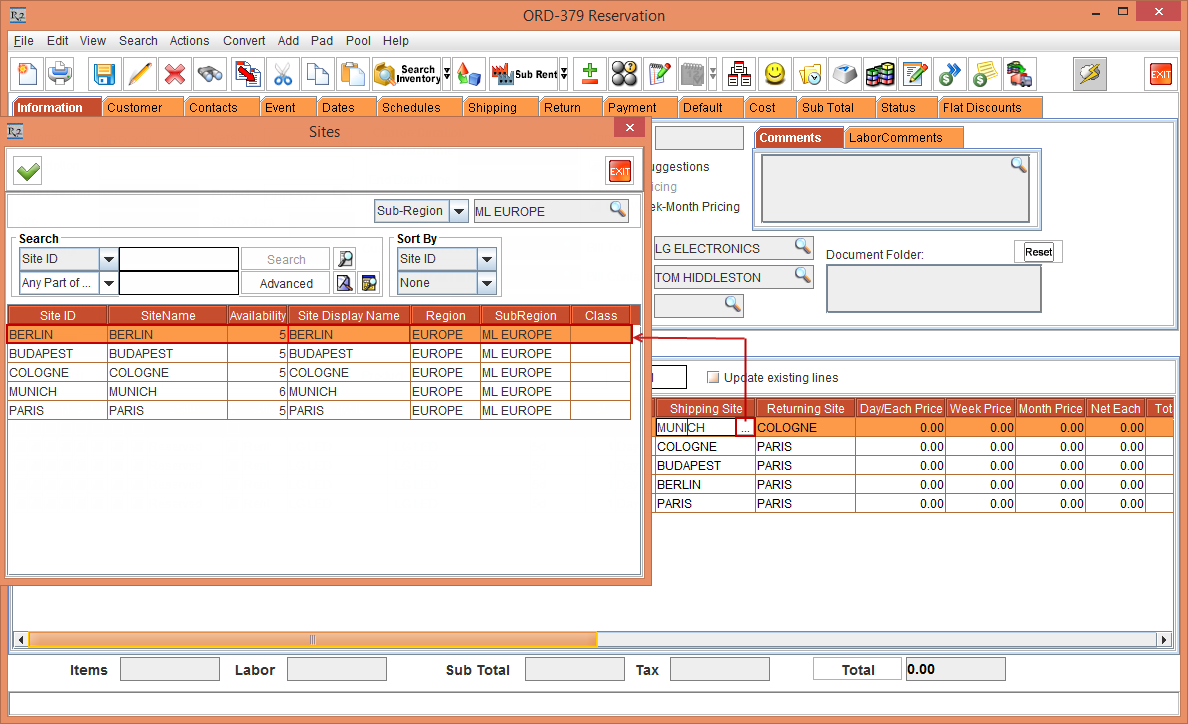
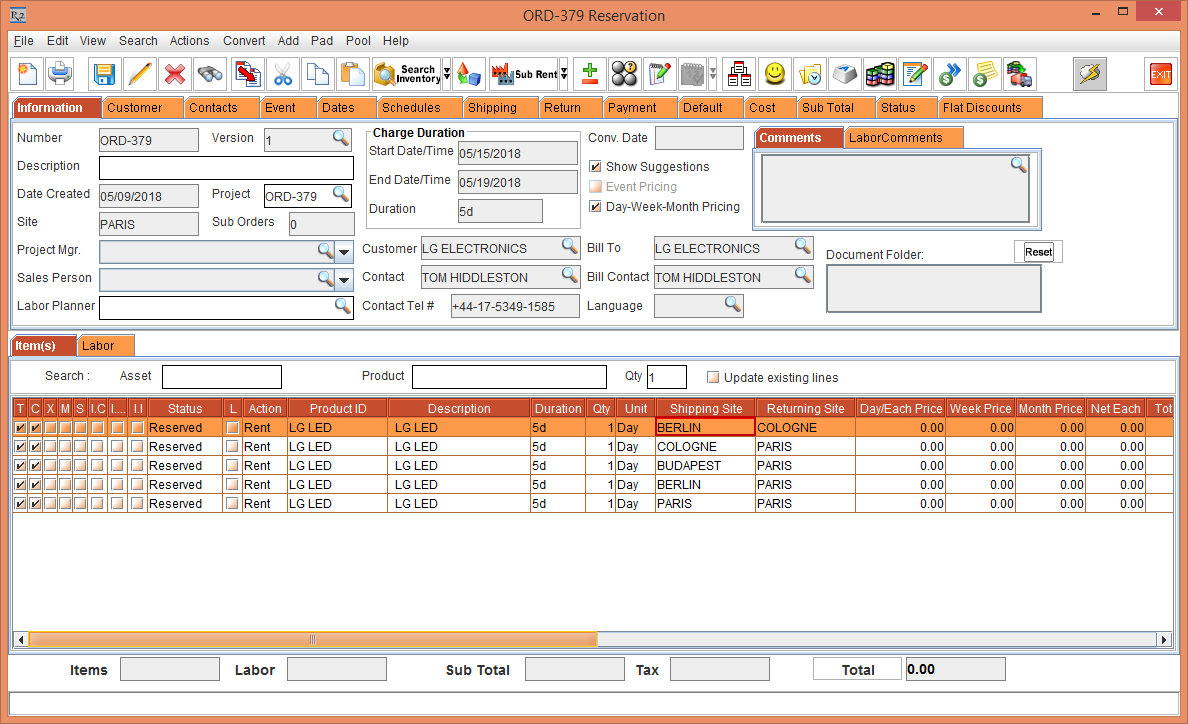
Click the More icon in the Returning Site column. The Sites window is displayed. Double-click and tag another Site [COLOGNE], as shown in Figure 2.16.
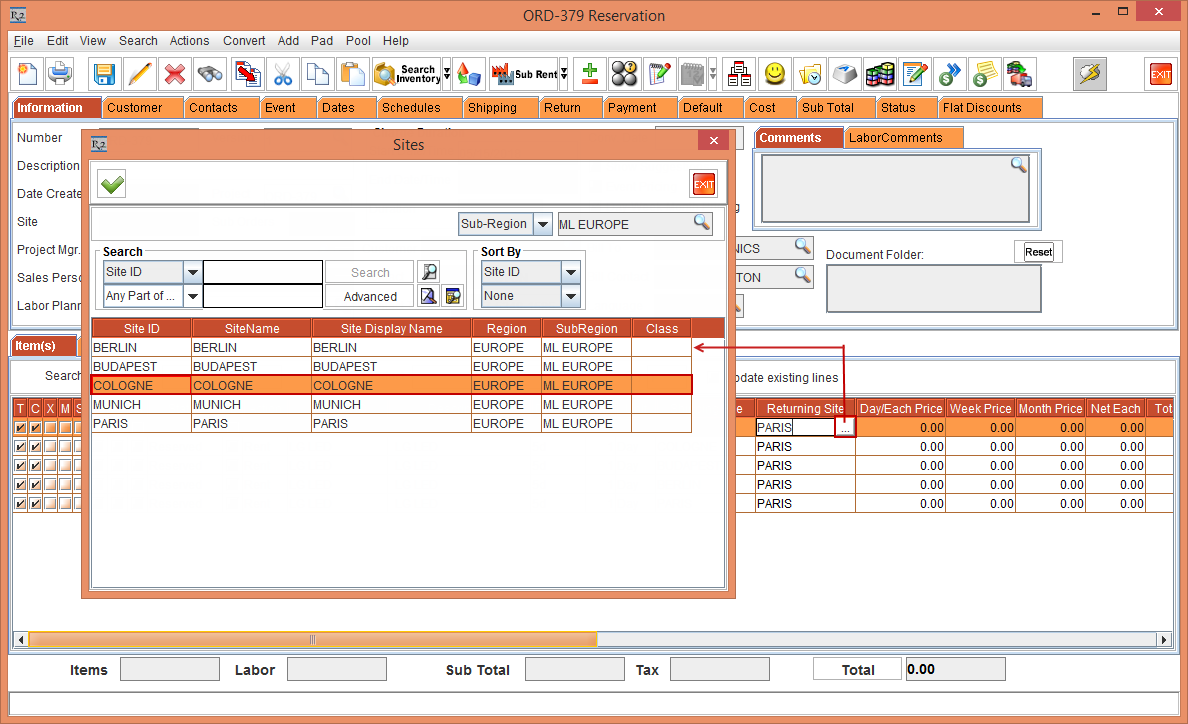
-
The Returning Site is now modified to [COLOGNE], as shown in Figure 2.17.
-
Click the More icon in the Shipping Site column. The Sites window is displayed. Double-click and tag another Site [BERLIN], as shown in Figure 2.18.
-
The Shipping Site is now modified to [BERLIN], as shown in Figure 2.19.
-
Select the Item line [LG LED] with the Shipping Site [BERLIN] and Returning Site [COLOGNE] and click the Availability button. Verify the availability of the Item [LG LED] after performing the Item to Reserved status from Pool status. The Availability window is displayed.
-
Click the date [16-May-2018]. The SKU: LG LED May 16 window is displayed.
-
The total availability of the Item [LG LED] in the Sub-Region [ML EUROPE] is 25. After performing 5 Items to Reserved status at the Sites [COLOGNE], [BUDAPEST], [PARIS] and [BERLIN], the total Item [LG STAR] availability in the Region [ML EUROPE] is modified to 25 with the 5 Items Reserved to the Sites [COLOGNE], [BUDAPEST], [PARIS] and [BERLIN], as shown in Figure 2.20.

-
Exit the Availability window.
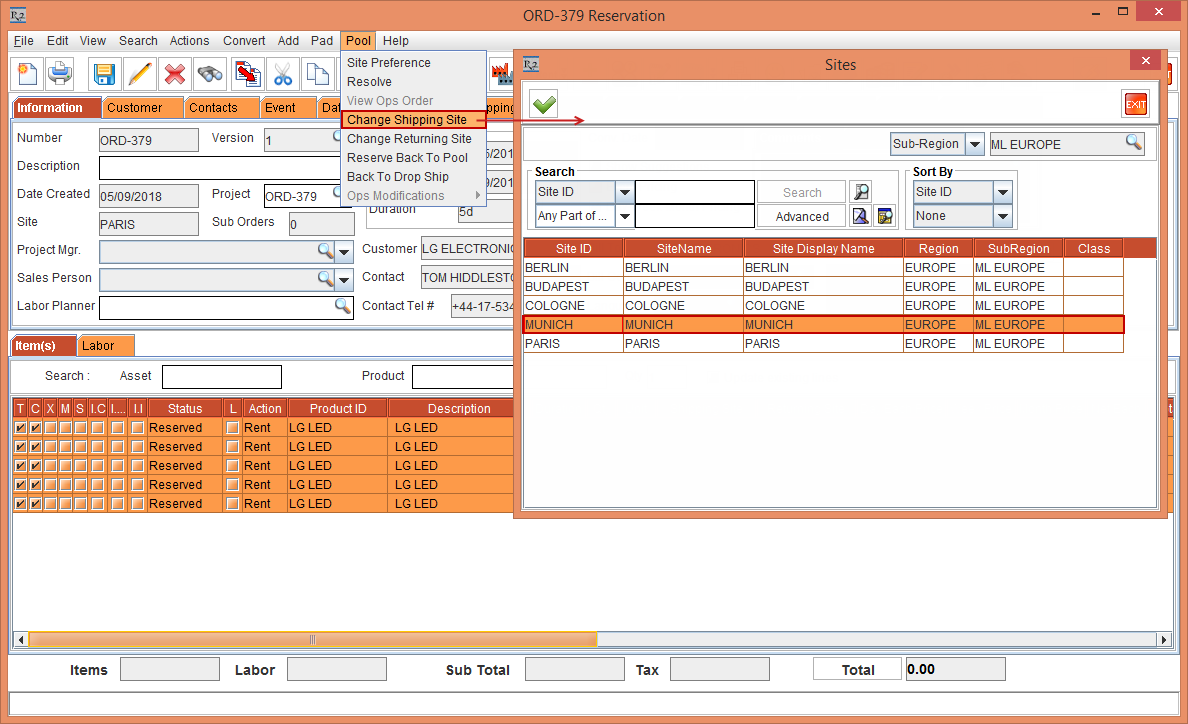
Scenario 2: Modifying the Shipping and Returning Site for all the Item lines from at once from the Order Header level
You can modify the Shipping Site for all the selected Item lines at once by following the below steps:
-
Open the Order [ORD-379].
-
Select all the Item lines by clicking [CTRL+A] using the Keyboard > Select the Pool menu > Change Shipping Site option. The Sites window is displayed.
-
Select and tag the Site [MUNICH], as shown in Figure 2.21.
-
The Shipping Site for all the Item lines is modified to Site [MUNICH], as shown in Figure 2.22.
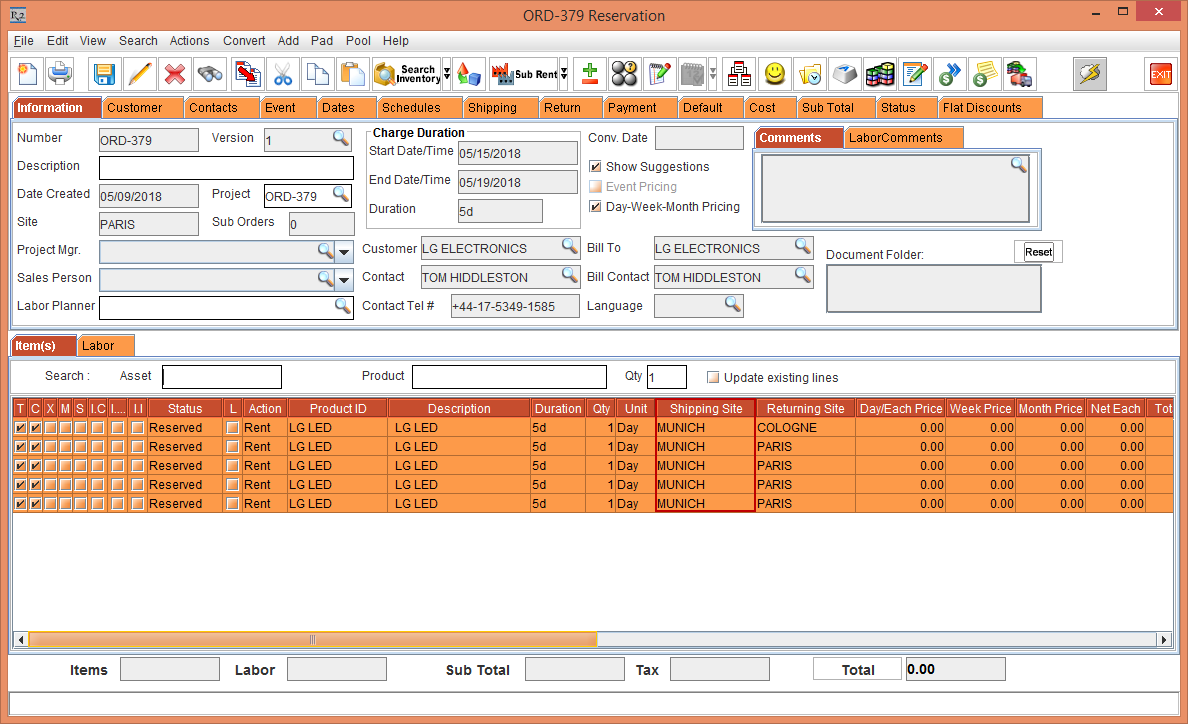
You can modify the Returning Site for all the Item lines at once by selecting the Pool menu > Change Returning Site option.
-
Select the Item line [LG LED] and click on Availability icon. The Availability window is displayed.
-
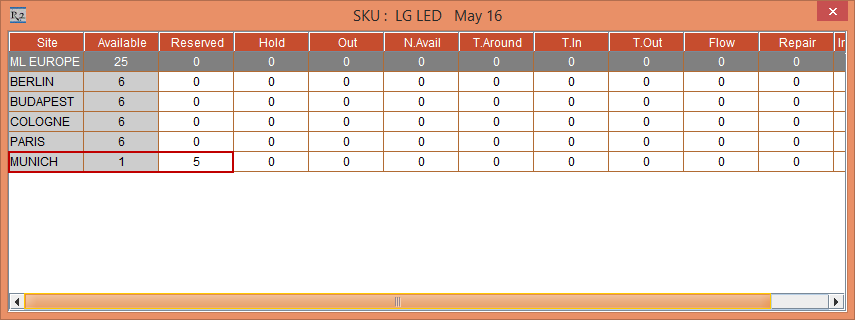
Click the Date [16-May-2018] to observe the Availability within the Order duration when the Shipping Site for all the Item lines is modified to Site [MUNICH].
-
The Site [MUNICH] is Reserved with 5 Item Qty with the other Sites displayed as 0 Qty, as shown in Figure 2.23.
-
Exit the Availability window for the Date [16-May-2018].
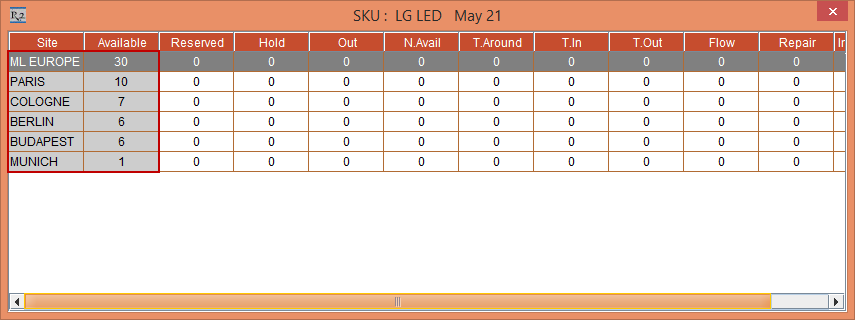
-
Click the Date [21-May-2018] to observe the Availability after the Order duration, when the Shipping Site for all the Item lines is modified to Site [MUNICH].
-
The Site [MUNICH] displays the Available Item Qty as 1, whereas the Site [PARIS] displays an increase in the Item Qty to 10 Qty and the Site [COLOGNE] displays an increase in the Item Qty to 7. The Site [MUNICH] returns 4 Item Qty to the Site [PARIS] and the Site [MUNICH] returns 1 Item Qty to the Site [COLOGNE] displaying a total of 30 Item Qty in the Sub-Region [ML EUROPE], as shown in Figure 2.21.
-
Exit the Availability window.
Reserve the Item Back to Pool Level
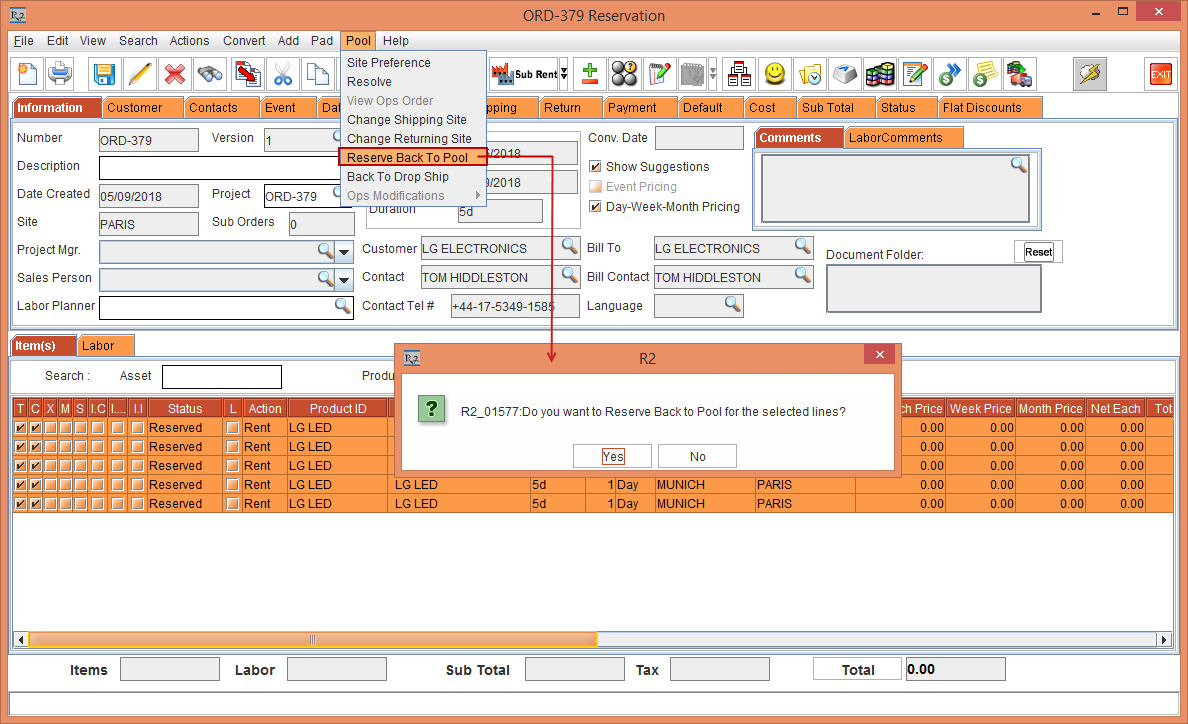
Before Filling and Shipping the Order, the Item that is Reserved at the Order level can be reserved back to the Pool level, by following the below steps:
-
In the Order [ORD-379], select all the Item lines by clicking [CTRL+A] using the Keyboard > select the Pool menu > Reserve Back To Pool option. The system displays a prompt with the message "Do you want to Reserve Back to Pool for the selected lines?" with a Yes and No buttons, as shown in Figure 2.22.
-
Select Yes. The six Item lines with 1 Qty each in Reserved Status gets merged to a single Item line displaying as 5 Qty and modified Item Status to Pool. The Shipping Site and Returning Site is modified to the Sub-Region [ML EUROPE], as shown in Figure 2.23.
-
Click the Availability icon.
-
Click on the Date [16-May-2018] in the Calendar to view the availability of the Serial Item [LG LED]. The Available column displays the Qty of the Serial Item [LG LED] as [25]. The Item Qty from the other Sites is reverted to the Sub-Region [ML EUROPE]. The Reserved column displays Qty of the Serial Item [LG LED] as [5] reserved to the Order [ORD-379], as shown in Figure 2.24.
-
Exit the Availability window.
-
Exit the Order [ORD-379].
Weight of the Item displayed Site Wise
The Weight of the Item with the Item Qty assigned to which Site is displayed in the Shipping tab.
-
Select the Account module. The Account window is displayed.
-
Tag a Company [LG].
-
Click the Reservation icon. The Order in Formation dialog box is displayed.
-
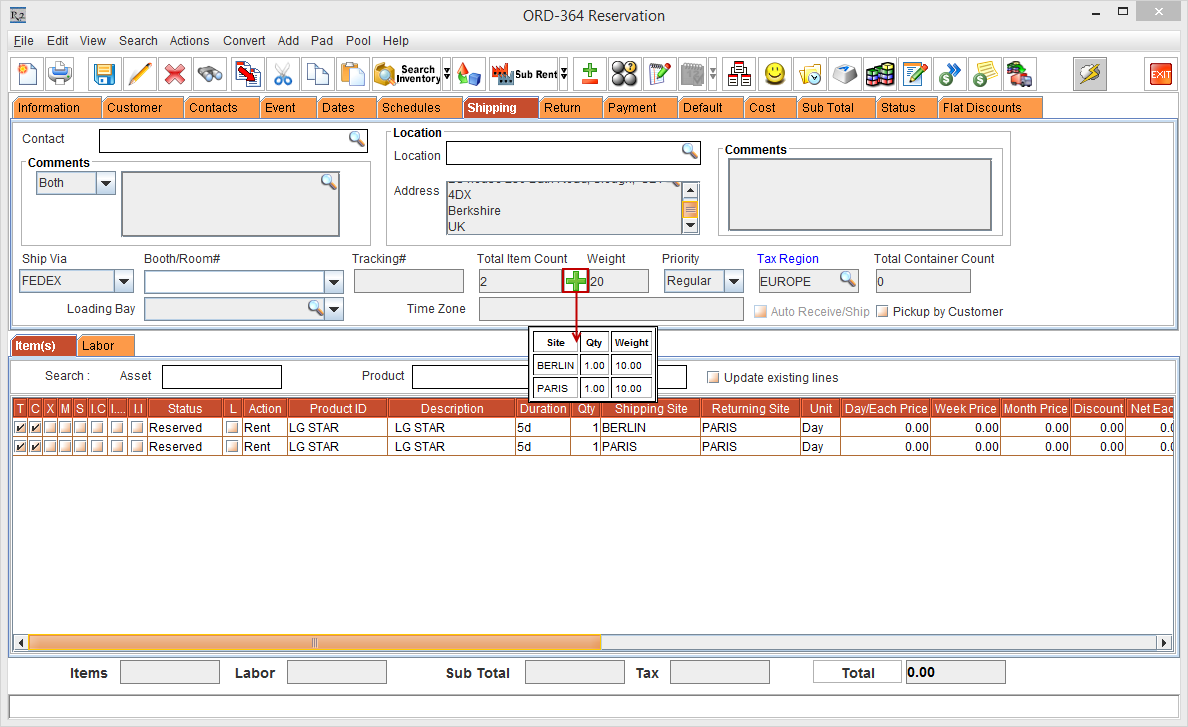
Create a Rental Reservation Order [ORD-364] for 5 days duration with the Start Date [05-May-2018], Start Time [09:00 AM] and End Date [10-May-2018] End Time [09:00 AM]. Click the Search Item icon. The Search Items window is displayed.
-
Search and add the Serial Item [LG STAR] with 2 Qty. The Status of the Serial Item [LG STAR] is displayed as Pool with the Shipping Site [ML EUROPE] and Returning Site [ML EUROPE].
The Item [LG STAR] Weight is entered as 10.00g in the Item Edit window.
-
Select the Item [LG STAR] line, right-click and select the Resolve option. The Assign Quantity window is displayed.
-
Assign the 1 Item Qty each to the Sites [BERLIN] and [PARIS]. Two Item lines are displayed with the Status as Reserved.
-
Select the Shipping tab.
-
Click the Site Wise icon, a window depicting the Weight of the Item with the Qty assigned Site wise is displayed, as shown in Figure 2.25.
-
Exit the Order [ORD-364].
Warehouse Task
The Warehouse task is generated based on the Shipping and the Returning Sites. For an Item line, if the Shipping Site is different from that of the Returning Site then Prep task and Ship task is generated for the Shipping Site and Pickup task and Return task is generated for the Returning Site.
-
The System Date is set to [02-May-2018].
-
Select the Account module. The Account window is displayed.
-
Tag a Company [LG].
-
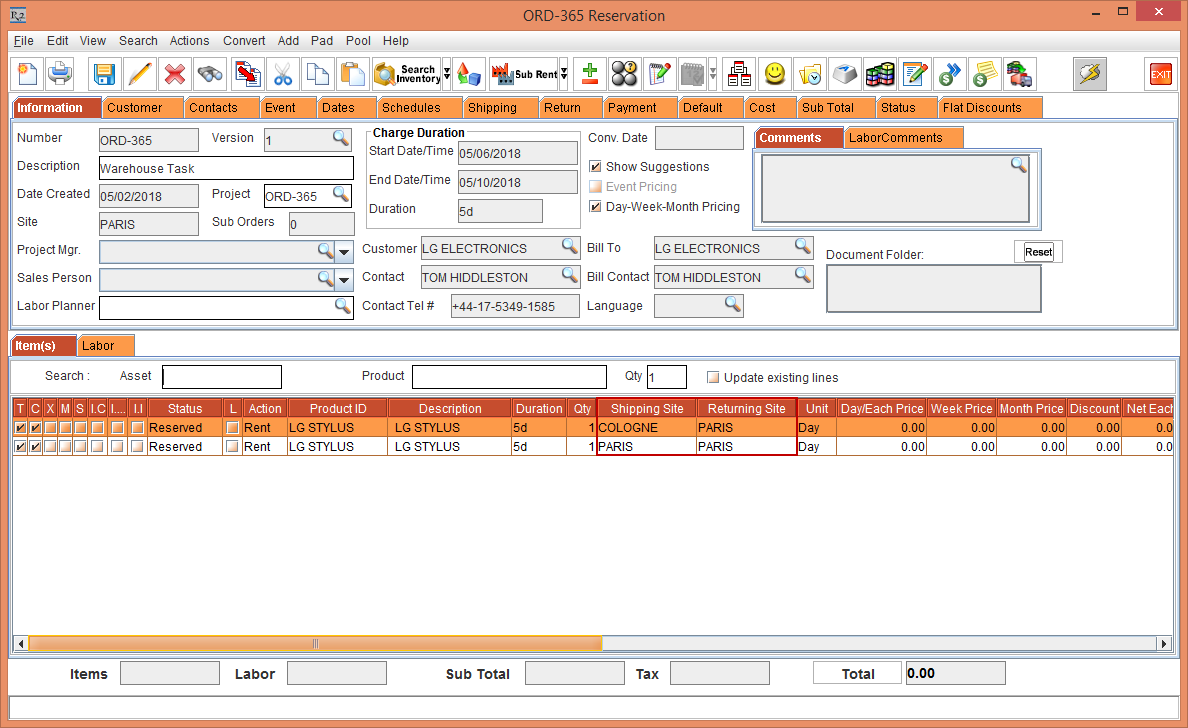
Create a Rental Reservation Order [ORD-365] for 5 days duration with the Start Date [06-May-2018], Start Time [09:00 AM] and End Date [11-May-2018] End Time [09:00 AM].
-
Click the Search Item icon. The Search Items window is displayed.
-
Search and Add for the Serial Item [LG STYLUS]. The Status of the Serial Item [LG STYLUS] is displayed as Pool due to the Cutoff time in days within the Sub-Region window provided as [3]. The Shipping Site and the Returning Site displays the name of the Sub-Region [ML EUROPE], as the Item is reserved at the Sub-Region level.
-
Select the Item line > right-click > Resolve option. The Assign Quantity window is displayed.
-
Assign 1 Item Qty to each of the Site [COLOGNE] and [PARIS]. Click OK.
-
The Serial Item [LG STYLUS] line Status with 2 Qty. is equally distributed displaying with 1 Item Qty to the Sites [COLOGNE] and [PARIS].
-
The Shipping Sites for each of the Item line is displayed as [COLOGNE] and [PARIS] with the Order Site as the Returning Site [PARIS] and the Status modified to Reserved, as shown in Figure 2.26.
-
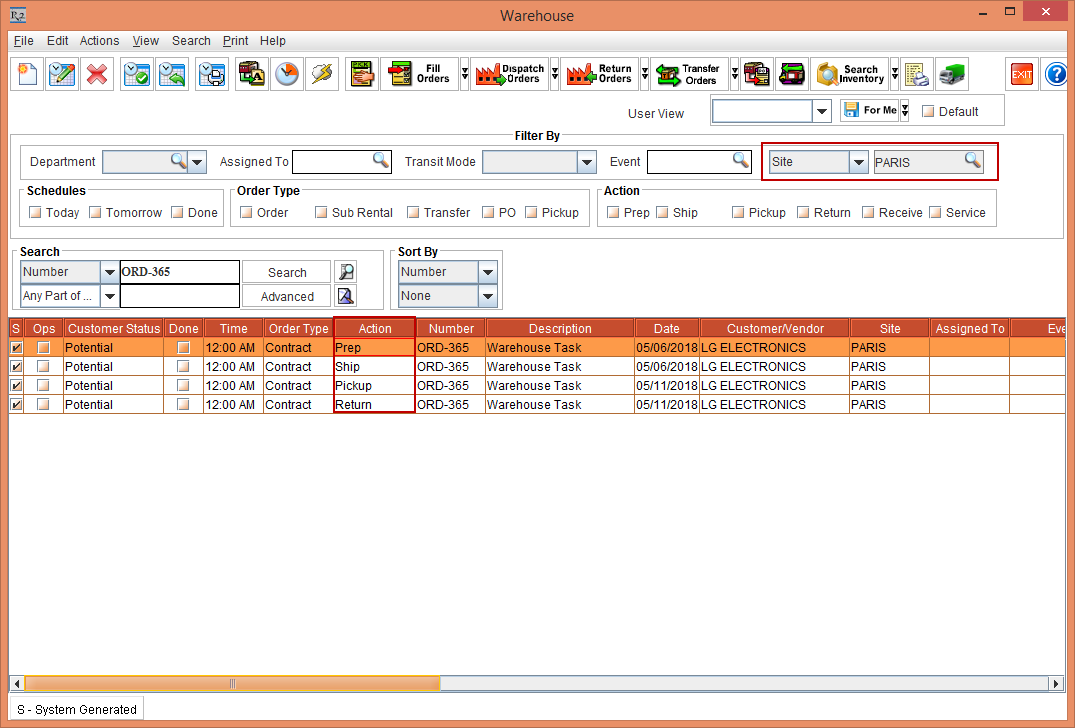
Select the Warehouse module. The Warehouse window is displayed.
-
Click the Site importable button and modify the Site</ span=""> to COLOGNE as it is the Shipping Site for one of the Item line.
-
Search for the Order [ORD-365]. The Prep Task and Ship Task is generated, as shown in Figure 2.27.
-
Double-click and open the line with the Action [PREP]. The Fill Order [ORD-365 Order Fill] window with the Shipping Site column [COLOGNE] and the Site field [COLOGNE] is displayed, as shown in Figure 2.28.
-
Fill the Item with Asset [LG STYLUS-13]. The Asset [LG STYLUS-13] Status is displayed as Filled, as shown in Figure 2.29.
-
Close the Fill Order [ORD-365 Order Fill] window.
-
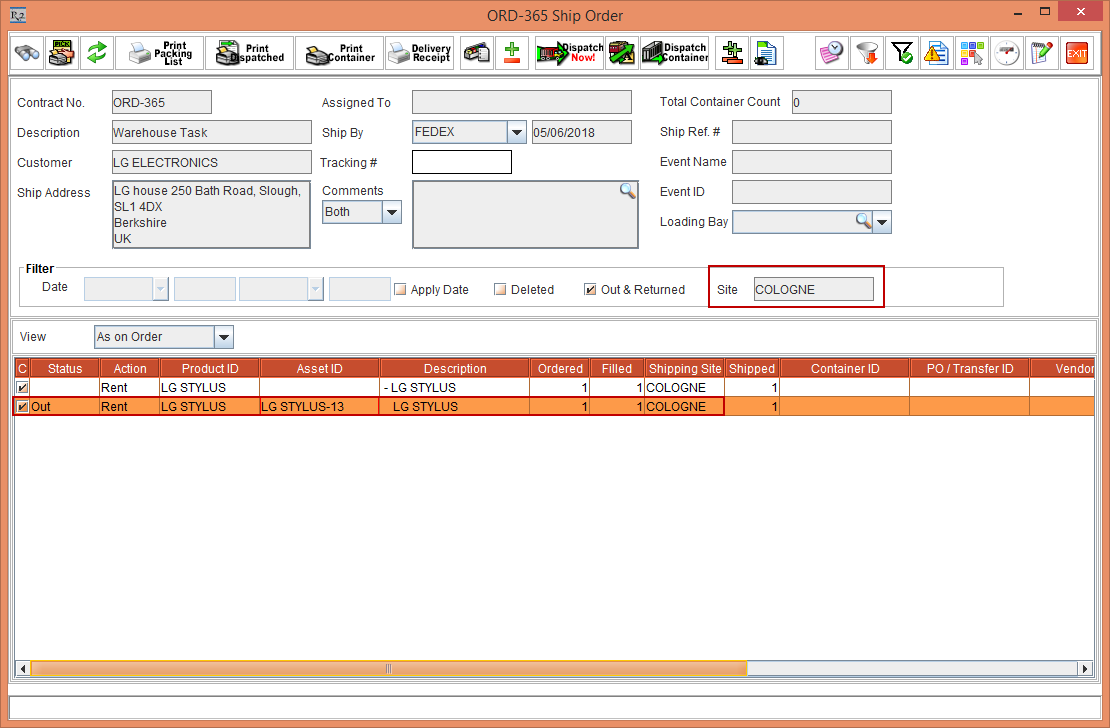
From the Warehouse window, double-click and open the line with the Action [SHIP].
-
The Ship Order [ORD-365 Ship Order] window with the Shipping Site column [COLOGNE] and Site field [COLOGNE] is displayed, as shown in Figure 2.30.
-
Ship the Asset [LG STYLUS-13]. The Asset [LG STYLUS-13] Status is displayed as Out, as shown in Figure 2.31.
-
Exit the Ship Order [ORD-365 Ship Order] window.
-
From the Warehouse window, click the Site importable button and modify the Site to PARIS, as it is the Returning Site for one Item line and the Shipping Site and Returning Site for another Item line.
-
Search for the Order [ORD-365]. The Prep Task, Ship Task, Pickup Task, and Return Task is generated, as shown in Figure 2.32.
-
Double-click and open the line with the Action [PREP]. The Fill Order [ORD-365 Order Fill] window with the Shipping Site column [PARIS] and the Site field [PARIS] is displayed.
-
Fill the Item with Asset [LG STYLUS-25]. The Asset [LG STYLUS-25] Status is displayed as Filled.
-
Exit the Fill Order [ORD-365 Order Fill] window.
-
From the Warehouse window, double-click and open the line with the Action [SHIP]. The Ship Order [ORD-365 Ship Order] window with the Shipping Site column [PARIS] and the Site field [PARIS] is displayed.
-
Ship the Item with Asset [LG STYLUS-25]. The Asset [LG STYLUS-25] Status is displayed as Out.
-
Exit the Ship Order [ORD-365 Ship Order] window.
-
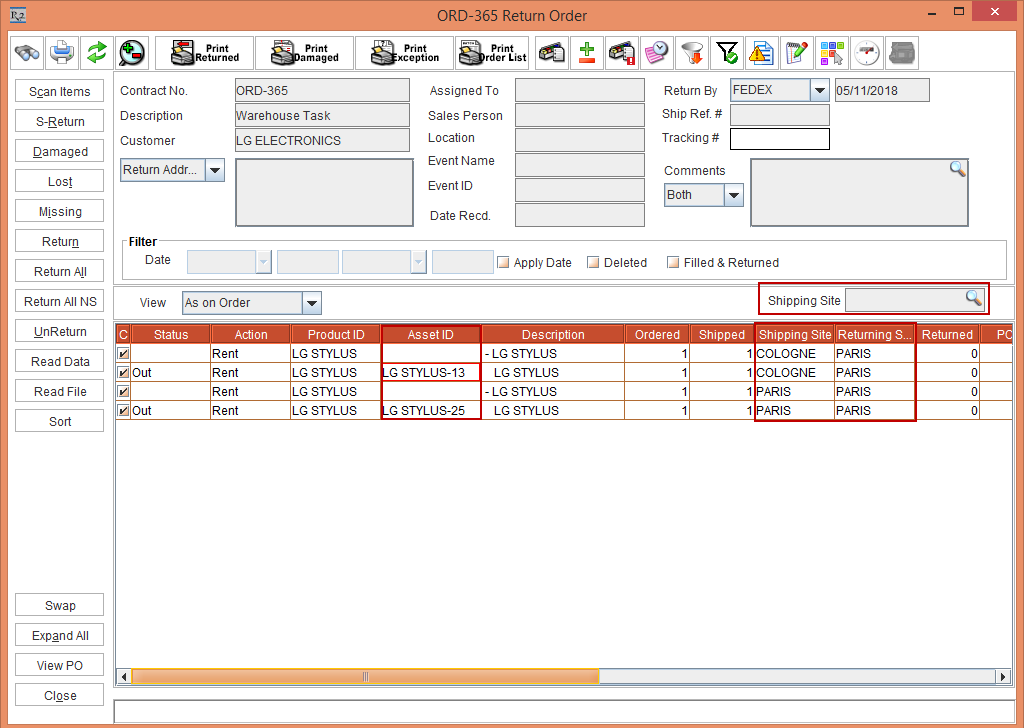
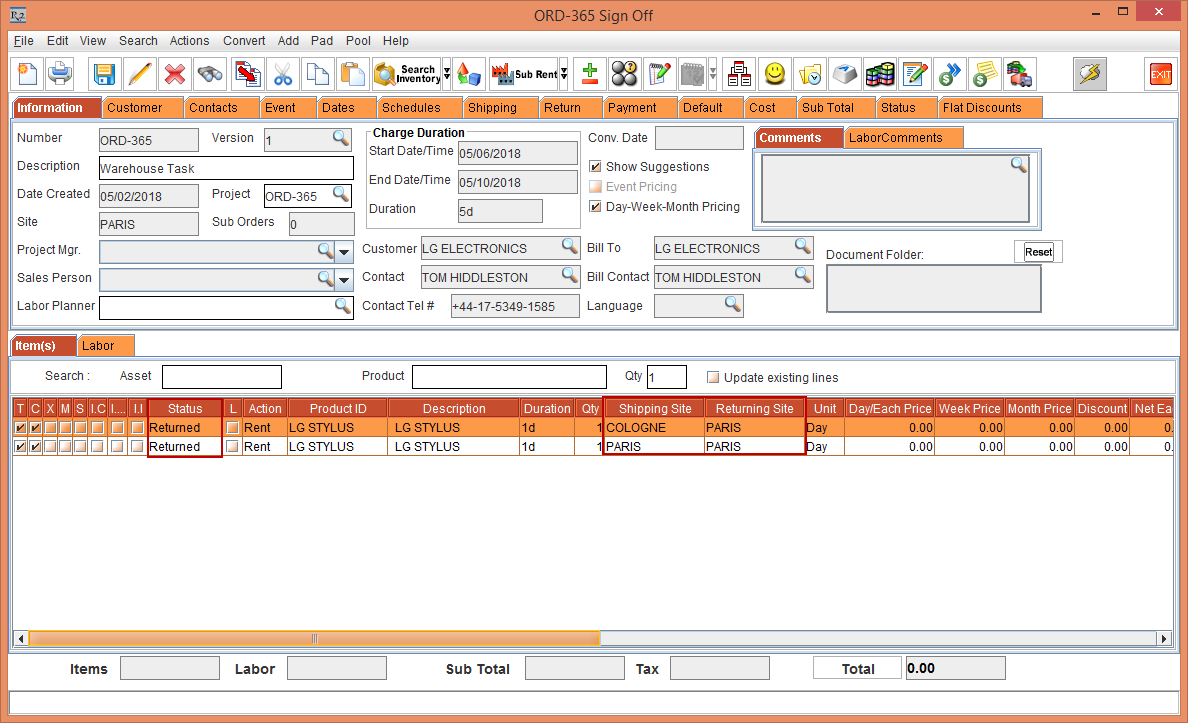
From the Warehouse window, double-click and open the line with the Action [RETURN]. The Return Order [ORD-365 Return Order] window is displayed.
-
The Return Order [ORD-365 Return Order] window displays the in Formation with the Shipping Site and Returning Site for the Assets [LG STYLUS-13] and Asset [LG STYLUS-25] in the Sites [COLOGNE] and [PARIS], as shown in the Table 2.1 and Figure 2.33.
Table 2.1 Return Order [ORD-365 Return Order] in Formation
|
Asset ID |
Shipping Site |
Returning Site |
|
LG STYLUS-13 |
COLOGNE |
PARIS |
|
LG STYLUS-25 |
PARIS |
PARIS |
-
You can view and Return the Assets from an individual Sites by selecting and applying the Site filter from the Shipping Site importable field.
-
Click the Shipping Site importable button. The Sites window is displayed.
-
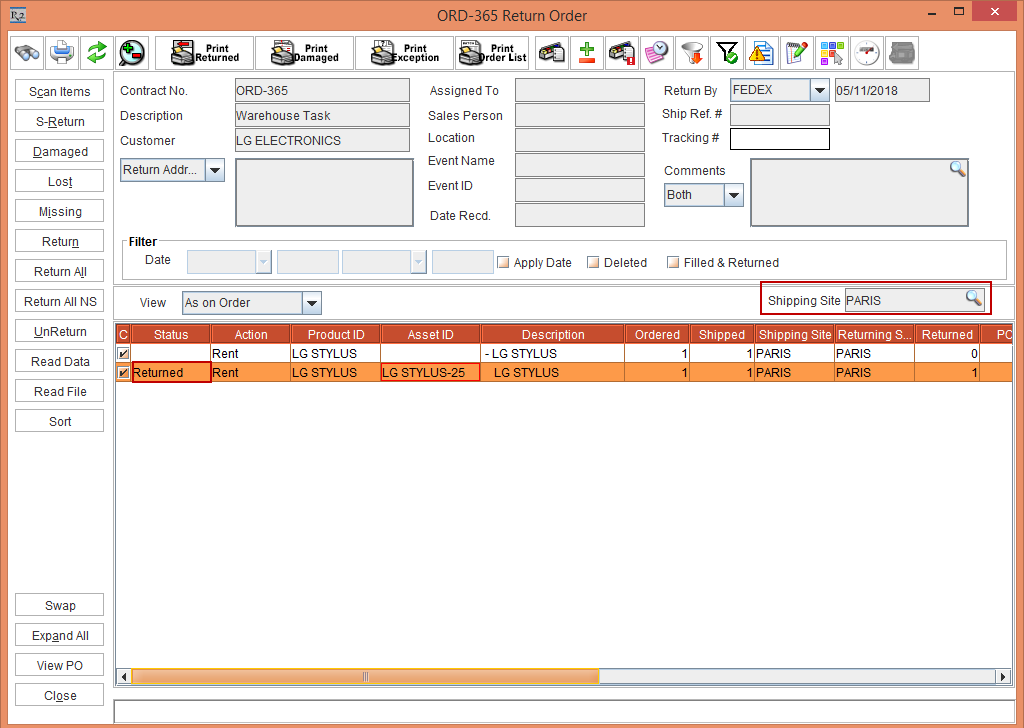
Tag the Site [PARIS] and click the Refresh button. The Asset [LG STYLUS-25] that is in Status [Out] only in the PARIS site is displayed, as shown in Figure 2.34.
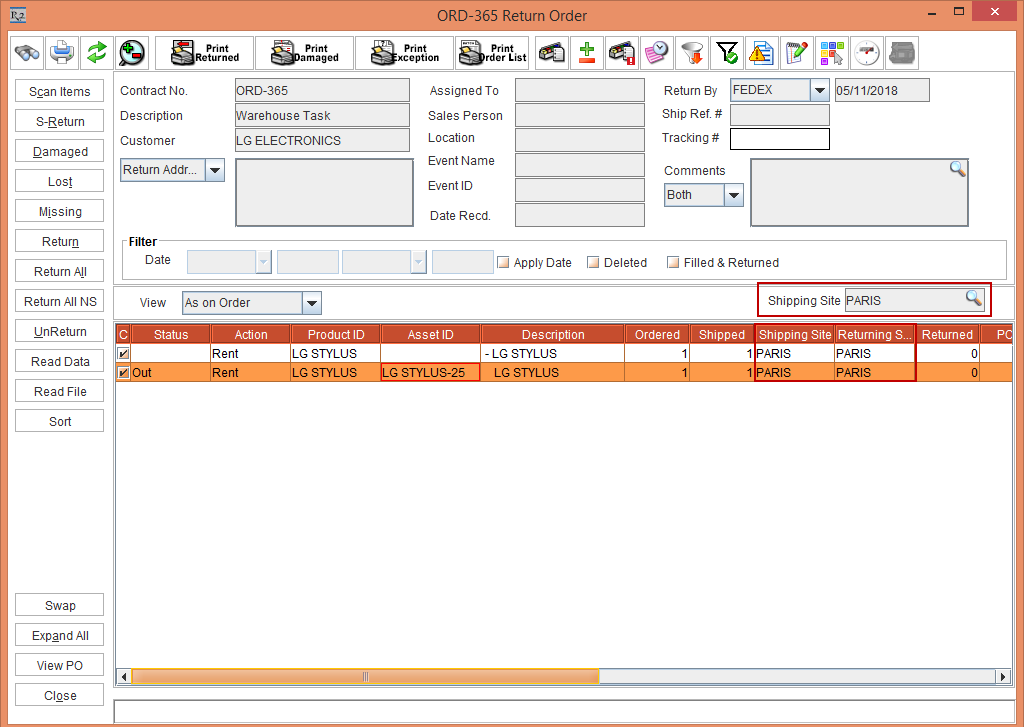
-
Select the Asset [LG STYLUS-25] line and click Return. The Status of the Asset [LG STYLUS-25] line is modified to Returned, as shown in Figure 2.35.
-
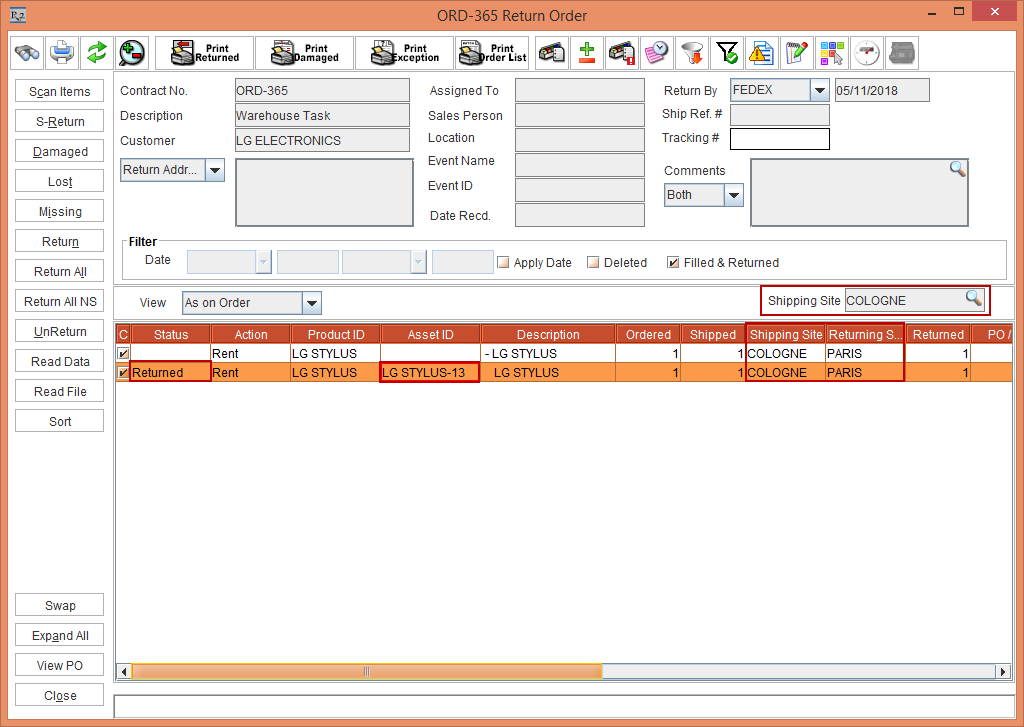
Click the Shipping Site importable button. The Sites window is displayed.
-
Tag the Site [COLOGNE] and click the Refresh button. The Asset [LG STYLUS-13] that is in Status [Out] only in the COLOGNE site is displayed.
-
Select the Asset [LG STYLUS-13] line and click Return. The Status of the Asset [LG STYLUS-13] line is modified to Returned, as shown in Figure 2.36.
-
Optionally, remove the Site Filter and click the Return All button to Return all the Assets [LG STYLUS-13] and [LG STYLUS-25] to the Site [PARIS].
-
Close the Return Order [ORD-365 Return Order] window.
-
Exit the Warehouse window.
-
Select the Account module > Search Orders button >Search Orders window.
-
Search and open the Order [ORD-365]. The Order [ORD-365] displays the Item [LG STYLUS] lines as Status [Returned], as shown in Figure 2.37.
-
Select the Item line and click the Availability button. The Availability window is displayed.
-
Click on the Date [07-May-2018] in the Calendar to view the availability, distribution, and usage of the Serial Item [LG STYLUS].
-
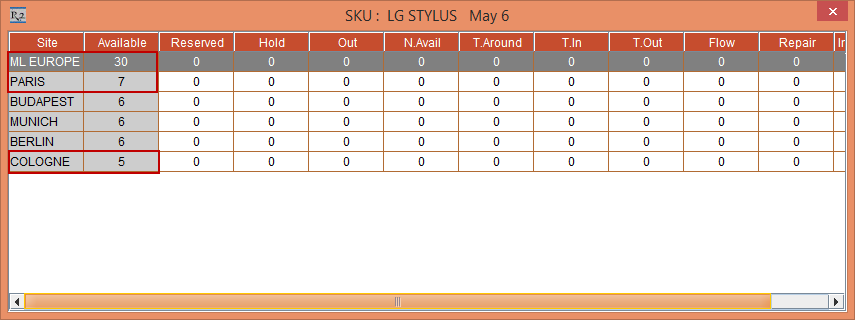
The Available column at the Sub-Region [ML EUROPE] displays the Available Item Qty as [30]. The Item [LG STYLUS] with 2 Qty from the Sites [COLOGNE] and [PARIS] is returned to the Site [PARIS] displaying an increase in the Item Qty to 7, as shown in Figure 2.38.
-
Exit the Availability window and the Order [ORD-365].
Within Cutoff time in days
-
Set the System Date as [02-May-2018].
-
Login to the R2 application with the Site [PARIS].
-
Select the Account module. The Account window is displayed.
-
Tag a Company [LG].
-
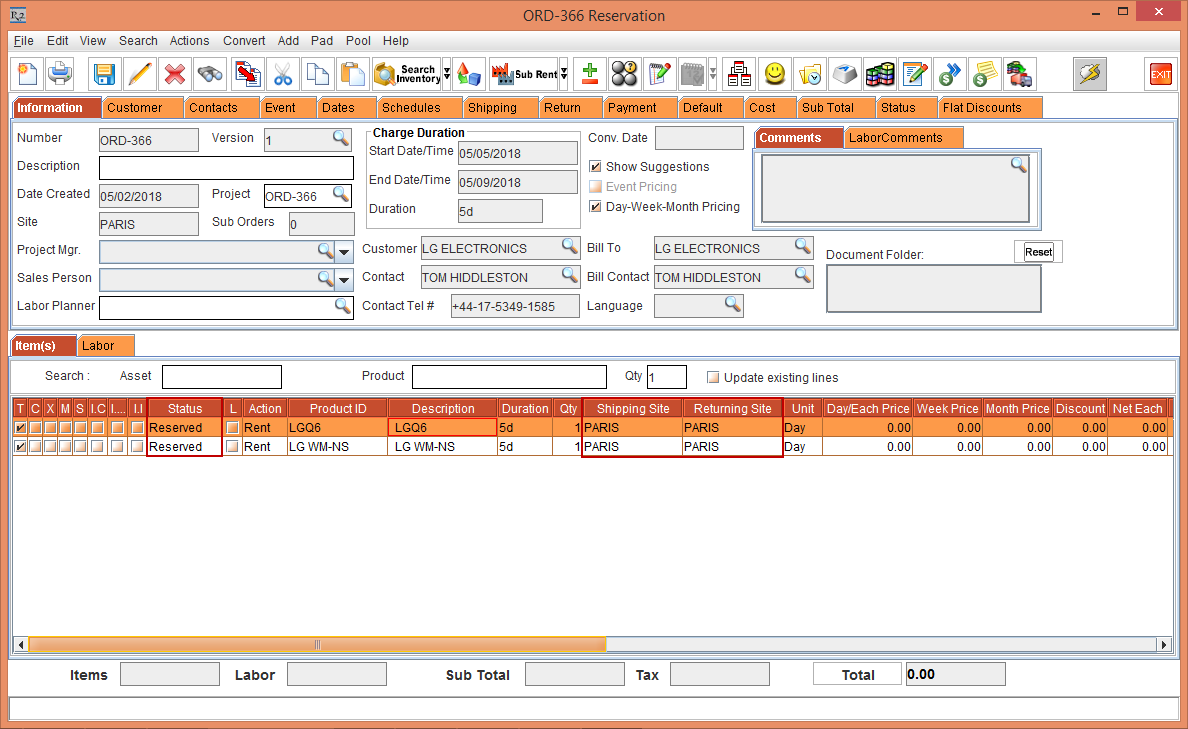
Create a Rental Reservation Order [ORD-366] for 5 days duration with the Start Date [05-May-2018], Start Time [09:00 AM] and End Date [10-May-2018] End Time [09:00 AM]. Click the Search Item icon. The Search Items window is displayed.
-
Search and add the Serial Item [LG Q6] and Non-Serial Item [LG WM-NS] with 1 Qty each.
-
The Status of the Serial Item [LG Q6] and Non-Serial Item [LG WM-NS] is displayed as Reserved with the Shipping Site and the Returning Site as the Order Site [PARIS], as shown in Figure 2.39.
The Shipping Site and the Returning Site is displayed as [PARIS] as the Items are added to the Order [ORD-366] within the Cutoff time in days [3] in the Sub-Region window.
-
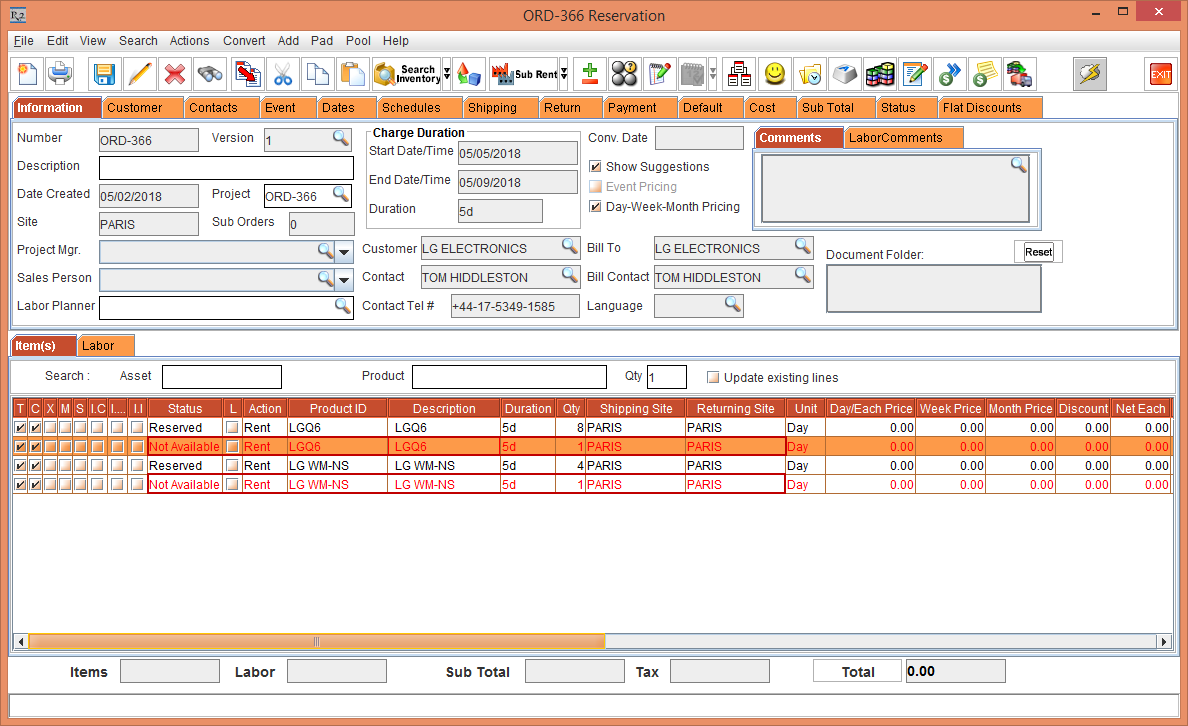
Modify the Serial Item [LG Q6] Qty to 9 and the Non-Serial Item [LG WM-NS] Qty to 5.
-
The Serial Item [LG Q6] line Status with 8 Qty. is displayed as Reserved and the Serial Item [LG Q6] line Status with 1 Qty. is displayed as Not Available with the Shipping Site and the Returning Site as the Order Site [PARIS], as shown in Figure 2.40.
-
The Non-Serial Item [LG WM-NS] line Status with 4 Qty. is displayed as Reserved and the Serial Item [LG WM-NS] line Status with 1 Qty. is displayed as Not Available with the Shipping Site and the Returning Site as the Order Site [PARIS], , as shown in Figure 2.40.
-
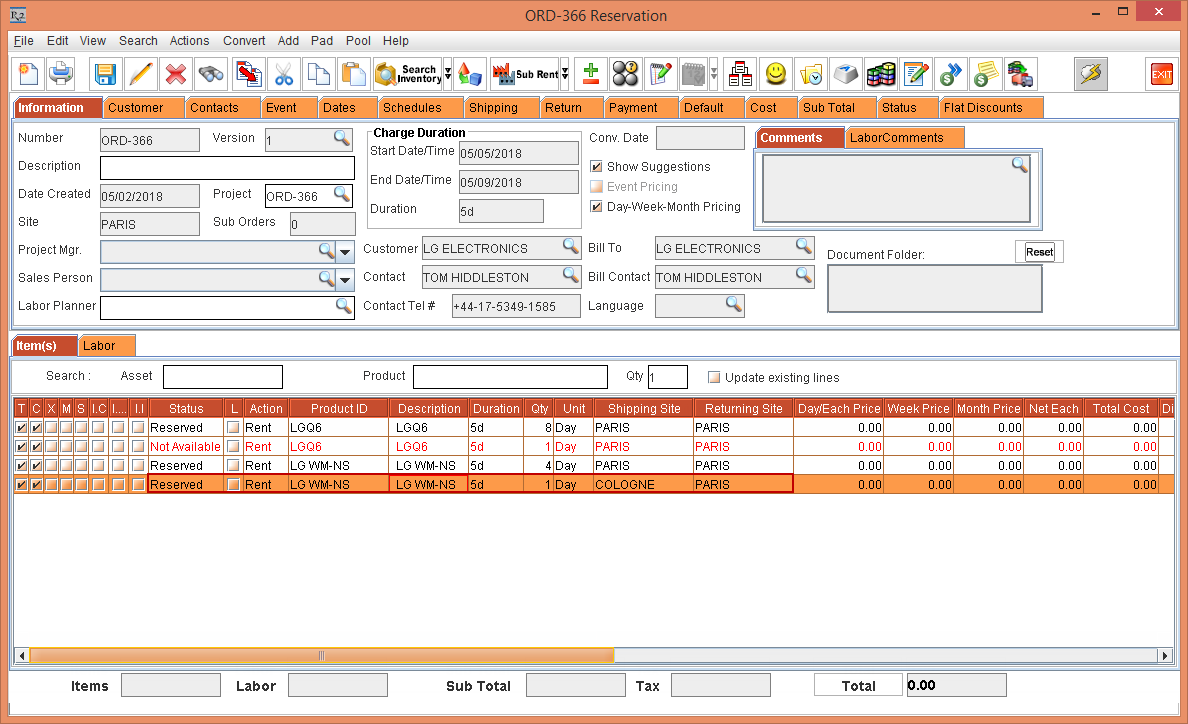
Select the More icon in the Shipping Site column of the Non-Serial Item [LG WM-NS] with the line Status [NOT AVAILABLE] and Qty [1]. The Sites window is displayed, as shown in Figure 2.41.

-
The Availability column in the Sites window displays the availability of the Non-Serial Item [LG WM-NS] in the Site. Tag the Site [COLOGNE] displaying the Availability [3].
-
The Non-Serial Item [LG WM-NS] with the line Status [NOT AVAILABLE] and Qty [1], is now reserved to the Site [COLOGNE] displaying the Shipping Site [COLOGNE] and Returning Site [PARIS], as shown in Figure 2.42.
-
Exit the Rental Reservation Order [ORD-366].
Order Without Drop-Ship
The Order without Drop-Ship can be created by following the below steps:
Prerequisites
-
Select the Maintenance module > Customer tab > Company tab.
-
Click the Site Importable button within the Maintenance window and create an Intra-Company for each of the Sites [BERLIN], [BUDAPEST], [COLOGNE], [MUNICH], and [PARIS].
-
Select the Maintenance module > Items tab.
-
Create and receive the Serial Item [LGQ6] with 12 Qty in the Sites [BERLIN], [BUDAPEST], and [COLOGNE].
Sample Workflow
-
Set the System Date [02-May-2018].
-
Login to the R2 application with the Site [PARIS].
-
Select the Account module. The Account window is displayed.
-
Tag a Company [LG].
For the Operation Order, by default the Intra-Company gets selected.
-
Click the Reservation icon.
-
The Order in Formation dialog box is displayed.
-
Create a Rental Reservation Order [ORD-367] for 5 days duration with the Start Date [06-May-2018], Start Time [09:00 AM] and End Date [11-May-2018] End Time [09:00 AM].
-
Click the Search Item icon. The Search Items window is displayed.
-
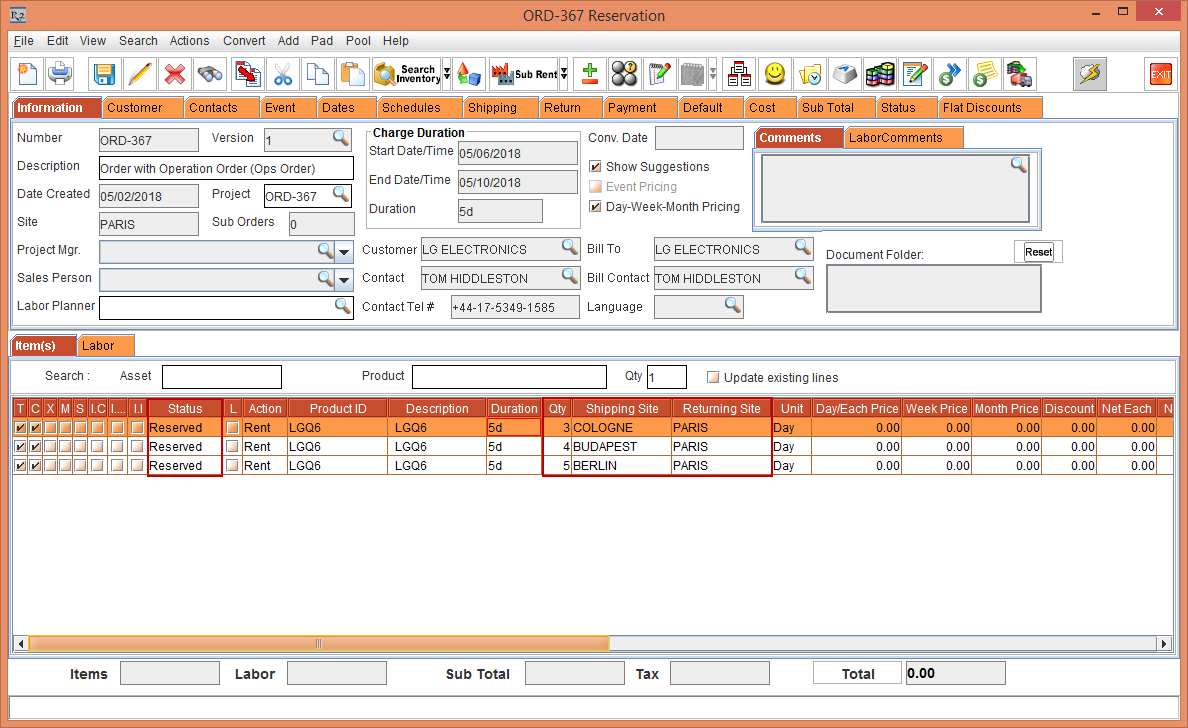
Search and add the Serial Item [LGQ6] with 12 Qty. The Status of the Serial Item [LG Q6] is displayed as Pool with both the Shipping Site and Returning Site as Sub-Region [ML EUROPE].
-
Select the Item line > right-click > Resolve option > the Assign Quantity window is displayed with the availability of the Item displayed in the Sites [COLOGNE], [BUDAPEST], and [BERLIN].
-
Click OK.
-
The Serial Item [LGQ6] is Reserved and distributed to the Sites [COLOGNE], [BUDAPEST], and [BERLIN] with the Returning Site as the Order Site [PARIS], as shown in Figure 3.0.
-
Select the Item lines with the Qty [4] and [5] comprising of the Shipping Sites [BUDAPEST] and [BERLIN] > right-click > select Generate Ops Order. The system displays a prompt with the message "Do you want to generate Operation order" with Yes and No buttons, as shown in Figure 3.1.
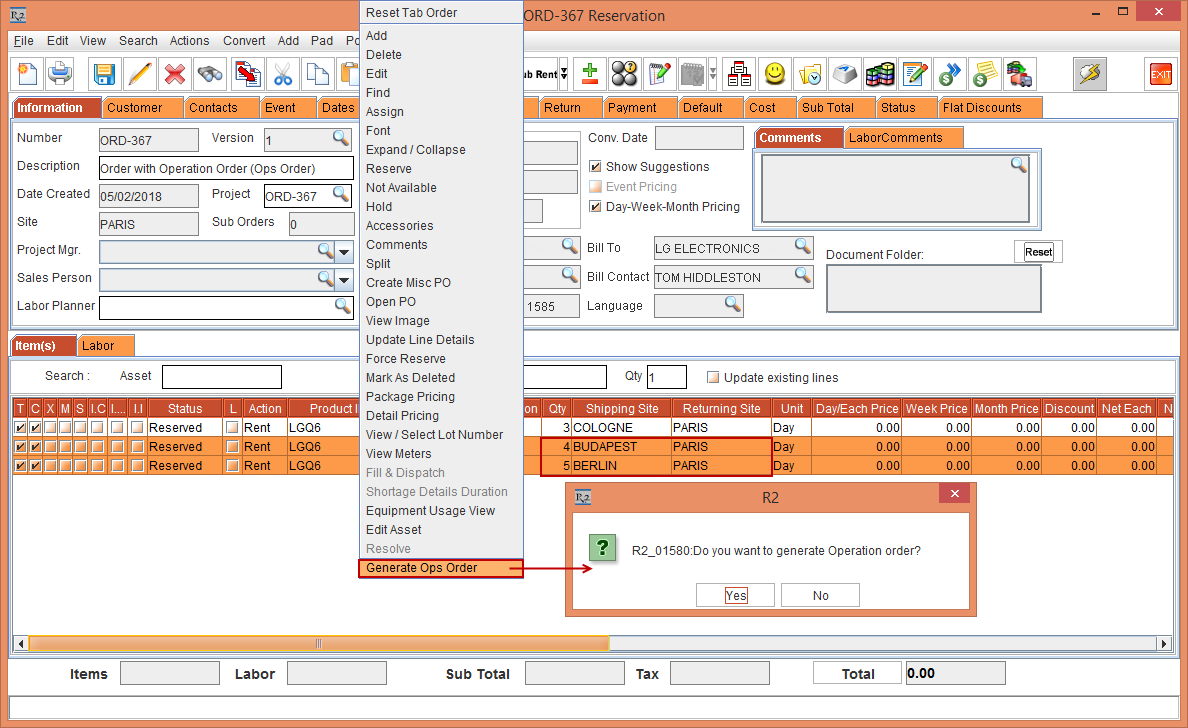
-
Select Yes.
-
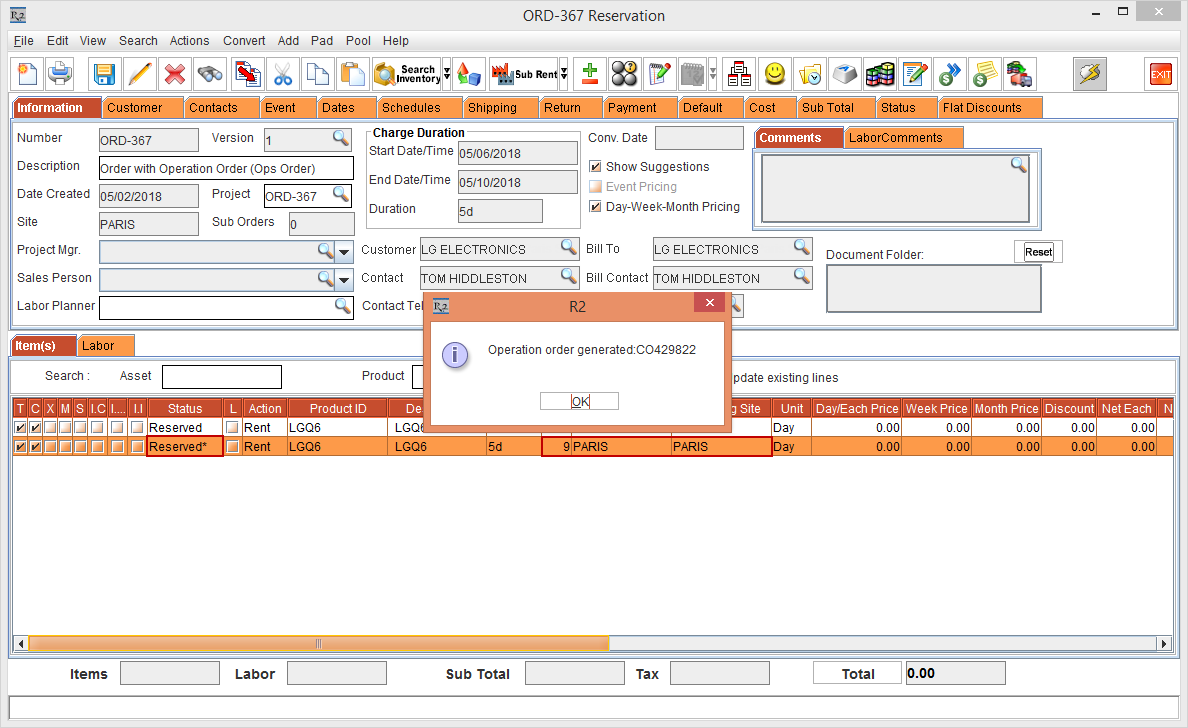
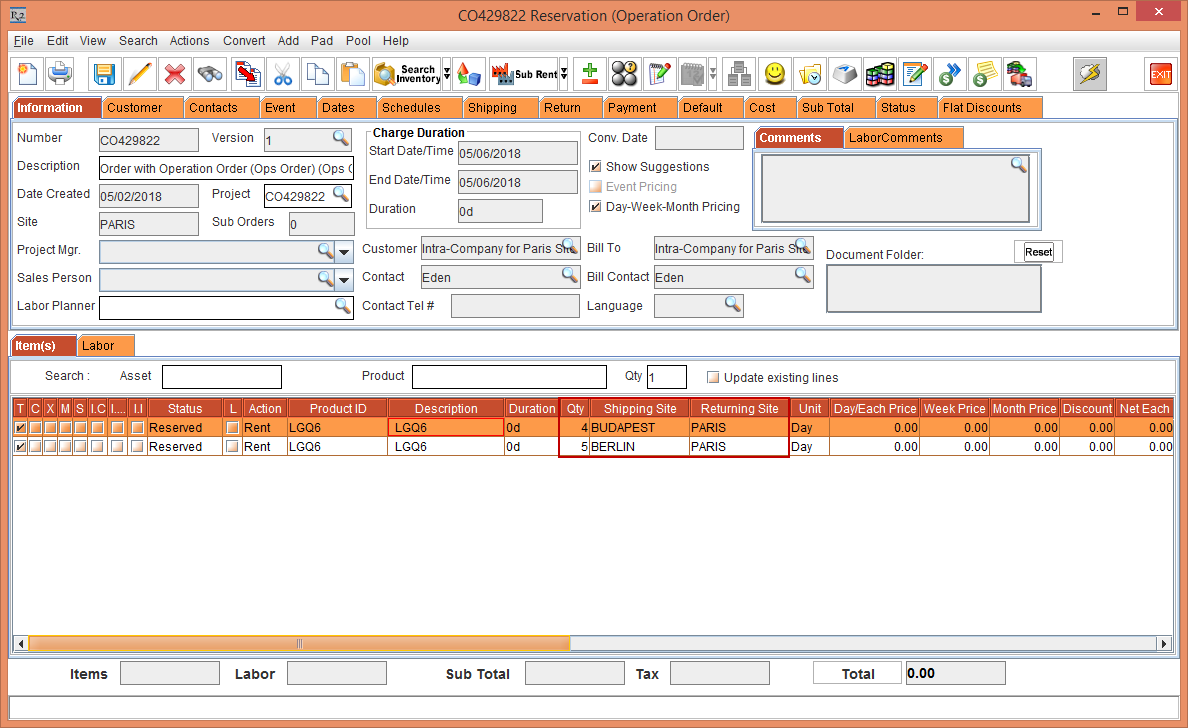
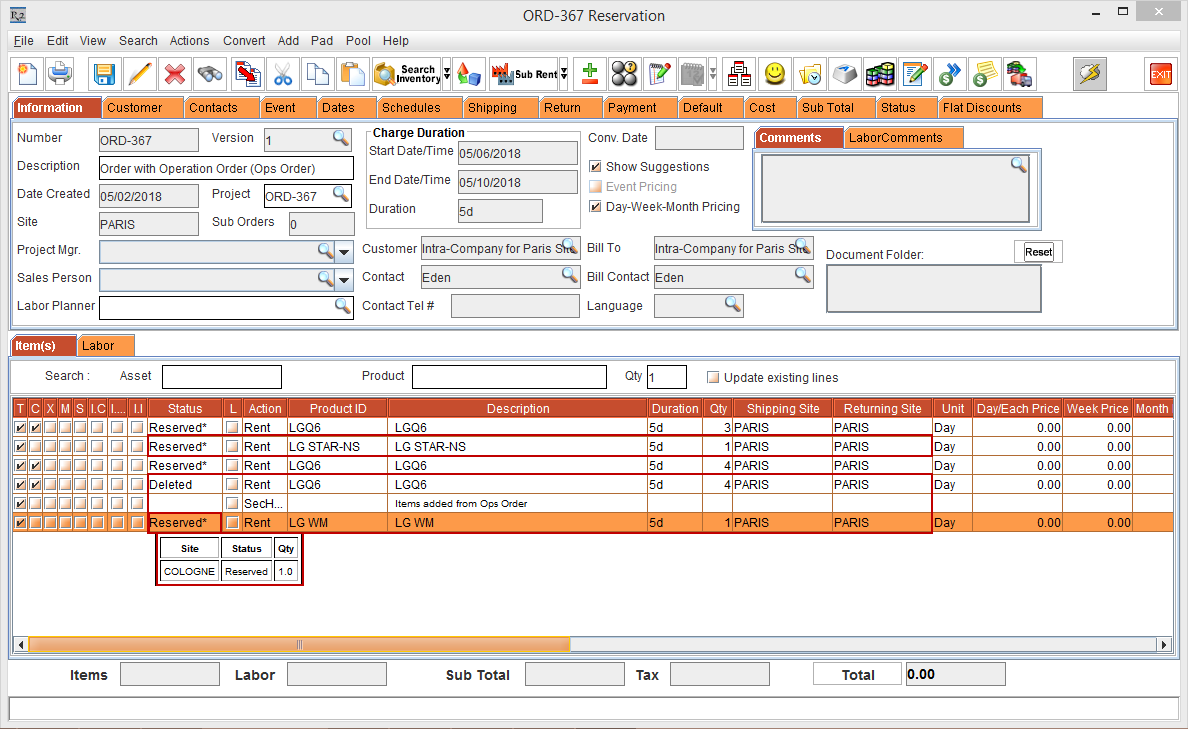
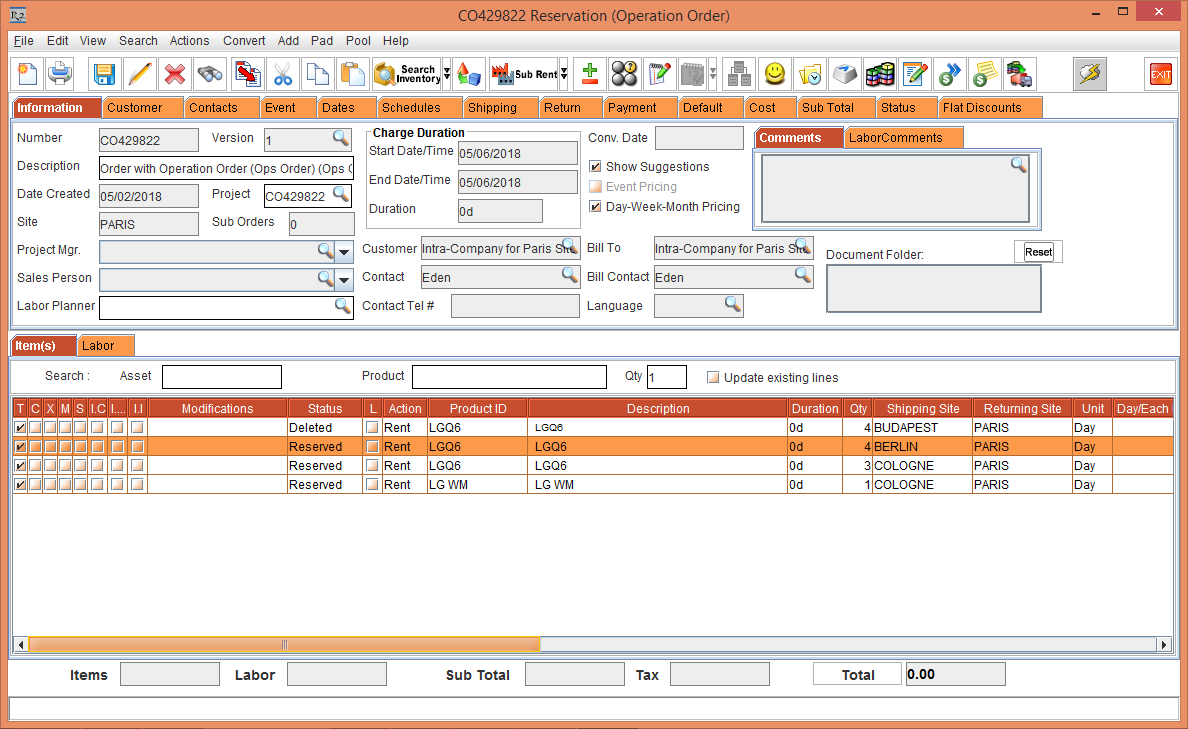
The Operation Order [CO429822] is generated with the Item lines of Qty [4] and [5] comprising of the Shipping Sites [BUDAPEST] and [BERLIN] merged to a single Item line.
-
The single Item line displays the Item Qty [9] with the Status [Reserved*] comprising of the Shipping Sites [PARIS] and Returning Site [PARIS] as the Site [PARIS] is the Order Site, as shown in Figure 3.2.
-
Click OK.
-
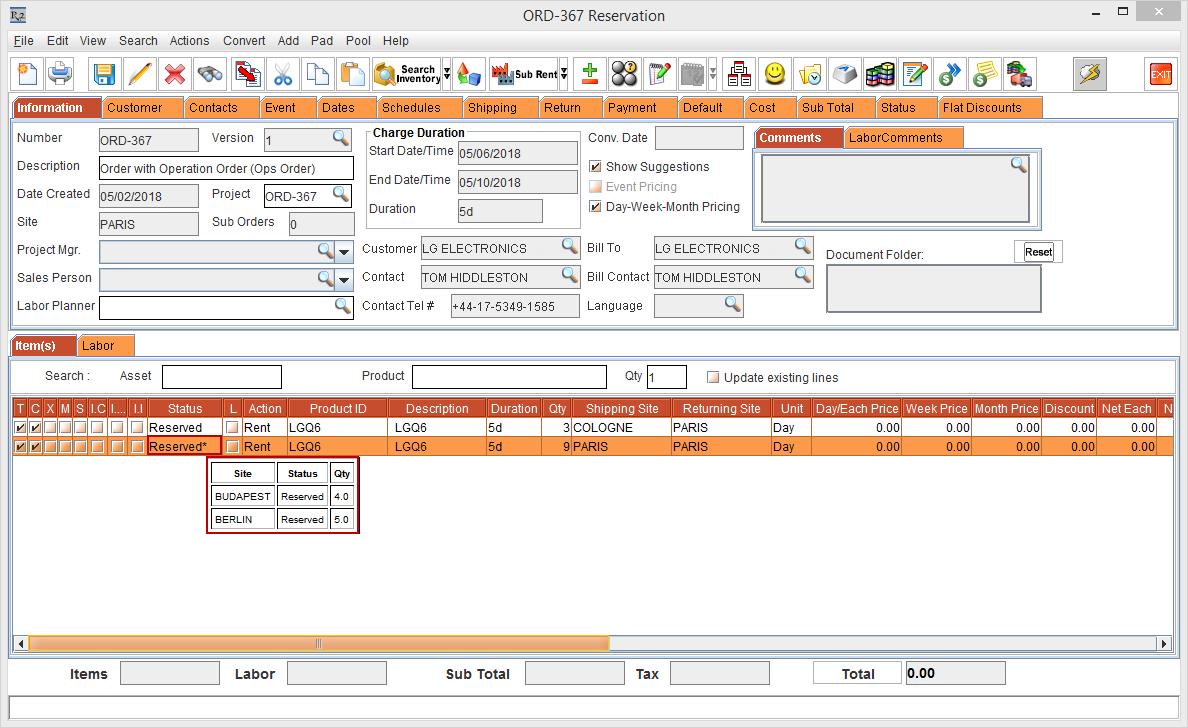
Select the Status [Reserved*], a tool tip is displayed with the Site, Status, and Qty of the Items for which the Operation Order is generated, as shown in Figure 3.3.
The Operation Order Item line in a Rental Reservation Order is displayed with the Status [*Reserved].
-
Select the Pool menu > View Ops Order option, as shown in Figure 3.4.
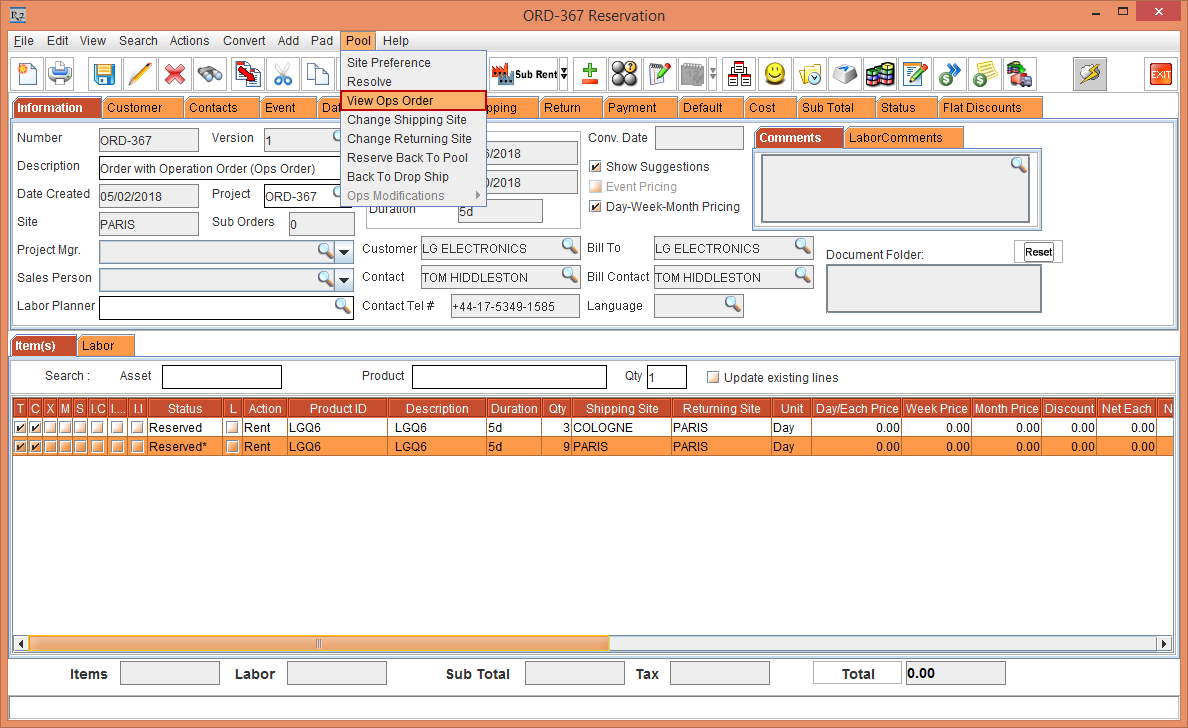
-
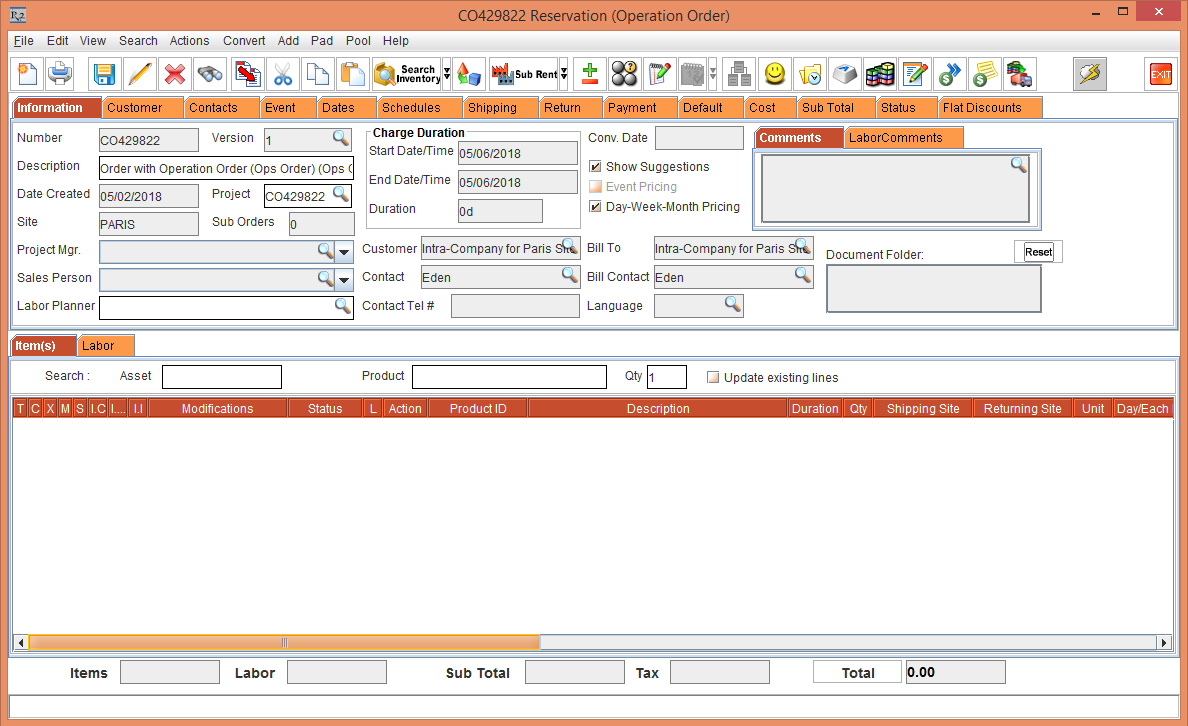
The Operation Order [CO429822 Reservation (Operation Order)] window linked to the Rental Reservation Order [ORD-367] is displayed, as shown in Figure 3.5.
You can generate only One Operation Order for a Rental Reservation Order.
-
The Operation Order [CO429822] window displays two Item lines. One Item line displaying the Shipping Site [BUDAPEST] and Returning Site [PARIS] and another Item line displaying the Shipping Site [BERLIN] and Returning Site [PARIS], as shown in Figure 3.5.
-
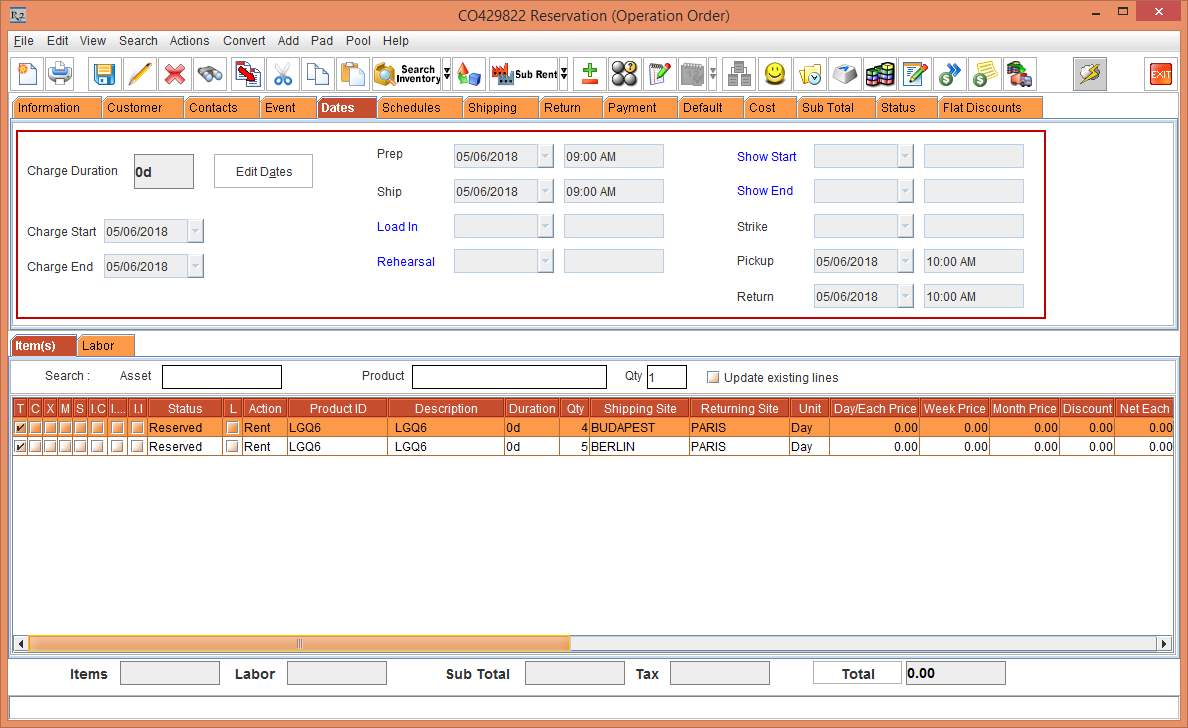
Select the Dates tab > Edit Dates button > Order Dates window, to verify the Dates in the Operation Order [CO429822]. The Operation Order [CO429822] is created for the dates, as shown in Figure 3.6.
-
The comparison of the Item lines Date and Time in the main Order [ORD-367] with the Item lines Date and Time in the Operation Order [CO429822] is, as shown in Table 3.0.
Table 3.0 Comparison of the Item lines Date and Time in Order [ORD-367] with the Item lines Date and Time in Operation Order [CO429822]
|
Date Type |
Date and Time of the Operation Order [CO429822] linked line in main Order [ORD-367] |
Date and Time of the line in Operation Order [CO429822] |
|
Charge Start Date |
06-May-2018 |
06-May-2018 |
|
Charge End Date |
10-May-2018 |
06-May-2018 |
|
Prep Date |
06-May-2018 Time [10:00 AM] |
06-May-2018 Time [09:00 AM] |
|
Ship Date |
06-May-2018 Time [10:00 AM] |
06-May-2018 Time [09:00 AM] |
|
Pickup Date |
11-May-2018 Time [09:00 AM] |
06-May-2018 Time [10:00 AM] |
|
Return Date |
11-May-2018 Time [09:00 AM] |
06-May-2018 Time [10:00 AM] |
-
Save the Operation Order [CO429822].
-
The Maximum Operation Order duration is 1 day.
-
When the Prep Date, Time and the Ship Date, Time are the same, a minimum of One Hour is needed to Return the Item from the Operation Order to the main Order Site.
-
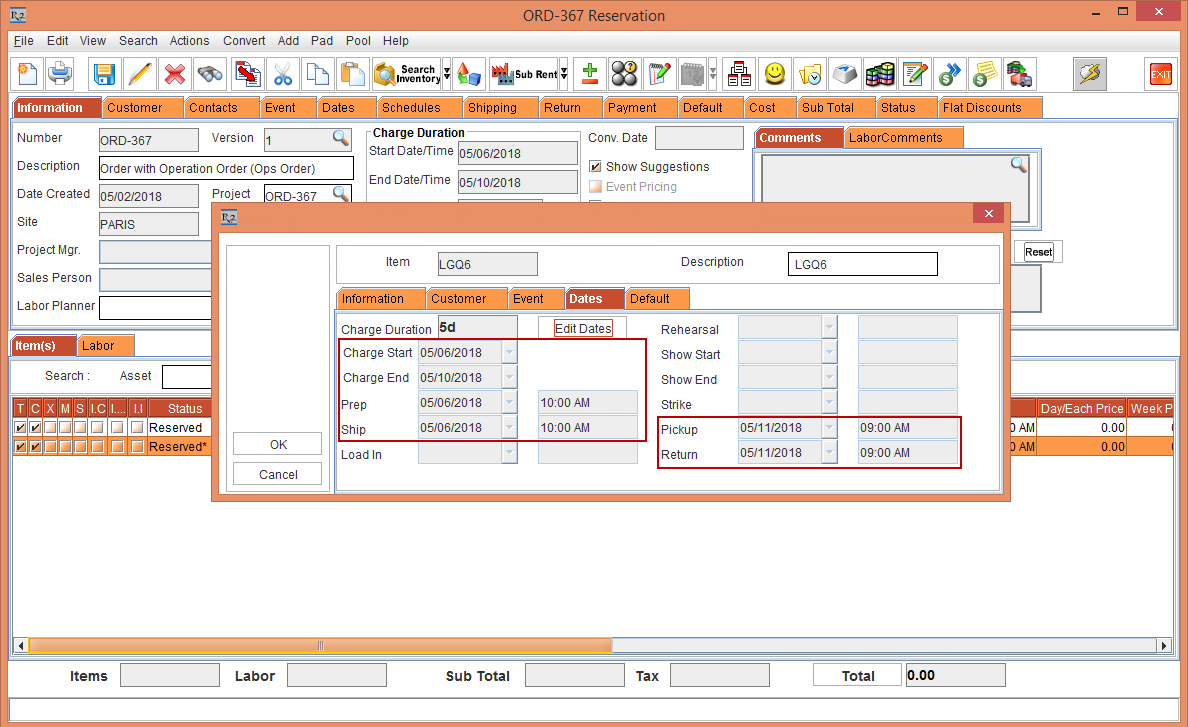
Open the Order [ORD-367] and verify the Ops Order Item line Dates with the Status [Reserved*] > Edit Dates. The Date and Time is displayed as Start Date [06-May-2018] Time [10:00 AM] and the Ship Date [06-May-2018] Time [10:00 AM].
-
Operation Order is generated only for the Action [RENT].
-
The Action of the Item line within the Operation Order cannot be modified to Action [SELL]. When you try to modify, a prompt with an error message is displayed.
-
A Non-Serial Kit in the Operation Order always displays the Qty [1] in the Kit Header, with the individual Qty displayed for the Child Items within the Non-Serial Kit.
-
The Assign operations cannot be performed for the Item lines with the Status [Reserved*], as the Item is allocated to a different Site.
-
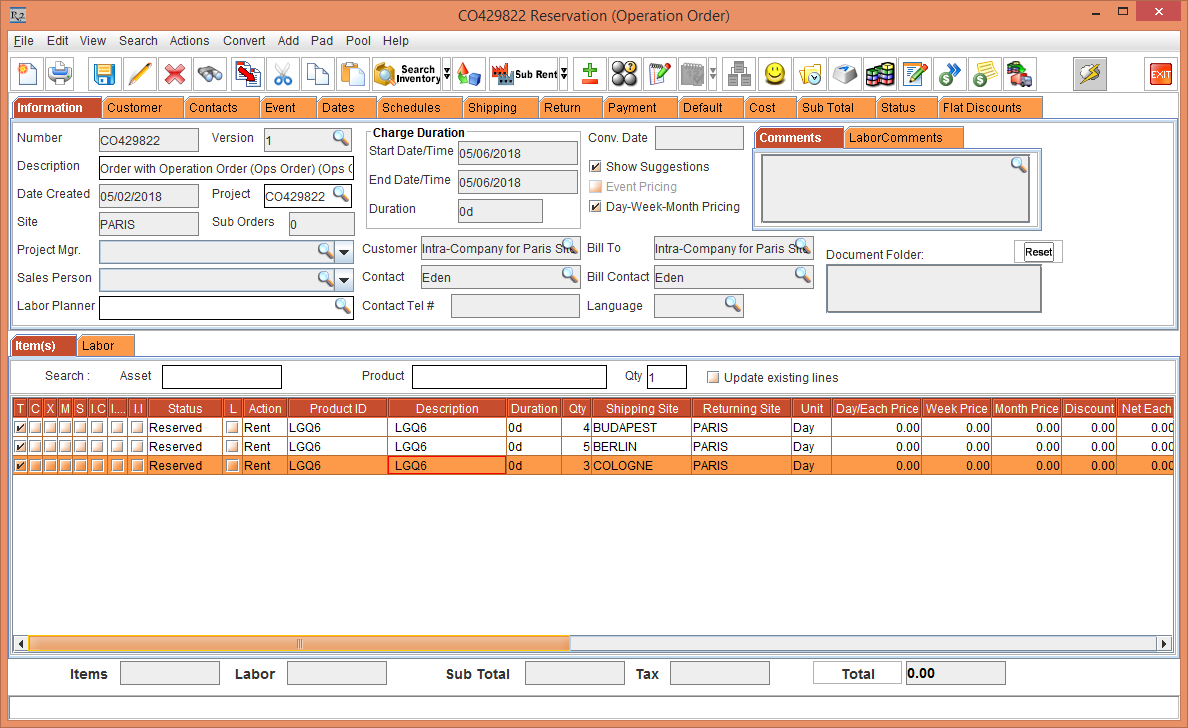
In the Rental Reservation Order [ORD-367], select the Item line [LGQ6] with 3 Qty, Status [Reserved], Shipping Site [COLOGNE] and Returning Site [PARIS] > right-click > select Generate Ops Order. The system displays a prompt with the message "Do you want to generate Operation order" with Yes and No buttons.
-
Select Yes. The system displays a prompt with the message "Operation order CO429822 is modified", as shown in Figure 3.8.

-
Select the Pool menu > View Ops Order option.
-
The modified Operation Order [CO429822 Reservation (Operation Order)] linked to the Rental Reservation Order [ORD-367] is displayed with the updated Item line [LGQ6] comprising of the Qty [3], Shipping Site [COLOGNE] and the Order Site as the Returning Site [PARIS], as shown in Figure 3.9.
Modifications Status in Operation Order
The following modifications performed in the Operation Order is displayed in the Modifications column of the Operation Order:
Mark the Item as Delete in the Operation Order
You cannot delete an Item in the Operation Order that is linked to the main Order instead you can mark the Item as Delete by following the below steps:
-
In the Operation Order [CO429822] window, select the Item line [LGQ6] with 4 Qty displaying the Shipping Site [BUDAPEST] and Returning Site [PARIS] > right-click > select the option Mark As Deleted. The system displays a prompt with the message "Do you want to mark the selected as Deleted?" with Yes and No buttons, as shown in Figure 3.10.
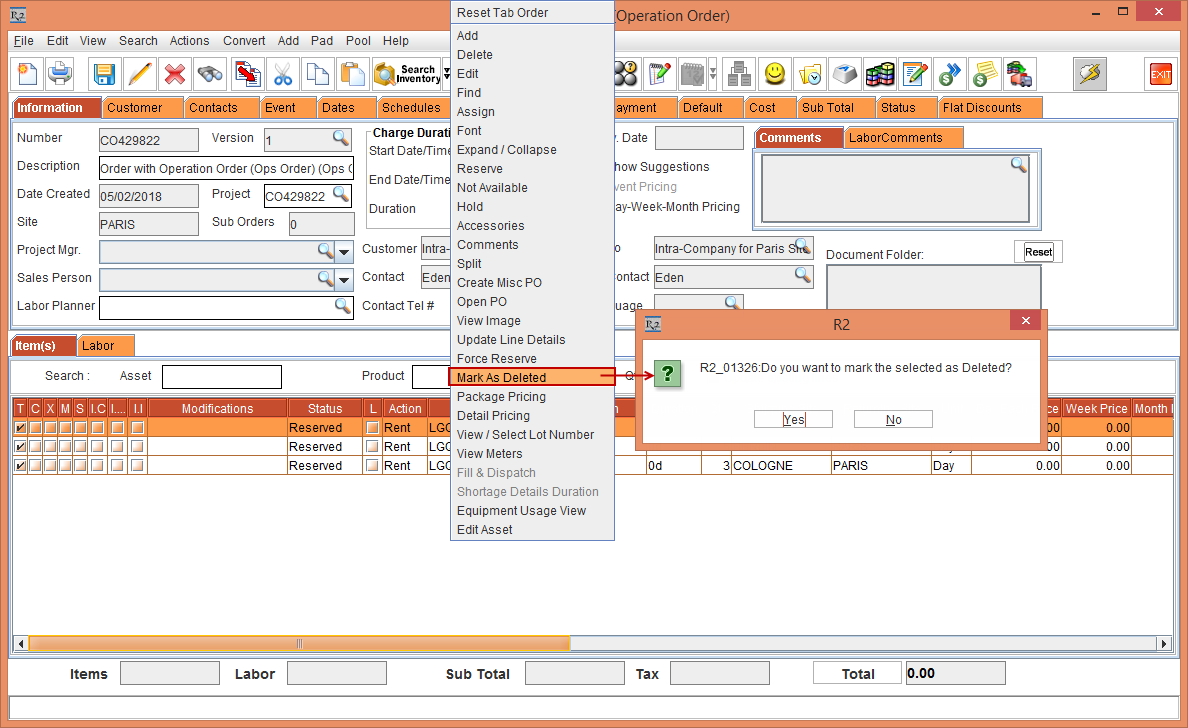
-
Click Yes. The Item Status is modified to Deleted. The Modifications column does not display any data, as shown in Figure 3.11.
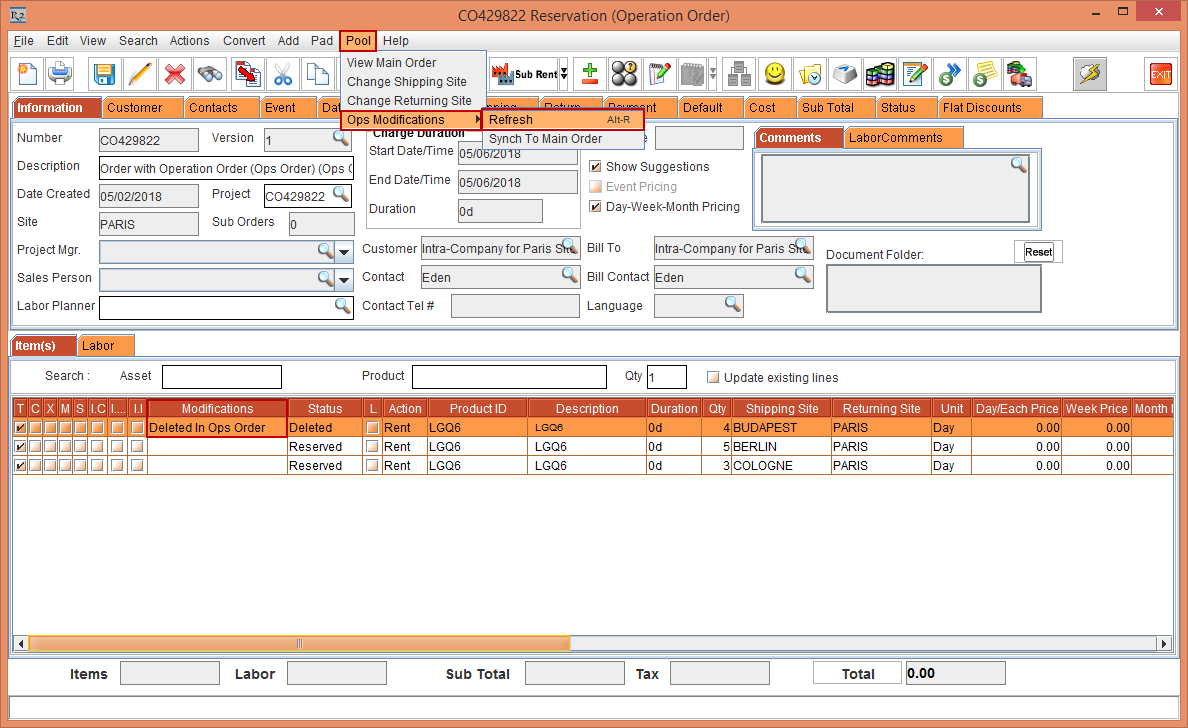
-
Select the Pool menu > Ops Modifications option > Refresh option or press the Hot Key [Alt+R] from the Keyboard, as shown in Figure 3.11.
-
The Operation Order [CO429822] window is refreshed with the Modifications column in the Item line displayed as Deleted In Ops Order, as shown in Figure 3.11.
Add an Item in the Operation Order
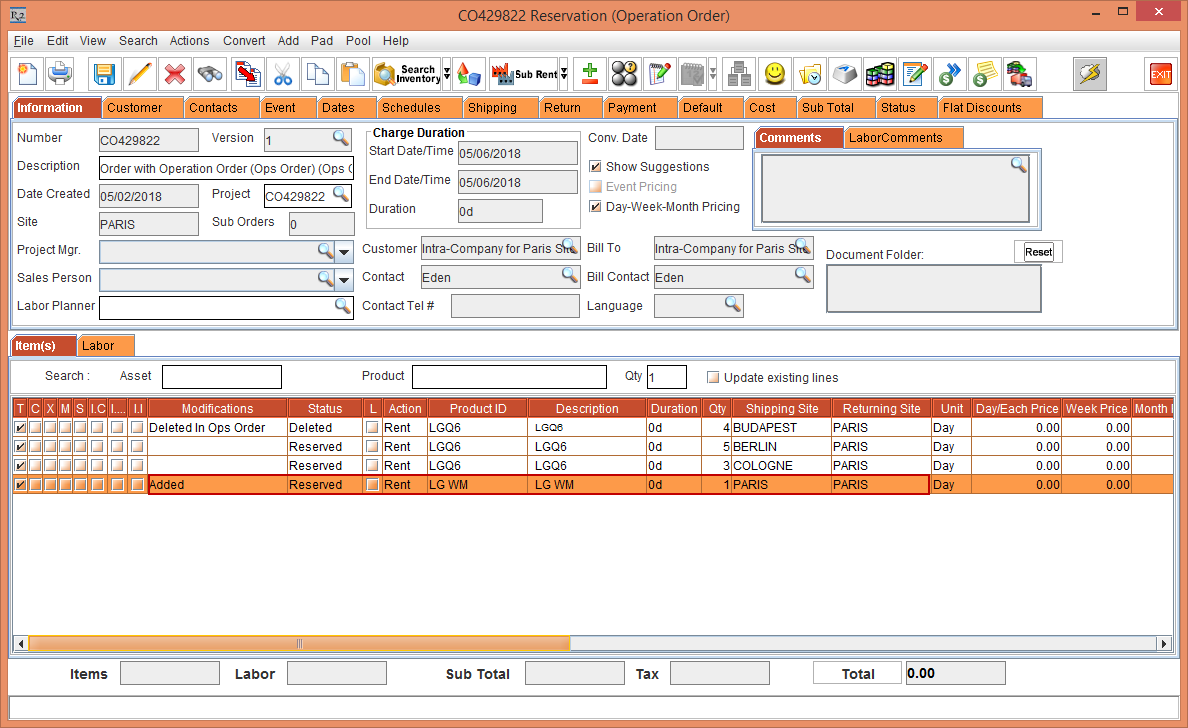
-
In the Operation Order [CO429822] window, select the Search menu > Items option. The Search Items window is displayed.
-
Search and add the Item [LG WM] with 1 Qty. The Item [LG WM] line is added to the Operation Order [CO429822] with the Shipping and Returning Sites as the Order Site [PARIS].
-
Select the Pool menu > Ops Modifications option > Refresh option or press the Hot Key [Alt+R] from the Keyboard. The Operation Order [CO429822] window is refreshed with the Modifications column in the Item [LG WM] line displayed as Added, as shown in Figure 3.12.
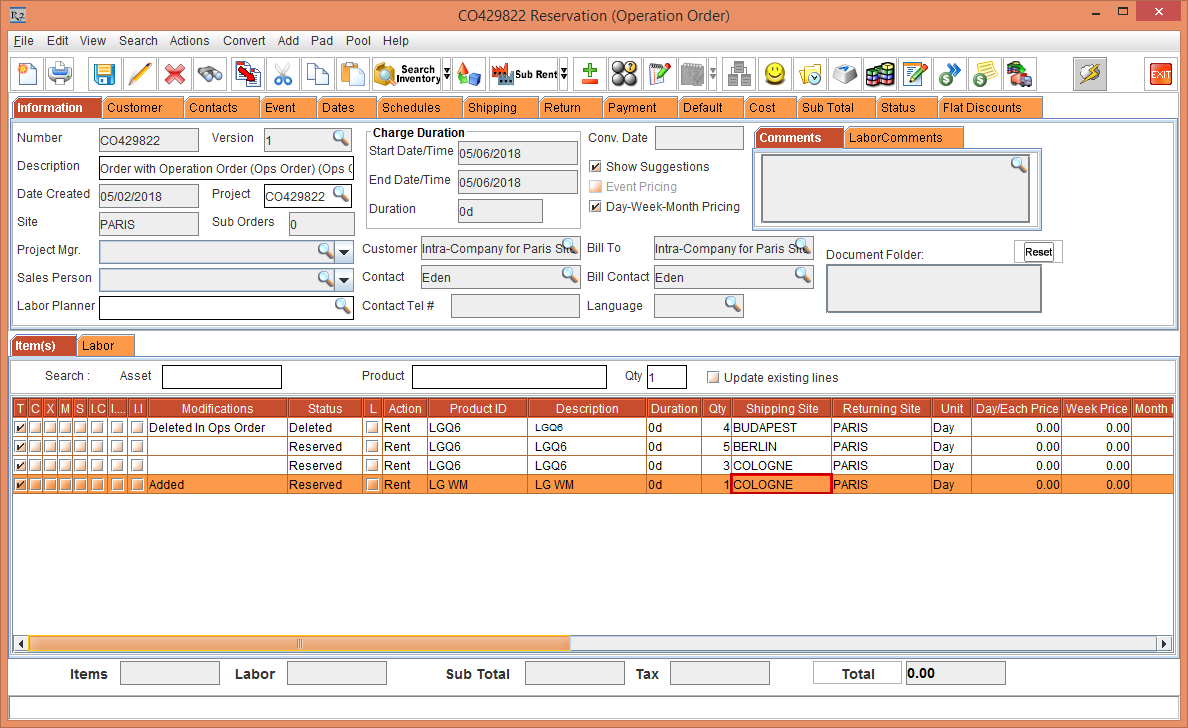
-
Modify the Shipping Site to Site [COLOGNE] for the newly added Item line, as shown in Figure 3.14.
-
The system will not allow to Synch the modifications from Operation Order to the linked Rental Reservation Order whose line level Shipping Site and Returning Site is as the Order Site. The Shipping Site must be different from the Order Site.
-
The Returning Site must always be the Order Site and must not be modified.
Exchange an Item in the Operation Order
-
In the Operation Order [CO429822] window, select the Item line [LGQ6] with 5 Qty displaying the Shipping Site [BERLIN] and Returning Site [PARIS] > right-click > select the option Assign. The Assign window is displayed, as shown in Figure 3.14.
-
Select the Exchange option, as shown in Figure 3.14.
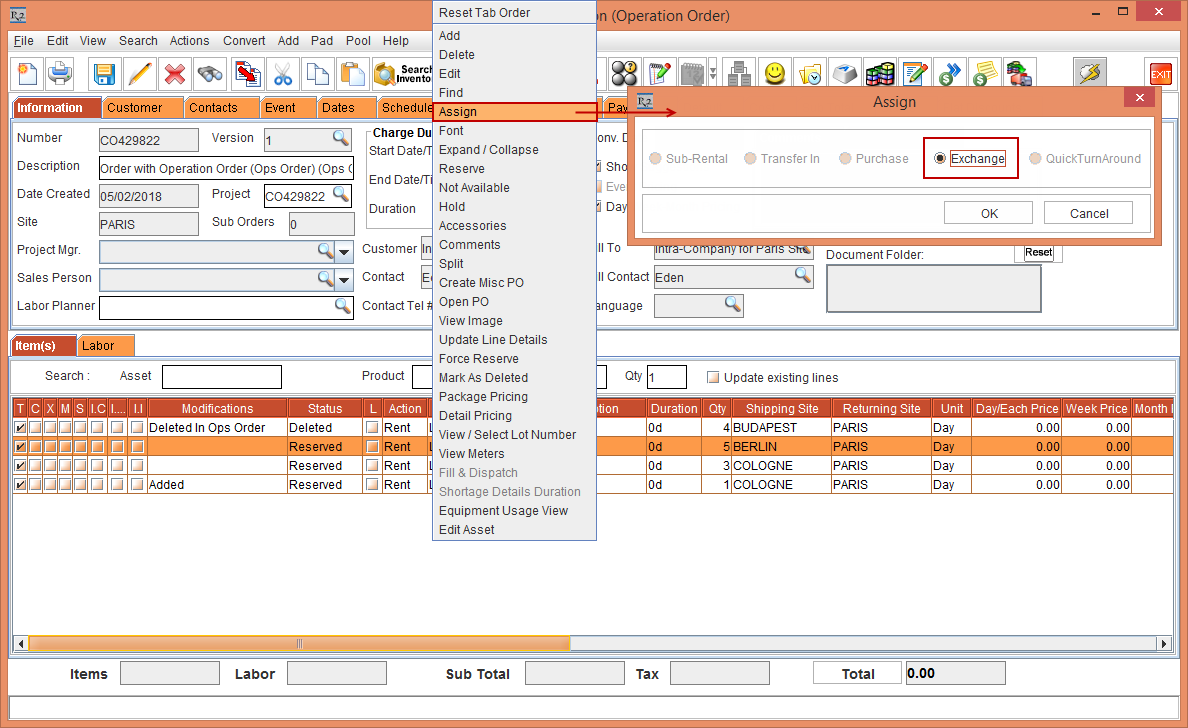
-
The Search Inventory window is displayed. Search and exchange the Item [LG STAR-NS] with 1 Qty.
-
Click OK.
-
Select the Pool menu > Ops Modifications option > Refresh option or press the Hot Key [Alt+R] from the Keyboard.
-
The Operation Order [CO429822] window is refreshed with the Modifications column in the Item line [LG STAR-NS] displayed as Exchanged, as shown in Figure 3.15.
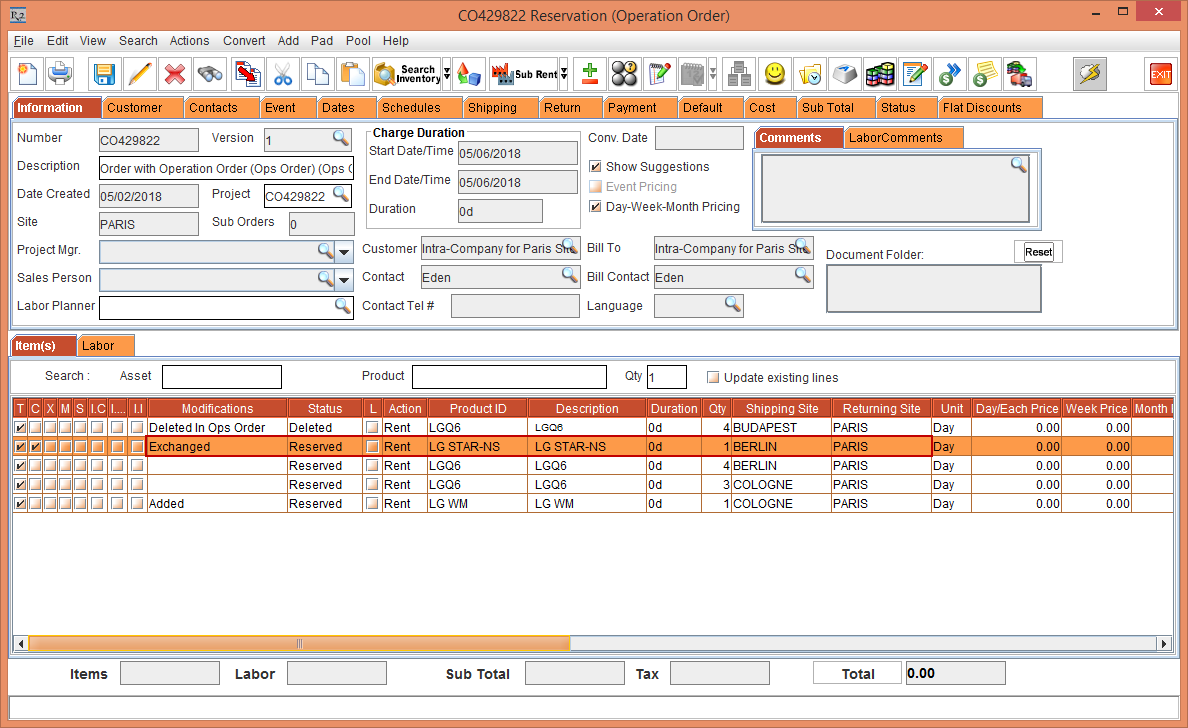
The synchronization of the modified data such as change in Date, Item Qty change is not allowed.
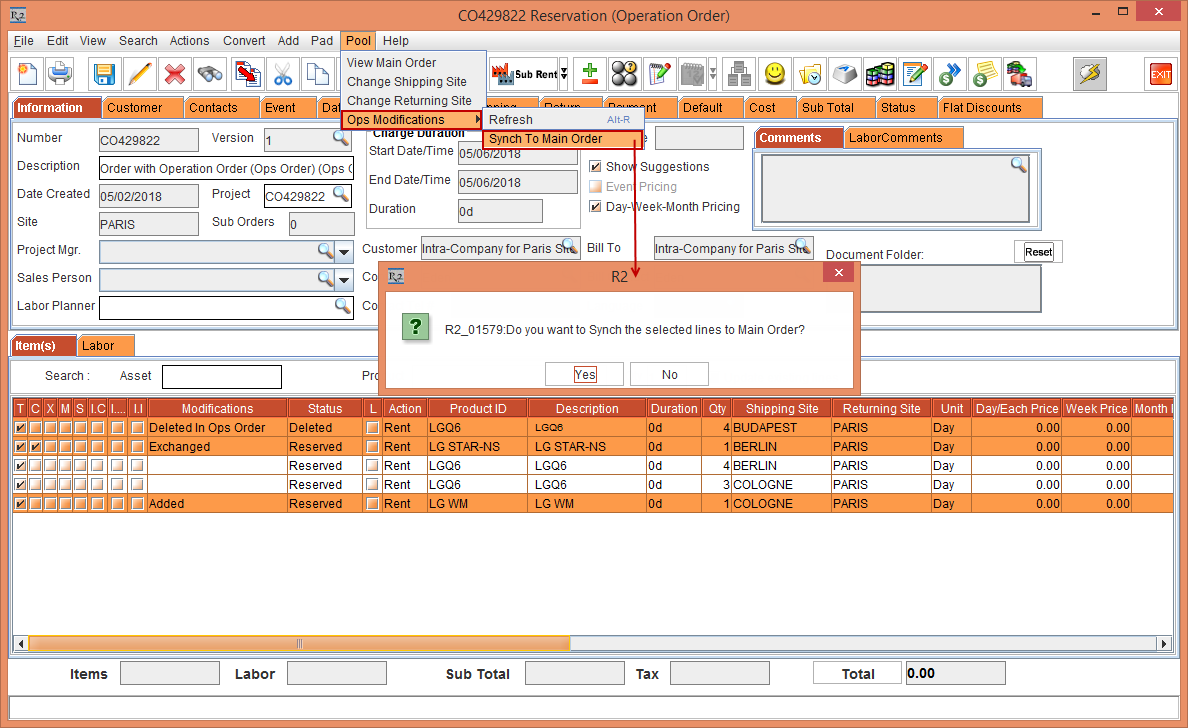
Synch the Operation Order Changes to Main Order
The modified lines from Operation Order must be Synchronized to the linked Rental Reservation Order by following the below steps:
-
Exit the Rental Reservation Order [ORD-367] that is linked to the Operation Order [CO429822] before you perform the synchronization.
-
In the Operation Order [CO429822] window, select the modified Item lines with the Modifications [Deleted In Ops Order], [Exchanged], and [Added].
Close the linked Rental Reservation Order before you perform the synchronization.
-
Select the Pool menu > Ops Modifications option > Synch To Main Order option. The system displays a prompt with the message "Do you want to Synch the selected lines to Main Order?" with Yes and No buttons, as shown in Figure 3.16.
Select the lines that are to be synchronized in the Operation Order before synchronizing the Operation Order with the Rental Reservation Order. Only the selected lines will get synchronized to the Rental Reservation Order.
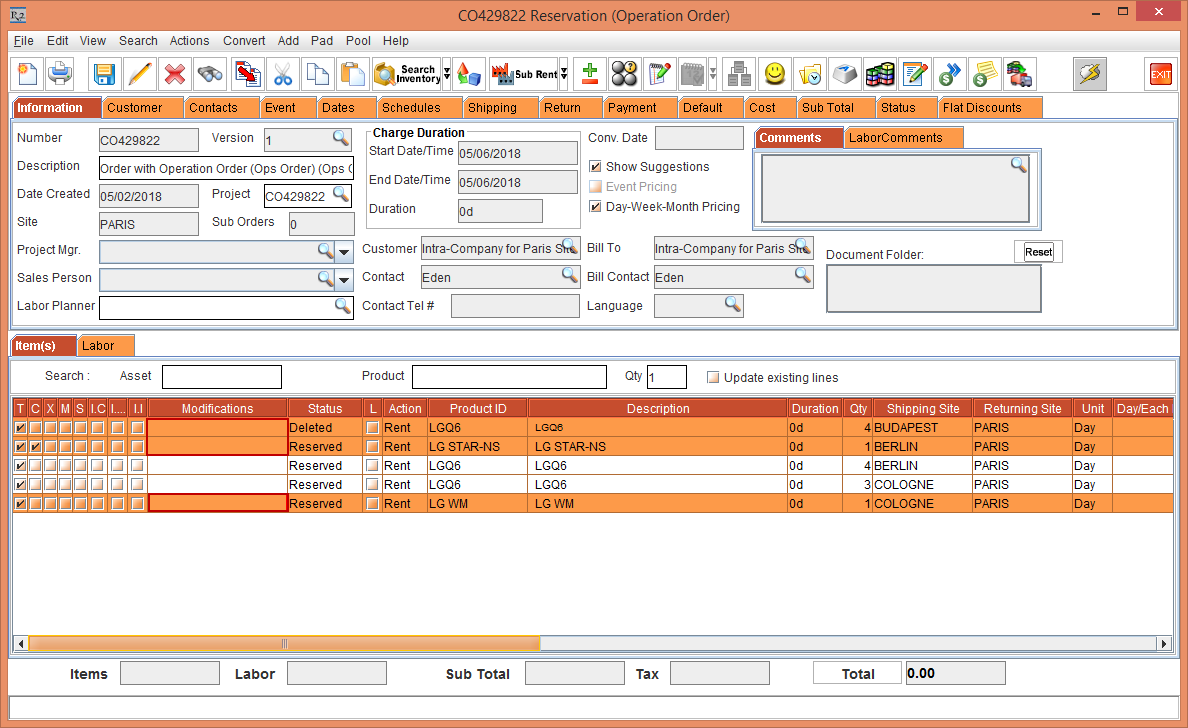
-
Click Yes. The Operation Order [CO429822] gets synchronized to the linked Rental Reservation Order [ORD-367] displaying no data in the Modifications column for the synchronized lines, as shown in Figure 3.17.
-
Select the Account module > Search Orders > Search and open the Order [ORD-367].
-
Compare the Operation Order [CO429822] with the linked Rental Reservation Order [ORD-336] and note the following changes:
-
The Modifications [Deleted In Ops Order], [Exchanged], and [Added] performed in the Operation Order [CO429822] is synchronized and the updated lines are displayed in the linked Rental Reservation Order [ORD-367] with the Status [Reserved*].
-
The item that is marked as deleted in the Operation Order is displayed as Deleted in the main Order on synchronizing from the Operation Order.
-
The newly added line in the Operation Order is displayed under the Section Header in the main Order on synchronizing from the Operation Order.
-
Select the Status [Reserved*], a tool tip is displayed with the Site, Status, and Qty of the Items for which the Item lines are modified in the Operation Order, as shown in Figure 3.18.
Delete the Item in the Rental Reservation Order
You can delete an Item in the linked Rental Reservation Order by following the below steps:
-
In the linked Rental Reservation Order [ORD-367], select the Item line [LG STAR-NS] and click Delete.
-
Select the Pool menu > View Ops Order option. The Operation Order [CO429822] linked to the Rental Reservation Order [ORD-367] is displayed.
-
Select the Pool menu > Ops Modifications option > Refresh option or press the Hot Key [Alt+R] from the Keyboard. The Status of the Item line [LG STAR-NS] is displayed as Deleted In Main Order, as shown in Figure 3.19.

-
Select the Item line [LG STAR-NS] and click Delete. The Item line [LG STAR-NS] gets deleted from the Operation Order [CO429822], as shown in Figure 3.20.
-
Exit the Operation Order [CO429822] window.
Other Pool Options in Operation Order
The other Pool options in the Operation Order are as follows:
-
View Main Order: Selecting this option in the Pool menu will allow you to only view the linked Rental Reservation Order [ORD-367] that is displayed in read-only mode from the Operation Order [CO429822].
-
Change Shipping Site: Selecting this option in the Pool menu will allow you to modify the Shipping Site in the selected Item line of the Operation Order [CO429822].
-
Change Returning Site: Selecting this option in the Pool menu will allow you to modify the Returning Site in the selected Item line of the Operation Order [CO429822].
-
Ops Modifications: The Ops Modifications menu comprises of the submenu Refresh and Synch To Main Order.
-
Refresh: Selecting the Refresh option or pressing the Hot Key [Alt+R] from the Keyboard will refresh the Operation Order window reflecting the modifications in the Modifications column.
-
Synch To Main Order: Selecting Synch To Main Order synchronizes the modified lines from Operation Order to the linked Rental Reservation Order.
To synchronize the modified Operation Order data with the linked Rental Reservation Order, the Returning Site should be the Order Site. The data synchronization will not happen if the Returning Site is modified to some other Site.
Back To Drop Ship Mode
Back To Drop Ship mode deletes the Item lines in the Operation Order removing the link between the Operation Order and linked Reservation Order and also changes the Shipping Site back to the original Shipping Site in the main Order as shown below:
-
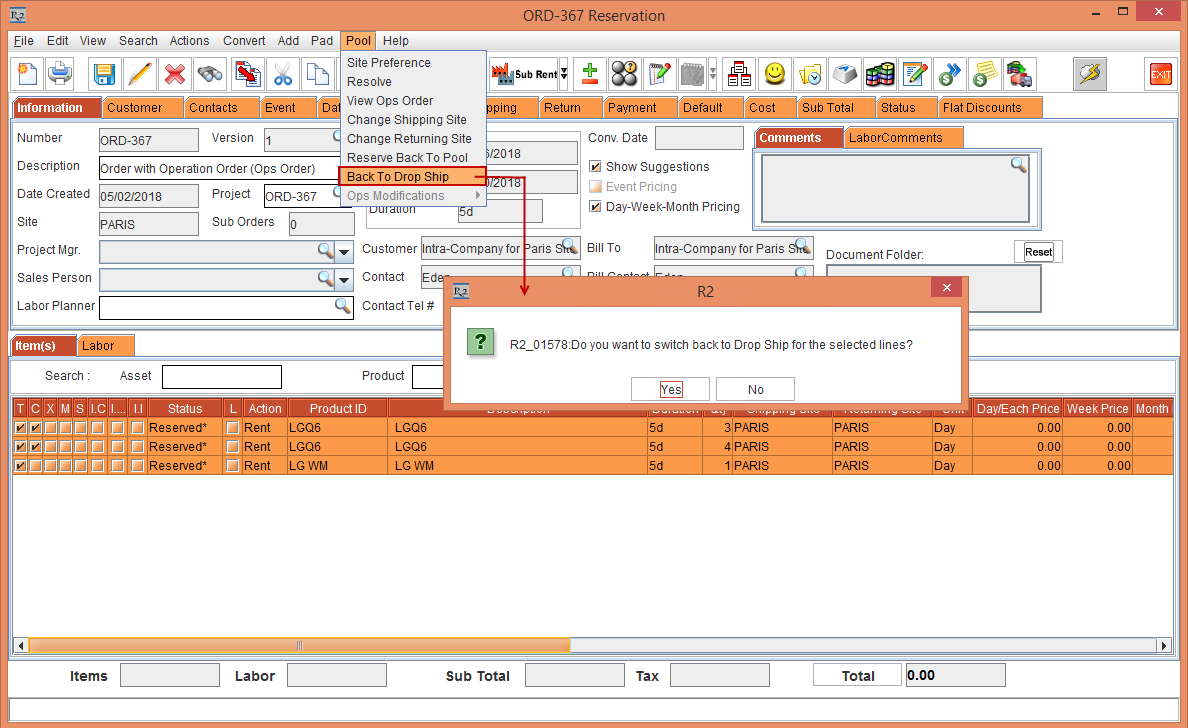
Select the Account module > Search Orders option > Search Orders window. Search and open the linked Rental Reservation Order [ORD-367].
-
Select the Item lines with the Status [Reserved*] that are to be cancelled.
-
Select the Pool menu > Back To Drop Ship option. The system displays a prompt with the message "Do you want to switch back to Drop Ship for the Selected lines?" with Yes and No buttons, as shown in Figure 3.21.
-
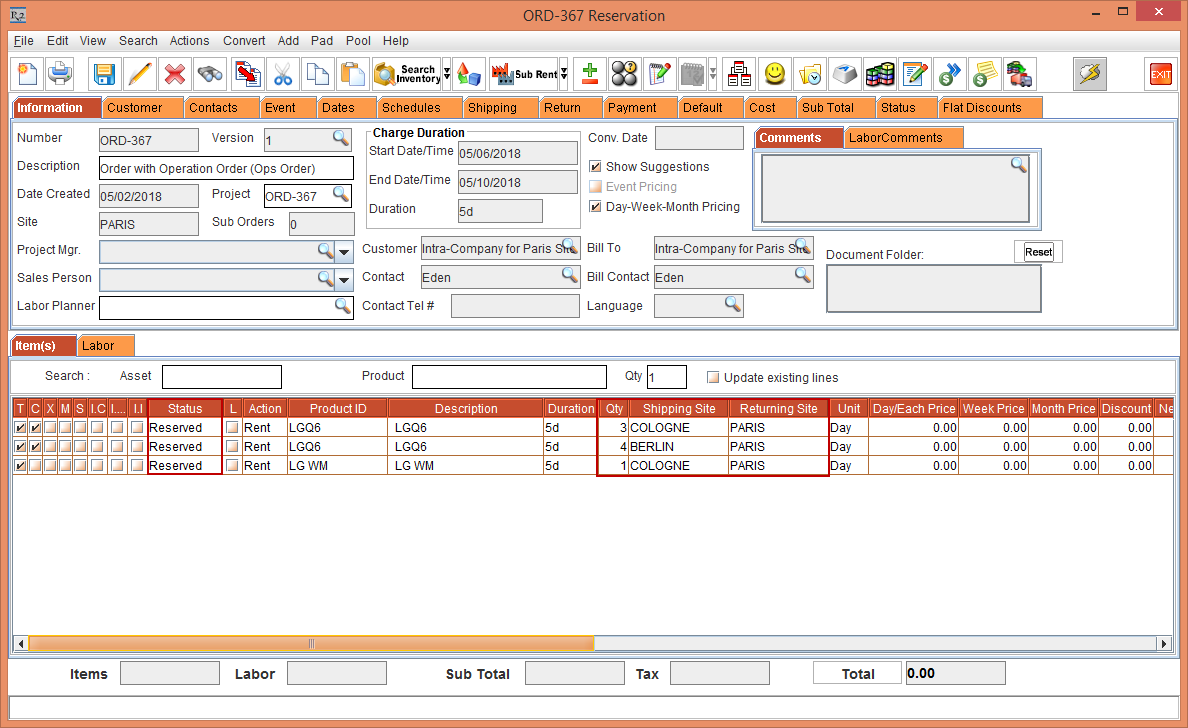
Click Yes. The Item lines with the Status [Reserved*] is modified to Status [Reserved] and the Shipping Site and Returning Site is also reverted to the Sites that was selected before generating the Operation Order, as shown in Figure 3.22.
-
Select the Pool menu > View Ops Order option. In the Operation Order [CO429822] all the selected Item lines are deleted, as shown in Figure 3.23.
Standalone Operation Order
The Standalone Operation Order can be created either from the Account module or Warehouse module by following the below steps:
-
Select the Account module. The Account window is displayed.
-
Select the File menu > New option > Operation Order option or press the Hot Key [Alt+Shift-O] from the Keyboard, as shown in Figure 3.24.
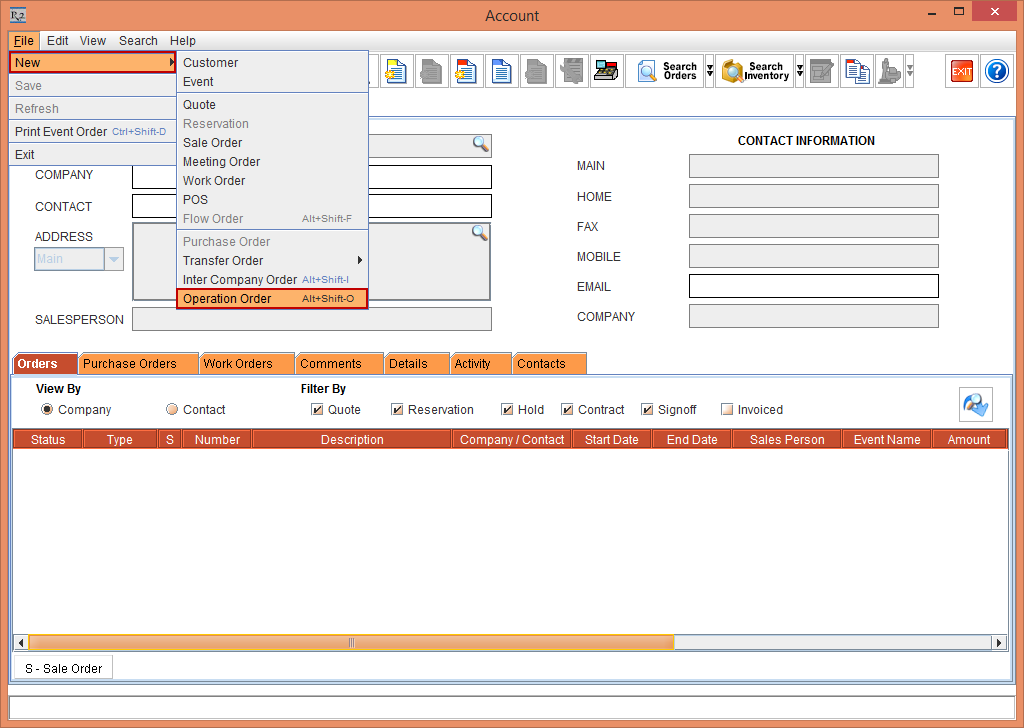
-
The Reservation (Operation Order) window is displayed, as shown in Figure 3.25. (OR)
-
Select the Warehouse module. The Warehouse window is displayed.
-
Select the File menu > New Operation Order option or press the Hot Key [Alt+Shift-O] from the Keyboard, as shown in Figure 3.25.
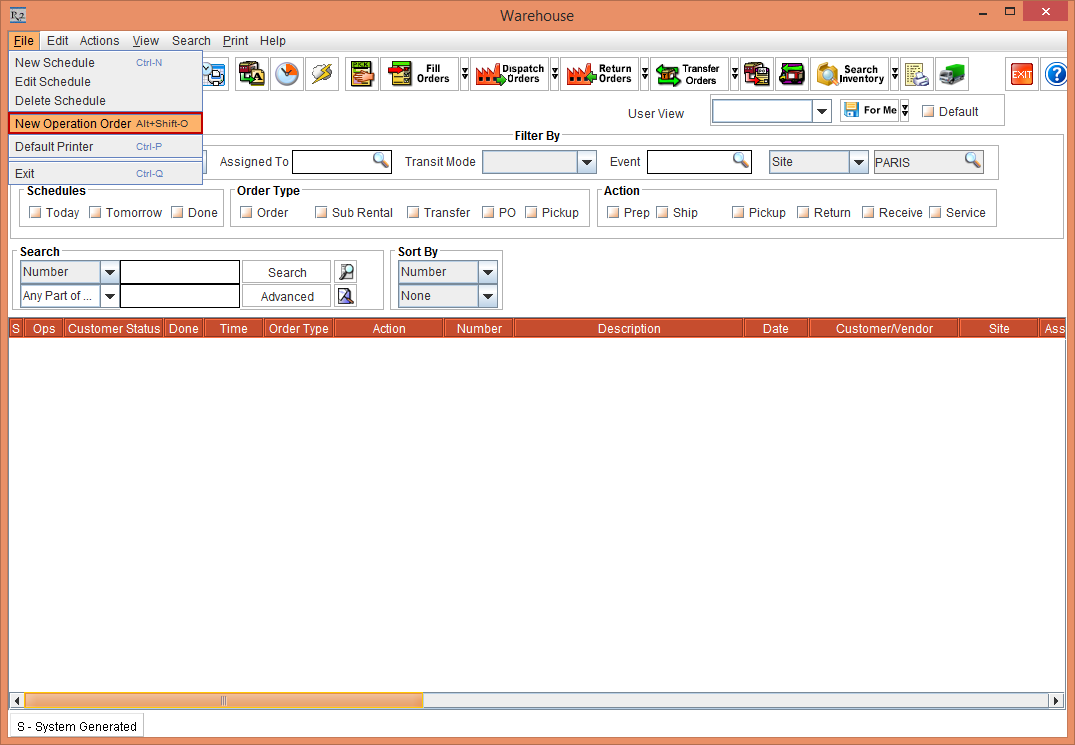
-
The Reservation (Operation Order) window is displayed, as shown in Figure 3.26.
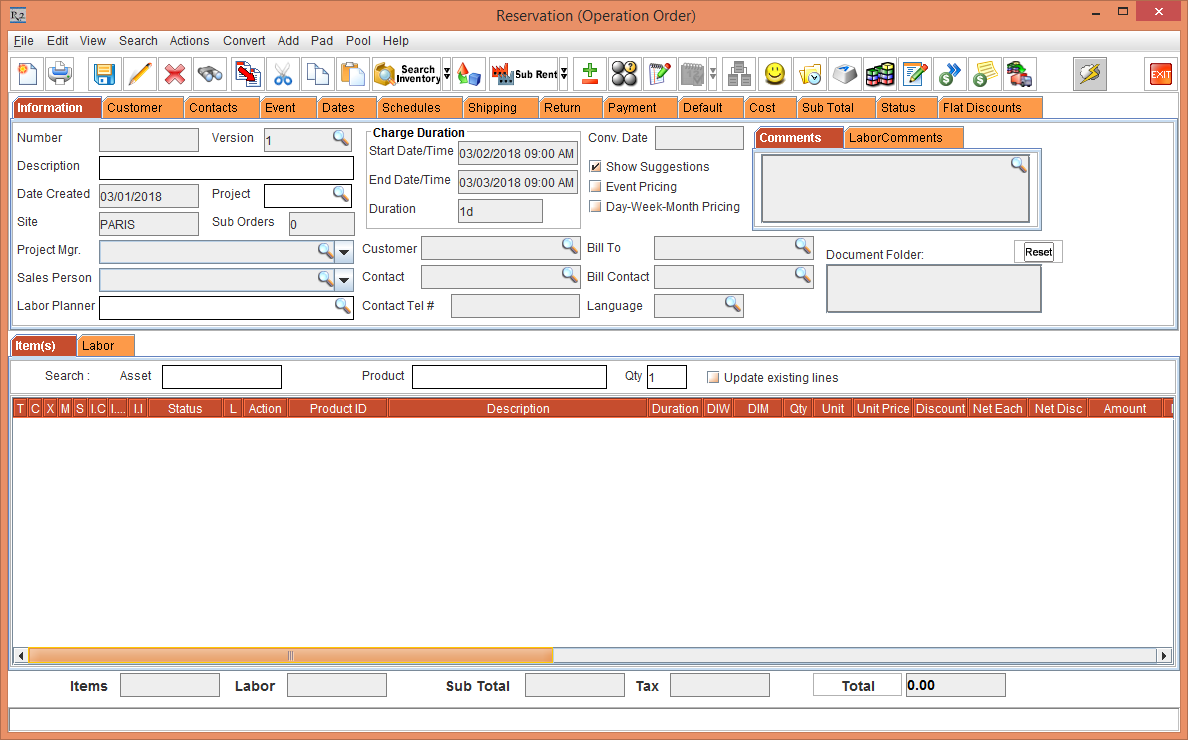
-
Select the Customer tab. Click the Company importable button. The Search Company / Contact window is displayed exhibiting the Intra-Company Customers by default, as shown in Figure 3.27.
A detailed Company Search will display the other Company Customers along with the Intra-Company Customers but only the Intra-Company Customers can be tagged to the Operation Order.
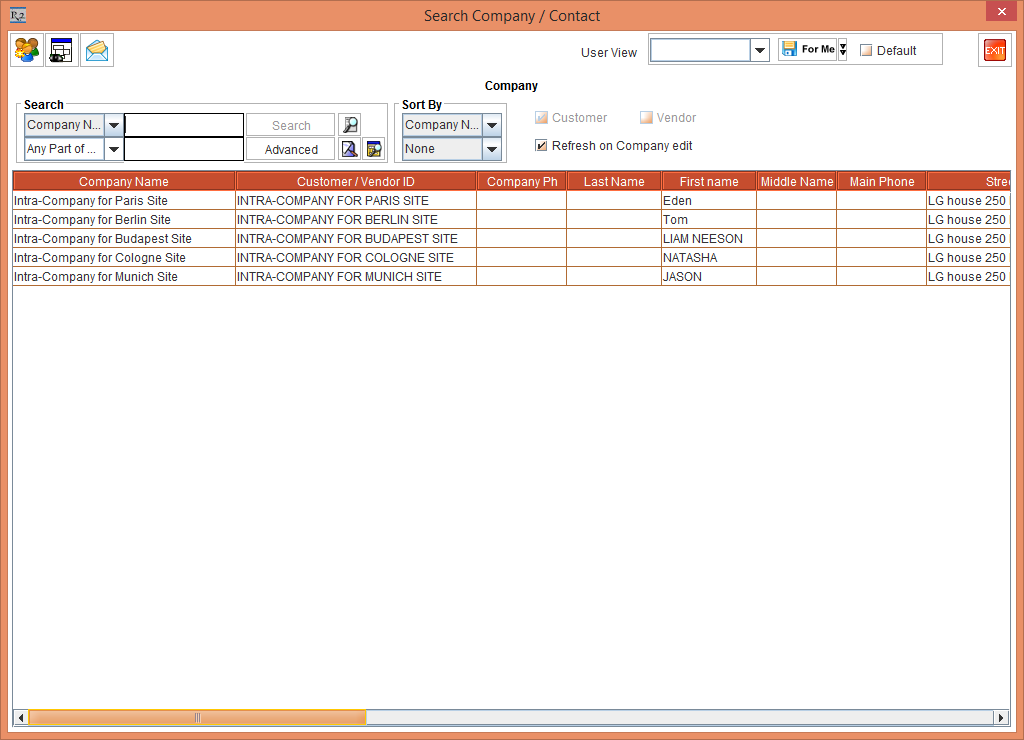
-
Select and tag an Intra-Company Customer [INTRA-COMPANY FOR BERLIN SITE].
-
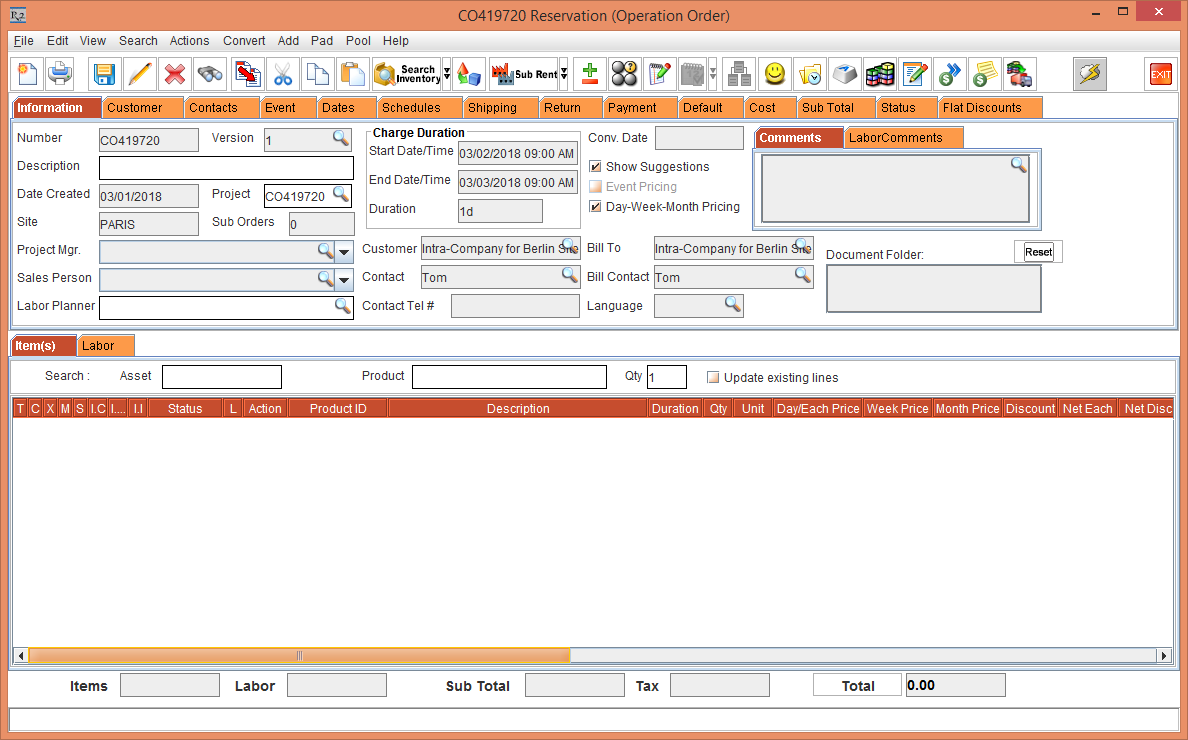
Save the Standalone Operation Order. The Order is saved as [CO419720 Reservation (Operation Order)], as shown in Figure 3.28.
-
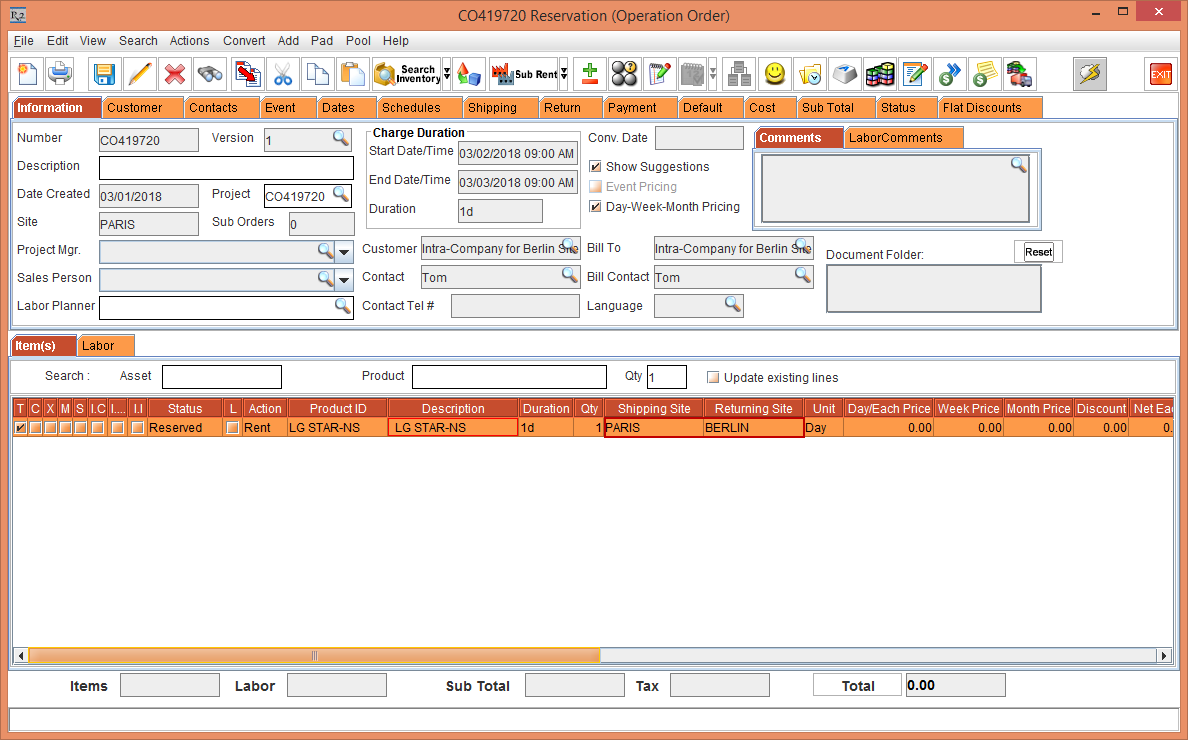
Select the Search menu > Items option > Search Items window is displayed.
-
Search and add the Item [LG STAR- NS] with 1 Qty. The Item line [LG STAR- NS] displays the Shipping Site [PARIS], as it is the Order Site and the Returning Site [BERLIN], as it is the Intra Company tagged to the Order, as shown in Figure 3.29.
-
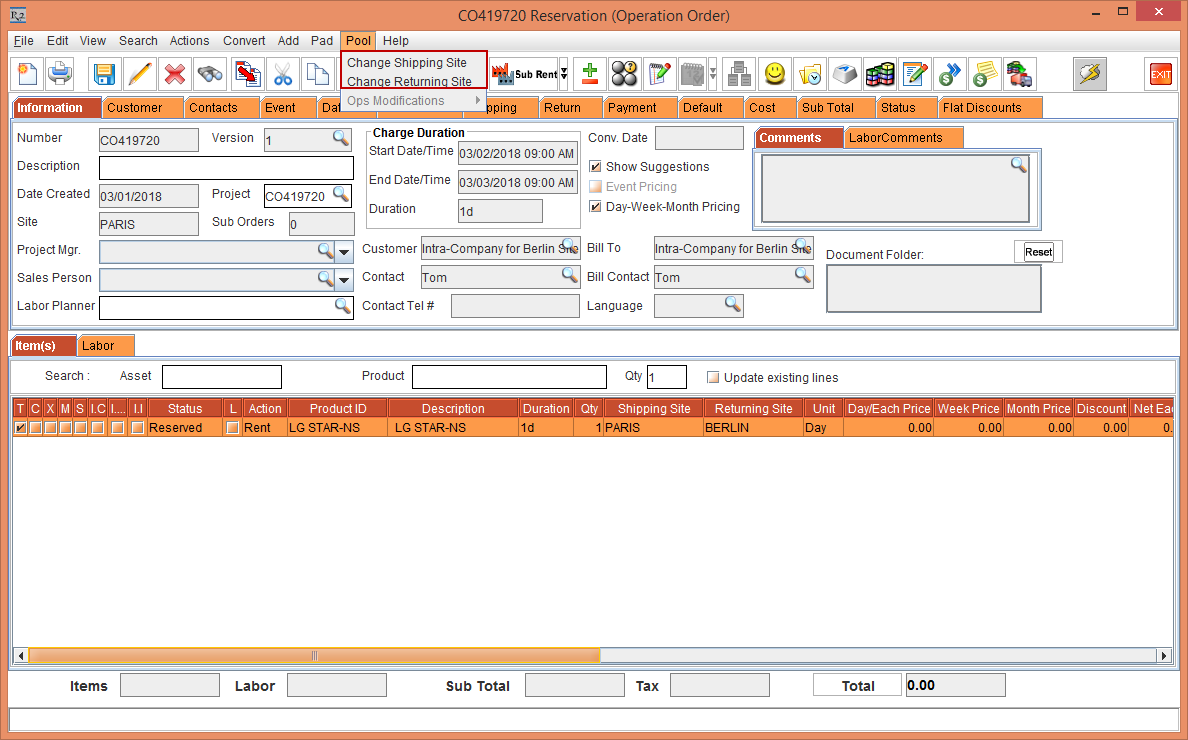
Select the Pool menu. The following Pool menu options in the Standalone Operation Order are displayed, as shown in Figure 3.30.
-
Change Shipping Site: Selecting this option in the Pool menu will allow you to modify the Shipping Site in the selected Item line of the Standalone Operation Order.
-
Change Returning Site: Selecting this option in the Pool menu will allow you to modify the Returning Site in the selected Item line of the Standalone Operation Order.
Warehouse Task for the Operation Order
The Warehouse task generated based on the Shipping and the Returning Sites. For an Item line in the Operation Order, the Prep task and Ship task is generated for the Shipping Site and only the Receive task is generated for the Returning Site. The Pickup Task and the Return Task is not generated.
-
Set the System Date [03-May-2018].
-
Login to the R2 application with the Site [PARIS].
-
Select the Account module. The Account window is displayed.
-
Tag a Company [LG].
-
Click the Reservation icon. The Order in Formation dialog box is displayed.
-
Create a Rental Reservation Order [ORD-368] for 5 days duration with the Start Date [07-May-2018], Start Time [09:00 AM] and End Date [12-May-2018] End Time [09:00 AM].
-
Click the Search Item icon. The Search Items window is displayed.
-
Search and add the Serial Item [LG STYLUS] with 6 Qty. The Status of the Serial Item [LG STYLUS] is displayed as Pool with both the Shipping Site and Returning Site as Sub-Region [ML EUROPE].
-
Select the Item line > right-click > Resolve option > the Assign Quantity window is displayed with the availability of the Item displayed in the Sites [PARIS], [BUDAPEST], and [BERLIN].
-
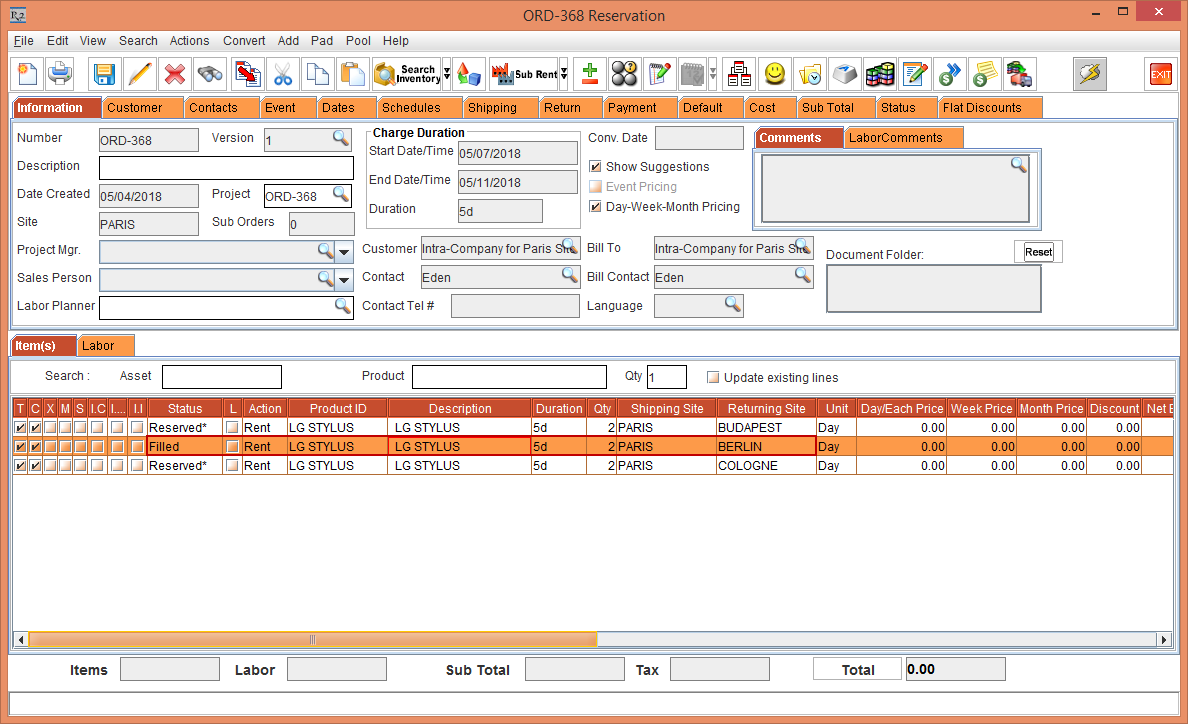
Click OK. The Serial Item [LG STYLUS] is Reserved and distributed to the Sites [COLOGNE], [BUDAPEST], and [BERLIN] with the Returning Site as the Order Site [PARIS].
-
Modify the Returning Site for each of the Item line to the Sites [COLOGNE], [BUDAPEST], and [BERLIN], as shown in Figure 3.31.

-
Select the Item lines > right-click > select Generate Ops Order. The system displays a prompt with the message "Do you want to generate Operation order" with Yes and No buttons.
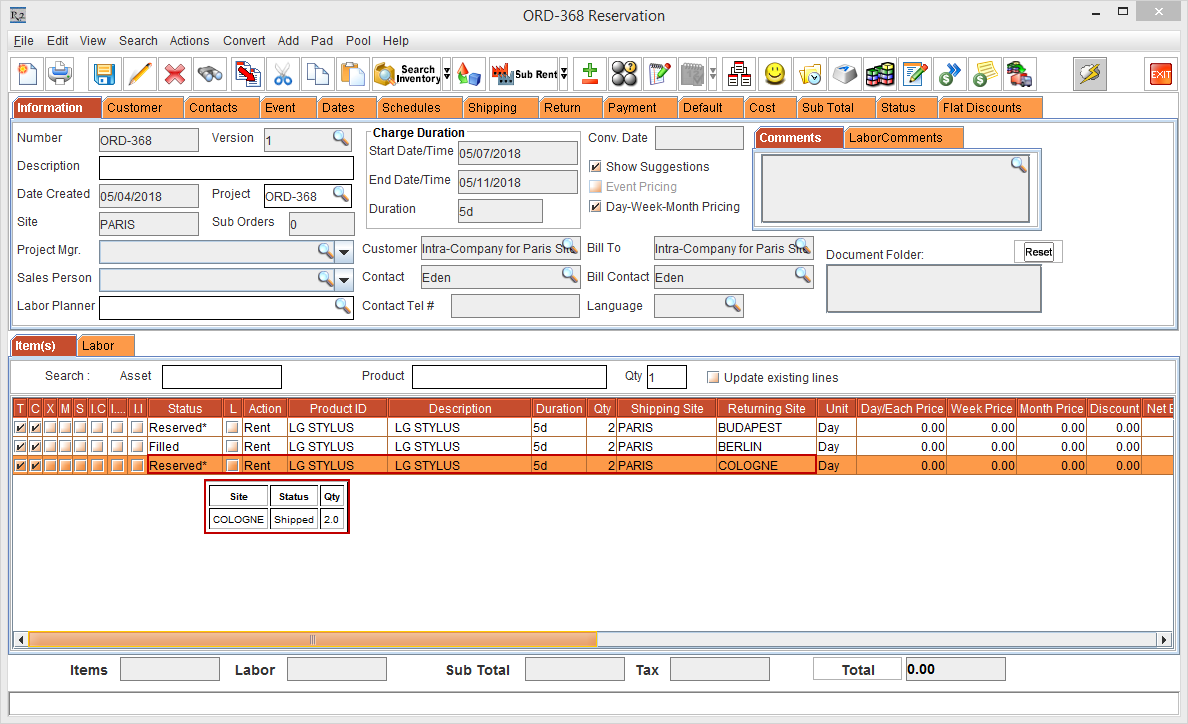
-
Click Yes. The Operation Order [CO430248] is generated with the Item lines displaying the Status [Reserved*].
-
Select the Pool menu > View Ops Order option.
-
The Operation Order [CO430248] window displays three Item lines.
-
The first Item line displaying the Shipping Site [COLOGNE], the second Item line displaying the Shipping Site [BUDAPEST] and the third Item line displaying the Shipping Site [BERLIN] with all the three Item lines displaying the Returning Site [PARIS], as shown in Figure 3.32.

-
Select the Warehouse module. The Warehouse window is displayed.
-
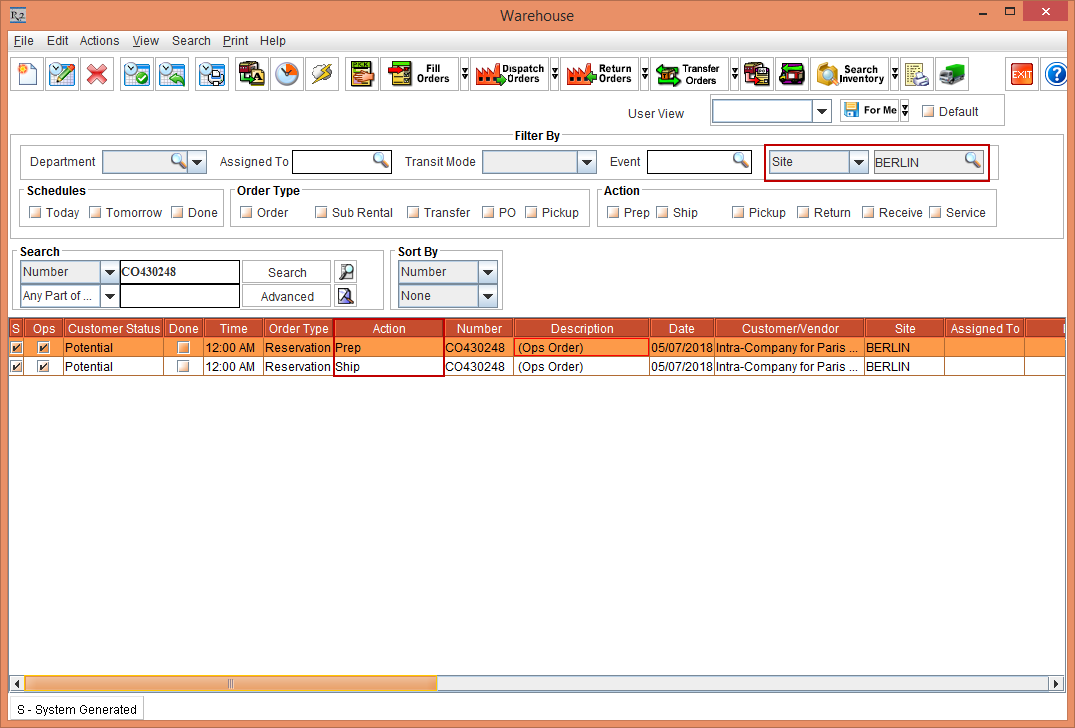
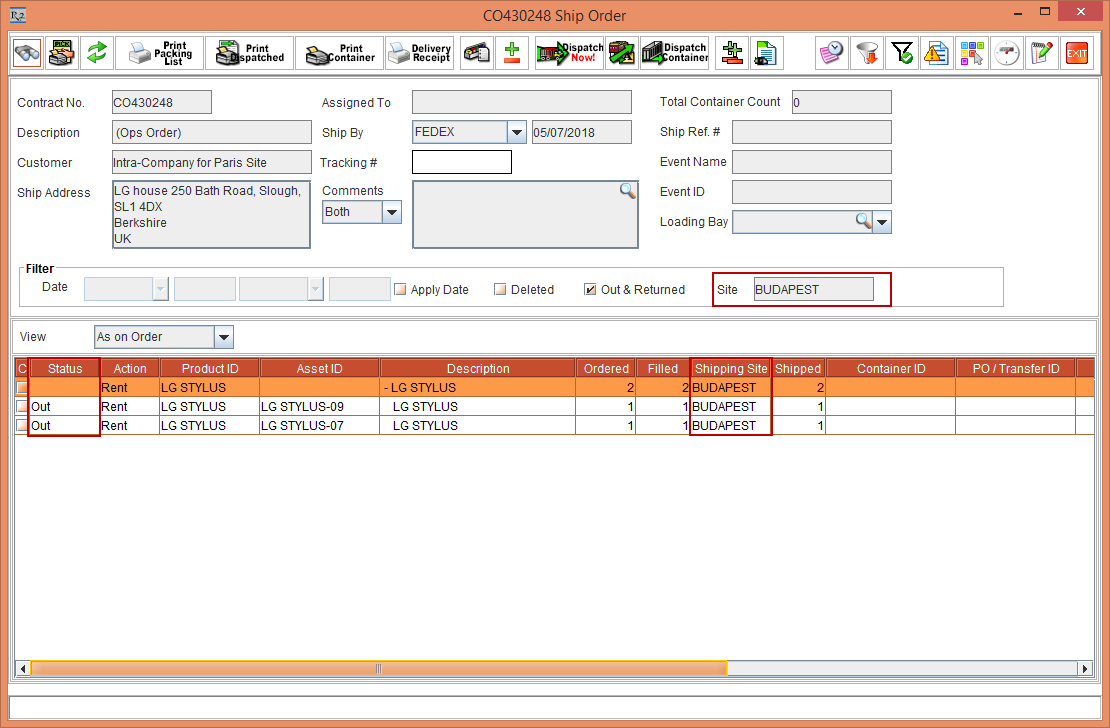
Click the Site importable button and modify the Site to BERLIN as it is the Shipping Site for one of the Item line in the Operation Order [CO430248].
-
Search for the Operation Order [CO430248]. The Prep Task and Ship Task is generated, as shown in Figure 3.33.
-
Double-click and open the line with the Action [PREP]. The Fill Order [CO430248 Order Fill] window displaying the Shipping Site column [BERLIN] and the Site field [BERLIN]. Fill the Item with Assets [LG STYLUS-01] and [LG STYLUS-02]. The Assets [LG STYLUS-01] and [LG STYLUS-02] Status is displayed as Filled, as shown in Figure 3.34.
-
Close the Fill Order [CO430248 Order Fill] window.
-
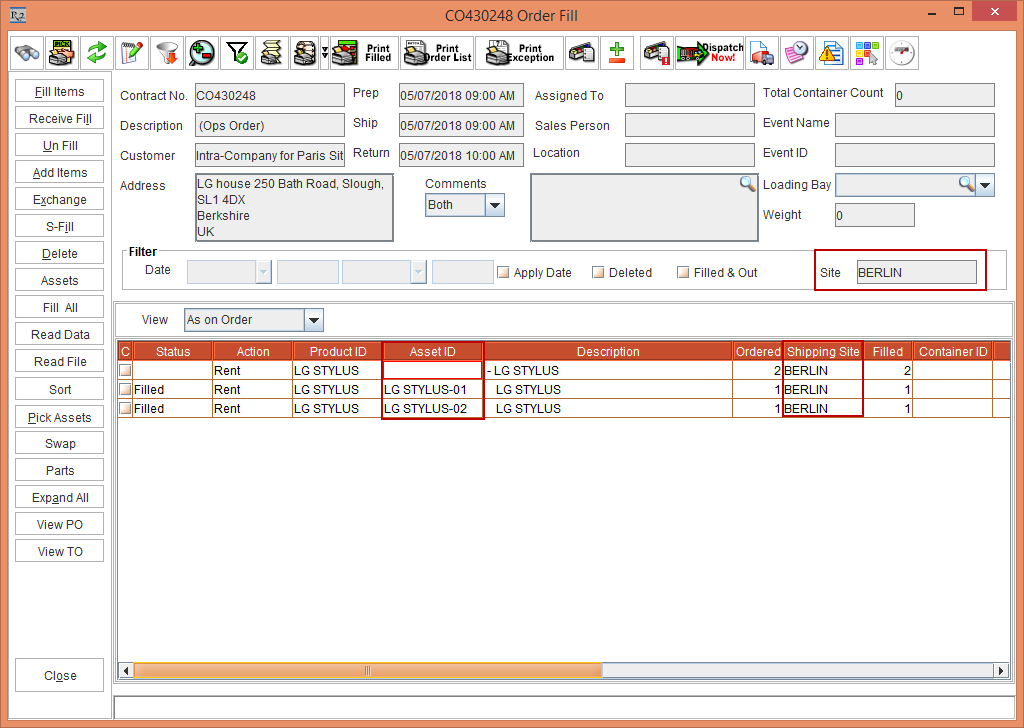
Double-click and open the line with the Action [SHIP]. The Ship Order [CO430248 Ship Order] window displaying the Shipping Site column [BERLIN] and the Site field [BERLIN]. Ship the Item with Assets [LG STYLUS-01] and [LG STYLUS-02]. The Assets [LG STYLUS-01] and [LG STYLUS-02] Status is displayed as Out, as shown in Figure 3.35.
-
Exit the Ship Order [CO430248 Ship Order] window.
-
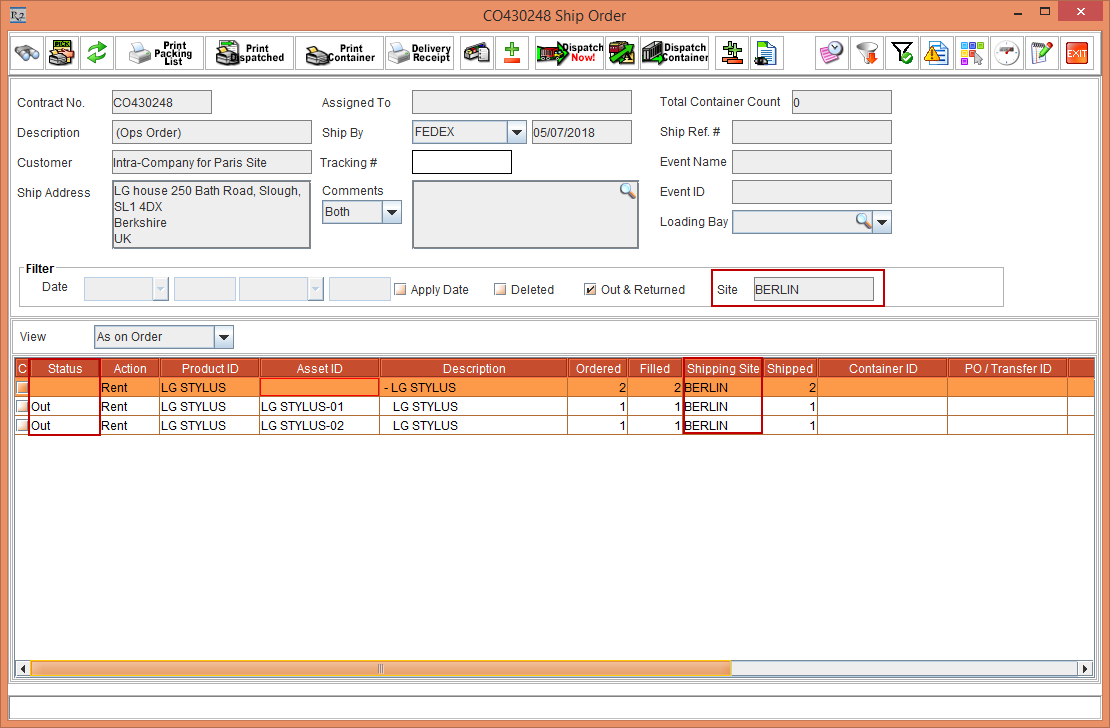
Click the Site importable button and modify the Site to BUDAPEST as it is the Shipping Site for the second Item line in the Operation Order [CO430248].
-
Search for the Operation Order [CO430248]. The Prep Task and Ship Task is generated.
-
Double-click and open the line with the Action [PREP]. The Fill Order [CO430248 Order Fill] window displaying the Shipping Site column [BUDAPEST] and the Site field [BUDAPEST]. Fill the Items with Assets [LG STYLUS-07] and [LG STYLUS-09]. The Assets [LG STYLUS-07] and [LG STYLUS-09] Status is displayed as Filled, as shown in Figure 3.36.
-
Close the Fill Order [CO430248 Order Fill] window.
-
Double-click and open the line with the Action [SHIP]. The Ship Order [CO430248 Ship Order] window displaying the Shipping Site column [BUDAPEST] and the Site field [BUDAPEST]. Ship the Assets [LG STYLUS-07] and [LG STYLUS-09]. The Assets [LG STYLUS-07] and [LG STYLUS-09] Status is displayed as Out, as shown in Figure 3.37.
-
Exit the Ship Order [CO430248 Ship Order] window.
-
Click the Site importable button and modify the Site to COLOGNE as it is the Shipping Site for the third Item line in the Operation Order [CO430248].
-
Search for the Operation Order [CO430248]. The Prep Task and Ship Task is generated.
-
Double-click and open the line with the Action [PREP]. The Fill Order [CO430248 Order Fill] window displaying the Shipping Site column [COLOGNE] and the Site field [COLOGNE]. Fill the Items with Assets [LG STYLUS-14] and [LG STYLUS-15]. The Assets [LG STYLUS-14] and [LG STYLUS-15] Status is displayed as Filled, as shown in Figure 3.38.
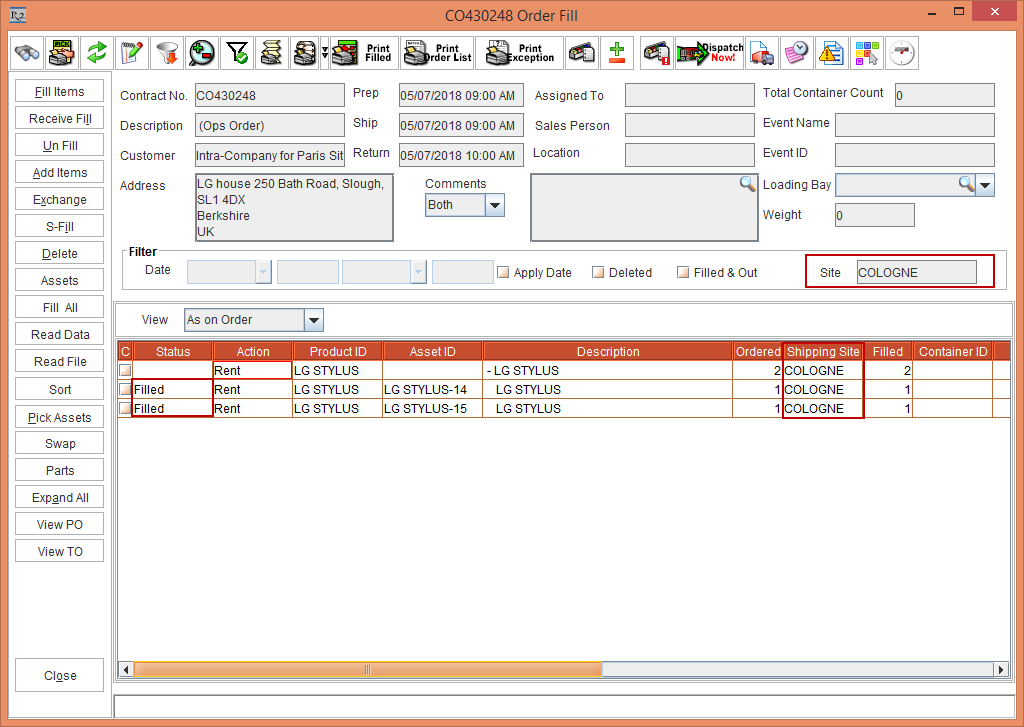
-
Close the Fill Order [CO430248 Order Fill] window.
-
Double-click and open the line with the Action [SHIP]. The Ship Order [CO430248 Ship Order] window displaying the Shipping Site column [COLOGNE] and the Site field [COLOGNE]. Ship the Assets [LG STYLUS-14] and [LG STYLUS-15]. The Assets [LG STYLUS-14] and [LG STYLUS-15] Status is displayed as Out, as shown in Figure 3.39.
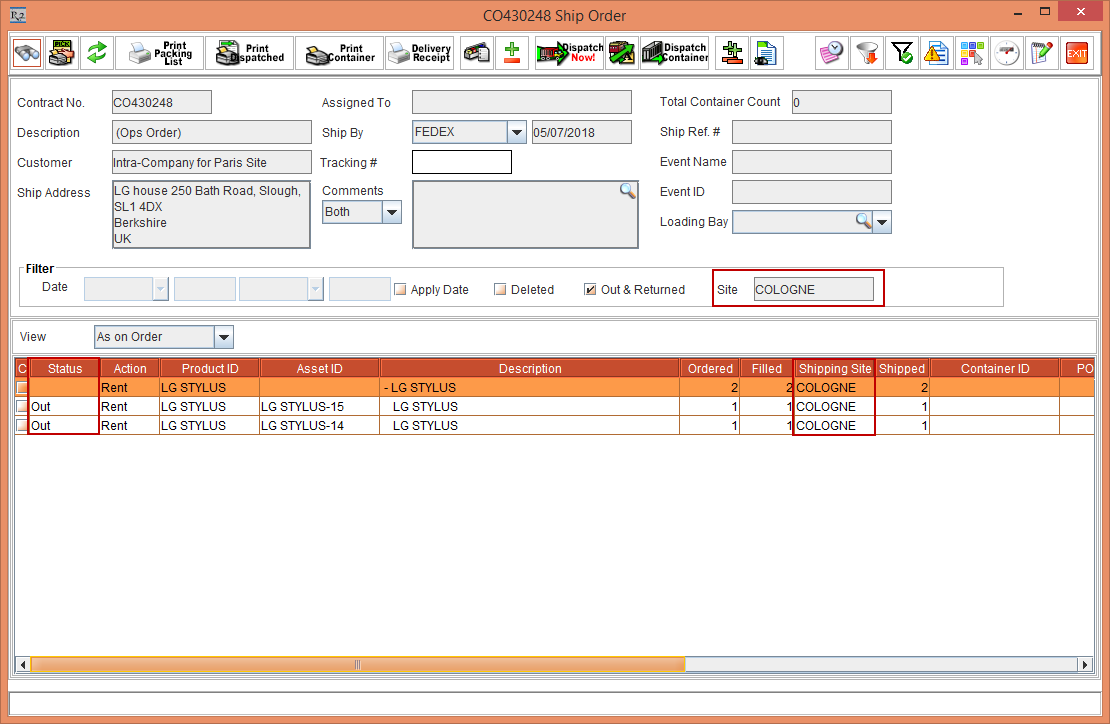
-
Exit the Ship Order [CO430248 Ship Order] window.
-
Click the Site importable button and modify the Site to PARIS as it is the Returning Site for all the three Item lines in the Operation Order [CO430248].
-
Search for the Operation Order [CO430248]. The Receive Task is generated, as shown in Figure 3.40.
-
For an Operation Order the Pickup Task and Return Task will not be generated, instead only the Receive Task is generated.
-
In the Warehouse window, do not select the Return check box and search for the Receive Task.

-
Double-click and open the line with the Action [RECEIVE].
-
The Return Order [CO430248 Return Order] window is displayed with the Shipping Site and Returning Site for the Assets in the Sites [COLOGNE], [BUDAPEST], and [BERLIN] along with the importable button Shipping Site to filter the Assets based on the Shipping Site, as shown inthe Table 3.1 and Figure 3.41.
Table 3.1 Dates in the Rental Reservation Order [CO430248 Return Order]
|
Asset ID of the Item LGQ6 |
Shipping Site |
Returning Site |
|
LG STYLUS-15 |
COLOGNE |
PARIS |
|
LG STYLUS-14 |
COLOGNE |
PARIS |
|
LG STYLUS-09 |
BUDAPEST |
PARIS |
|
LG STYLUS-07 |
BUDAPEST |
PARIS |
|
LG STYLUS-01 |
BERLIN |
PARIS |
|
LG STYLUS-02 |
BERLIN |
PARIS |
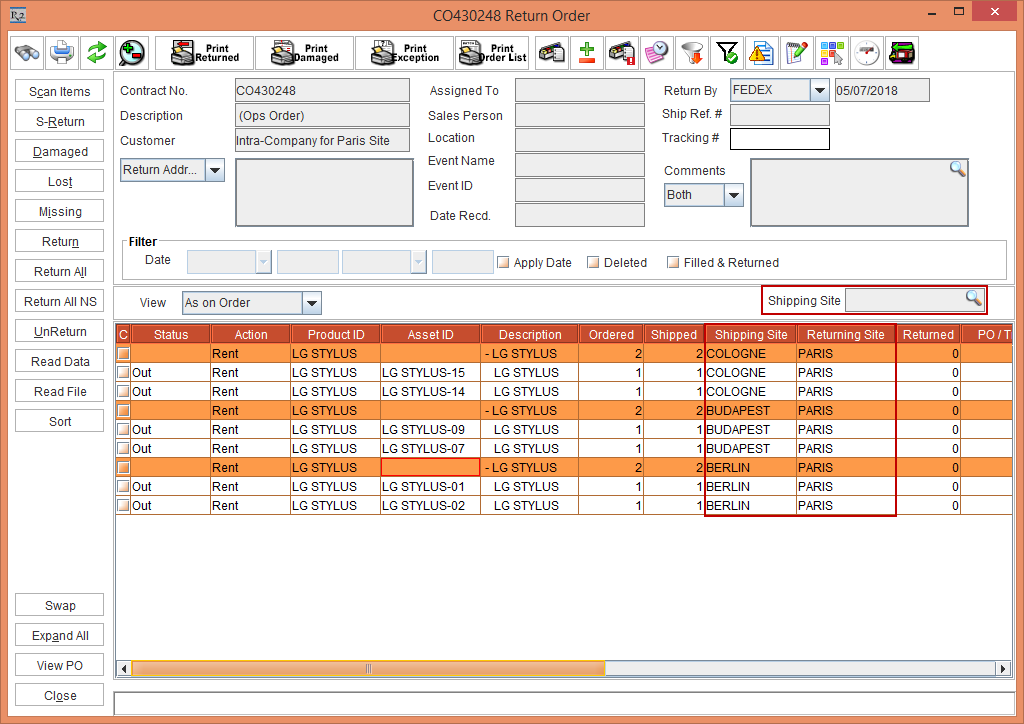
-
Click the Shipping Site importable button. The Sites window is displayed.
-
Tag the Site [BERLIN] and click the Refresh button. The Assets [LG STYLUS-01] and [LG STYLUS-02] that is in Status [Out] only in the BERLIN site is displayed, as shown in Figure 3.42.
-
Click the Receive and Fill Main Order button, as shown in Figure 3.42.
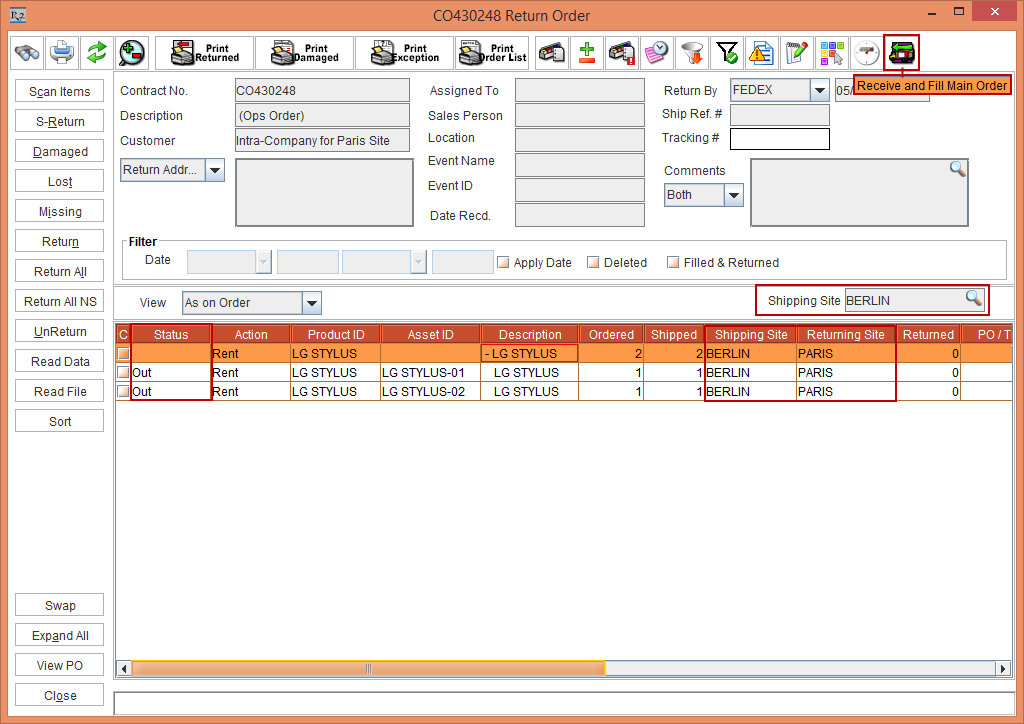
-
The system displays a prompt with the message "Do you want to Receive and Fill to Main order for the selected lines?" with Yes and No buttons.
-
Select Yes.
-
Exit the Warehouse module.
-
Select the Account module > Search Orders button > Search and open the linked Rental Reservation Order [ORD-368]. The Item [LG STYLUS] with the Assets [LG STYLUS-01] and [LG STYLUS-02] is received and filled in the Order [ORD-368] displaying the Status as Filled, as shown in Figure 3.43.
-
Click on the Status [Reserved*] of the Operation Order Item line. The tool tip is displayed with the Status as Shipped to Site [COLOGNE], and Item Qty [2], as shown in Figure 3.44.
For the Item line that is Filled in the Warehouse of the Operation Order, when viewed in the main Order, the Operation Order Item line with the Status [Reserved*] displays the Tooltip Status as Filled.
Kit behavior
The Item Pooling in the Serial Kit is and the Non-Serial Kit is explained below:
Serial Kit behavior
-
Select the Maintenance module > Items tab > Kits tab.
-
Click the Site Importable button within the Maintenance window and create Kits [LG SERIAL KIT-1] and [LG SERIAL KIT-2] in the Sites [MUNICH] and [PARIS] and receive Assets as follows:
Table 3.2 Receive the Assets for the Kits [LG SERIAL KIT-1] and [LG SERIAL KIT-2] in the Sites [MUNICH] and [PARIS]
|
Site Name |
Kit Name |
Item [LG STAR] Asset Name |
Item [LG WM] Asset Name |
|
MUNICH |
LG SERIAL KIT-1 |
LG STAR-07 |
LG WM-07 |
|
LG STAR-08 |
LG WM-08 |
||
|
LG SERIAL KIT-2 |
LG STAR-09 |
LG WM-09 |
|
|
LG STAR-10 |
LG WM-10 |
||
|
PARIS |
LG SERIAL KIT-1 |
LG STAR-11 |
LG WM-11 |
|
LG STAR-12 |
LG WM-12 |
||
|
LG SERIAL KIT-2 |
LG STAR-13 |
LG WM-14 |
|
|
LG STAR-13 |
LG WM-14 |
-
Save and Exit the Maintenance module.
-
Set the System Date [03-May-2018].
-
Login to the R2 application with the Site [PARIS].
-
Select the Account module. The Account window is displayed.
-
Tag a Company [LG].
-
Click the Reservation icon. The Order in Formation dialog box is displayed.
-
Create a Rental Reservation Order [ORD-369] for 5 days duration with the Start Date [07-May-2018], Start Time [09:00 AM] and End Date [12-May-2018] End Time [09:00 AM].
-
Select the Dates tab > click the Edit Dates button. The Order Dates window is displayed.
-
Select the Search menu > Kits option. The Search Items window is displayed.
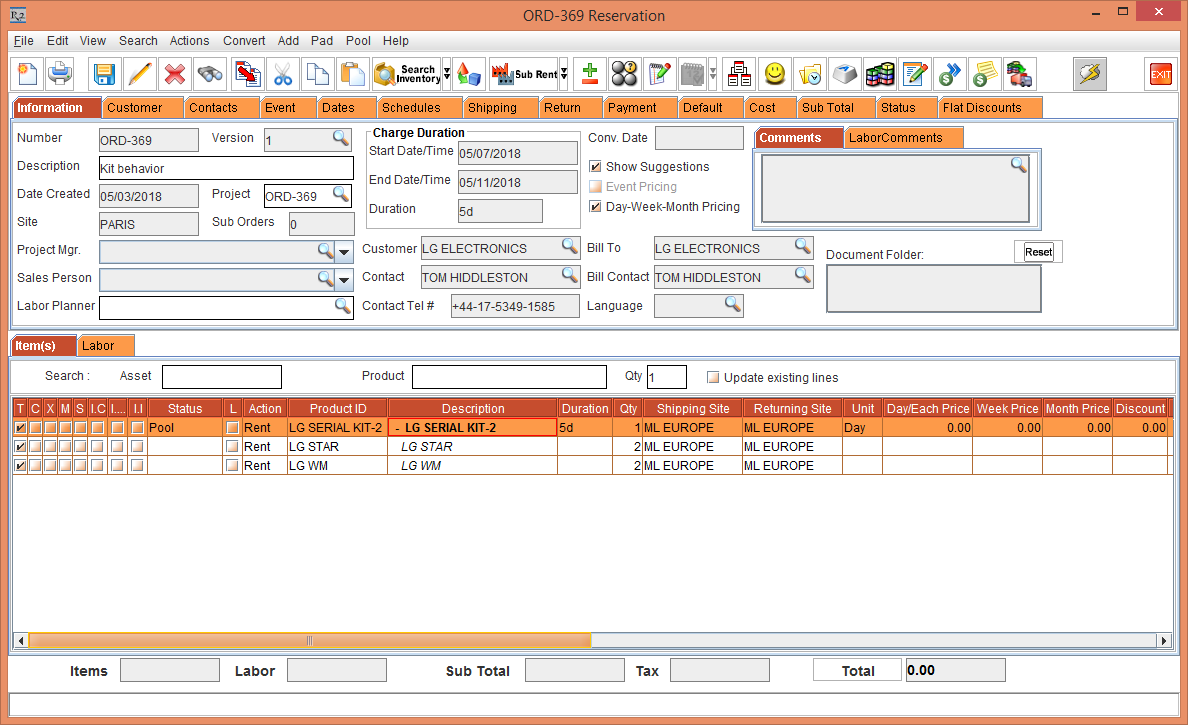
-
Search for the Serial Kit [LG SERIAL KIT-2]. The Kit Header [LG SERIAL KIT-2] with the Child Items [LG WM] and [LG STAR] along with the Shipping Site and Returning Site as the Sub-Region [ML EUROPE] is displayed, as shown in Figure 3.45.
-
Select the Kit Header [LG SERIAL KIT-2], right-click and select the Resolve option. The Assign Quantity window is displayed, as shown in Figure 3.46.
-
Modify the Site [PARIS] Assigned Qty [0] and Site [MUNICH] Assigned Qty [1]
-
Click OK. The Shipping Site and Returning Site of the Kit Header [LG SERIAL KIT-2] with the Child Items [LG WM] and [LG STAR] is modified to Shipping Site [MUNICH] and Returning Site [PARIS] respectively, as shown in Figure 3.47.

-
After Resolving the Kit Header [LG SERIAL KIT-2], only the Shipping Site and Returning Site of the Kit Header [LG SERIAL KIT-2] can be modified which gets reflected to the Child Items [LG WM] and [LG STAR].
-
The Shipping Site and Returning Site of the Child Items [LG WM] and [LG STAR] cannot be modified individually.
-
The right-click and select the Resolve option is enabled only for the Kit Header [LG SERIAL KIT-2] and not the Child Items [LG WM] and [LG STAR].
-
The Pool menu > Resolve option functions similar to that of a normal Item.
Non-Serial Kit behavior
-
Select the Maintenance module > Items tab > Kits tab.
-
Click the Site Importable button within the Maintenance window and create Non-Serial Kits [LG NON-SERIAL KIT-1] and [LG NON-SERIAL KIT-2] in the Sites [MUNICH] and [PARIS] and receive Items.
Table 3.3 Receive the Items for the Non-Serial Kits [LG NON-SERIAL KIT-1] and [LG NON-SERIAL KIT-2] in the Sites [MUNICH] and [PARIS]
|
Site Name |
Kit Name |
Item [LG STAR -NS] |
Item [LG WM-NS] |
|
MUNICH |
LG NON-SERIAL KIT-1 |
LG STAR-NS |
LG WM-NS |
|
LG NON-SERIAL KIT-2 |
LG STAR-NS |
LG WM-NS |
|
|
PARIS |
LG NON-SERIAL KIT-1 |
LG STAR-NS |
LG WM-NS |
|
LG NON-SERIAL KIT-2 |
LG STAR-NS |
LG WM-NS |
-
Save and Exit the Maintenance module.
-
Login to the R2 application with the Site [PARIS].
-
Select the Account module. The Account window is displayed.
-
Tag a Company [LG].
-
Click the Reservation icon. The Order in Formation dialog box is displayed.
-
Create a Rental Reservation Order [ORD-370] for 5 days duration with the Start Date [07-May-2018], Start Time [09:00 AM] and End Date [12-May-2018] End Time [09:00 AM].
-
Select the Search menu > Kits option. The Search Items window is displayed.
-
Search and add the Non-Serial Kit [LG NON-SERIAL KIT-2] with 4 Qty. The Kit Header [LG NON-SERIAL KIT-2] will not display any Shipping Site and Returning Site whereas the Child Items [LG WM-NS] and [LG STAR-NS] displays the Shipping Site and Returning Site as Sub-Region [ML EUROPE], as shown in Figure 3.48.
-
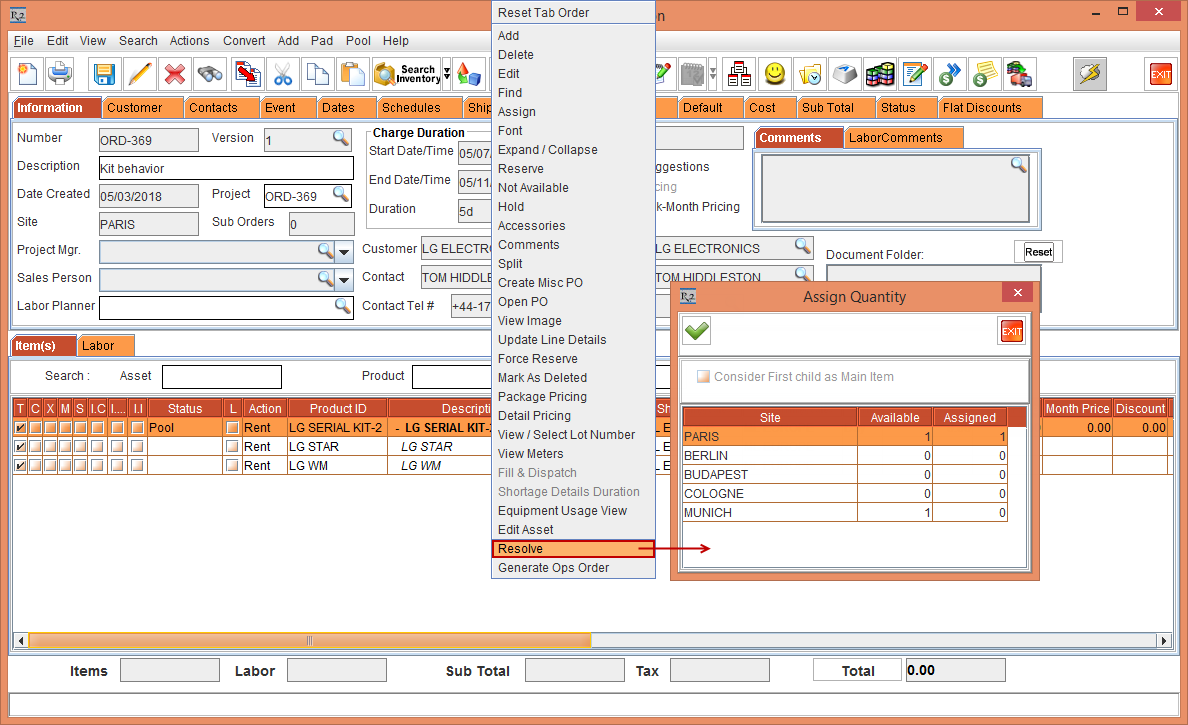
Select the Child Item [LG STAR-NS] within the Non-Serial Kit [LG NON-SERIAL KIT-2], right-click and select the Resolve option. The Assign Quantity window is displayed, as shown in Figure 3.49.
The Child Item [LG STAR-NS] is considered as the Main Item.
-
The Assign Quantity window displays the Available and Assigned Qty for the Sites [PARIS] as [5], [BERLIN] as [1], and [BUDAPEST] as [2], as shown in Figure 2.43.
-
When the Consider First Child as Main Item check box is selected, the other child Item [LG WM-NS] must get resolved in the same Site where the first child Item [LG STAR-NS] is getting resolved. If the there is no availability of the other child Item [LG WM-NS] in the Site where the first child Item [LG STAR-NS] is getting resolved, then the system will search for the availability of the other child Item in the next Site based on the Order Site Preference.
-
Click OK.
-
The Non-Serial Kit [LG NON-SERIAL KIT-2] with the Child Items [LG STAR-NS] and [LG WM-NS] gets resolved at various Sites based on the availability and Order Site Preference, as shown in Figure 3.50.
-
The Consider First Child as Main Item check box in the Assign Quantity window is enabled only for the first child item within the Non-Serial Kit. It is disabled for the subsequent child items.
-
If the Consider First Child as Main Item check box in the Assign Quantity window is not selected and resolved, only the selected child Item gets resolved modifying the Item Status as Reserved. Whereas the other child Items must be manually resolved.
-
The Item Resolve can performed from the line level (Item line > right-click > Resolve) and Order level (Pool menu > Resolve).
-
After resolving the Non-Serial Kit, the Shipping Site and the Returning Site of the child Items within the Non-Serial Kit can still be modified.
Support of E-Pool in Quote Order
E-Pool is not supported for a Quote Order. When a Quote Order is converted to a Rental Reservation Order, the Order Site is displayed both as Shipping Site and Returning Site within the respective columns based on the Cutoff time in days in the Sub-Region window.
Prerequisites:
-
Set the system date [28-Apr-2018].
-
Select the Maintenance module > Employee tab > Site tab.
-
Edit the Site [PARIS] > click the Sub-Region importable button. The Group List window is displayed.
-
Edit the Sub-Region [ML EUROPE]. The Sub-Region window with the E-Pool Configuration fields are displayed.
-
Enter the Cutoff time in days as 3.
-
Exit the Sub-Region window.
-
Select the Maintenance module > Items tab > Site tab.
-
Select the Maintenance module > Items tab.
-
Create and receive the Items [LG WM] and [LG WM-NS] with 2 Qty each.
-
Exit the Maintenance window.
Sample Workflow
-
Select the Account module. The Account window is displayed.
-
Tag a Company [LG].
-
Click the Quote icon. The Order in Formation dialog box is displayed.
-
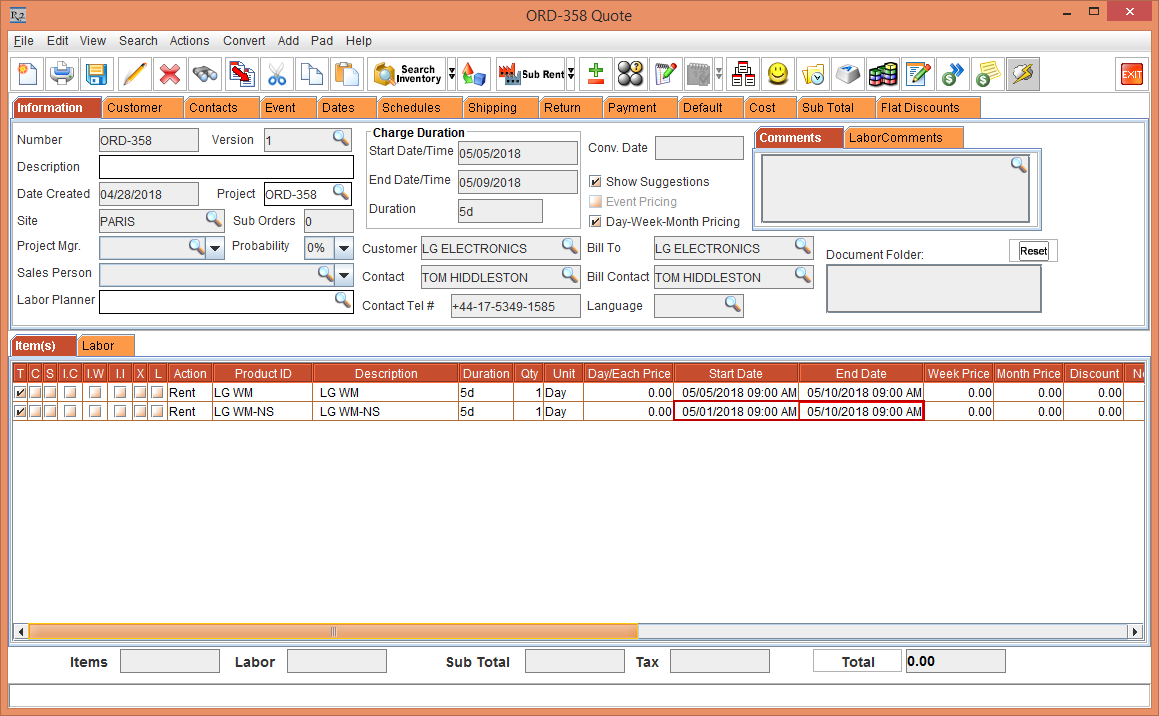
Create a Quote Reservation Order [ORD-358 Quote] for 5 days duration with the Start Date [05-May-2018], Start Time [09:00 AM] and End Date [10-May-2018] End Time [09:00 AM]. Click the Search Item icon. The Search Items window is displayed.
-
Search for the Items [LG WM] and [LG WM-NS] with 1 Qty each. The Shipping and the Returning sites are not displayed for a Quote Order.
-
Right-click the Item [LG WM-NS] > Edit option> Dates tab > Edit Dates button > Order Line Dates window, modify the Prep Date [01-May-2018] to End Date [10-March-2018], as shown in Figure 4.0.
-
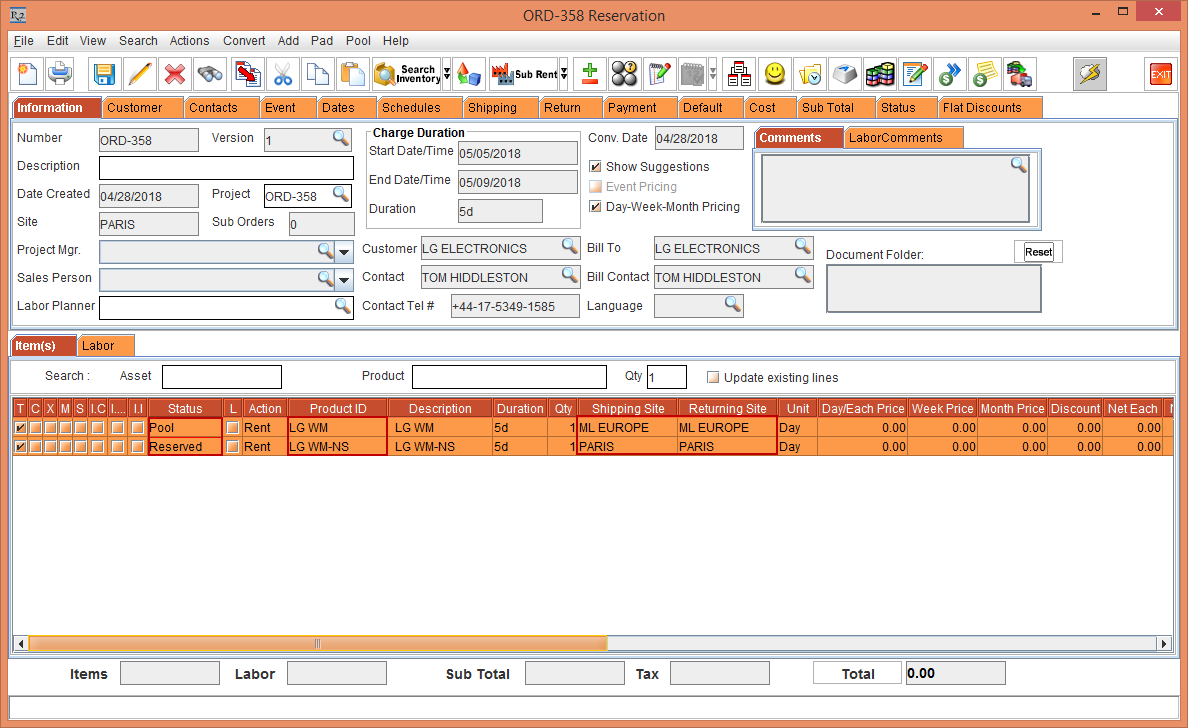
Select the Convert menu > To Reservation option. The Quote Reservation Order [ORD-358 Quote] is converted to the Rental Reservation Order [ORD-358].
-
It is observed that the Rental Reservation Order [ORD-358] displays the Status of the Item [LG WM] as Pool due to the Start Date [05-May-2018] and End Date [10-May-2018] that is exceeding the Cutoff time in days [3]. The Shipping Site and the Returning Site is displayed as Sub-Region [ML EUROPE].
-
Whereas, the Status of the Item [LG WM-NS] is displayed as Reserved due to the Start Date [01-May-2018] and End Date [10-May-2018] which is within the Cutoff time in days [3]. The Shipping Site and the Returning Site is displayed as the Order Site [PARIS].
Support for Pool Items Modified to Hold
-
Select the Item lines [LG WM] and [LG WM-NS] > right-click > Hold option.
-
The Status of the Item [LG WM] that displayed as Pool before converting the Item line to Hold is modified to Hold (Pool) after the conversion. The Shipping Site and the Returning Site is displayed as Sub-Region [ML EUROPE], as shown in Figure 4.2.
-
Whereas, the Status of the Item [LG WM] that displayed as Reserved before converting the Item line to Hold is modified to Hold after the conversion. The Shipping Site and the Returning Site is displayed as the Order Site [PARIS], as shown in Figure 4.2.

-
You can Resolve the Items with the Status Hold (Pool) and Hold as a normal Order.
-
Exit the Order [ORD-358]
Assign Operations for the Pool Item lines with different Shipping Sites
Assign operations such as Purchase, Sub-Rental, and Transfer-In can be performed for the Item lines with different Shipping Sites. The Purchase Order and Transfer Order displays the Shipping Site of the respective Item lines as the Site of Purchase Order and Transfer Order.
Prerequisites:
-
Set the system date [28-Apr-2018].
-
Select the Maintenance module > Employee tab > Site tab.
-
Edit the Site [PARIS] > click the Sub-Region importable button. The Group List window is displayed.
-
Edit the Sub-Region [ML EUROPE]. The Sub-Region window with the E-Pool Configuration fields are displayed.
-
Enter the Cutoff time in days as 3.
-
Exit the Sub-Region window.
-
Select the Maintenance module > Items tab > Site tab.
-
Select the Maintenance module > Items tab.
-
Create and receive the Items [LG STAR] with 6 Qty.
-
Exit the Maintenance window.
Sample Workflow
-
Select the Account module. The Account window is displayed.
-
Tag a Company [LG].
-
Click the Reservation icon. The Order in Formation dialog box is displayed.
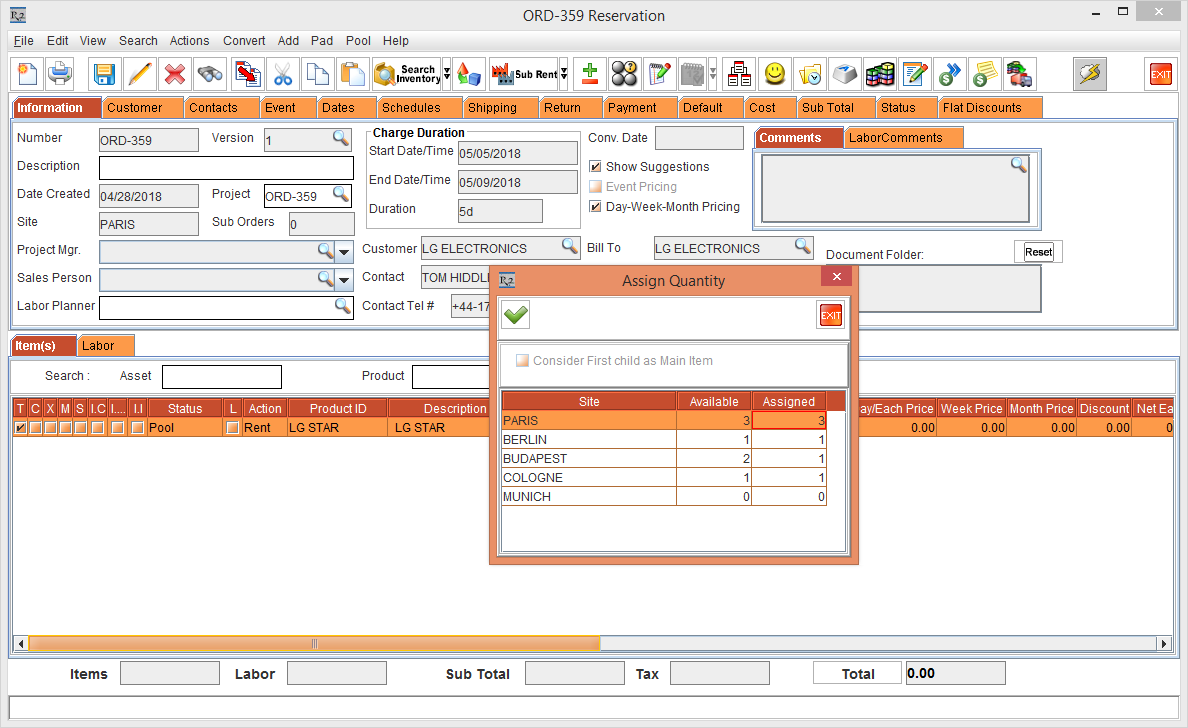
-
Create a Rental Reservation Order [ORD-359] for 5 days duration with the Start Date [05-May-2018], Start Time [09:00 AM] and End Date [10-May-2018] End Time [09:00 AM]. Click the Search Item icon. The Search Items window is displayed.
-
Search and add the Item [LG STAR] with 6 Qty. The Shipping Site and the Returning Site is displayed as Sub-Region [ML EUROPE].
-
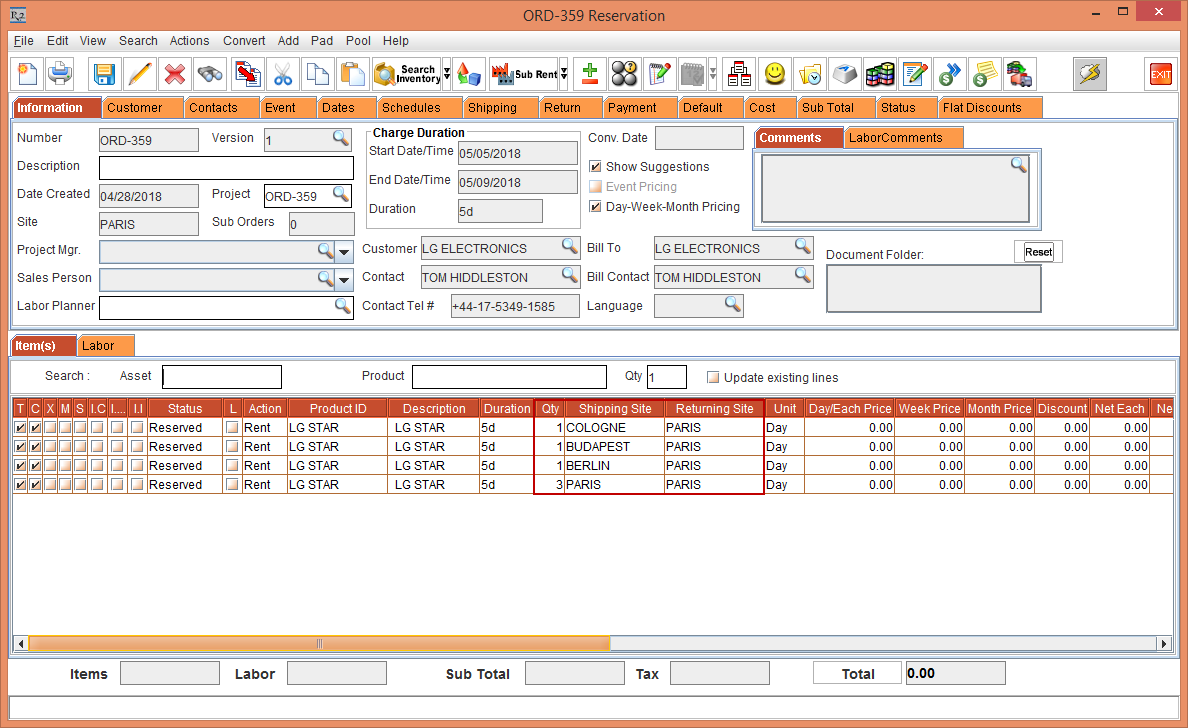
Right-click the Item [LG STAR] line > Resolve option. The Assign Quantity window is displayed with the stock Available at the Sites [PARIS], [BERLIN], [BUDAPEST], and [COLOGNE]. Assign the Item quantity in the respective Sites, as shown in Figure 4.3.
-
Click OK.
-
The Item [LG STAR] gets split into 4 Item lines with a different Shipping Site and Returning Site for each, as shown in Figure 4.4.
-
Select the Item line [LG STAR] with Item Qty 1 displaying the Shipping Site [COLOGNE] and Returning Site [PARIS]. Right-click > Assign > the Assign window is displayed. Select the Purchase radio button and click OK, as shown in Figure 4.5.
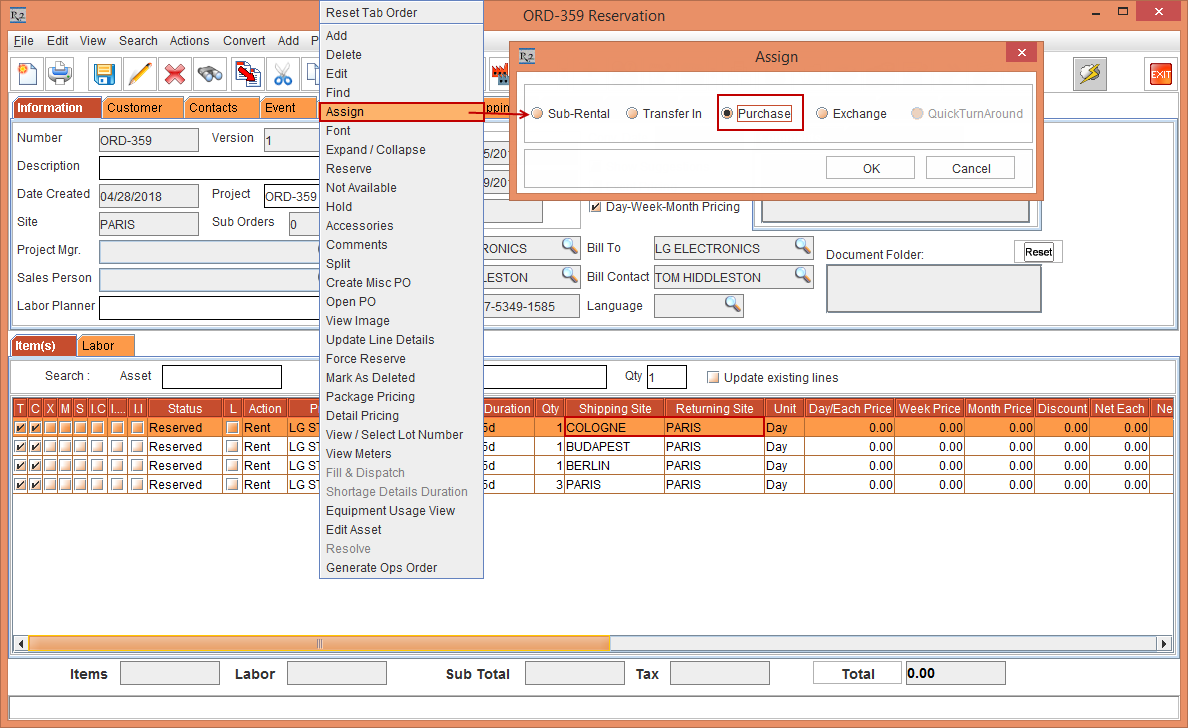
-
The Assign Vendor window is displayed. Select the User Assign radio button. The Purchase Order window is displayed.
-
Select the Create New Purchase Order radio button. The Supplier window is displayed.
-
Tag the Supplier [LG ELECTRONICS]. The Purchase Order [PO-032 Purchase Order] for the Shipping Site [COLOGNE] is created displaying the Site [COLOGNE], as shown in Figure 4.6
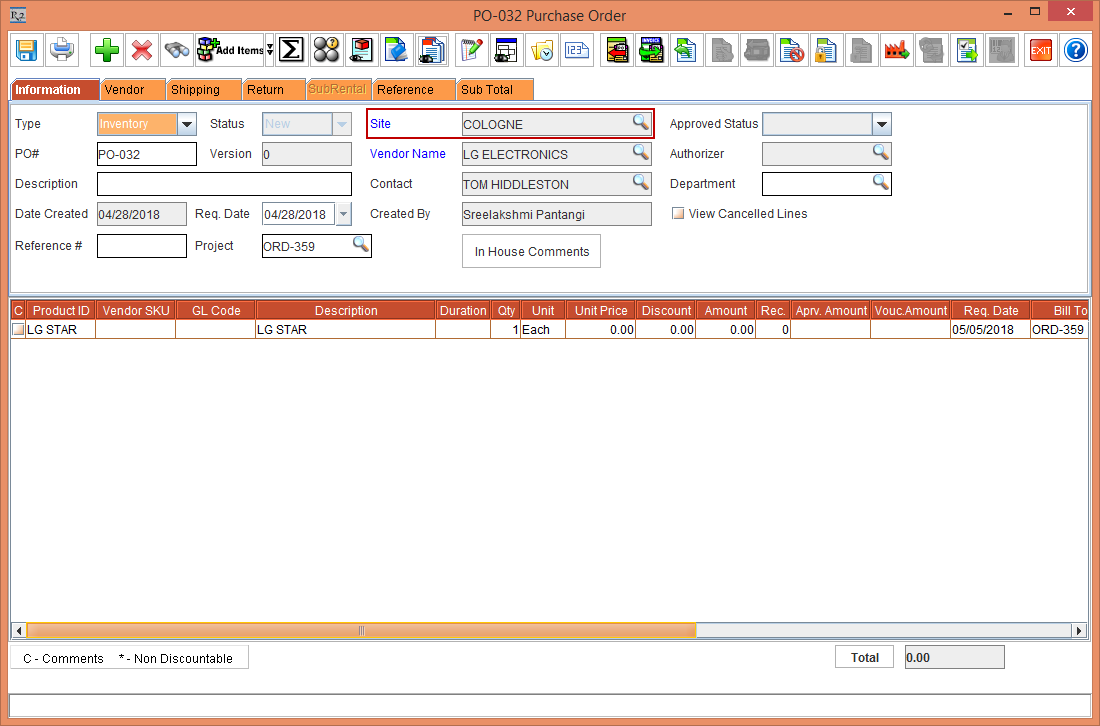
-
Exit the Purchase Order [PO-032 Purchase Order] window. The system prompts for a confirmation for the release of Purchase Order [PO-032 Purchase Order]. Click Yes.
-
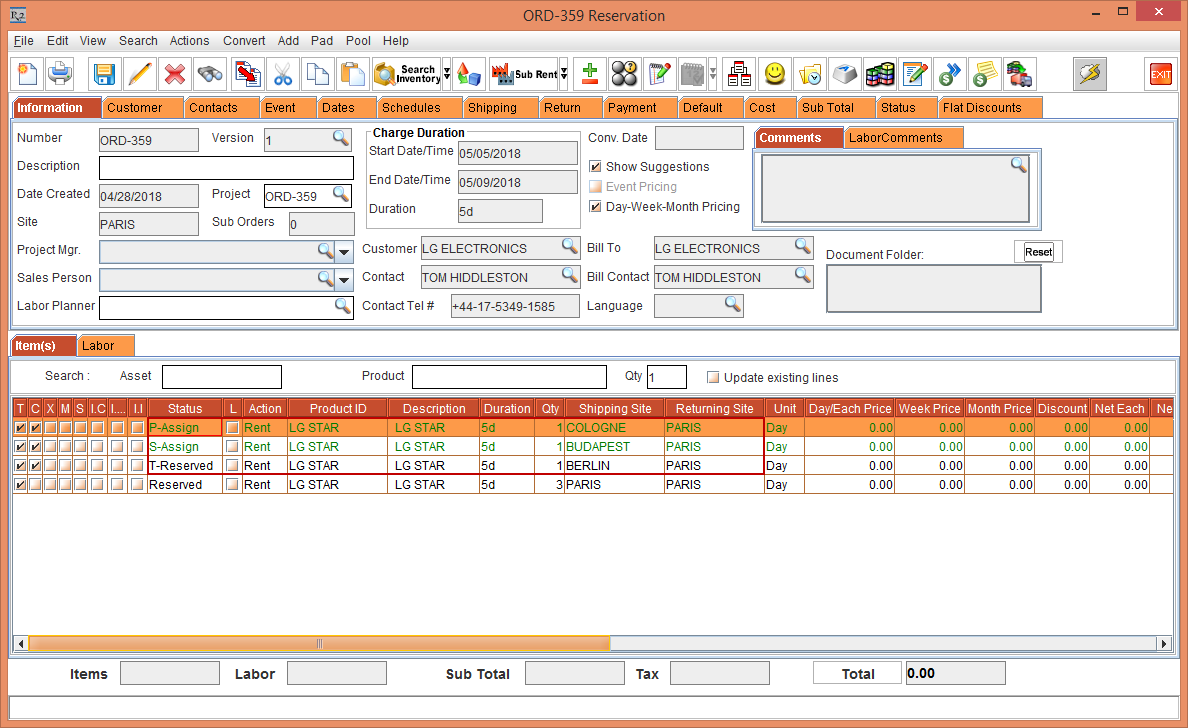
In the Order [ORD-359], the Item line [LG STAR] Status with Item Qty 1 displaying the Shipping Site [COLOGNE] is modified to P-Assign, as shown in Figure 4.7.
-
Similarly, when a Sub-Rent for the Item is preformed the Purchase Order for the Shipping Site [BUDAPEST] is created displaying the Site [BUDAPEST] and modifying the Item line Status in the Order [ORD-359] to S-Assign. Also, when a Transfer In for the Item is preformed the Transfer Order for the Shipping Site [BERLIN] is created displaying the Site [BERLIN] and modifying the Item line Status in the Order [ORD-359] to T-Reserved, as shown in Figure 4.7.
-
Exit the Order [ORD-359].
Equipment Usage View for the Pool Item lines
The Pool Items can be viewed in the Equipment Usage View window only when the viewed by Sub-Region and Group By [Nothing].
Prerequisites:
-
Set the system date [28-Apr-2018].
-
Select the Maintenance module > Employee tab > Site tab.
-
Edit the Site [PARIS] > click the Sub-Region importable button. The Group List window is displayed.
-
Edit the Sub-Region [ML EUROPE]. The Sub-Region window with the E-Pool Configuration fields are displayed.
-
Enter the Cutoff time in days as 3.
-
Exit the Sub-Region window.
-
Select the Maintenance module > Items tab > Site tab.
-
Select the Maintenance module > Items tab.
-
Create and receive the Items [LG PC] and [LG LED] with 6 Qty each.
-
Select the Kits tab.
-
Create a Non-Serial Kit [LG NON-SERIAL KIT-3] and add the Items [LG PC] and [LG LED] with 1 Qty each.
-
Exit the Maintenance window.
Sample Workflow
-
Select the Account module. The Account window is displayed.
-
Tag a Company [LG].
-
Click the Reservation icon. The Order in Formation dialog box is displayed.
-
Create a Rental Reservation Order [ORD-360] for 5 days duration with the Start Date [05-May-2018], Start Time [09:00 AM] and End Date [10-May-2018] End Time [09:00 AM]. Click the Search Item icon. The Search Items window is displayed.
-
Search and add the Item [LG LED] with 11 Qty. The Shipping Site and the Returning Site displayed as Sub-Region [ML EUROPE].
-
Select the Item line [LG LED] > right-click the > Resolve option. The Assign Quantity window is displayed with the stock Available at the Sites [BERLIN], [BUDAPEST], and [PARIS].
-
Assign the 6 quantity of the Item [LG LED] distributing 2 Qty each to the Sites [BERLIN], [BUDAPEST], and [PARIS].
-
The Item line [LG LED] gets split into four lines in which three of the Item lines Status is displayed as [Reserved] with the Shipping Site displayed as Sites [BERLIN], [BUDAPEST], and [PARIS] respectively. The Returning Site for all the three Item lines is displayed as the Order Site [PARIS], as shown in Figure 4.8.
-
The Item line [LG LED] with 5 Qty is Pool reserved displaying the Status [Pool] with the Shipping Site and the Returning Site displayed as Sub-Region [ML EUROPE], as shown in Figure 4.8.
-
Select the Item line [LG LED] in Status [POOL] > right-click > Equipment Usage View option, as shown in Figure 4.9.
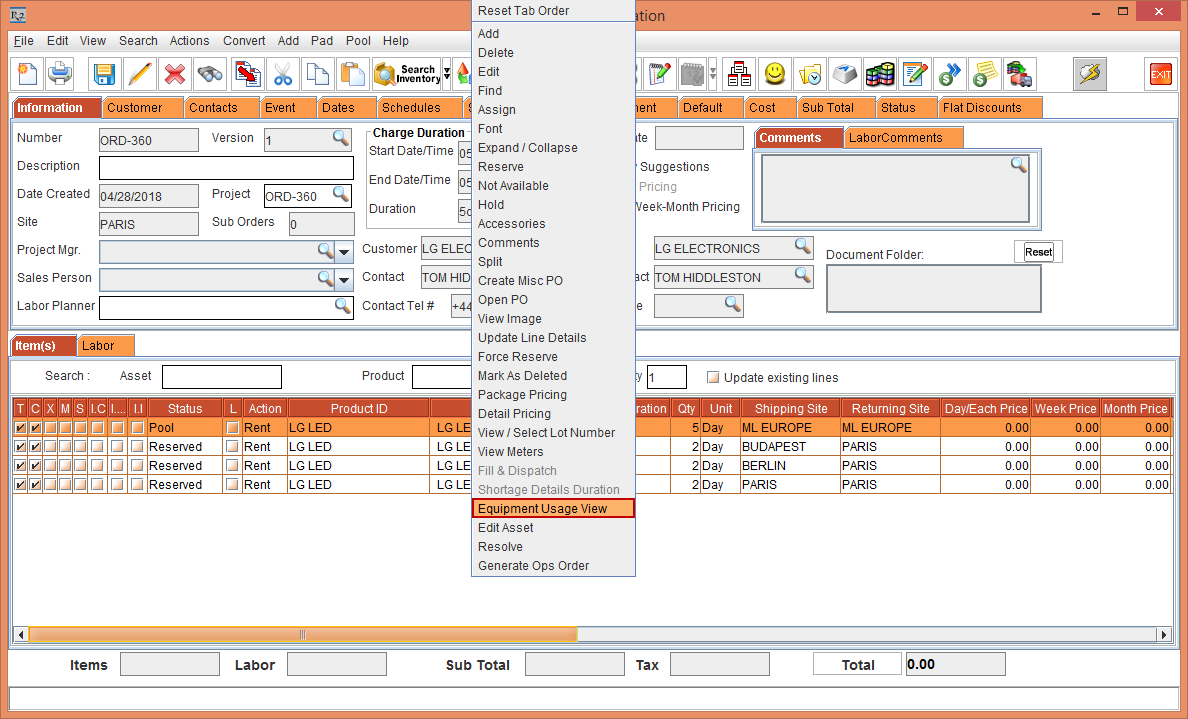
-
The Equipment Usage View window for the Item line [LG LED] is displayed.
-
Select the Day Views drop-down as 1 Month, Sub-Region drop-down as [ML EUROPE], the Sort By drop-down as Site and Descending with the Group By drop-down as Nothing.
-
Click the Refresh button. The Equipment Usage View window displays the equipment usage view for the Item [LG LED], as shown in Figure 4.10.
The Pool Status lines in the Equipment Usage View window are displayed only when the Item is filtered for Sub-Region. The availability at the Pool level is not displayed in the Equipment Usage View window if the Item filtered with Site.
-
Three lines have been included to depict the Total Stock of Item in the Pool, Effective Available at the Sub-Region [ML EUROPE], and Item Availability at the Site level, as shown in Figure 4.10.
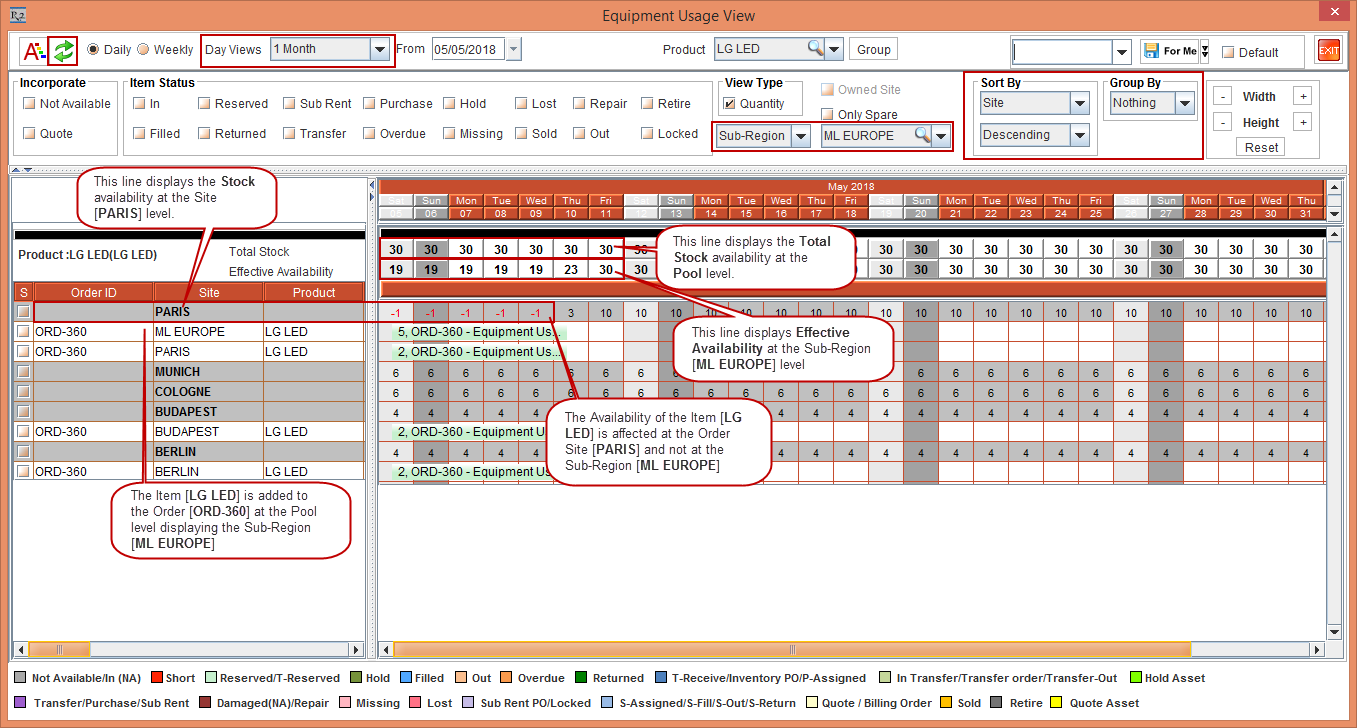
-
The Availability for the Items in Status [POOL] is displayed differently in the Equipment Usage View window and in the R2 Availability window.
-
For the Items in Pool Status, the Availability is consumed at the Pool level in the R2 Availability window. Whereas, in the Equipment Usage View window the Availability for the Pool Reserved line is consumed at the Order Site [PARIS] level. Hence the negative availability is displayed at the Order Site [PARIS] level and not at the Sub-Region [ML EUROPE] level, as shown in Figure 4.10.
-
Exit the Equipment Usage View window for the Item line [LG LED].
-
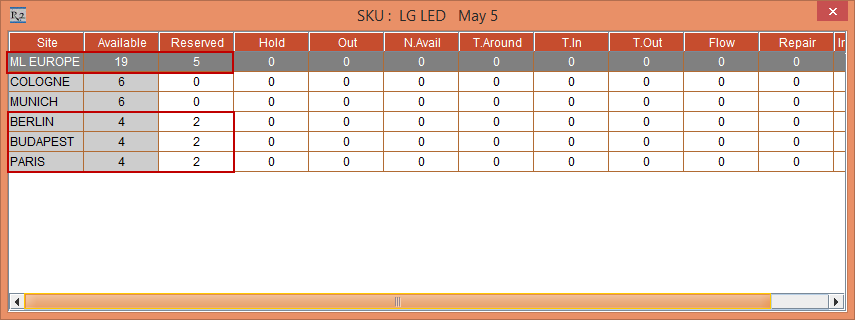
To view the R2 Availability in the Order [ORD-360], select the Item line [LG LED] and click the Availability icon to view the Item availability.
-
The availability of the Item [LG LED] in the Sub-Region [ML EUROPE] is displayed as 19, whereas the Item at the Sub-Region [ML EUROPE] level is Reserved to 5 and is Reserved to 2 each at the Sites [BERLIN], [BUDAPEST], and [PARIS], as shown in Figure 4.11.
-
Exit the Availability window.
-
Delete the Item lines [LG LED] in Pool Status and Reserved Status.
-
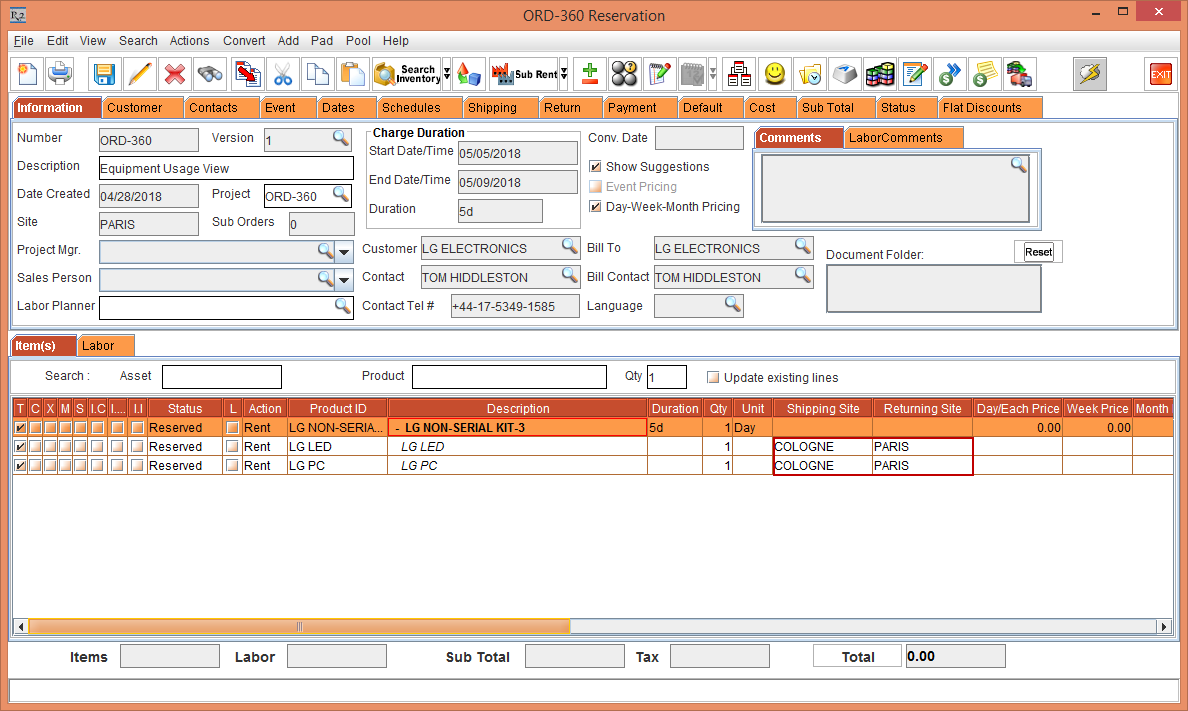
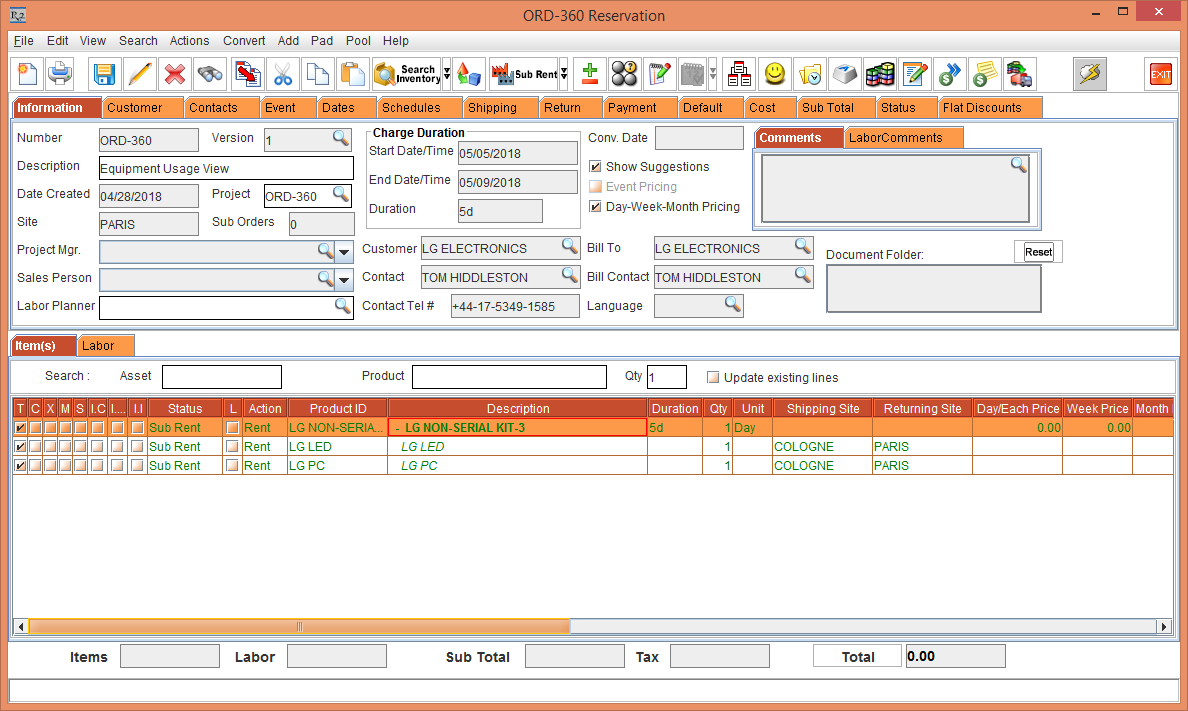
Search and add the Non-Serial Kit [LG NON-SERIAL KIT-3] comprising the Items [LG LED] and [LG PC] with 1 Qty.
-
Expand the Non-Serial Kit [LG NON-SERIAL KIT-3] > Right-click the Item line [LG LED] > Resolve option. The Assign Quantity window is displayed with the stock Available at the Site [COLOGNE].
-
Assign the Items [LG LED] and [LG PC] with 1 quantity to the Site [COLOGNE].
-
The Shipping Site of the Items [LG STAR-NS] and [LG WM-NS] is displayed as Site [COLOGNE] and Returning Site as the Order Site [PARIS], as shown in Figure 4.12.
-
Select the Non-Serial Kit [LG NON-SERIAL KIT-3] header > right-click > Equipment Usage View option.
-
The Equipment Usage View window for the Non-Serial Kit [LG NON-SERIAL KIT-3] is displayed.
-
Select the Item [LG PC] within the Non-Serial Kit [LG NON-SERIAL KIT-3] > right-click > select the Sub-Rent option. The system displays a prompt with the message "Do you want to perform the action for entire package?" with Yes, No, and Cancel buttons, as shown in Figure 4.13.
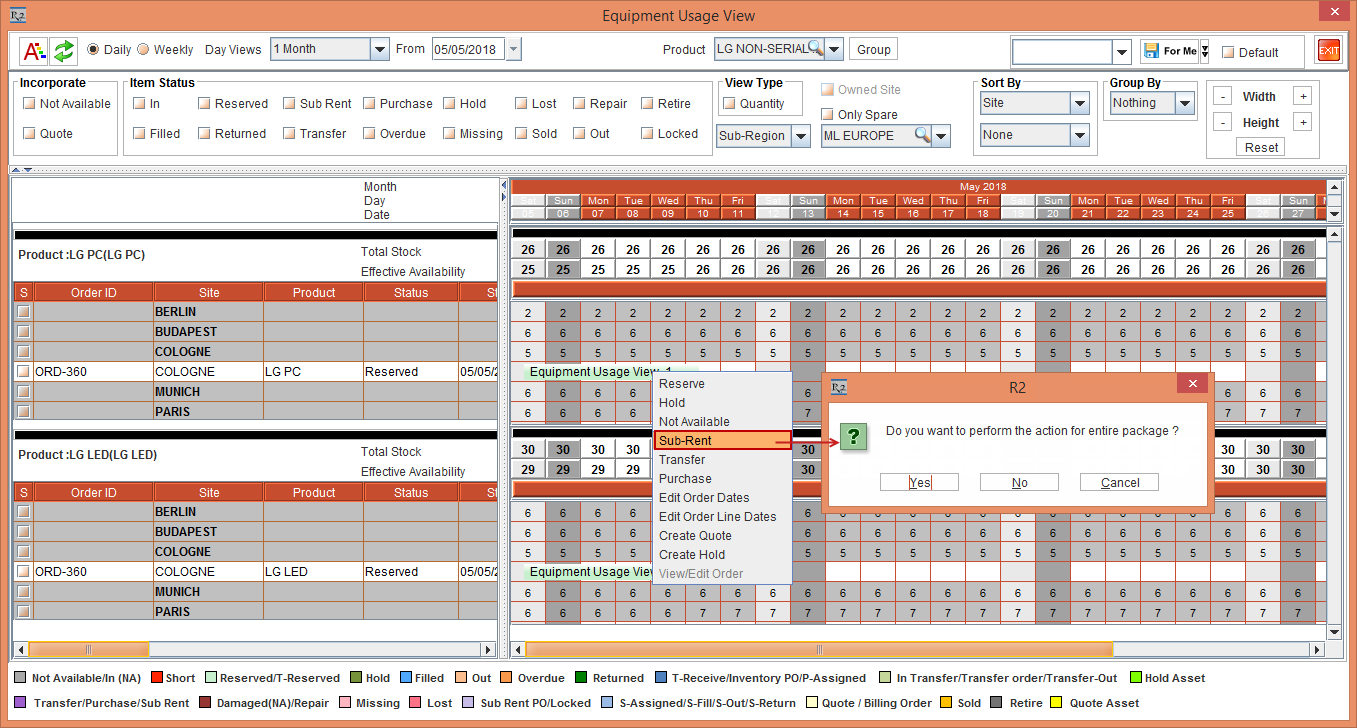
-
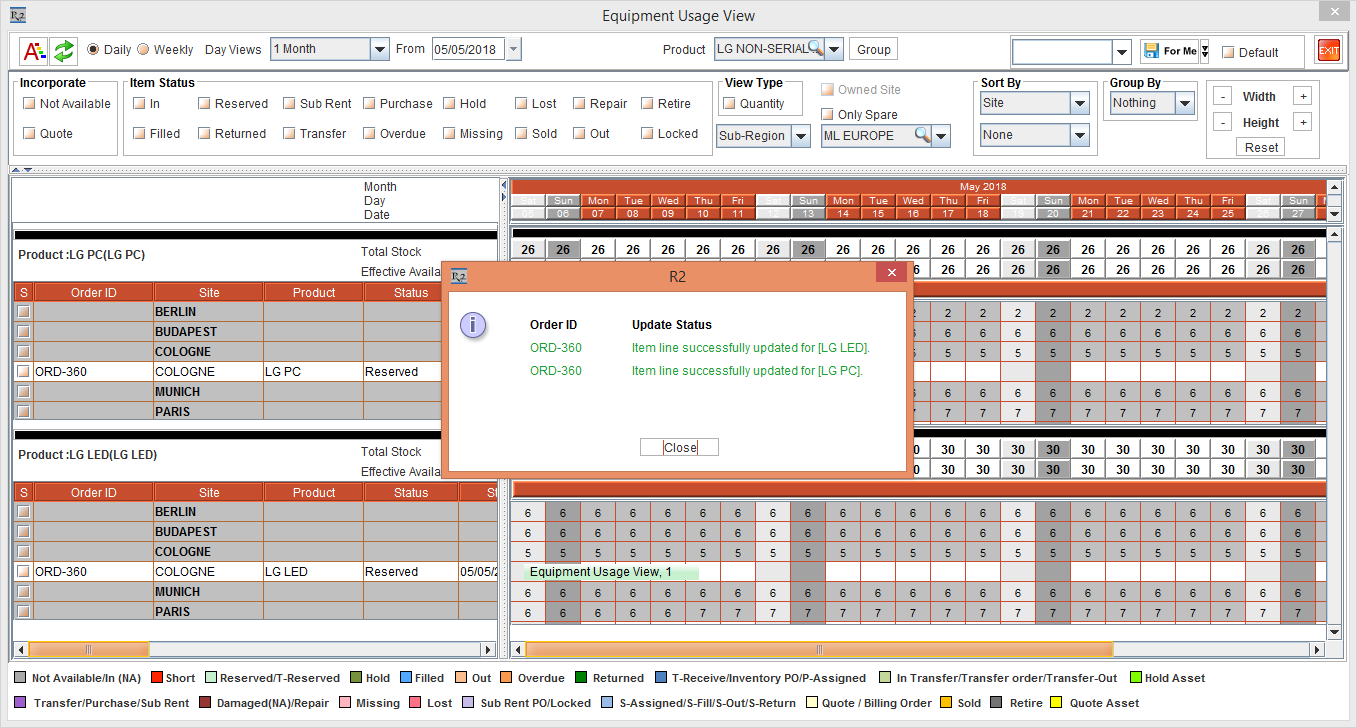
Select Yes. The system displays a confirmation prompt is displayed, as shown in Figure 4.14.
-
Selecting the No option will only modify the Status for the selected line to Sub-Rent.
-
The modification of Status from the Equipment Usage View window is implemented for Reserve, Hold, Not Available, Sub-Rent, Transfer, and Purchase.
-
Click Close. The status and color of the Items [LG LED] and [LG PC] graph within the Non-Serial Kit [LG NON-SERIAL KIT-3] is modified to Sub-Rent items, as shown in Figure 4.15.
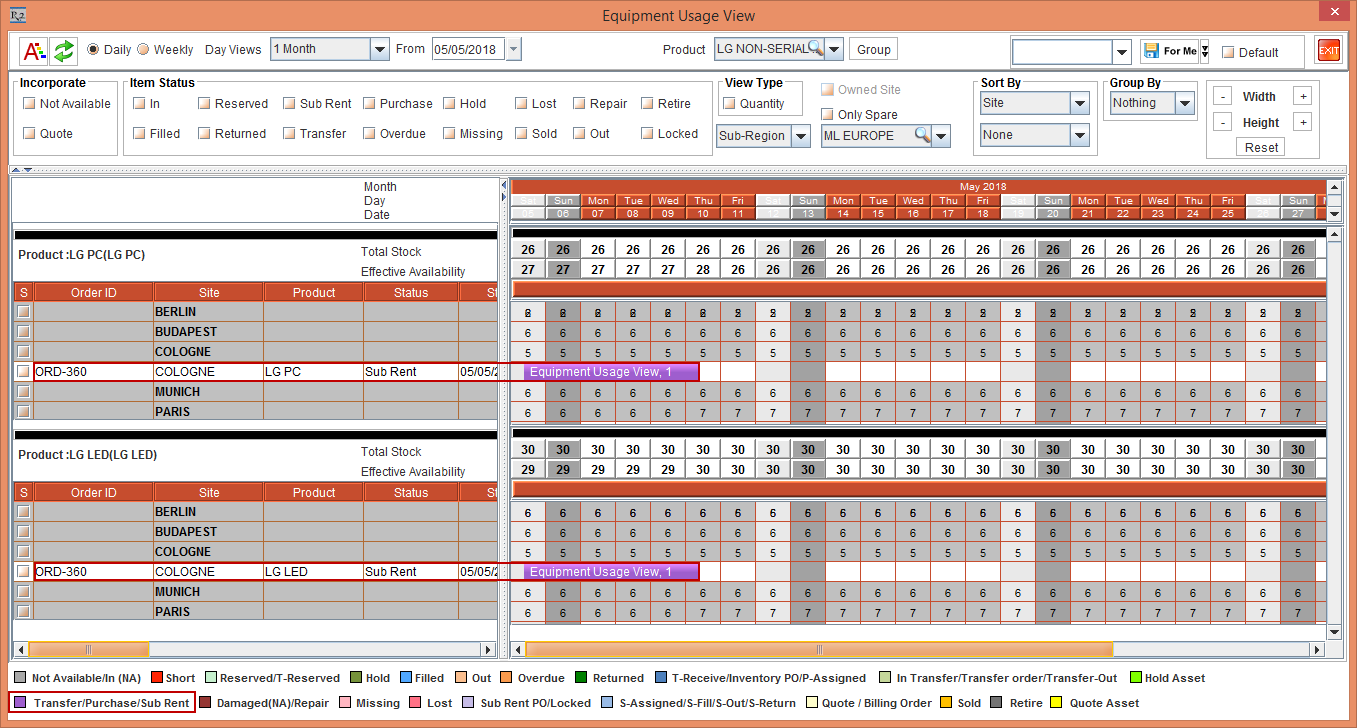
-
Exit the Equipment Usage View window for the Non-Serial Kit [LG NON-SERIAL KIT-3].
-
Verify the Status of the Items [LG LED] and [LG PC] within the Non-Serial Kit [LG NON-SERIAL KIT-3] modified to Sub-Rent, as shown in Figure 4.17
The modification of Status from the Equipment Usage View window is implemented for Reserve, Hold, Not Available, Sub-Rent, Transfer, and Purchase reflecting the changes in the Order.
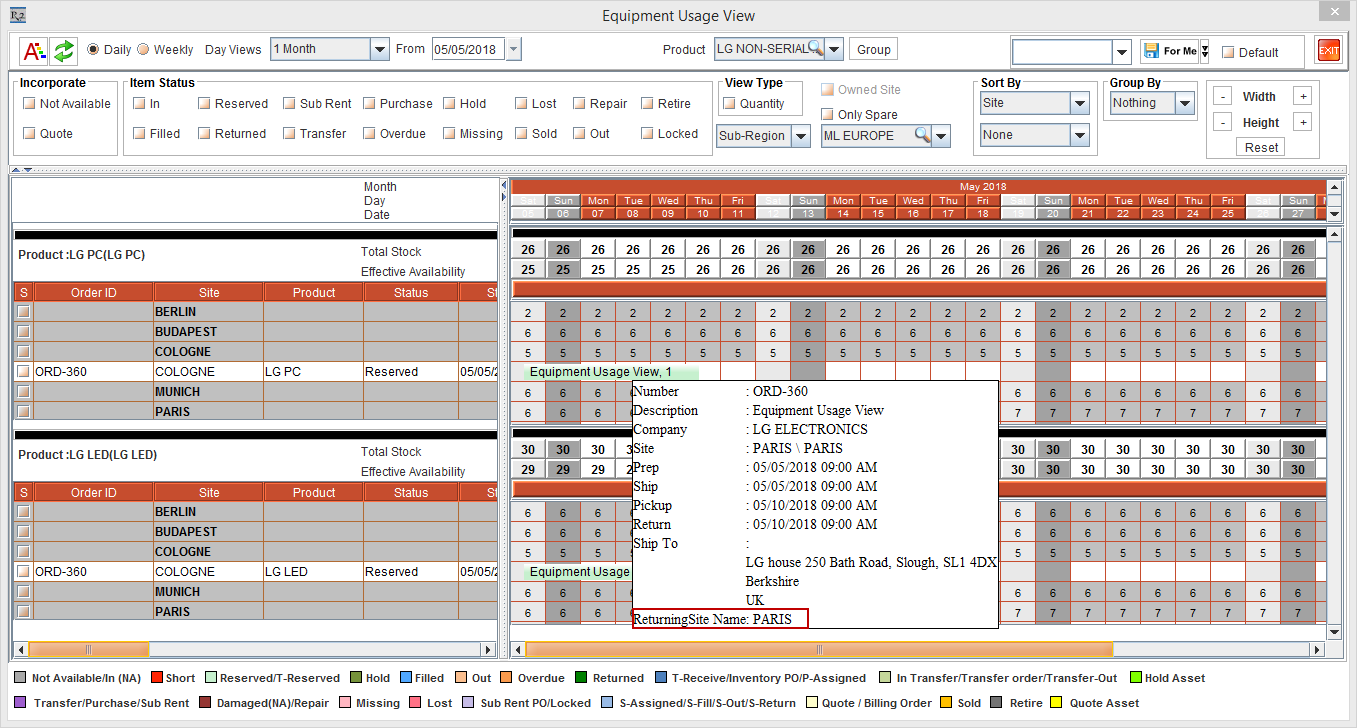
Support for the Returning Site Name in the Tool Tip
-
Perform a left-click on the Order Line Time Bar or the Assets Time Bar of the Item [LG PC]. The Tool Tip is displayed. The Tool Tip has been improvised displaying the Returning Site Name: PARIS along with the other details, as shown in Figure 4.17.
-
Exit the Equipment Usage View window for the Non-Serial Kit [LG NON-SERIAL KIT-3].
Supported CIDs in the EDR Print
The EDR print will have details of the Shipping Site and Returning Site present in the Order.
-
CID 74 - Prints the Shipping Site name
-
CID 75 - Prints the Returning Site name
When the Equipment Pooling or the E-Pool check-box is selected from the Warehouse tab of the Configuration module and from the Sub-Region level of the Maintenance module,
-
The Assign Asset option in the Order > Item line > right-click is disabled.
-
The Quote Confirmation feature or Converting to Billing Order will not function.
-
The Fill & Dispatch option in the Order > Item line > right-click is enabled only when the Shipping Site is the same as the Order Site.
-
Lot Number is not displayed for the Pool reserved lines.
-
The following Pool actions cannot be performed, if the Item line is assigned with a Lot Number:
-
Changing the Shipping Site and the Returning Site
-
Reserve Back to Pool
-
Generate Operation Order
-
-
For the Item lines with Reserved Status, the Assign operations such as Sub-Rental, Transfer In, Purchase, and Exchange is created at the Shipping Site of the Item line.
-
For the Item lines with Pool Status, the Assign operations such as Sub-Rental, Transfer In, Purchase, and Exchange is created at the Sub-Region of the Item line.
-
The Search Orders window and the Warehouse window displays the Ops column. The Ops check box is selected for the Operation Orders.
-
The Item lines that are not returned from the linked Operation Order, the turn around time defined in the Item line Edit window is not impacted.
-
The Operation Order always displays the Quantity of the Non-Serial Kit header as 1.
-
The Action [Sell] Items are not allowed in the Operation Order.
-
The Service Work Order is generated at the Warehouse Site where it is marked as Damaged.
-
Sale Order: The following are the changes in Sale Order:
-
The Returning Site column is not displayed in the Sale Order.
-
The Operation Order cannot be generated for the Item lines with Sell Action
-
-
Sub Orders cannot be generated for an Operation Order.
-
The Equipment Pooling check box in the Configuration module and the Maintenance module cannot be unselected once any E-Pool actions are performed.
-
The Availability for a Sell Item is modified.