Table of Contents
Introduction
Currently in R2,
E-mails sent while printing orders/invoices/EDR etc through Form Type Options dialog have a hardcoded subject and content as given below:
Subject: R2: Order Print Attached
Content: R2 has generated this mail with Attachment. You have received this mail from <email- id of the logged in employee>
Also, this hardcoded subject and content is same for any kind of prints which has the option to be mailed.
Henceforth in R2,
Subject and Contents of E-mails sent from R2, when printing Orders/invoices/Equipment Delivery Receipts etc will be made configurable.
Customization of subject and contents of email can be done for different types of forms that R2 supports through Maintenance > Form Setup and user can customize it as language specific if multi- language is set as enabled in Configuration.
While sending emails when printing through Form Type Options dialog, the customized subject and contents for selected Language and Form can be seen and allowed to be modified.
NOTE: For any type of form, options for setting customized e-mail subject and content will be available for all types of forms. But note that R2 currently supports printing of items by their description / long description in multi-language is supported only for Order (153500UI), Summary Invoice (159600UI), Event Order (153300UI), Equipment Delivery Receipt (153800UI) and Pick-lists(all formats). Refer R2 release notes for the details on printing items in multi-language.
Configuring Custom Email Templates and Mailing Prints with Custom Email Templates
For clear and easier understanding this section is divided into three sub sections namely Creating Custom Email Templates, Linking Custom Email Templates to Forms and Mailing Prints with Custom Email Templates explained below are the steps for the same:
Creating Custom Email Templates
-
Create a text file for example OrderEmail.txt and place it anywhere in the system.
-
Edit the file to have below required Subject and Contents in the text file
Example
SUBJECT = In receipt to your Order.
MESSAGE = Your Order has been processed an Items have been filled and shipped, attached are the details with reference to your Order.
-
Save the file.
Create similar text file by following steps 1 to 3 to have custom email templates as different for different forms and in different languages if required.
Linking Custom Email Templates to Forms
The process of linking Custom email templates to Forms vary depending on whether the Multi-Language feature is enabled or disabled in R2. Below explained are the steps for the same:
When Multi-Language is disabled
-
Access Maintenance module, click on the Form Setup dialog.
The Form Setup dialog will be displayed.
-
Click on the Add button, the Form Setup dialog will be displayed.
-
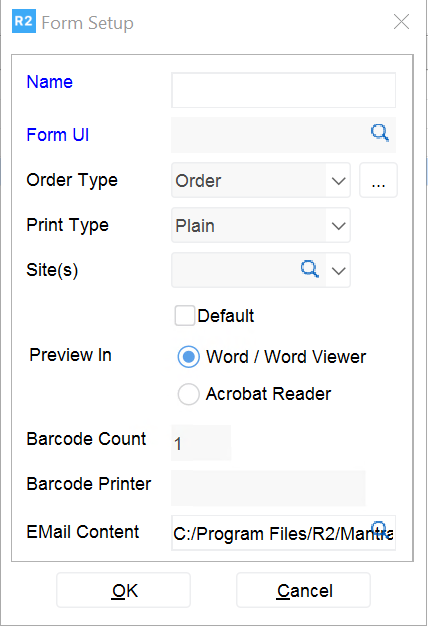
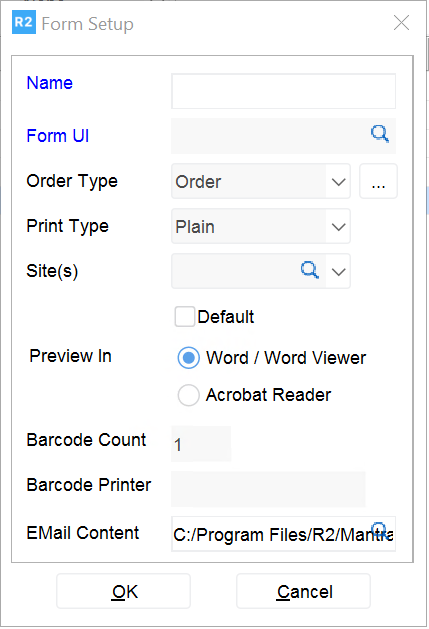
Enter a Name and tag the required Form in the Form UI field and select the Order Type.
-
Click on the importable button in the Email Content field which will be provided as shown in Fig 1.1, wherein the selected form can be linked to the required custom email template.
Fig 1.1 when Multi-Language is disabled
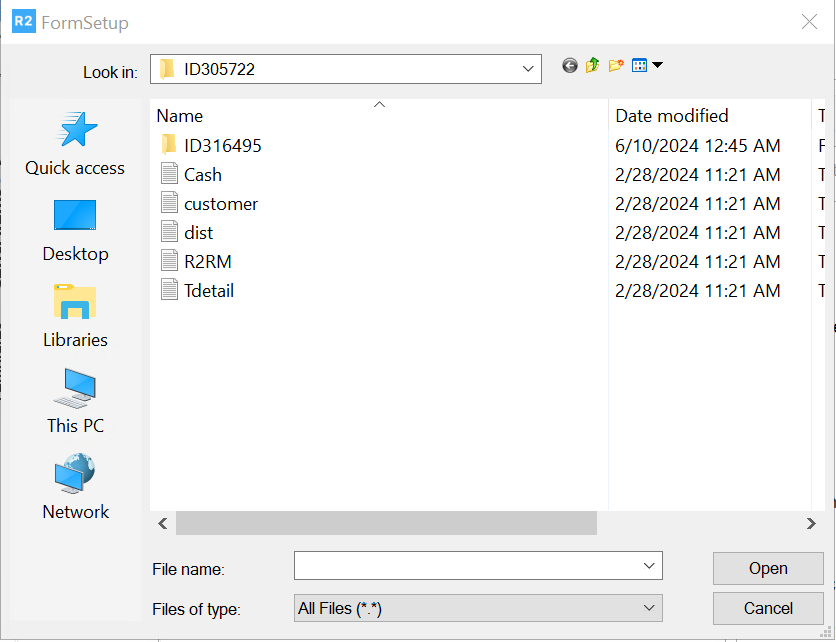
The Select a File to Attach dialog will be displayed.
-
Browse for the file with Custom Email template which needs to be used while emailing the selected type of print with the selected form and click on Open.
Fig 1.2
The selected Email Template will be linked to the Form and the path of the selected file will be displayed in the Email Content field of Form Setup dialog.
Fig 1.3
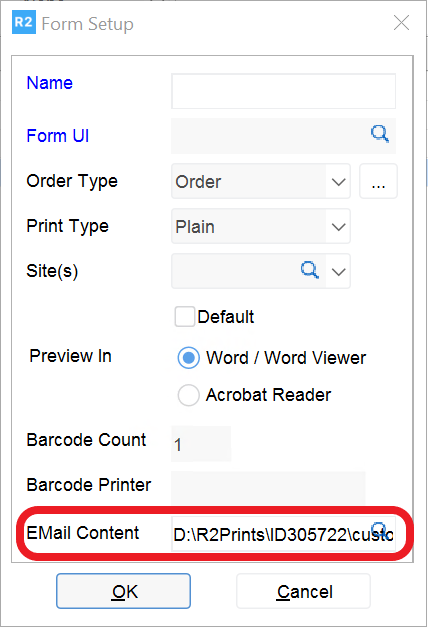
NOTE: Instead of importing the path if path is known it can be typed in Email Content field.
-
Click on Ok, to complete the process of linking the Email template to the selected Form.
-
Continue the same process and link the custom email content for all the forms if required.
When Multi-Language is enabled
-
Access Maintenance module, click on the Form Setup dialog.
-
The Form Setup dialog will be displayed
-
Click on the Add button, the Form Setup dialog will be displayed.
-
Enter a Name and tag the required Form in the Form UI field and select the Order Type.
-
To link different Email Contents
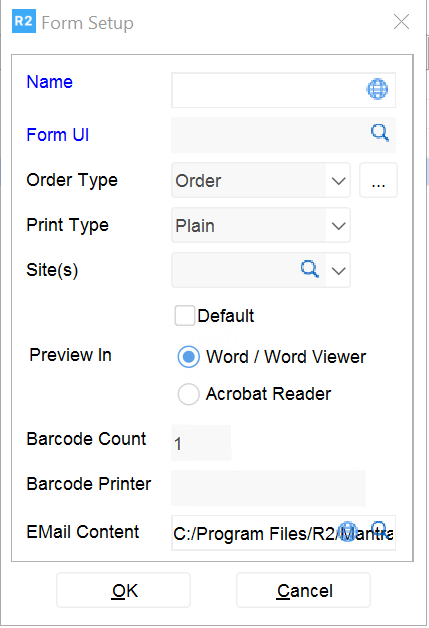
Click on the Multi Language icon in the Email Content field which will be provided as shown in Fig 1.4, wherein the selected form can be linked to the required custom email template for a specific language.
Fig 1.4 when Multi-Language is enabled (that is at least one language is selected in language field of Configuration)
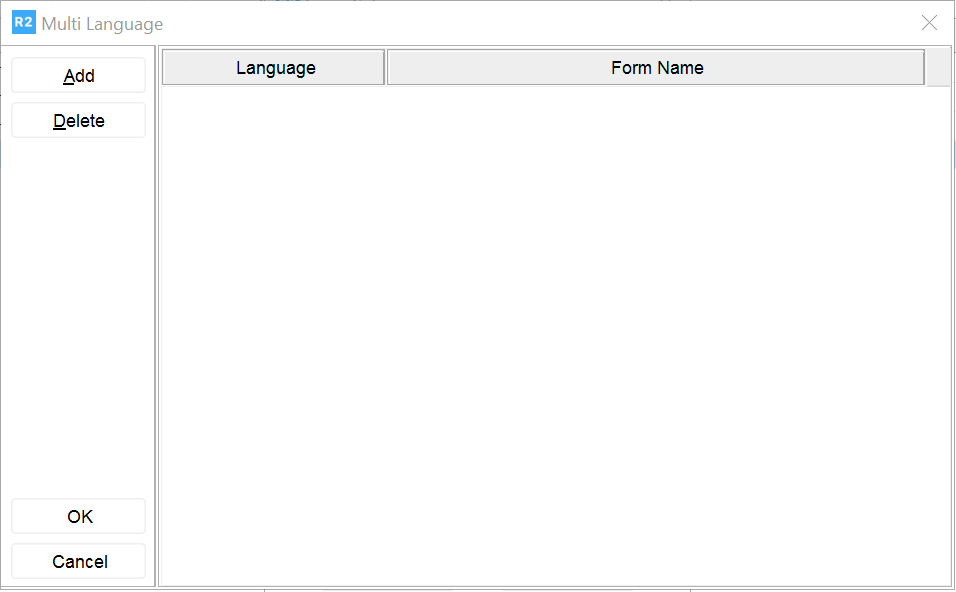
The Multi-Language dialog will be displayed.
Fig 1.5
-
Click on the Add button in the Multi-Language dialog and select a language from the drop down.
Fig 1.6
.png?cb=0b877433bf9298120f5d22c9644be0bb)
-
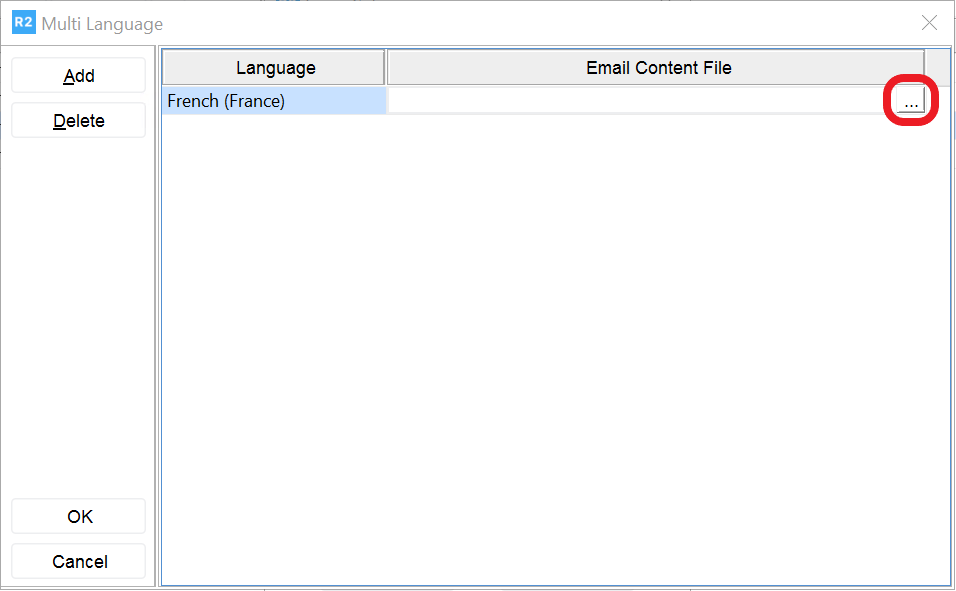
Click on the importable button in the Email Content File column.
Fig 1.7
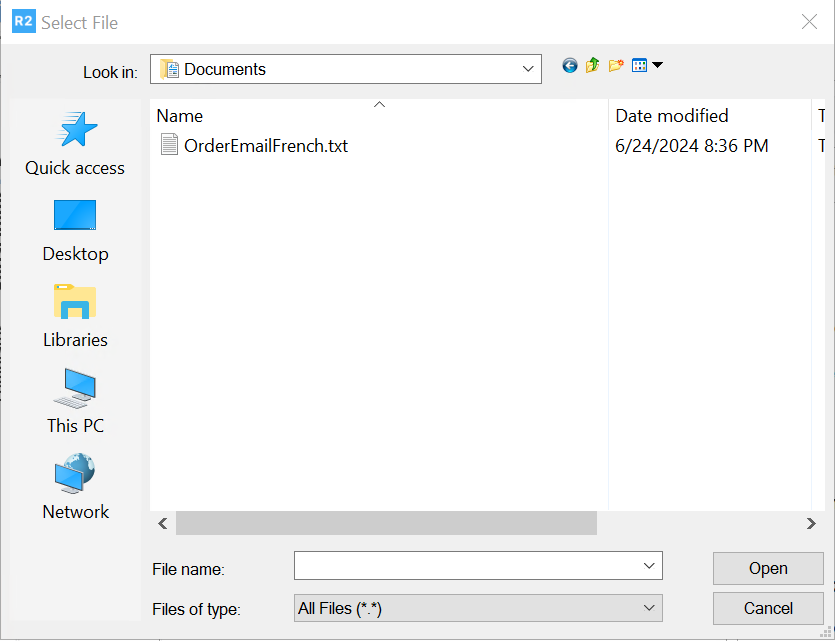
The Select a File to Attach dialog will be displayed.
-
Browse for the file with Custom Email template which needs to be used while emailing the selected type of print with the selected form. As in the example select OrderEmailFrench.txt and click on Open.
Fig 1.8
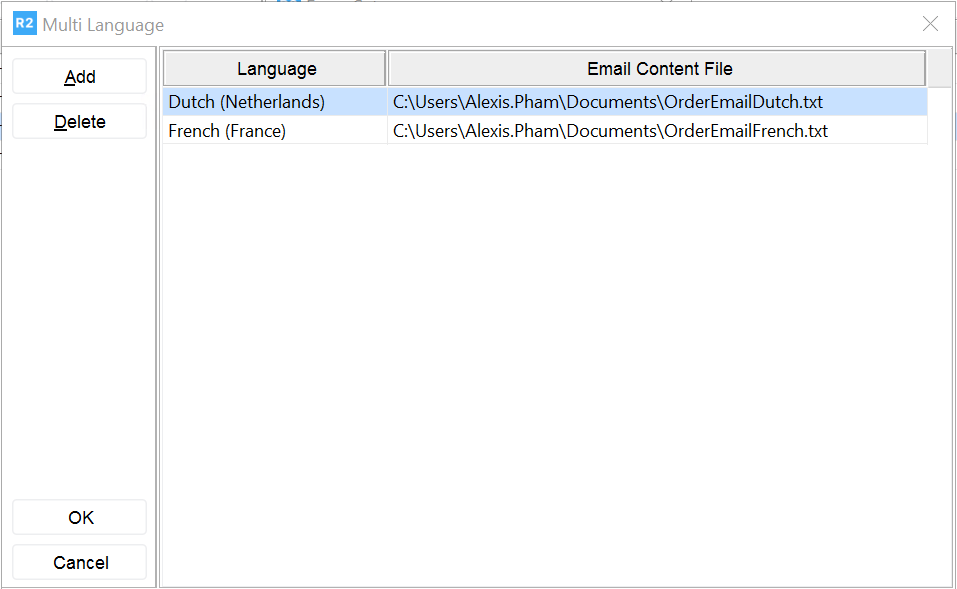
Continue steps 6 through 8 to link different Custom Email Templates to the selected Form specific to different languages as shown in fig 1.9
Fig 1.9
-
Click on Ok button.
Note: To link an Email Template file to the selected Form which is common to all languages (that is a template which is not specific to any language click on the importable button field instead of clicking on the Multi-language icon in Step 5. In the Select a File to Attach dialog which is displayed, select the Email template file and click on Ok.
Mailing Prints with Custom Email Templates
Mailing Prints When Multi-Language is disabled
-
Access the Form Type options dialog for the kind of print which you want to Print and Email.
-
The Form Type Options dialog displayed will be shown with the default Form if any present. Otherwise first form of the kind of print is being done will be shown.
Fig 1.10
Note: The Language field is not visible as multi-language is disabled.
-
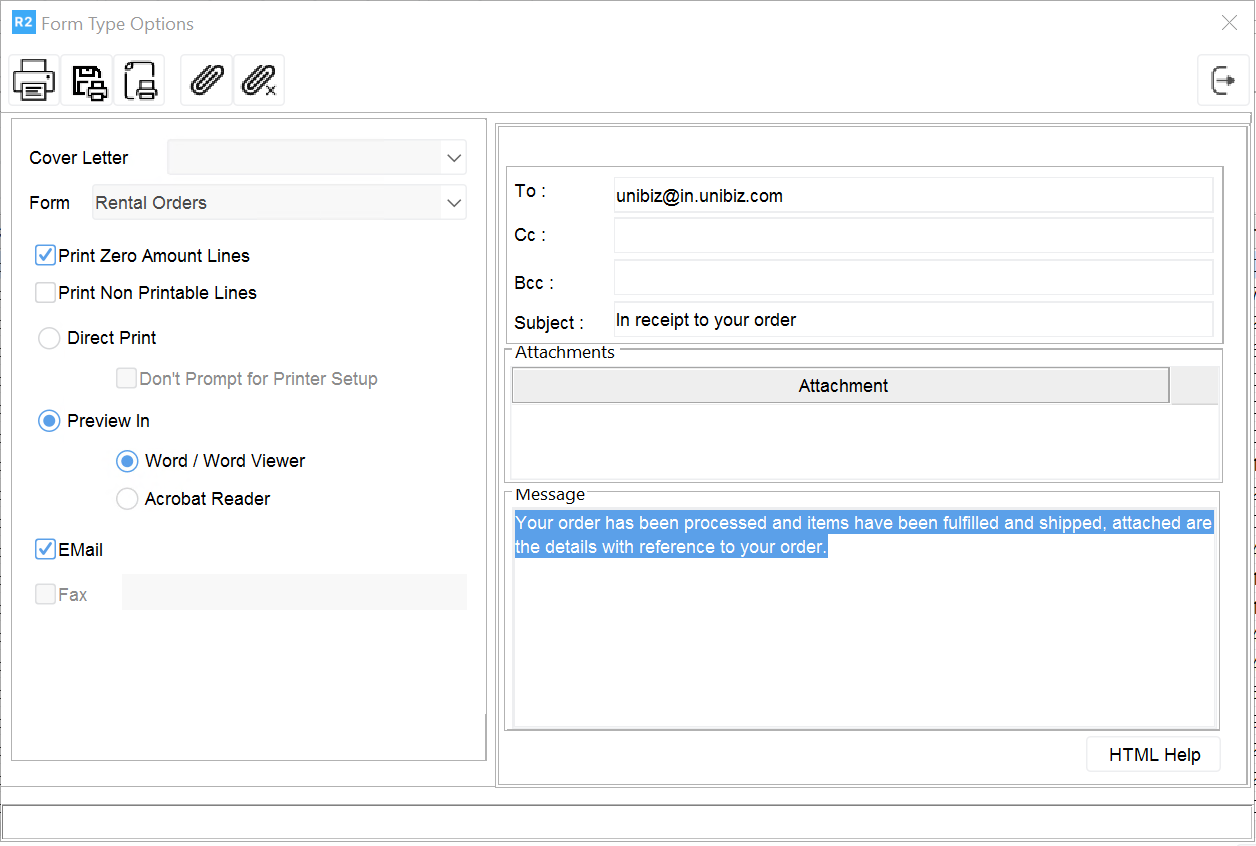
Select the Email option, the Form Type options dialog will expand as shown in fig 1.11
-
Based on the Form selected, the customized contents from the linked Email Template will be updated in the Subject and Contents field.
-
If necessary change the Form on the left hand side of From Type Options dialog, Subject and Content of Email will be defaulted from the Email content file defined for the Form selected.
-
If needed user can modify the Subject and Content defaulted from template, by editing the same in the respective fields shown.
-
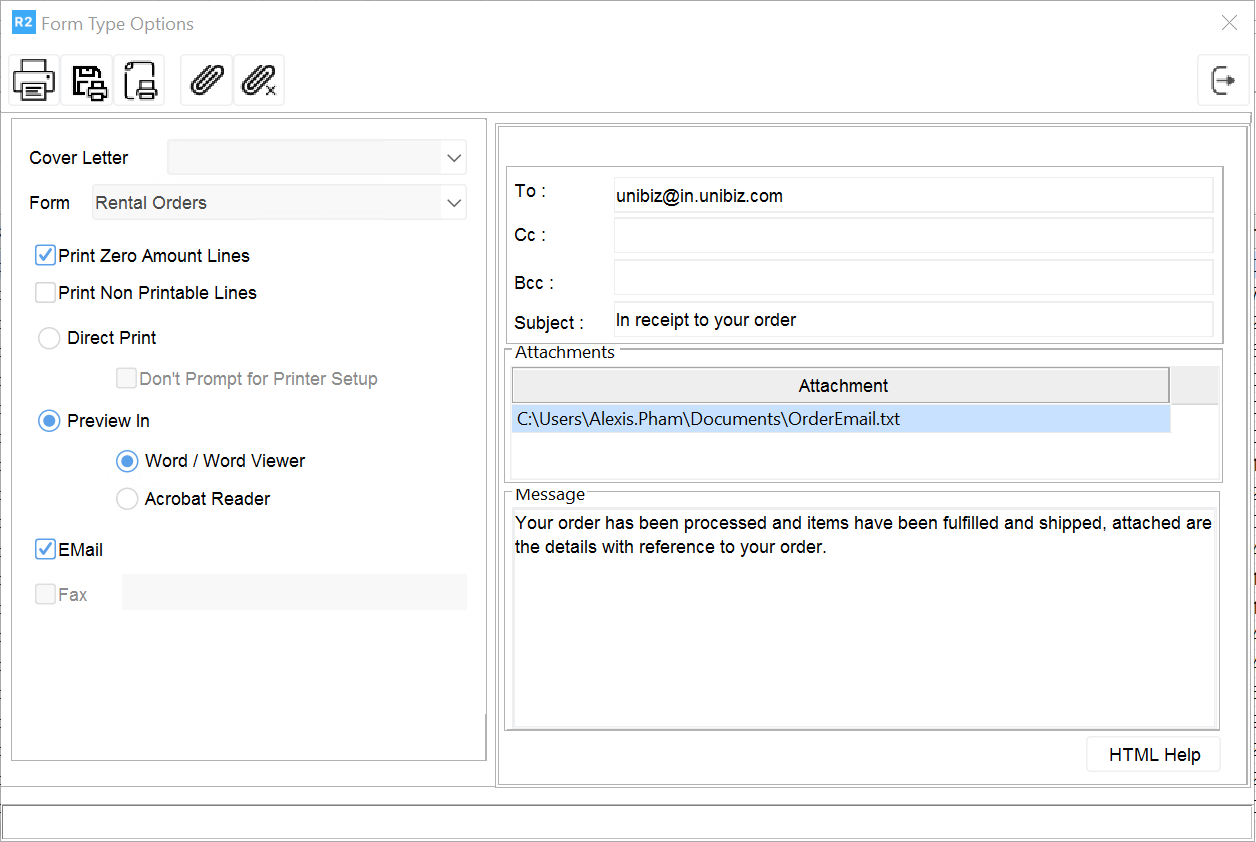
Type in the To address and add attachments if needed.
-
-
Click on the Print icon in the Form Type Options dialog.
-
The selected kind of print will be printed and the Email will be sent with the contents seen on Form Type Options dialog to the recipient address entered in the To field.
-
Defaulting of Contents from Template to Form Type Options dialog when Multi- Language is disabled
Case 1
-
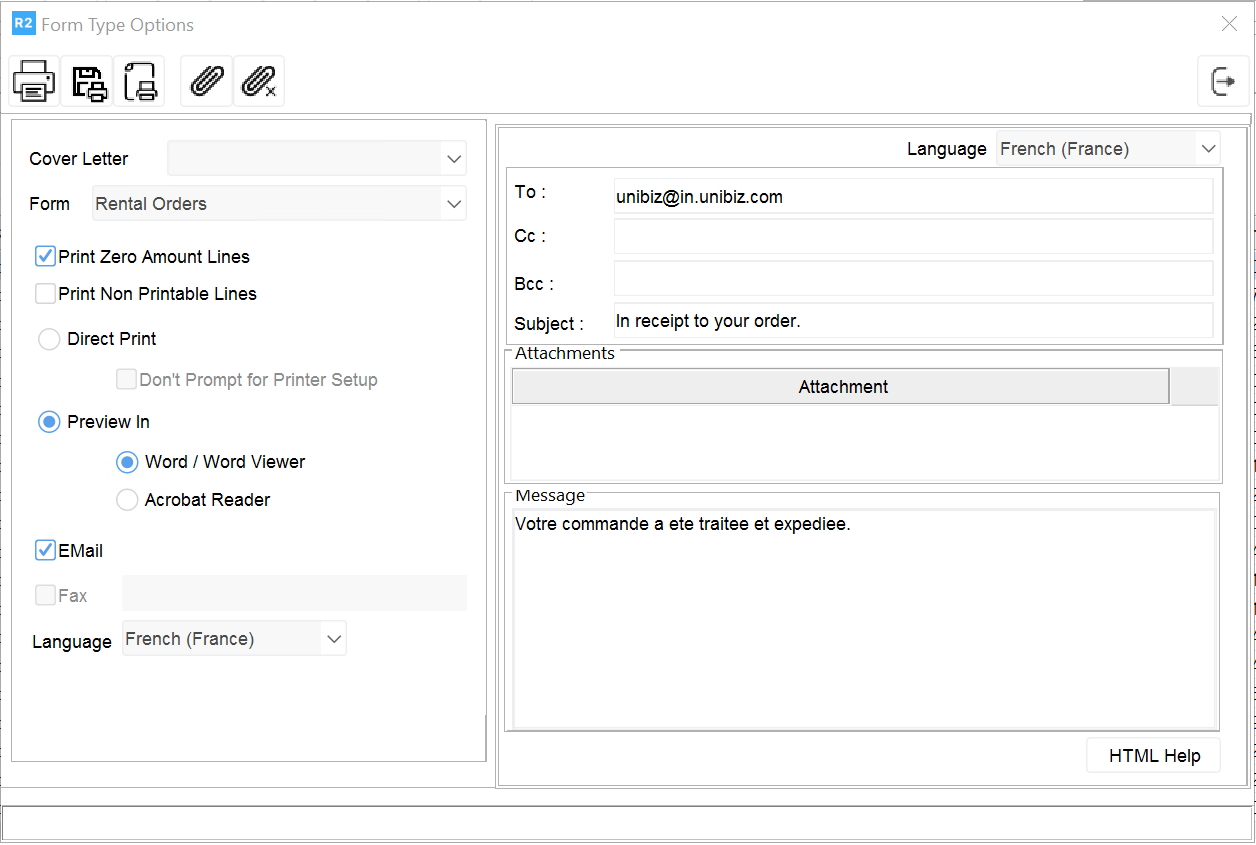
In the Form Type Setup dialog, define a Form with name as ‘Rental Orders’ for 153500UI form.
-
Click on the importable icon in the Email Content field of and browse for the text file which has the default email content say OrderEmail.txt created in any path as said earlier.
-
Access the Form Type options dialog for the kind of print which you want to Print and Email.
-
Select a Form Rental Order and set Email as True.
-
System refers to the OrderEmail.txt file linked to Rental Orders form and displays the same in Subject and Message fields as shown in fig 1.12
-
Now if some other form is selected, the Email Subject and Message will be defaulted from the newly selected form if any Email Content file is defined for that Form.
-
Fig 1.12
Note: Language field is not visible in this dialog.
Case 2
-
In the Form Type Setup dialog, define a Form with name as Rental Orders for 153500UI form.
-
Do not link any file in the Email Content field by clicking on the importable button.
-
Access the Form Type options dialog for the kind of print which you want to Print and Email.
-
Select a Form Rental Order and set Email as True.
-
As no Email Content file is linked, system displays the default contents in the Email section of Form Type options dialog.
-
The Default Subject and Contents are:
Default Subject: R2: Order Print Attached
Default Content: R2 has generated this mail with Attachment. You have received this mail from <email-id of the logged in employee>
-
If required this can be modified.
Mailing Prints When Multi-Language is enabled
-
Access the Form Type options dialog for the kind of print which you want to Print and Email.
-
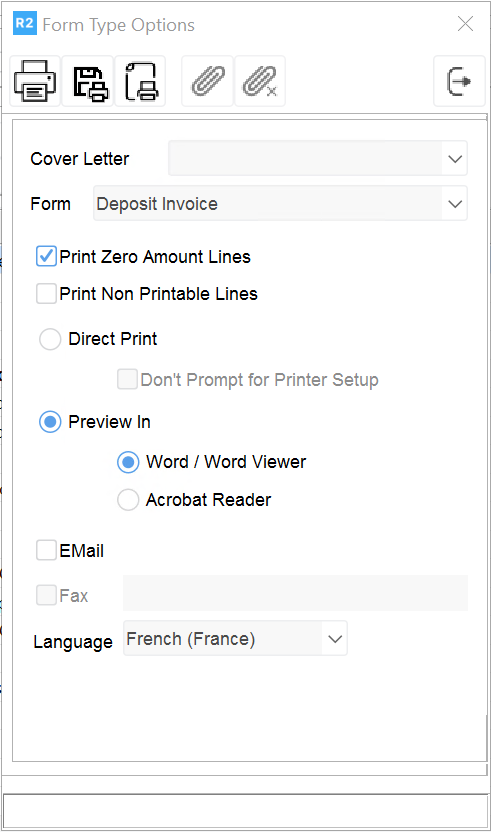
Currently, the Form Type Options dialog displayed for while printing Orders, Event Orders, Summary Invoices and Equipment Deliver Receipts, will be display the Language filed and by default it will display the language taken from logged-in Employee and with the default form if present otherwise first form of the kind of print is being done will be set as shown in Fig 1.13.
-
The Form Type Options dialog displayed for other prints like regular invoices, meeting orders, Purchase Orders etc (where printing of items in Multi-language is not supported) the Language option will not be present but displays with the default form if present otherwise first form of the kind of print is being done will set.
-
-
Select the Email option, the From Type options dialog will expand
-
In case of 1a, the language which is present in the Language on the left hand side of the Form Type Options dialog will also be defaulted to the Language field in the Email section of Form Type Options dialog as shown in fig 1.14. Also, the Email Subject and Content linked to the selected form, for the selected Language will be displayed in the Subject and Message fields of Email Section.
-
Fig 1.14
-
Items in the print will be printed in the language selected on the Language field of left hand section. Email Subject and content will be defaulted based on the Language field on the Email section.
-
The Language field in the email section of form type options dialog will be available in all Form Type options dialog irrespective of whether the printing of items in Multi-Language is supported or not. But Language field on the left hand side will be available if printing of items in Multilanguage is supported.
-
In Form Type options dialog, where Language is present in the left hand section, on changing the Language on Left hand section changes the Language in the Email section as well and the contents of the email will be refreshed and will display the contents as in the Email content file which is linked to the newly selected language and the form.
However, on changing the language in the email section of Form type options dialog will not change the language in the left hand side of form type options dialog. In this case the contents and subject in the Email section will be based on the language selected in the Email section.
-
Continue to set the required values in the Form Type options dialog as described below:
-
Select the Form which need to used for printing and select the Language on the left had side (if present) which indicates in which language the items need to be printed and if necessary change the Language in the Email section which will default the Subject and Content from the template file linked to the form and this language.
-
Modify the Subject and Content, by editing the same in the respective fields shown.
-
Type in the To address and add attachments if needed.
-
-
Click on the Print icon in the Form Type Options dialog.
-
The selected order, invoice, EDR etc will be printed and the Email will sent the contents seen on Form Type Options dialog to the recipient address entered in the To field.
-
Defaulting of Contents from Template to Form Type Options dialog when Multi- Language is enabled
When Multi-Language is enabled, that is at least one language is selected in the Language field of Configuration and Default Language for Employee is also selected.
Case 1
In Configuration → Language select Languages as German, French, Spanish and English.
Set the Default Language for Employee as German.
In the Form Type Setup dialog, define a Form with name as Rental Order for 153500UI form.
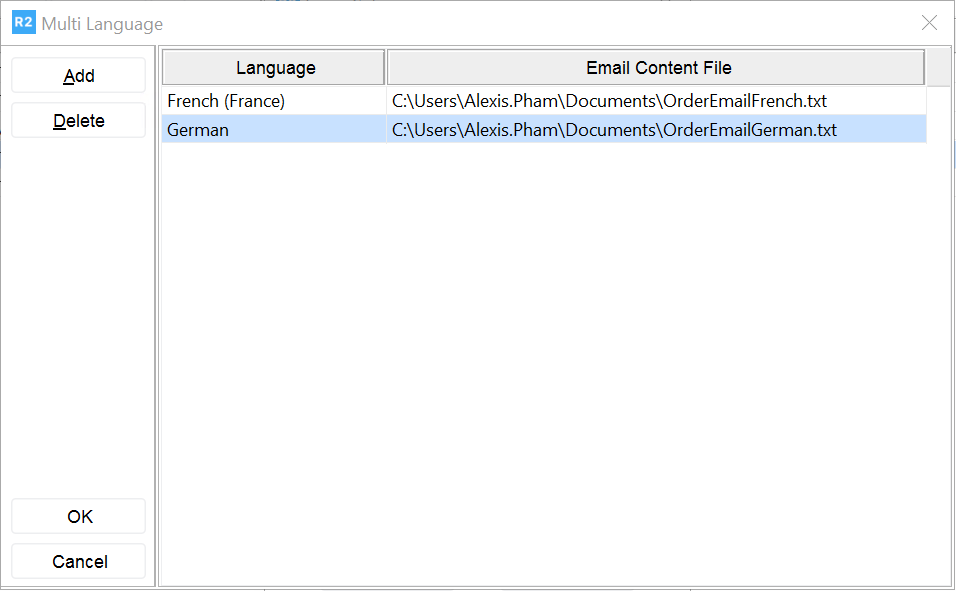
Click on the multi-language icon in the Email Content field of and add 2 records one for German, French and one without any language selected as shown in fig below:
Fig 1.15
-
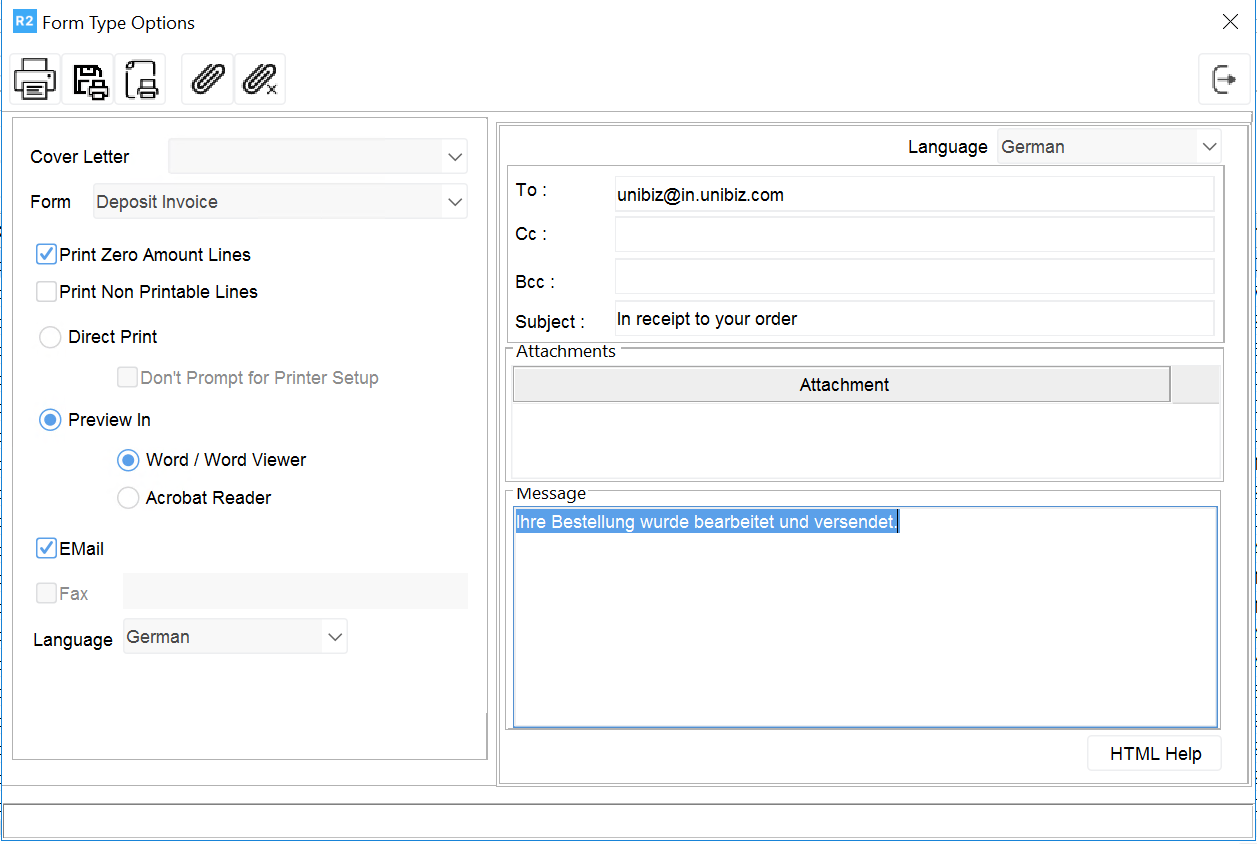
Print the Order, the Form Type options dialog will be displayed with Language as German.
-
Select a Form Rental Order and set Email as True.
-
System will refer to the Email Template linked to language German for the Form Rental order and display the contents of Email template linked to German in Email section of Form Type options dialog as shown in below:
-
Fig. 1.16
Case 2
-
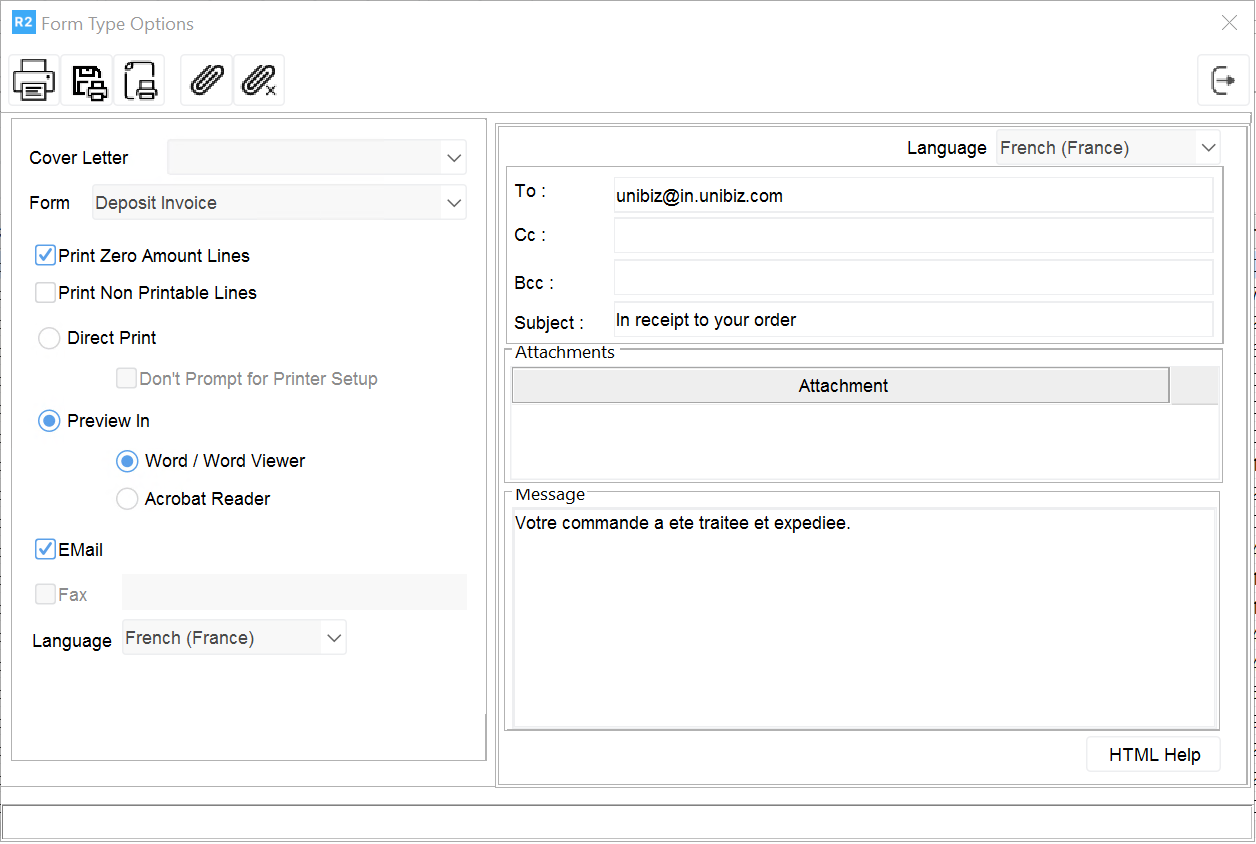
In Case 1, change the Language in the Form Type options dialog to French, let the Form selected be Rental Order.
-
Set Email option as True.
-
System will refer to the Email Template linked to language French for the Form Rental order and display the contents of Email template linked to French in Email section of Form Type options dialog as shown in fig 1.17
-
Fig. 1.17
Case 3
-
In Case 1, change the Language in the Form Type options dialog to Spanish, let the Form selected be Rental Order.
-
Set Email option as True.
-
If no Email Template records is defined for the selected language and form Rental order
-
System will refer to the Form Setup in Maintenance à Form Setup which is done for form Rental Orders and verify if there is any path found in the Email content field of Form setup dialog (as explained in the Note of Linking Custom Email Templates to Forms when Multi-Language is enabled), if this found then the contents of the email template linked here will be displayed in the Form Setup dialog.
-
If an email template path is not found in the Email Content field of Form Setup dialog, then the Default R2 contents in the Email section of Form Type options dialog.
-
-
The Default Subject and Contents are:
Default Subject: R2: Order Print Attached
Default Content: R2 has generated this mail with Attachment. You have received this mail from unibiz@in.unibiz.com
|
Form Type |
Recipient Code |
Recipient |
|
Order |
{PROJECT_MANAGER} |
Project Manager(s) tagged to the Order |
|
{SALES_PERSON} |
Sales Person(s) present for the Order |
|
|
{MAIN_CONTACT} |
Order Main Contact |
|
|
{BILLING_CONTACT} |
Order Billing Contact |
|
|
{SHIPPING_CONTACT} |
Order Shipping Contact |
|
|
{RETURN_CONTACT} |
Order Return Contact |
|
|
{CREATED_BY} |
Created by employee of Order |
|
|
Invoice |
{PROJECT_MANAGER} |
Project Manager(s) tagged to the Invoiced Order |
|
{SALES_PERSON} |
Sales Person(s) present for the Invoiced Order |
|
|
{MAIN_CONTACT} |
Main Contact present for the Invoiced Order |
|
|
{BILLING_CONTACT} |
Billing Contact present for the Invoiced Order |
|
|
{SHIPPING_CONTACT} |
Shipping Contact present for the Invoiced Order |
|
|
{RETURN_CONTACT} |
Return Contact present for the Invoiced Order |
|
|
{CREATED_BY} |
Created by employee of the Invoice |
|
|
Deposit
|
{PROJECT_MANAGER} |
Project Manager(s) tagged to the Order for which deposit is made. |
|
{SALES_PERSON} |
Sales Person(s) tagged to the Order for which deposit is made. |
|
|
{MAIN_CONTACT} |
Main Contact present in the Order, for which deposit is made. |
|
|
{BILLING_CONTACT} |
Billing Contact present in the Order, for which deposit is made. |
|
|
{SHIPPING_CONTACT} |
Shipping Contact present in the Order, for which deposit is made. |
|
|
{RETURN_CONTACT} |
Return Contact present in the Order, for which deposit is made |
|
|
{CREATED_BY} |
Created by employee of the deposit. |
|
|
Delivery Receipt |
{PROJECT_MANAGER} |
Project Manager(s) tagged to the Order for which Delivery Receipt being printed. |
|
{SALES_PERSON} |
Sales Person(s) tagged to the Order for which Delivery Receipt being printed. |
|
|
{MAIN_CONTACT} |
Main Contact present in the Order for which Delivery Receipt being printed. |
|
|
{BILLING_CONTACT} |
Billing Contact present in the Order for which Delivery Receipt being printed. |
|
|
{SHIPPING_CONTACT} |
Shipping Contact present in the Order for which Delivery Receipt being printed. |
|
|
{RETURN_CONTACT} |
Return Contact present in the Order for which Delivery Receipt being printed. |
|
|
{CREATED_BY} |
Created by employee of the order for which Delivery Receipt is being printed. |
|
|
PO |
{VENDOR_CONTACT} |
Vendor Contact present in the Purchase Order. |
|
{PO_SHIPPING_CONTACT} |
Shipping Contact present in the Purchase Order. |
|
|
{PO_RETURN_CONTACT} |
Return Contact present in the Purchase Order. |
|
|
{CREATED_BY} |
Created by employee of Purchase Order. |
|
|
Meeting Order |
{PROJECT_MANAGER} |
Project Manager(s) tagged to the Meeting Order |
|
{SALES_PERSON} |
Sales Person(s)present for the Meeting Order |
|
|
{MAIN_CONTACT} |
Main Contact present in the Meeting Order |
|
|
{BILLING_CONTACT} |
Billing Contact present in the Meeting Order |
|
|
{SHIPPING_CONTACT} |
Shipping Contact present in the Meeting Order |
|
|
{RETURN_CONTACT} |
Return Contact present in the Meeting Order |
|
|
{CREATED_BY} |
Created by employee of Meeting Order |
|
|
Event |
{EVENT_SALES_MANAGER} |
Event Sales Manager |
|
{EVENT_CLIENT_MANAGER} |
Event Client Manager |
|
|
{ EVENT_PROJECT_MANAGER} |
Event Project Manager |
|
|
{ EVENT_MAIN_CONTACT} |
Main Contact of the Event |
|
|
{ EVENT_BILLING_CONTACT} |
Billing Contact of the Event |
|
|
{CREATED_BY} |
Created by employee of the Event |
|
|
Card Payment |
{PROJECT_MANAGER} |
Project Manager(s) tagged to the Order on which payment is done |
|
{SALES_PERSON} |
Sales Person(s)present for the Order on which payment is done |
|
|
{MAIN_CONTACT} |
Main Contact on the order on which payment is done |
|
|
{BILLING_CONTACT} |
Billing Contact present in the Order on which payment is done |
|
|
{SHIPPING_CONTACT} |
Shipping Contact present in the Order on which payment is done |
|
|
{RETURN_CONTACT} |
Return Contact present in the Order on which payment is done |
|
|
{CREATED_BY} |
Created by employee of Card Payment |
|
|
[Applicable for All Types of Forms] |
{SELF} |
Logged-in Employee |