Details
This feature provides the ability to:
-
Enter and record the Lot (Tier) of a Non-serial Item at the time of receiving its quantity into Inventory.
-
Allot the quantity of a Non-serial Item being sold on a Rental Order/Sale Order from a specific Lot - while adding/after adding from within the Order/while filling/while shipping.
-
Include Lot details of Item in the Order's Pick List Print and in its Invoice Print.
-
Allot the quantity of a Non-serial Item being transferred on a Inventory Transfer Order from a specific Lot - while adding/after adding from within the Order/from Transfer Order Detail View.
More details about this functionality is provided in Additional Details about the Functionality section.
Sample Workflow - Selecting Lot for Non-serial Sell Item in Rental/Sale Orders
The functionality is explained with a sample workflow given below.
-
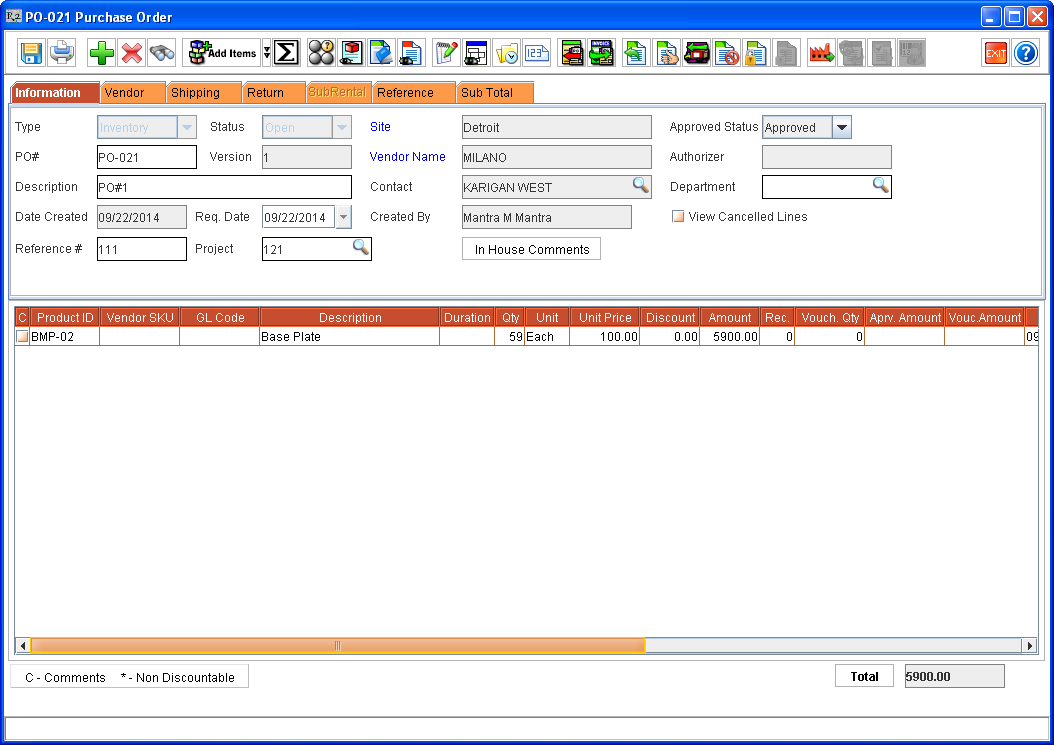
Create a Purchase Order [PO-021] for Vendor [MILANO] and add 59 quantities of the Item [BMP-02] to it and release the Purchase Order.
-
lick Receive icon on the Purchase Order (PO). The Scan Items window is displayed.
-
The Vendor Name will be defaulted to Vendor field from the PO.
-
The Batch No. field has a system generated Batch number present in it. However, Batch Description and Lot Number fields are blank, as shown in Figure 1.1.
-
The Lot details of Receive lines of Items being received can be entered at the time of receiving in Scan Items dialog box (either accessed from a PO or from Item edit of the Item). The Receive lines can also be received without entering any Lot related information.
Note: The Lot Details can be entered for all Serial and Non-serial Items in Scan Items dialog box. However the functionality to choose the quantity of Item being sold from received Lots is supported only for Non-serial Sell Items (Non-serial Items whose Rent and Sub-rent check boxes are not selected and Sell check box is selected in their Item edit window > Allow section).
Table 1.0 Details of new Fields added to Scan Items Window
|
Field Name |
Description |
|---|---|
|
Batch No |
This field contains a system generated batch number for this Lot of Items being received.
|
|
Batch Description |
The user can manually enter an appropriate description for this Batch of Items being received in this field.
|
|
Vendor |
|
|
Lot Number |
The user can manually enter the Lot Number in this field, for the Lot of item being received.
|

|
When multiple Items care being received by accessing Scan Items window, clicking on this tags the previous Item received, in this session of Scan Items window.
|

|
When multiple Items care being received by accessing Scan Items window, clicking on this tags the next Item to be received, in this session of Scan Items window.
|
-
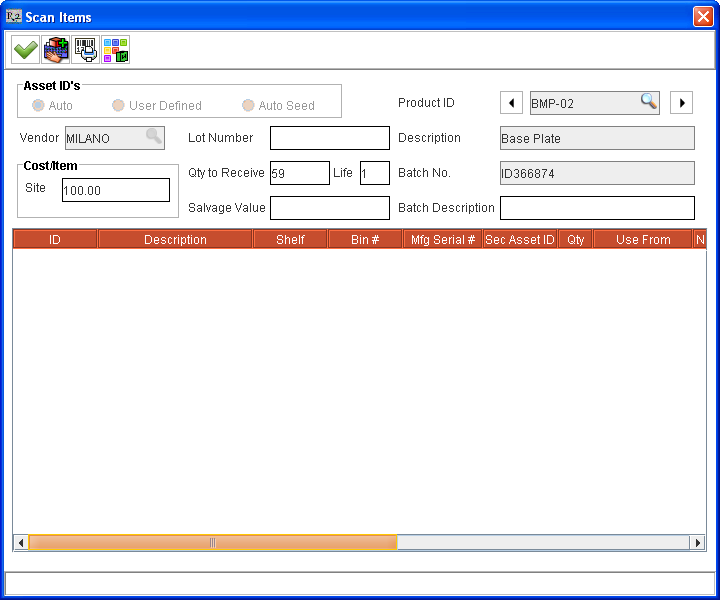
Enter the details for this Lot of item being received in the various fields of Scan Items window and click Receive icon. The 59 quantities of [BMP-02] get received and displayed in a row in the Scan Items window’s grid, as shown in Figure 1.2.
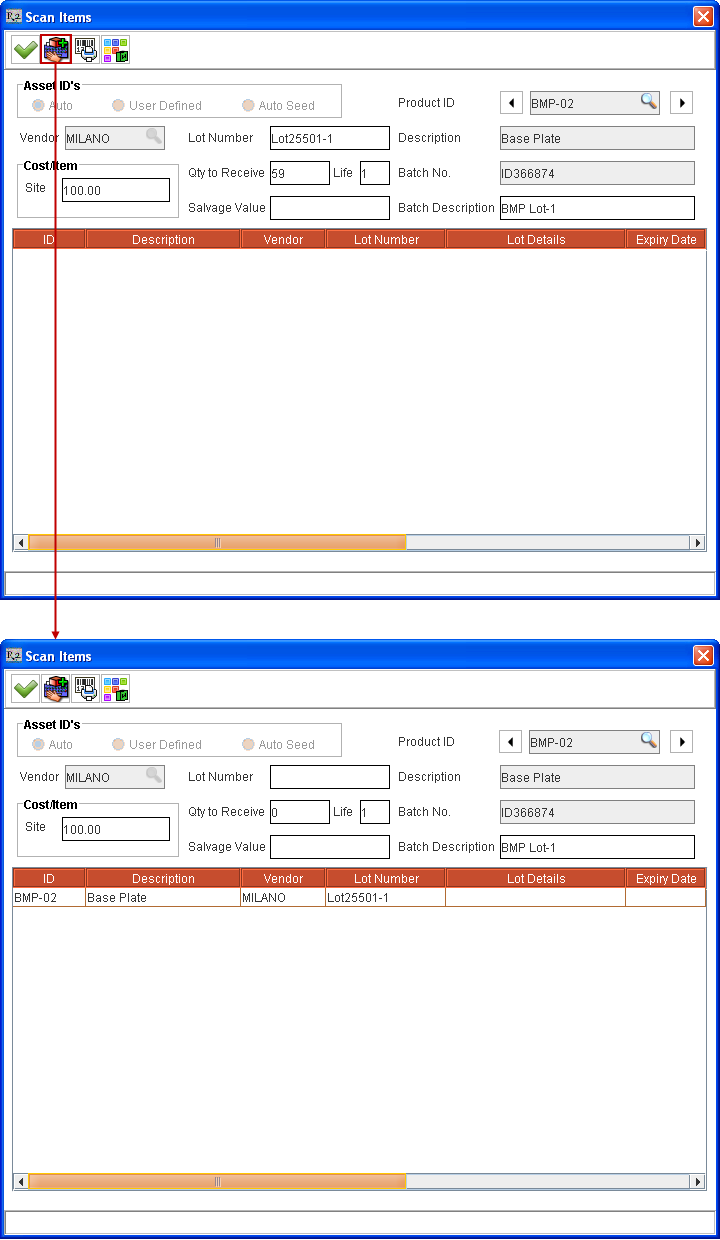
Table 1.1 Details of new Columns added to Scan Items Window
|
Column Name |
Description |
|---|---|
|
Lot Number |
This column displays the Lot Number of the Lot of Item received.
|
|
Expiry Date |
In this column the expiry date of the Lot of Item received can be entered.
|
|
Lot Details |
In this column some extra information about the Item can be entered, by clicking on the field under this column and entering the required information. |
|
Vendor |
This column displays the Vendor Name of Vendor from whom the Lot of Item is received. This is displayed as provided while receiving the Lot of Item. This is read-only. |
-
Right-click on the listed received Lot's line in the grid and select Assign Expiry Date command. The Assign Expiry Date dialog box is displayed. Select the Expiry Date for the received Lot as 09/22/2015.
-
Enter Lot Details for the received Lot as "Light blue in color."
-
Click the Lot History icon present in Scan Items window. The Lot History dialog box is displayed where the user can view the details for the Lots of the Item previously received at different times for the Vendor tagged in Vendor field of Scan Items window, as shown in Figure 1.3.
-
If no Vendor is tagged in Vendor field then, the Lot History dialog box displays details of all Lots received for this Item.
-
Selecting a listed receive line from Scan Items window grid and clicking Lot History icon > Down arrow > For Selected Line displays the Lot History dialog box with details of the selected receive line's Item's Lots. The Lot History window's title has the Item's Product ID (Description) displayed in it.
-
Viewing the lot details of the Item helps to identify the previously used Lot Number for the Item. Thereby the user can enter the current Lot Number for the Item in a sequence.
-
Viewing Orders where Items from this Lot are used - Select a Lot listed in Lot Details dialog box and click the View Orders icon. The View Orders window is displayed listing all the Order(s) where Items from this Lot are allotted for selling.
Table 1.2 Details of Columns in Lot History Window
|
Column Name |
Description |
|---|---|
|
Lot No |
This column displays the Lot Number of the Lot of Item received. This is displayed as provided while receiving the Lot of Item in Lot Number field. |
|
Qty |
The quantity of Item received in this Lot. |
|
Alloted Qty |
The total quantity of Item allotted from this Lot for sale in one or more Rental and Sale Orders. If there exists any value under this column for a particular Lot's row, then selecting that row and clicking View Orders icon displays the View Orders window. The View Orders window lists the details of the Order(s) where the Items from this Lot are used for selling. |
|
Received Date |
The date when this Lot is received. |
|
Expiry Date |
The Expiry Date of the Lot of Item received. This is for information purpose only. The system will allow selling an Item even if the Lot in which it is received has crossed its Expiry Date. |
|
Lot Details |
Extra information about the Lot of Items is displayed. |
Note: All the details displayed in Lot Details window is read-only and cannot be modified here.
Right-clicking on a Purchase Order's Item line > selecting View Lot Details command also displays the Lot Details window with details of the received Lot.
-
Create one or more Purchase Orders and receive multiple Lots of the Item [BMP-02] from Vendor [MILANO], as listed in Table 1.3.
For example, 419 quantities of the Item [BMP-02] added to a Purchase Order can be received in a single Lot or can be received in multiple Lots by entering appropriate Lot Numbers and Quantity in Lot Number and Qty fields of Scan Items window and receiving them. Alternatively this can also be received by adding required quantities to multiple POs and receiving them or by receiving them from Item Edit window > Receive button > Scan Items window by tagging appropriate Vendor [MILANO], as need be.
Table 1.3 Received Lots for Item [BMP-02] from Vendor [MILANO]
|
Vendor Name |
Lot Number |
Quantity |
Cost |
Receive Date |
Expiry Date |
|---|---|---|---|---|---|
|
Milano |
Lot 25501-1 |
59 |
100$ |
09/22/2014 |
09/22/2015 |
|
|
Lot 25501-2 |
61 |
100$ |
09/23/2014 |
09/23/2015 |
|
|
Lot 25501-3 |
63 |
100$ |
09/24/2014 |
09/24/2015 |
|
|
Lot 25501-4 |
60 |
100$ |
09/25/2014 |
09/25/2015 |
|
|
Lot 25501-5 |
60 |
100$ |
09/26/2014 |
09/26/2015 |
|
|
Lot 25501-6 |
55 |
100$ |
09/27/2014 |
09/27/2015 |
|
|
Lot 25501-7 |
61 |
100$ |
09/28/2014 |
09/28/2015 |
-
Select Item edit window > Receive Log. The Receive Log dialog box is displayed for the Item listing its receiving history.
-
Select a listed line and click Lot Details button. The Lot Details dialog box is displayed with details of the received Lot, as shown in Figure 1.4.
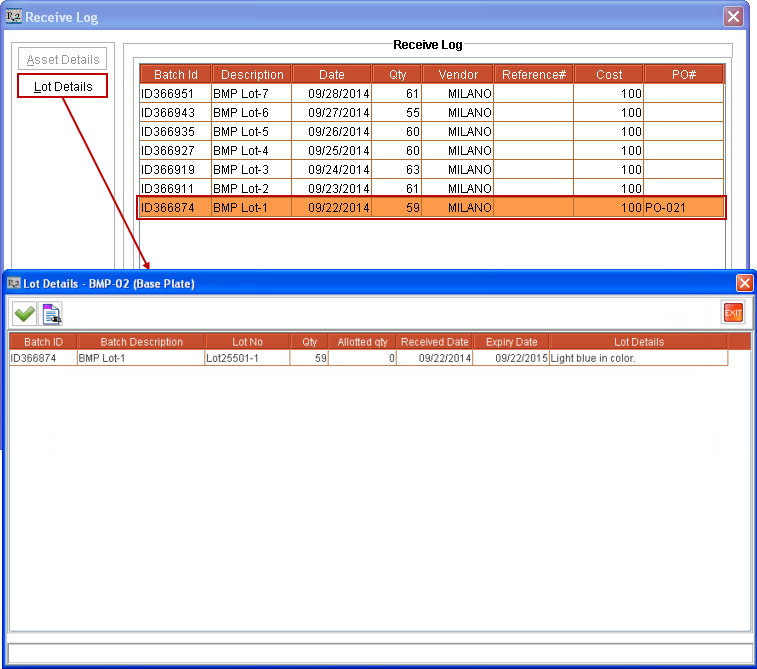
-
Viewing Orders where Items from this Lot are used - Select a Lot listed in Lot Details dialog box with any value present under Alloted Qty column and click the View Orders icon. The View Orders window is displayed listing all the Order(s) where Items from this Lot are allotted for selling.
Table 1.4 Details of Columns in Lot Details Window
|
Column Name |
Description |
|---|---|
|
Batch ID |
The ID of the Batch in which this Lot of Items is received. |
|
Batch Description |
The Description of the Batch in which this Lot of Items is received. |
|
Lot No |
This column displays the Lot Number of the Lot of Item received. This is displayed as provided while receiving the Lot of Item in Lot Number field. |
|
Qty |
The quantity of Item received in this Lot. |
|
Alloted Qty |
The total quantity of Item allotted from this Lot for sale in one or more Rental and Sale Orders. If there exists any value under this column for a particular Lot's row, then selecting that row and clicking View Orders icon displays the View Orders window. The View Orders window lists the details of the Order(s) where the Items from this Lot are used for selling. |
|
Received Date |
The date when this Lot is received. |
|
Expiry Date |
The expiry date of the Lot of Item received. This is for information purpose only. The system will allow selling an Item even if the Lot in which it is received has crossed its Expiry Date. |
|
Lot Details |
Extra information about the Lot of Items is displayed. |
Note: All the details displayed in Lot Details window is read-only and cannot be modified here.
-
Receive multiple Lots of same Non-serial Item [BMP-02] from another Vendor [VELVET] for 186 quantities, as shown in Table 1.5.
Table 1.5 Received Lots for Item [BMP-02] from Vendor [VELVET]
|
Vendor Name |
Lot Number |
Quantity |
Cost |
Receive Date |
Expiry Date |
|---|---|---|---|---|---|
|
Velvet |
Lot 25601-1 |
60 |
120$ |
09/28/2014 |
09/28/2015 |
|
|
Lot 25501-2 |
63 |
120$ |
09/29/2014 |
09/29/2015 |
|
|
Lot 25501-3 |
63 |
120$ |
09/30/2014 |
09/30/2015 |
The collated details of various Lots of the Item [BMP-02] received from multiple Vendors, is provided in Table 1.6, for ease of reference.
Table 1.6 Lot Details of received quantity of Item [BMP-02]
|
Vendor Name |
Lot Number |
Quantity |
Cost |
Receive Date |
Expiry Date |
|---|---|---|---|---|---|
|
Milano |
Lot 25501-1 |
59 |
100$ |
09/22/2014 |
09/22/2015 |
|
|
Lot 25501-2 |
61 |
100$ |
09/23/2014 |
09/23/2015 |
|
|
Lot 25501-3 |
63 |
100$ |
09/24/2014 |
09/24/2015 |
|
|
Lot 25501-4 |
60 |
100$ |
09/25/2014 |
09/25/2015 |
|
|
Lot 25501-5 |
60 |
100$ |
09/26/2014 |
09/26/2015 |
|
|
Lot 25501-6 |
55 |
100$ |
09/27/2014 |
09/27/2015 |
|
|
Lot 25501-7 |
61 |
100$ |
09/28/2014 |
09/28/2015 |
|
|
|
|
|
|
|
|
Velvet |
Lot 25601-1 |
60 |
120$ |
09/28/2014 |
09/28/2015 |
|
|
Lot 25501-2 |
63 |
120$ |
09/29/2014 |
09/29/2015 |
|
|
Lot 25501-3 |
63 |
120$ |
09/30/2014 |
09/30/2015 |
-
Selecting Lot while Adding Item(s) to a Sale Order:
-
Create a Sale Order [ORD-121].
-
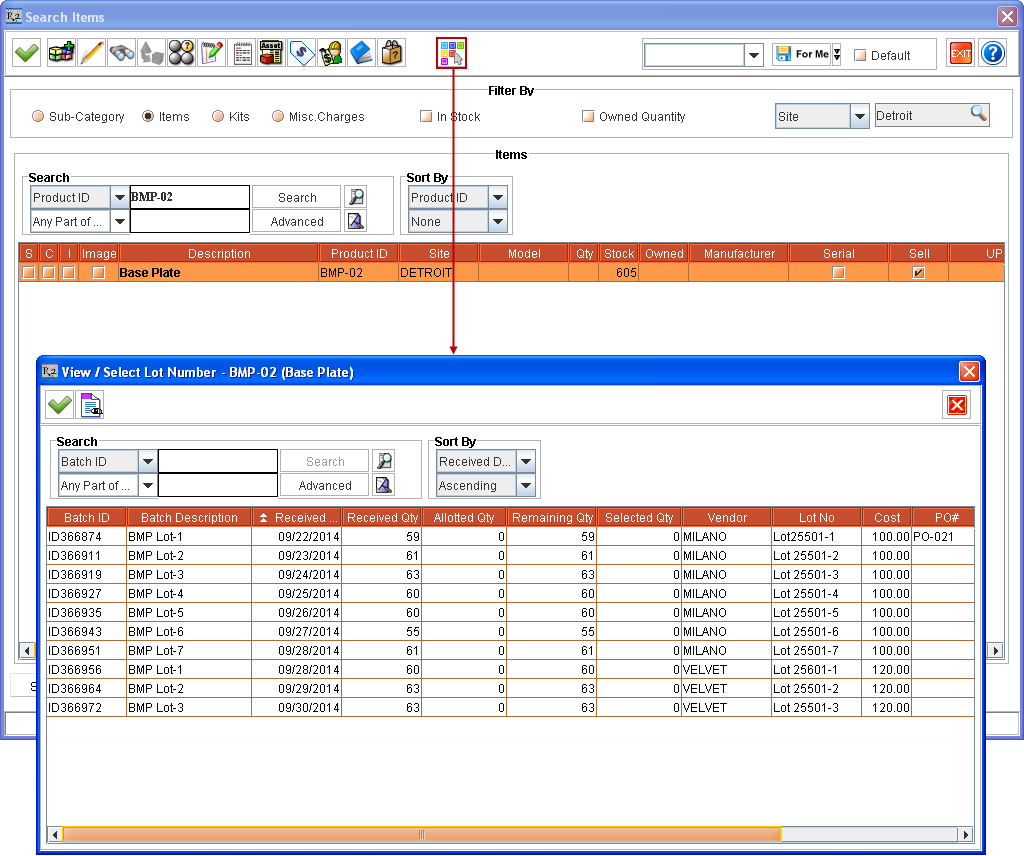
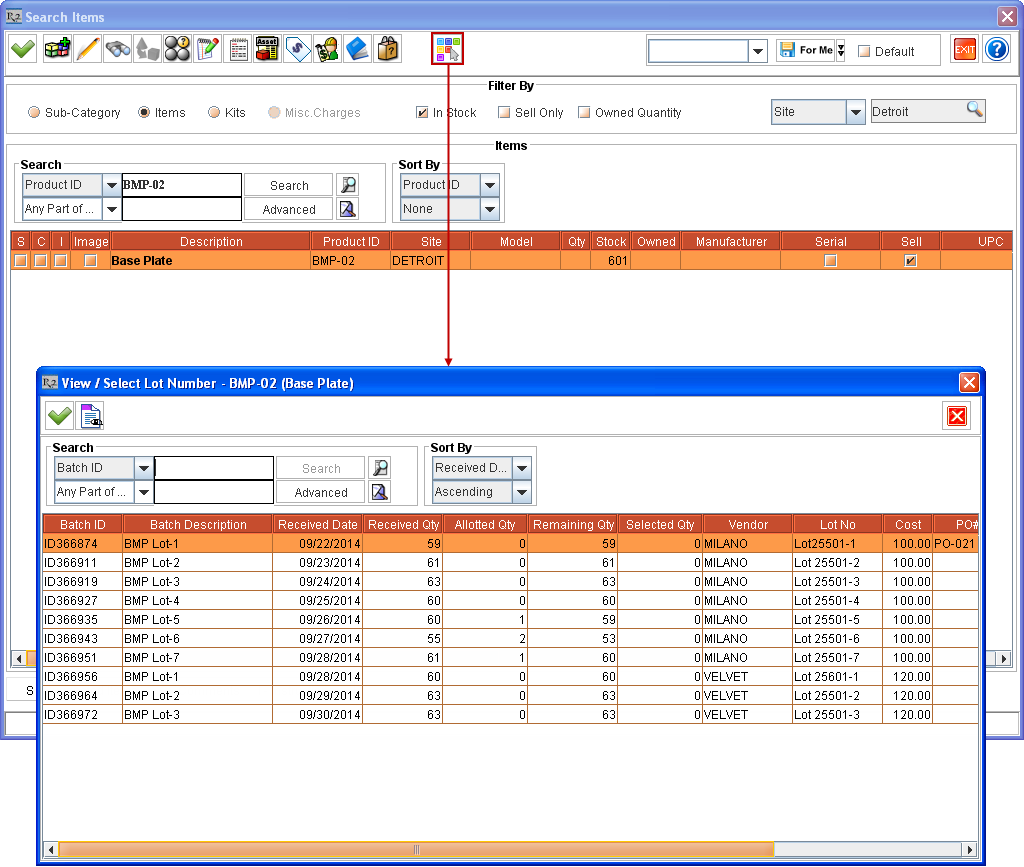
Click Search Inventory button > Items. The Search Items window is displayed.
-
Search and find [BMP-02], click on its line to select it.
-
Click View / Select Lot Number

Notes regarding accessing View / Select Lot Number window from Search Items window
-
The View / Select Lot Number window is displayed only if the selected Item is a Non-serial Item.
-
On adding Non-serial Items with Lots allotted, they get added to Rental/Sale Order with Action as Sell. Allotting can also be done from Receive lines listed for the Item without any Lot related information.
-
If the Lots are allotted to Non-serial Items which are not sellable then, on adding to Order, the allotted quantity of the Item gets added to the Order but without any Lots allotted. The system displays an appropriate message with details in this case.
-
The Lot can also be selected for an Item without entering any quantity under Qty column in Search Items window. The number of quantity of the Item for which Lot is allotted gets selected as the Item's quantity in Search Items window on exiting View / Select Lot Number window.
-
The View / Select Lot Number window can also be accessed from Order > Search Inventory window by clicking Select Lot icon. This action displays the View / Select Lot Number window, when the Search Inventory window is accessed from anywhere in the system. However, the Item(s) selection and their Lot allotting works only when Search Inventory window is accessed from within an Order.
-
While allotting Lot Numbers to Items, the Lots received in Order Site alone are displayed for allotting.
-
Enter the quantity of Item to be allotted from various Lots of the Item, by entering appropriate values against Lot rows under Qty column. The entered quantity in Qty column can't be more than what is displayed under Remaining Qty column for the same Lot.
-
When the View / Select Lot Number window is opened from Search Items window after selecting an Item - for allotting Lots of Item before adding them to Order then:
-
The quantity that can be allotted against one or more Lots listed is limited only by the Lots' Remaining Qty and is not limited by the quantity selected in Search Items window before accessing the View / Select Lot Number window. For example, if 2 quantity of Item [BMP-02] was selected in Search Items window and View / Select Lot Number window is accessed. Then the user can choose to perform Lot allotment in one of the following ways:
-
The 2 quantities of Item can be allotted from one or more listed Lots.
-
Partial Allotment - Can allot less than 2 quantities from one or more listed Lots. For example, if Lots are allotted for 1 quantity then the 2 quantities of Item [BMP-01] will get added to Order but only 1 quantity will have Lot allotted.
-
More Allotment - Can choose to allot more than 2 quantities from one or more Lots. For example, 4 quantities can be allotted. The 4 quantities of Item [BMP-01] will get added to the Order with Lots allotted.
-
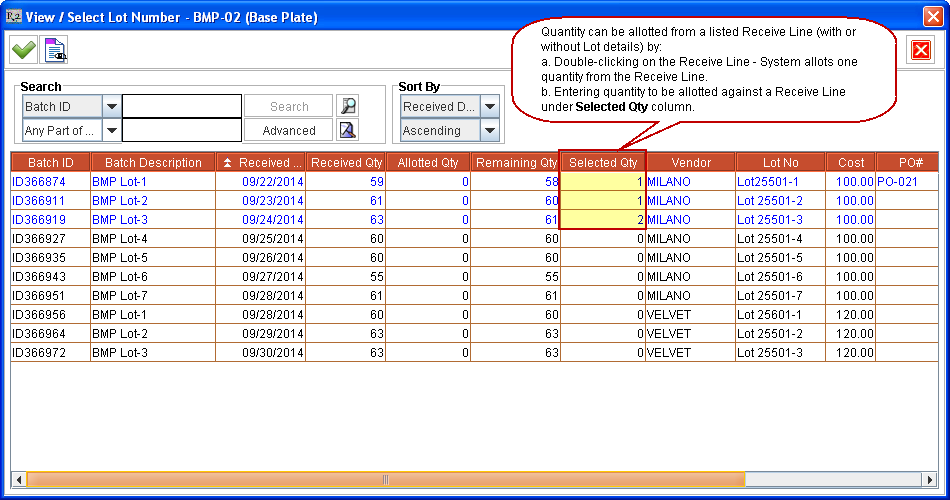
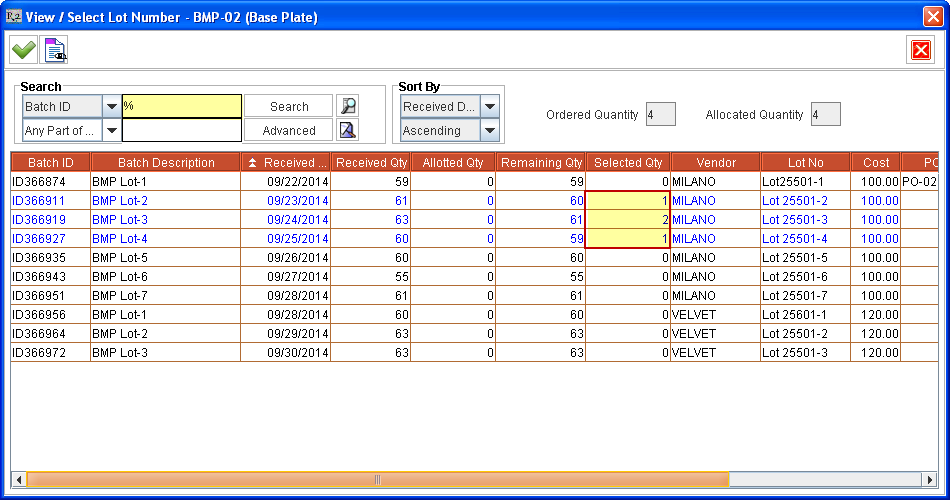
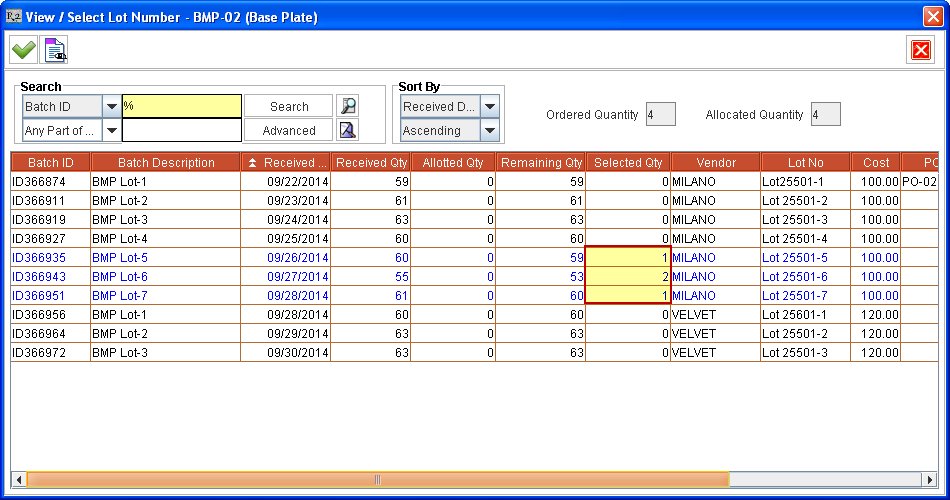
Choose the Item quantity from the listed Lots by entering the appropriate quantity against them under the Qty column, as shown in Figure 1.6.
-
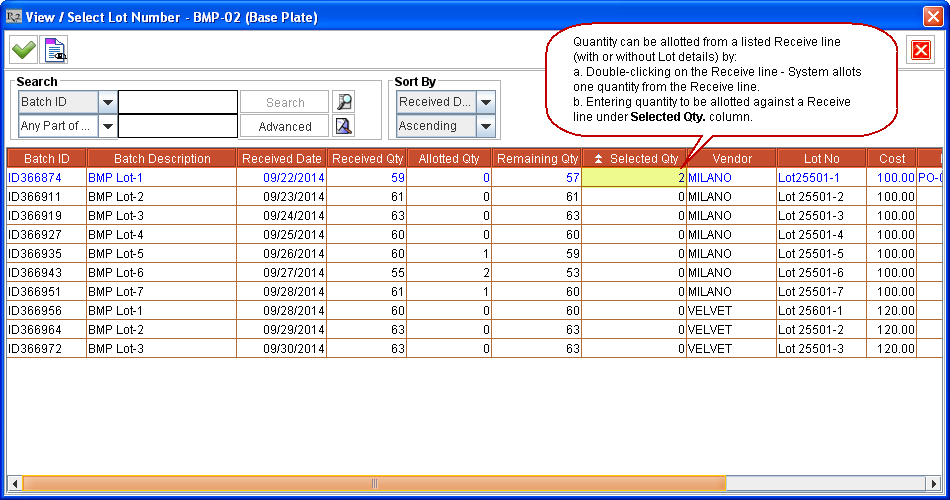
Quantity can be allotted from one or more listed Lots in the View / Select Lot Number window by:
-
Double-clicking on a Lot's line - System allots one quantity from the Lot.
-
Entering quantity to be allotted against listed Lot's line under Selected Qty column - Entered quantity gets allotted from that Lot. This quantity cannot be more than the quantity remaining to be allotted from the Lot, as listed under Remaining Qty column.
Table 1.7 Details of Columns in View / Select Lot Number Window accessed from Search Items Window
|
Column Name |
Description |
|---|---|
|
Batch ID |
Batch ID of received Lot of Item, as generated by the system on receiving. |
|
Batch Description |
Batch Description of received Batch of Items, as provided by the user. |
|
Received Date |
Date when the Lot of Items is received. |
|
Received Qty. |
Quantity of Item that was received in the Lot. |
|
Allotted Qty. |
Total Quantity of Item that is already allotted from this Lot to different sell lines across one or more Rental or Sale Orders. |
|
Remaining Qty. |
Quantity remaining in this Lot, which can be used for allotting against item quantity which is yet to be allotted to Lots from various sell lines of Orders. |
|
Selected Qty. |
This column can be used to enter a quantity against a listed Lot thereby allotting that much quantity from that Lot to the sell Item line of this Order from where the View / Select Lot Number window is accessed. The quantity entered under this column for a Lot cannot be more than its remaining quantity to be allotted, as displayed under Remaining Qty. column. |
|
Vendor |
Vendor Name assigned while receiving the batch. It is defaulted from the Purchase Order, if Scan Items window is accessed from a Purchase Order. Else it can be chosen in the Scan Items window, if need be. |
|
Lot No. |
The Lot Number of the Lot of Items received in a Batch. |
|
Cost |
Cost of this Lot of Items, as provided while receiving. |
|
PO# |
ID of the Purchase Order in which this Lot is received, if it is received using a Purchase Order. |
|
Expiry Date |
The Expiry Date as set after receiving the Lot of Item in the Scan Items window/Receive Batch window. This is for information purpose only. The system will allow selling an Item even if the Lot in which it is received has crossed its Expiry Date. |
|
Lot Details |
This column displays the extra information about the Lot of Item as entered after receiving it in Scan Items window. |
-
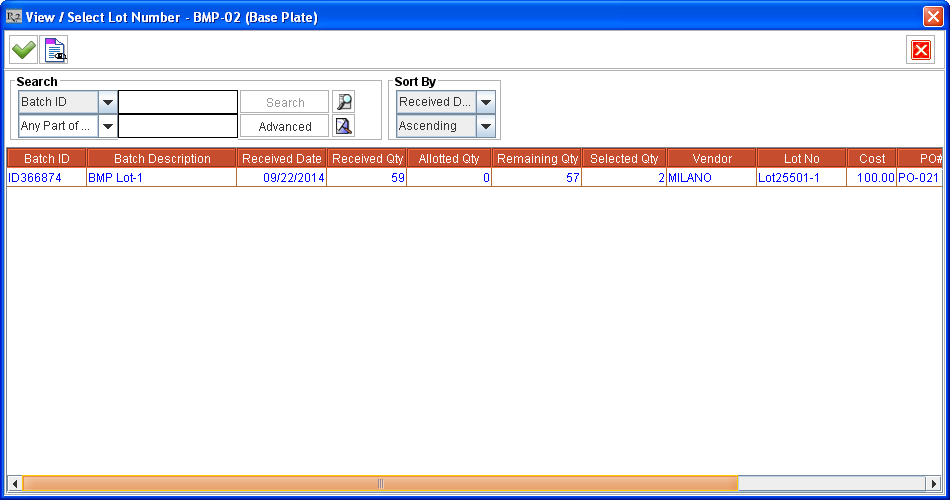
Click Select

-
Click Yes. Items get allotted from selected Lots and the View / Select Lot Number window is closed.
Notes regarding message prompted on clicking OK icon from View / Select Lot Number window after allotment of Lots
-
On allotting Lots for an Item (or modifying existing allotment) from View / Select Lot Number and clicking OK icon, system prompts with the message "R2_01338:Adding Items with Lot Numbers allocated will save the Order." with Yes and No options.
-
Clicking Yes - This saves the Lot allotted to quantities of the Item and will close the View / Select Lot Number window.
-
If Yes is selected after allotting Lots for an Item then, the system won't prompt this message on allotting Lots for other Items, when View / Select Lot Number window is accessed from same instance of Search Items window.
-
Clicking No - This closes the message prompt and the View / Select Lot Number window remains open for further modifications in Lot allotment. Clicking OK icon from View / Select Lot Number window again prompts the same message.
-
Click View / Select Lot Number

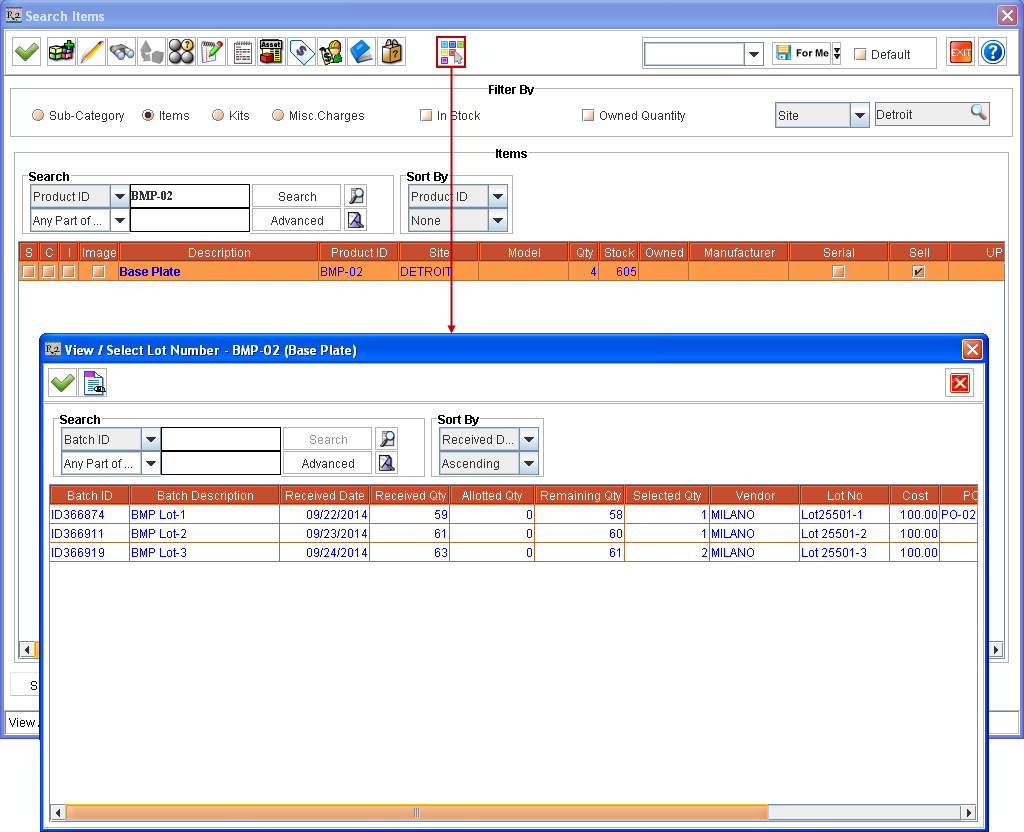
Table 1.8 Details of Quantity Allotted from Lots by accessing View / Select Lot Number Window from Search Items Window
|
Vendor Name |
Batch ID |
Quantity |
Cost |
Allotted Qty |
|---|---|---|---|---|
|
Milano |
ID366874 |
59 |
100$ |
1 |
|
|
ID366911 |
61 |
100$ |
1 |
|
|
ID366919 |
63 |
100$ |
2 |
-
Click Select icon from Search Items window. The selected 4 quantities of [BMP-02] gets added to Sale Order [ORD-121].

Notes regarding Selecting Lot for Multiple Items selected from Search Items window
-
Lot(s) can be allotted to one Item at a time from View / Select Lot Number window accessed from Search Items window > Select Lot icon.
-
After finishing Lot allotment for an Item, the View / Select Lot Number window can be accessed again and Lot(s) can be allotted for another Item, selected from same instance of Search Items window.
-
On clicking Search Items window > Select icon after all Lot allotments for multiple Items The total selected quantity of such Items get added to the Order. If the system is unable to allot Lot(s) for one or more of the Items added to the Order, then the system will prompt a message with details of all Items' IDs whose Lot allotment failed. However such Items selected quantity will get added to the Order without their Lot(s) being allotted. Their Lots can be allotted from View / Select Lot Number window accessed from within the Order (by selecting the added Item line and right-click > View /Select Lot Number command).
-
Selecting/Modifying Lots for Item(s) from within an Order - This can be performed to modify the Lots selected for an Item added to the Sale Order or for selecting Lots for Items added to the Sale Order whose Lots are not yet selected. This can also be performed for Non-serial Sell Items added with Action as Sell in Rental Orders or Sale Orders.
Notes regarding accessing View / Select Lot Number window from Rental/Sale Orders
-
The allotment of Lot for Items can be done for Items added to Orders by accessing View / Select Lot Number window by selecting the added Item line and right-click > View /Select Lot Number command.
-
From Sale Orders - The View / Select Lot Number window can be accessed for all Non-serial Items added to Sale Order.
-
From Rental Orders - The View / Select Lot Number window can be accessed for all Non-serial Items added to Rental Order with Action as Sell.
-
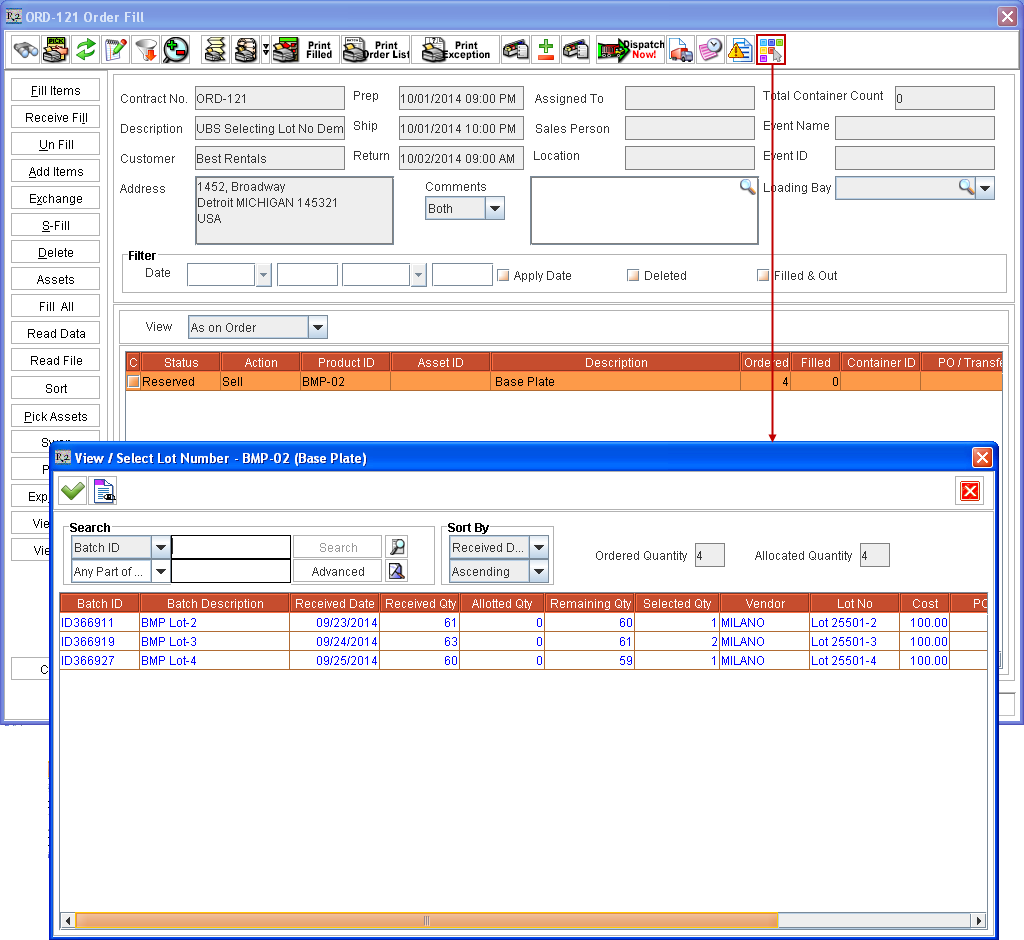
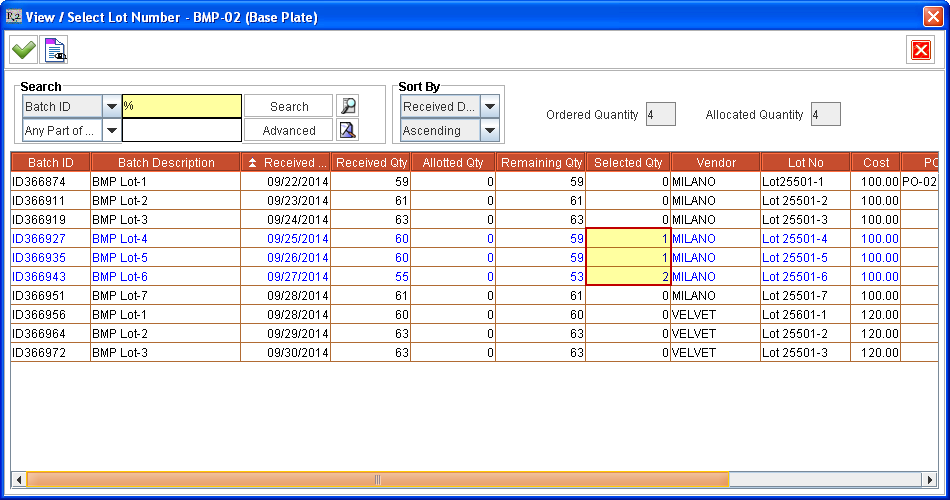
Select the Item line of [BMP-02] from within the Sale order [ORD-121] and right-click > View /Select Lot Number command. The View / Select Lot Number window is displayed with Lots lines from where the allotting is already done for this Item, as shown in Figure 1.8.
Figure 1.8 View / Select Lot Number Window accessed from an Order
-
Perform a blank search. All the Lots received for Item [BMP-02] for this Site gets listed in View / Select Lot Number window.
-
Change from 1 to 0 under Qty column against [Lot 25501-1] for Vendor [MILANO]. Instead enter 1 quantity under Qty column against Lot No as [Lot 25501-4] from Vendor [MILANO] , as shown in Figure 1.9.
-
Ordered Quantity field - This field displays the quantity of Item added to the Order in this Item line.
-
Allocated Quantity field - This field displays the quantity of Item, from the Order's currently selected Item line, which are allotted Lot(s).
-
Click Select

-
Selecting/Modifying Lots for Item(s) from within Order Fill window of an Order - This can be performed to modify the Lots selected for an Item added to an Order or for selecting Lots for Items added to an Order whose Lots are not yet selected.
-
Select View menu > Fill Order. The Order Fill window is displayed.
-
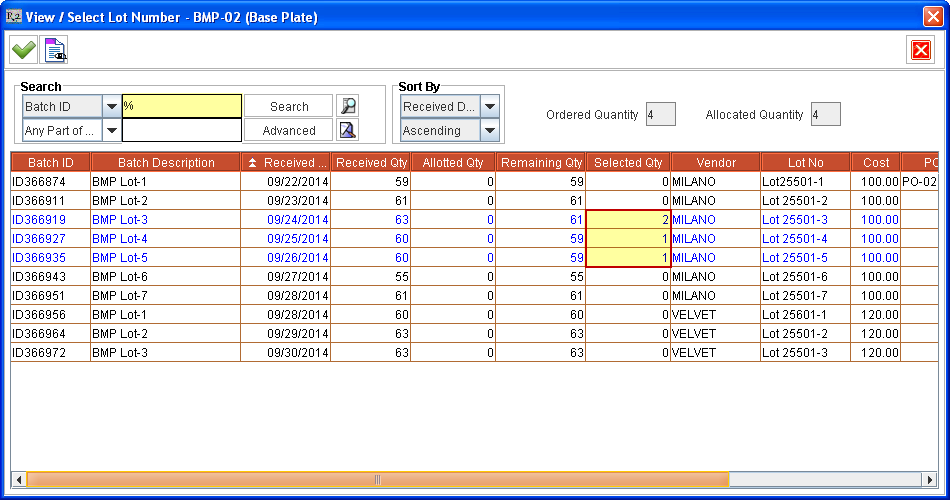
Select the Item line of [BMP-02] from the grid and click the View / Select Lot Number

-
Perform a blank search. All the Lots received for Item [BMP-02] for this Site gets listed in View / Select Lot Number window.
-
Change from 1 to 0 under Qty column against [ Lot 25501-2] for Vendor [MILANO]. Instead enter 1 quantity under Qty column against Lot No as [Lot 25501-5] from Vendor [MILANO] , as shown in Figure 1.11.
-
Click Select

-
Click Fill All button and fill all the quantities of the Item in the Order [ORD-121].
-
Click Close button and exit from Order Fill window, without shipping the filled Items.
-
Selecting/Modifying Lots for Item(s) from within Ship Order window of an Order - This can be performed to modify the Lots selected for an Item added to an Order or for selecting Lots for Items added to an Order whose Lots are not yet selected.
-
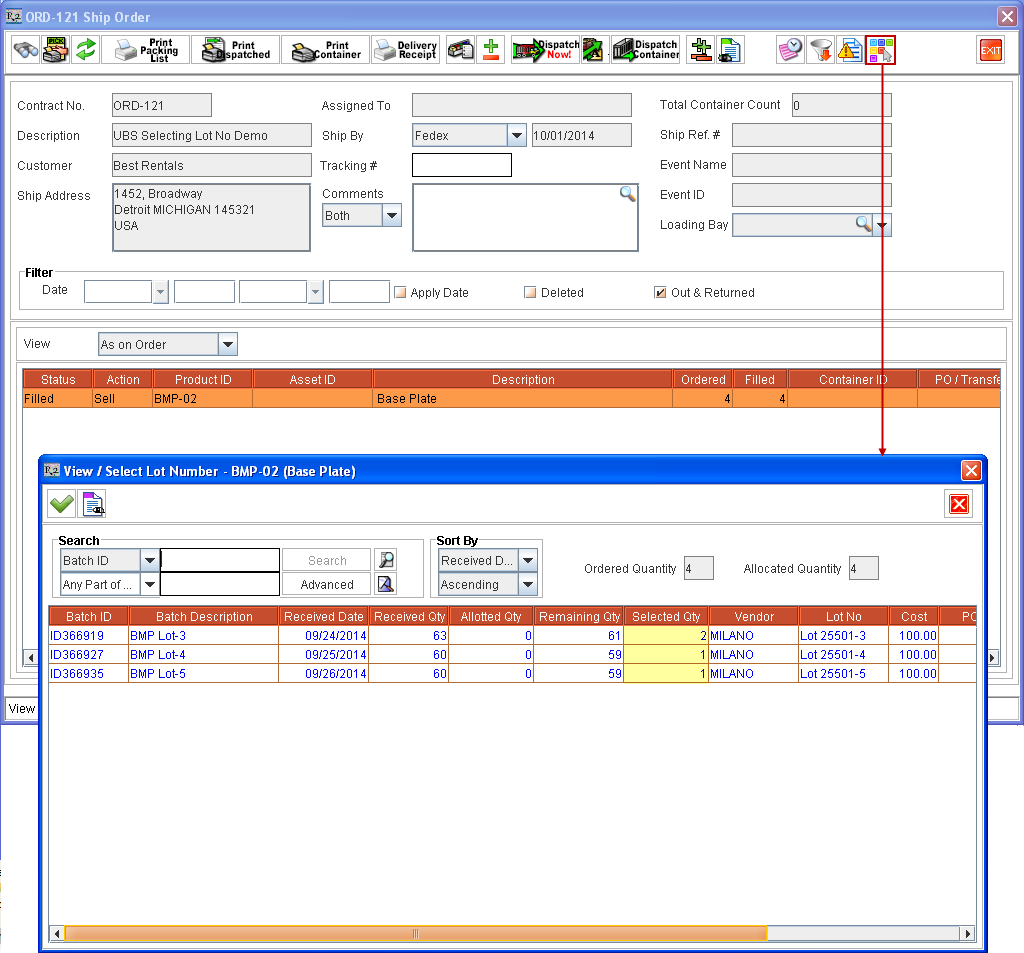
Select View menu > Ship Order. The Ship Order window is displayed.
-
Select the Item line of [BMP-02] and click the View / Select Lot Number

-
Perform a blank search. All the Lots received for Item [BMP-02] for this Site gets listed in View / Select Lot Number window.
-
Change from 2 to 0 under Qty column against [Lot 25501-3] for Vendor [MILANO]. Instead enter 2 quantity under Qty column against Lot No as [Lot 25501-6] from Vendor [MILANO] , as shown in Figure 1.13.
-
Click Select

-
Generating Pick List Print for Order with allotted Lots information - Click Pick List Print

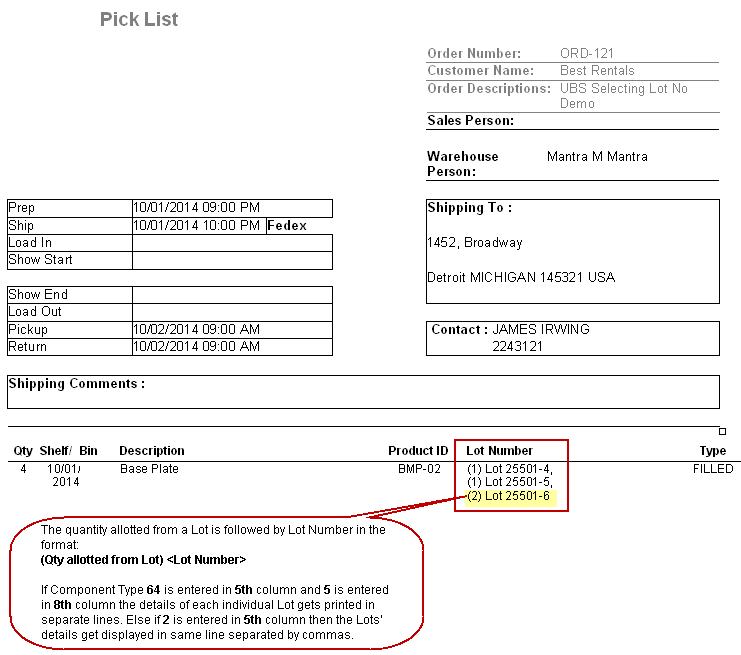
Sample Pick List Print UI
-
Click Dispatch Now icon and ship all the filled quantities of the Item in the Order [ORD-121].
-
Viewing Lot Details and Order(s) details where quantity from Lot is sold from Stock Change History Window - Perform these steps for viewing the Item’s Lot details and how it is allotted to its quantities sold on Orders.
-
Select Item edit window (for example, from Search Items window) of Item [BMP-02] > click History button. This displays the Stock Change History window of the Item [BMP-02].
-
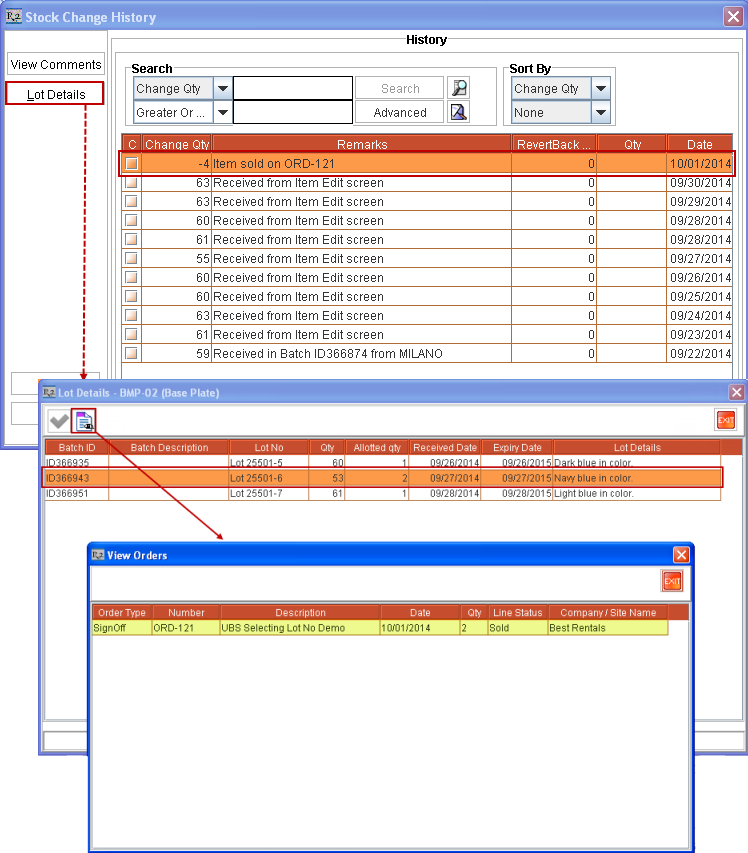
Select a sold history line in the grid and click the Lot Details button. This displays the Lot Details dialog box listing all the Lots from where the quantities of the Item are sold, with the sold quantity displayed against the Lots, as shown in Figure 1.15.
-
Select a listed Lot and click the View Orders icon. The Orders window is displayed listing the Orders were the Items from the Lot is sold, as shown in Figure 1.15.
The View Orders window can be accessed from:
-
View / Select Lot Number window (which in turn can be accessed from various places like Item Search window, from within an Order, from Order Fill window, and from Ship Order window).
-
Lot Details window (which in turn can be accessed from Stock Change History window, and from Receive Log window).
-
Lot History window (accessed from Scan Items window).
-
Selecting/Modifying Lots for Item(s) from within Return Order window of an Order - This can be performed to modify the Lots selected for an Item added to an Order or for selecting Lots for Items added to an Order whose Lots are not yet selected.
Notes on Selecting Lot while Returning Item(s) on an Order
-
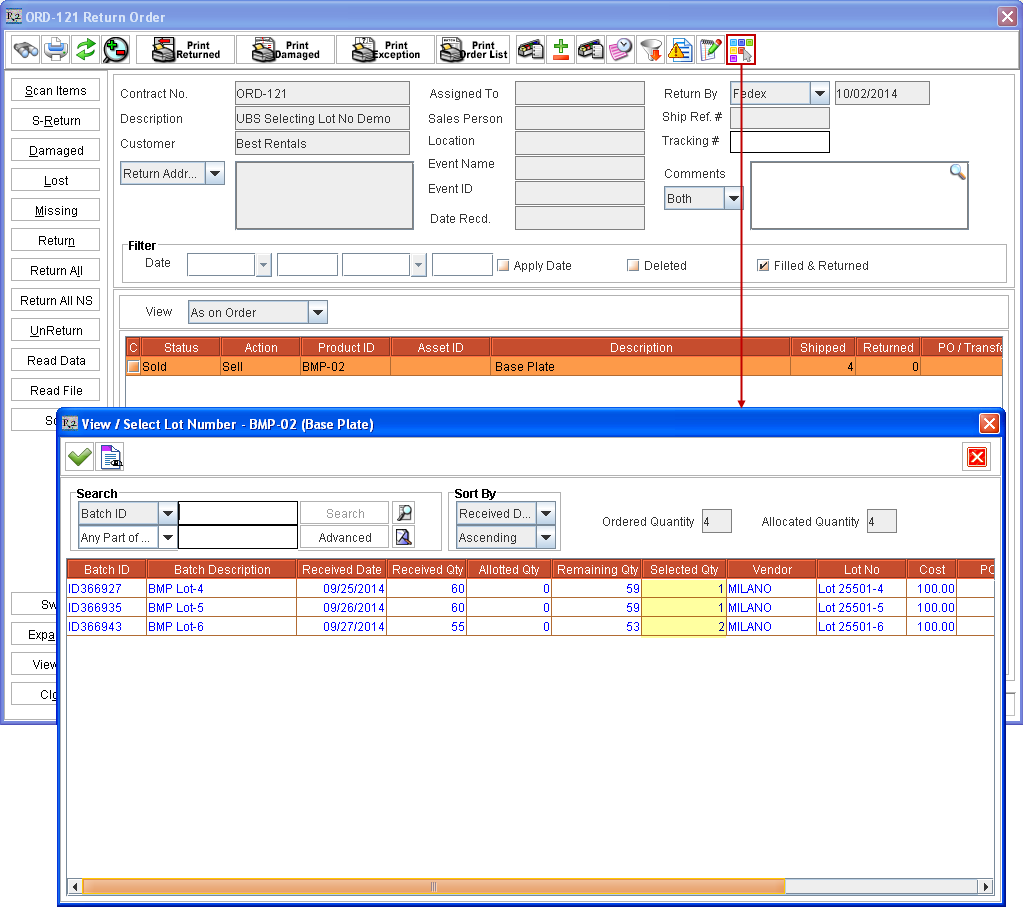
Select View menu > Return Order. The Return Order window is displayed.
-
Select Filled & Returned check box and click Refresh

-
Select the Item line of [BMP-02] and click the View / Select Lot Number

-
Perform a blank search. All the Lots received for Item [BMP-02] for this Site gets listed in View / Select Lot Number window.
-
Change from 1 to 0 under Qty column against [ Lot 25501-4] for Vendor [MILANO]. Instead enter 1 quantity under Qty column against Lot No as [Lot 25501-7] from Vendor [MILANO] , as shown in Figure 1.17.
-
Click Select

Sample Workflow - Selecting Lot for Non-serial Sell Item in Inventory Transfer Orders
The functionality is explained with a sample workflow given below. Consider that the a new Item [BMP-02] is created in the system.
-
Create one or more Purchase Orders and receive multiple Lots of the Item [BMP-02] from multiple Vendors, as shown in Table 2.0.
Table 2.0 Lot Details of received quantity of Item [BMP-02]
|
Vendor Name |
Lot Number |
Quantity |
Cost |
Receive Date |
Expiry Date |
|---|---|---|---|---|---|
|
Milano |
Lot 25501-1 |
59 |
100$ |
09/22/2014 |
09/22/2015 |
|
|
Lot 25501-2 |
61 |
100$ |
09/23/2014 |
09/23/2015 |
|
|
Lot 25501-3 |
63 |
100$ |
09/24/2014 |
09/24/2015 |
|
|
Lot 25501-4 |
60 |
100$ |
09/25/2014 |
09/25/2015 |
|
|
Lot 25501-5 |
60 |
100$ |
09/26/2014 |
09/26/2015 |
|
|
Lot 25501-6 |
55 |
100$ |
09/27/2014 |
09/27/2015 |
|
|
Lot 25501-7 |
61 |
100$ |
09/28/2014 |
09/28/2015 |
|
Velvet |
Lot 25601-1 |
60 |
120$ |
09/28/2014 |
09/28/2015 |
|
|
Lot 25501-2 |
63 |
120$ |
09/29/2014 |
09/29/2015 |
|
|
Lot 25501-3 |
63 |
120$ |
09/30/2014 |
09/30/2015 |
Note: For more information on how to receive Lots of Items read the Sample Workflow - Selecting Lot for Non-serial Sell Item in Rental/Sale Orders.
-
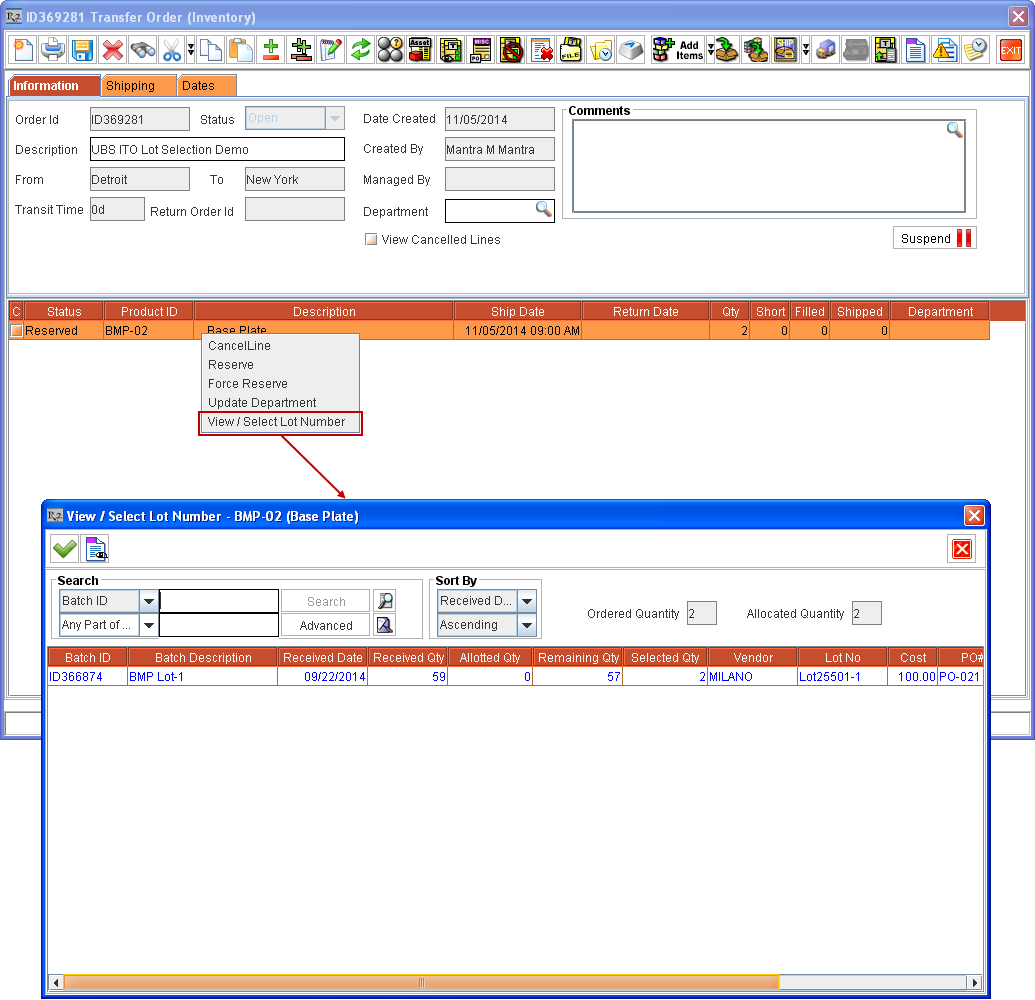
Create an Inventory Transfer Order [ID369281] from [DETROIT] Site to [NEWYORK] Site with Auto Ship/Receive check box as not selected.
Note: An Inventory Transfer Order can be created by clicking Maintenance module > Inventory Transfer Order
![]()
-
Click Resume

-
Click Add Items icon. The Search Items window is displayed.
-
Search and find Item [BMP-02].
-
Select Item line of [BMP-02] in Search Items window and click View / Select Lot Number

Notes regarding accessing View / Select Lot Number window from Search Items window
-
The View / Select Lot Number window is displayed only if the selected Item is a Non-serial Item.
-
On adding Non-serial Items with Lots allotted, they get added to Inventory Transfer Order. Allotting can also be done from Receive lines listed for the Item without any Lot related information.
-
If the Lots are allotted to Non-serial Items which are not sellable then, on adding to Order, the allotted quantity of the Item gets added to the Order but without any Lots allotted. The system displays an appropriate message with details in this case.
-
The Lot can also be selected for an Item without entering any quantity under Qty column in Search Items window. The number of quantity of the Item for which Lot is allotted gets selected as the Item's quantity in Search Items window on exiting View / Select Lot Number window.
-
While allotting Lot Numbers to Items, the Lots received in Order Site alone are displayed for allotting.
-
Enter the quantity of Item to be allotted from various Lots of the Item, by entering appropriate values against Lot rows under Qty column. The entered quantity in Qty column can't be more than what is displayed under Remaining Qty column for the same Lot.
-
When the View / Select Lot Number window is opened from Search Items window after selecting an Item - for allotting Lots of Item before adding them to Order then:
-
The quantity that can be allotted against one or more Lots listed is limited only by the Lots' Remaining Qty and is not limited by the quantity selected in Search Items window before accessing the View / Select Lot Number window. For example, if 2 quantity of Item [BMP-02] was selected in Search Items window and View / Select Lot Number window is accessed. Then the user can choose to perform Lot allotment in one of the following ways:
-
The 2 quantities of Item can be allotted from one or more listed Lots.
-
Partial Allotment - Can allot less than 2 quantities from one or more listed Lots. For example, if Lots are allotted for 1 quantity then the 2 quantities of Item [BMP-01] will get added to Order but only 1 quantity will have Lot allotted.
-
More Allotment - Can choose to allot more than 2 quantities from one or more Lots. For example, 4 quantities can be allotted. The 4 quantities of Item [BMP-01] will get added to the Order with Lots allotted.
-
Choose the Item quantity from the listed Lot(s). For example, select 2 quantity from [Lot 25501-1] for Vendor [MILANO] by entering the appropriate quantity against the listed Lot [Lot 25501-1] under the Qty column, as shown in Figure 2.1.
-
Quantity can be allotted from one or more listed Lots in the View / Select Lot Number window by:
-
Double-clicking on a Lot's line - System allots one quantity from the Lot.
-
Entering quantity to be allotted against listed Lot's line under Selected Qty column - Entered quantity gets allotted from that Lot. This quantity cannot be more than the quantity remaining to be allotted from the Lot, as listed under Remaining Qty column.
-
Click Select

-
Click Yes. Items get allotted from selected Lots and the View / Select Lot Number window is closed.
Notes regarding message prompted on clicking OK icon from View / Select Lot Number window after allotment of Lots
-
On allotting Lots for an Item (or modifying existing allotment) from View / Select Lot Number and clicking OK icon, system prompts with the message "R2_01338:Adding Items with Lot Numbers allocated will save the Order." with Yes and No options.
-
Clicking Yes - This saves the Lot allotted to quantities of the Item and will close the View / Select Lot Number window.
-
If Yes is selected after allotting Lots for an Item then, the system won't prompt this message on allotting Lots for other Items, when View / Select Lot Number window is accessed from same instance of Search Items window.
-
Clicking No - This closes the message prompt and the View / Select Lot Number window remains open for further modifications in Lot allotment. Clicking OK icon from View / Select Lot Number window again prompts the same message.
-
Click View / Select Lot Number icon

-
Click Select
Notes regarding Selecting Lot for Multiple Items selected from Search Items window
-
Lot(s) can be allotted to one Item at a time from View / Select Lot Number window accessed from Search Items window > Select Lot icon.
-
After finishing Lot allotment for an Item, the View / Select Lot Number window can be accessed again and Lot(s) can be allotted for another Item, selected from same instance of Search Items window.
-
On clicking Search Items window > Select icon after all Lot allotments for multiple Items The total selected quantity of such Items get added to the Order. If the system is unable to allot Lot(s) for one or more of the Items added to the Order, then the system will prompt a message with details of all Items' IDs whose Lot allotment failed. However such Items selected quantity will get added to the Order without their Lot(s) being allotted. Their Lots can be allotted from View / Select Lot Number window accessed from within the Order (by selecting the added Item line and right-click > View /Select Lot Number command).
-
Selecting/Modifying Lots for Item(s) from within an Inventory Transfer Order - This can be performed to modify the Lots selected for an Item added to the Inventory Transfer Order or for selecting Lots for Items added to the Inventory Transfer Order whose Lots are not yet selected.
-
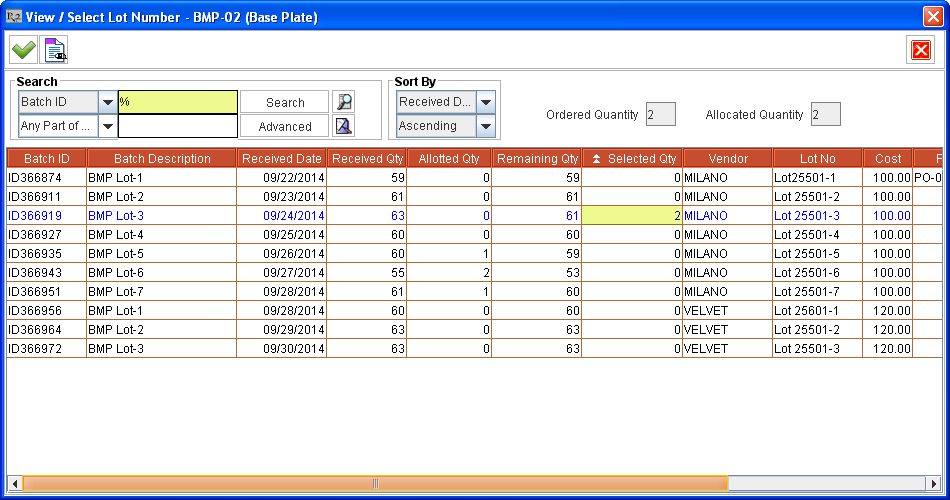
Select the Item line of [BMP-02] from within the Inventory Transfer Order [ID369281] and right-click > View /Select Lot Number command. The View / Select Lot Number window is displayed with Lots lines from where the allotting is already done for this Item, as shown in Figure 2.3.
-
Perform a blank search. All the Lots received for Item [BMP-02] for this Site gets listed in View / Select Lot Number window.
-
Change from 2 to 0 under Qty column against [Lot 25501-1] for Vendor [MILANO]. Instead enter 2 quantity under Qty column against Lot No as [Lot 25501-2] from Vendor [MILANO] , as shown in Figure 2.4.

-
Ordered Quantity field - This field displays the quantity of Item added to the Order in this Item line.
-
Allocated Quantity field - This field displays the quantity of Item, from the Order's currently selected Item line, which are allotted Lot(s).
-
Click Select
-
Selecting/Modifying Lots for Item(s) from within Inventory Transfer Order Detail View window - This can be performed to modify the Lots selected for an Item added to an Inventory Transfer Order or for selecting Lots for Items added to an Inventory Transfer Order whose Lots are not yet selected.
-
Click Detail View

-
Select the Item line of [BMP-02] from the grid and click the View / Select Lot Number

-
Perform a blank search. All the Lots received for Item [BMP-02] for this Site gets listed in View / Select Lot Number window.
-
Change from 2 to 0 under Qty column against [Lot 25501-2] for Vendor [MILANO]. Instead enter 2 quantity under Qty column against Lot No as [Lot 25501-3] from Vendor [MILANO] , as shown in Figure 2.6.
-
Click Select icon. The Items get allotted from selected Lots and the View / Select Lot Number window is closed.
-
Click Exit icon. The Inventory Transfer Order's Transfer Detail View window is closed.
-
Allotting/Modifying Lot Allotted after Filling of Items in an Inventory Transfer Order - Click Fill All

-
The Lot(s) allotted for quantities of Item(s) added to the Inventory Transfer Order can still be modified/newly allotted, by accessing the View / Select Lot Number window.
-
The Lot No. of Non-serial Items added to an Inventory Transfer Order can be included in its Pick List print (4203000UI) by using CID 41.
-
-
Allotting/Modifying Lot Allotted after Shipping of Items from an Inventory Transfer Order - Click Ship All

-
If the Auto Ship/Receive check box is selected for an Inventory Transfer Order then, the Lot allotted cannot be modified for them once they are shipped.
-
In this example, the Auto Ship/Receive check box is not selected and as such the 2 quantities of [BMP-02] can still be modified till they are received at To Site [NEWYORK].
-
The Lot(s) allotted for quantities of Item(s) added to the Inventory Transfer Order can still be modified/newly allotted, by accessing the View / Select Lot Number window till it is Received at the To Site. The Lot allotting/modification can be done either from the From Site [DETROIT] or from the To Site [NEWYORK].
-
-
Click Exit icon and exit from Inventory Transfer Order window.
-
Allotting/Modifying Lot Allotted before Receiving of Items from an Inventory Transfer Order in the Receiving Site - Search and open Inventory Transfer Order [ID369281] from its To Site [NEWYORK].
-
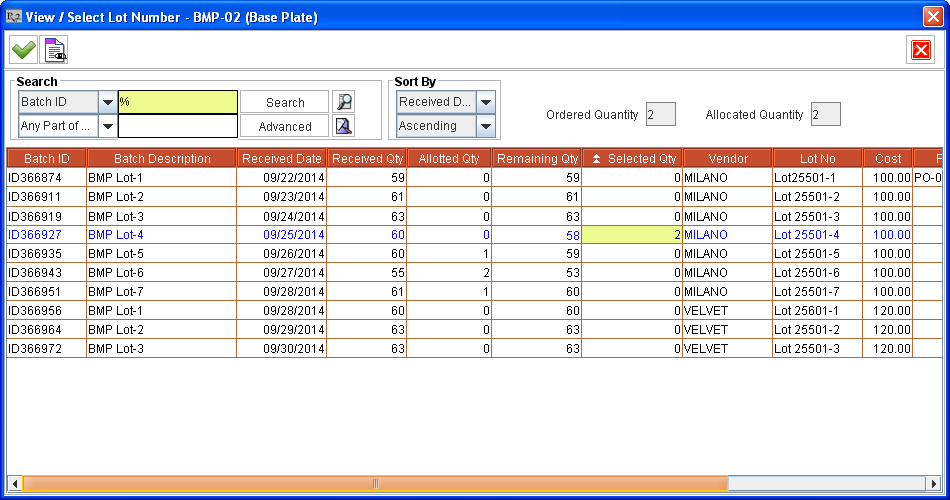
Select the Item line of [BMP-02] from within the Inventory Transfer Order [ID369281] and right-click > View /Select Lot Number command. The View / Select Lot Number window is displayed with Lots lines from where the allotting is already done for this Item, as shown in Figure 2.7.
-

-
Perform a blank search. All the Lots received for Item [BMP-02] for this Site gets listed in View / Select Lot Number window.
-
Change from 2 to 0 under Qty column against [Lot 25501-3] for Vendor [MILANO]. Instead enter 2 quantity under Qty column against Lot No as [Lot 25501-4] from Vendor [MILANO] , as shown in Figure 2.8.
-
Click Select icon. The Items get allotted from selected Lots and the View / Select Lot Number window is closed.
-
Click Receive

-
The Lot(s) allotted for the Item [BMP-02] in Inventory Transfer Order [ID369281] can't be modified after it is Received at Site [NEWYORK].
-
The Stock of the Item in its parent Site gets reduced by its quantity which is Inventory Transferred to another Site, once it is Received at that Site.
-
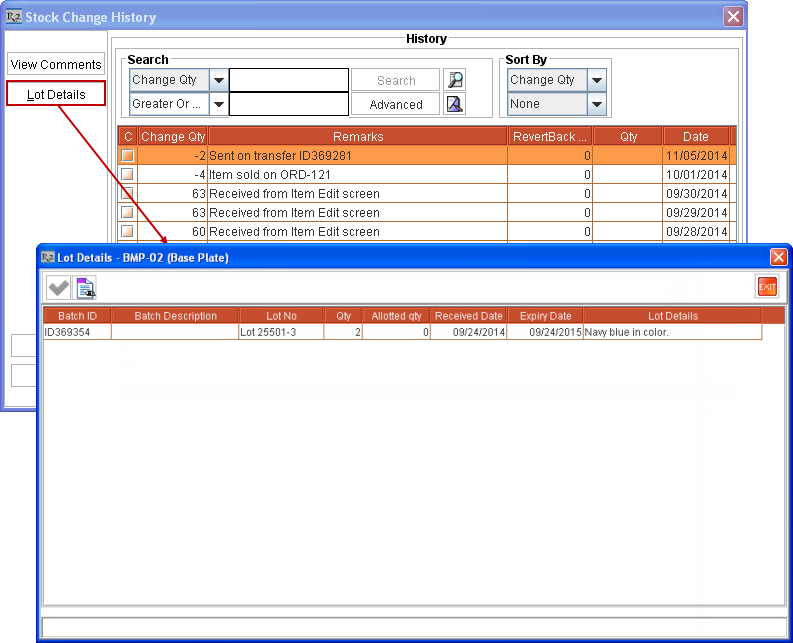
The Received Qty of the Lot (from where the Item was allotted while transferring in the Inventory Transfer Order) gets reduced by the quantity which is transferred. Thus in the example, 2 quantities of [BMP-02] from [Lot 25501-3] is Inventory Transferred from [DETROIT] to [NEWYORK]. Now the Lot [Lot 25501-3] of [BMP-02] in Site [DETROIT] will have only 3 quantities available for allotting.
-
-
Search and open Item Edit window of the Item [BMP-02] in Site [DETROIT].
-
Click History button. The Stock Change History window for Item [BMP-02] is displayed.
-
Select the history line corresponding to the 2 quantities of the Item transferred using Inventory Transfer Order [ID369281] and press Lot Details button. The Lot Details window gets displayed with details of the Lot [Lot 25501-3] of [BMP-02] which is transferred in Inventory Transfer Order [ID369281], as shown in Figure 2.9.
Additional Details about the Functionality
The additional details about the functionality is provided below:
-
Order Site’s Lot - While allotting Lot Numbers to Items, the Lots received in Order Site alone are displayed for allotting.
-
Cost Calculation in various places in system - The Lot selection doesn’t affect the Cost calculation. Current behavior of the system persists.
-
Barcode Printing - The tags are provided to print:
-
LOTNO - Use this for including Lot No.
-
LOTDETAIL - Use this for including Lot Details.
-
VENDORNAME - Use this for including Vendor Name. If Vendor is not present for Item line then it will be taken from Order header.
-
EXPIRYDATE - Use this for including Expiry Date.
-
Data Conversion - Data conversion can be used to update the Lot details of batches of Item(s) received using Quantity data conversion. The following information can be updated to received Batches using data conversion:
-
Lot Number
-
Expiry Date
-
Lot Details
-
Returning Items - While returning sold non-serial Item having Lot assigned:
-
Full Return - The Non-serial Item quantity gets returned without prompting the user to select any Lots. The Item quantities get returned to the Lots from where they were allocated and the Lot quantity available for allocating gets updated accordingly.
-
Partial Return - System will automatically display the View / Select Lot Number window with Lots from where the Item(s) quantity was allotted in the Order, provided:
-
The Item(s) were allotted from more than one Lot.
-
The Configuration module > Warehouse tab > Auto Select Lot on Partial Sale Return check box is not selected. (This check box will be in selected state by default on upgrading R2.) If the Auto Select Lot on Partial Sale Return check box is selected then the system automatically allocates the Lot on partial returning of Items.
User has to enter the Lot No. for the returned items against appropriate Lots. System will revert the quantity in the selected Lot for the Item, and this quantity can be used for assigning from other Orders.
-
Automatic Lot allotting based on Configuration setup - Based on selection within Configuration module > Accounting tab > Inventory Costing Convention for Qty Items the quantity of Item(s) added to an Order get allotted from its Receive lines in the Order Site. This happens on partially filling and shipping Items or while selling Items without allotting Lots for them. When the value selected in Inventory Costing Convention for Qty Items field is:
-
Average - When the quantity of Item(s) added to an Order is not allotted (or partially allotted) then the quantity (remaining quantity) of Items get allotted from their existing Receive lines in FIFO (First In First Out) format automatically on shipping from Order. This also makes the Receive lines list in the View / Select Lot Number window in Ascending order of their Received Date.
-
FIFO - When the quantity of Item(s) added to an Order is not allotted (or partially allotted) then the quantity (remaining quantity) of Items get allotted from their existing Receive lines in FIFO (First In First Out) format automatically on shipping from Order. This also makes the Receive lines list in the View / Select Lot Number window in Ascending order of their Received Date.
-
LIFO - When the quantity of Item(s) added to an Order is not allotted (or partially allotted) then the quantity (remaining quantity) of Items get allotted from their existing Receive lines in LIFO (Last In First Out) format automatically on shipping from Order. This also makes the Receive lines list in the View / Select Lot Number window in Descending order of their Received Date.
Note: Automatic Lot allotting of the quantities of Item transferred using an Inventory Transfer Order gets allotted in LIFO format irrespective of the setup in Configuration module.
-
Receive Report - The Lot Number information of Item is included in the Receive Report.
-
Splitting of an Item line - The original Item line/first line retains the Lot Number allotted. Lot Number re-distribution is not supported.
-
P-Assign - On receiving Items on a linked PO, system does not automatically allot the Lot Number for the linked Order lines.
-
On Marking Item Line with Lot allotted as Not Available - The Item line retains the allotted Lot Number.
-
Allotting Lot Number based on Item line Status - No restrictions for allotting Lot number for any non-serial sell item line, which is in any Status other than in Deleted status.
-
Deleting Line and Mark as Deleted - The deleting of Order's Item lines/mark the Item lines as Deleted, is not allowed, if Lot number is assigned for the Item line quantities. Appropriate error message gets displayed as "R2_00879:Unable to Delete". Clicking on Details button displays the detailed message as "R2_01337:Cannot delete, as Lot Number(s) are selected for this item.".
-
Invoicing - The system allows allotting Lot Number to Item lines even if the Item line is added to an Invoice or not.
-
Assigning Lot Number while Receiving - The Lot Number can be assigned to Serial/Non-serial/Hybrid Items while being received irrespective of whether it is sellable or not.
-
Hybrid Items - The system will allow setting the Lot number while receiving the Hybrid Items (Non-serial Items having with Assets check box selected). However, allotting Lot number on Orders, is not allowed for Hybrid Items.
-
Serial Kits - Allotting Lot number is not allowed for Serial Kits and their child serial/non-serial Items.
-
Non-serial Kits - Lot number can be allotted to Non-serial child Items with Action as Sell, of a Non-serial Kit added to an Order with Action as Sell.
-
Conversion of Orders from Quote to Hold to Reservation - Conversion of Order status from Quote to Hold to Reservation or vise versa retains the lot allotting done for various Item(s) in the Order.
-
Cancelling of Orders having Item(s) added with their Lot allotted - Cancelling of Orders having Item(s) added with their Lot(s) allotted reverts the Lot allocation to the respective Lot(s) of the Item(s), and the reverted quantity in the Lot(s) can be used for allotting in other Orders.
-
On partially filling and shipping the item in a Sale Order - Click here to read a sample scenario of Lot allotting on partially filling and shipping Item on a Sale Order.
Prerequisite:
-
Select the Configuration module > Accounting tab > Inventory Costing Convention for Qty Items as Average/FIFO.
Scenario 1:
-
Create a Non-serial sell item [BMP-04] and receive 10 quantities each in two Lots.[Lot#1] and [Lot#2].
-
Create a Sale Order [ORDER#1] and add 15 quantities of item [BMP-04] to the order.
-
Allot lot as 8 quantities from [Lot#1] and 7 quantities from [Lot#2].
-
Now go to Fill Order window and fill 12 quantities of [BMP-04] from the Order.
-
Ship the 12 quantities of Item [BMP-04] from Ship Order window. The Order [ORDER#1] will have two item lines, one with 12 quantities of [BMP-04] with Status as Sold and other with 3 quantities of [BMP-04] with Status as Reserved.
-
Select the [BMP-04] Item line with 12 quantities with Sold Status and right-click > View/Select Lot Number command. System displays following Lot related information:
-
Lot#1 - Received Qty = 10 Allotted Qty = 0 Remaining Qty = 2 Selected Qty = 8
-
Lot#2 - Received Qty = 10 Allotted Qty = 3 Remaining Qty = 3 Selected Qty = 4
-
Select the [BMP-04] Item line with 3 quantities with Reserved Status and right-click > View/Select Lot Number command. System displays following Lot related information:
-
Lot#1 - Received Qty = 10 Allotted Qty = 8 Remaining Qty = 2 Selected Qty = 0
-
Lot#2 - Received Qty = 10 Allotted Qty = 4 Remaining Qty = 3 Selected Qty = 3
Scenario 2:
-
Create a Non-serial sell item [BMP-05] and receive 10 quantities each in a single Lot [Lot#1].
-
Create a Sale Order [ORDER#1] and add 10 quantities of item [BMP-05] to the order.
-
Allot lot as 5 quantities of the Item [BMP-05] from [Lot#1].
-
Now go to Fill Order window and fill 7 quantities of [BMP-05] from the Order.
-
Ship the 7 quantities of Item [BMP-05] from Ship Order window. The Order [ORDER#1] will have two item lines, one with 7 quantities of [BMP-05] with Status as Sold and other with 3 quantities of [BMP-05] with Status as Reserved.
-
Select the [BMP-05] Item line with 7 quantities with Sold Status and right-click > View/Select Lot Number command. System displays following Lot related information:
-
Lot#1 - Received Qty = 10 Allotted Qty = 0 Remaining Qty = 3 Selected Qty = 7
-
Select the [BMP-05] Item line with 3 quantities with Reserved Status and right-click > View/Select Lot Number command. System displays following Lot related information:
-
Lot#1 - Received Qty = 10 Allotted Qty = 7 Remaining Qty = 3 Selected Qty = 0
-
-
CID for printing Lot Number in Invoice Prints - The CID 8615 can be used to print Lot Number in Invoice Prints. Click here, for viewing a sample Invoice print UI file.
-
CID for printing Lot Number in Transfer Order Prints - The CID 43 can be used to print Lot Number in Transfer Order Prints.
-
Non-serial Sell Item line on an Order whose Depreciation is posted - The system won't allow to allot Lot Number or modify already allotted Lots for a Non-serial Sell Item line on an Order whose Depreciation is already posted. However, the Lot(s) if already allocated for the Non-serial Sell Item line on the Order can be viewed by accessing the View / Select Lot Number window, for the Item from the Order.
-
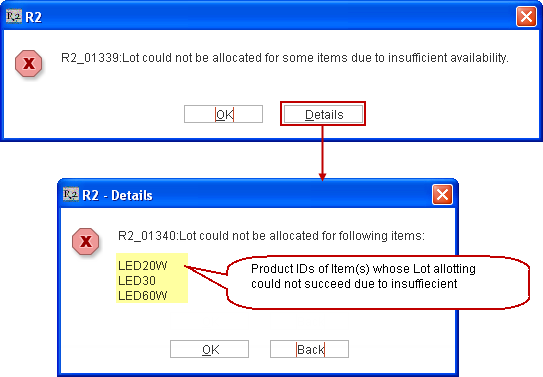
Multi-user scenario of allotting Lot Number - If multiple users try to allot from the same Lot for the Item added to one or more Orders, the Lot get successfully allotted for the first user who clicks OK icon in View / Select Lot Number window. Subsequently when the second user, who also selected the Item from the same Lot (but whose quantity is not available sufficiently now), gets prompted saying ”R2_01339:Lot could not be allocated for some items due to insufficient availability." with OK and Details button. Clicking on Details button displays the details of the Item(s) whose Lot couldn't be allotted as shown in Figure 3.0.
-
Releasing extra allotted quantity of Item while dispatching the Item - While selling an Item, the extra allotted quantity of the Item will be released by the system and an entry is made in the Exceptions window. Click here to read the sample scenario of releasing the extra allotted quantity of Item while dispatching the Item.
Scenario:
-
Create a Non-serial sell item [BMP-06] and receive 10 quantities each in a single Lot [Lot#1] with Batch ID [Batch#1].
-
Create a Sale Order [ORDER#1] and add 5 quantities of item [BMP-06] to the order.
-
Allot 10 quantities of Item [BMP-06] from [Lot#1].
-
Select View menu > Fill Order. The Order Fill window is displayed.
-
Fill and Ship 5 quantities of the Item [BMP-06], in the Order [ORDER#1] from the Order Fill window.
-
Exit the Order Fill window. The prompt message "Exceptions found during scanning. Do you want to view it now?'" is displayed with Yes and No options.
-
Click Yes. The Exceptions window gets displayed with the Exceptions entry ”Extra allotted quantity released by system from: Batch (Batch#1), Lot (Lot#1)” which is made for releasing the excess 5 quantities of the Item [BMP-06] allotted on the Order [ORDER#1].
Note: The prompt message for viewing the Exceptions will also be displayed on exiting the Ship Order window if Item(s) are shipped from Ship Order window.
-
-
Re-assigning extra allotted quantity of Item in an Order to another Order while dispatching the Item - While selling an Item, the extra allotted quantity of the Item in another will be released by the system and an entry is made in the Exceptions window. Click here to read the sample scenario of re-assigning excess allotted quantity of Item while from an Order to another Order while dispatching the Item.
Scenario:
-
Create a Non-serial sell item [BMP-06] and receive 10 quantities in a single Lot [Lot#1] with Batch ID [Batch#1].
-
Create a Sale Order [ORDER#1] and add 5 quantities of the Item [BMP-06] to the Order [ORDER#1].
-
Allot 10 quantities of Item [BMP-06] from [Lot#1] in [ORDER#1].
-
Do not Fill or Ship the Item [BMP-06] on the Order [ORDER#1].
-
Create another Order [ORDER#2] and add 5 quantities of the Item [BMP-06] to the Order [ORDER#2].
-
Select View menu > Fill Order. The Order Fill window is displayed.
-
Fill and Ship 5 quantities of the Item [BMP-06] in the Order [ORDER#2]. The excess quantity previously allotted on the Order [ORDER#1] is automatically re-assigned to the Order [ORDER#2].
-
Exit the Order Fill window. The prompt message "Exceptions found during scanning. Do you want to view it now?'" is displayed with Yes and No options.
-
Click Yes. The Exceptions window is displayed with the Exceptions entry ”Lot Re-assigned by system from: Order (ORDER#1), Batch (Batch#1), Lot (Lot#1)” .
Note: The prompt message for viewing the Exceptions will also be displayed on exiting the Ship Order window if Item(s) are shipped from Ship Order window.
-
Open the Order [ORDER#1] > View menu > Change History > View Exceptions icon. The Exceptions window is displayed with Exception entry "Lot Re-assigned by system to: Order (ORDER#2), Batch (Batch#1), Lot (Lot#1)" which is the exception entry regarding the excess quantity allotted on [ORDER#1] being automatically re-allotted by the system to [ORDER#2].
-
Feature Revision History
|
Revision No |
Changes in Feature |
Version |
Reference ID |
|---|---|---|---|
|
1 |
Selecting Lot for Non-serial Sell Items |
05.70.02-00 |
27196 |
|
2 |
Selecting Lot for Non-serial Sell Items in Inventory Transfer Orders |
05.70.03-00 |
27196 |
|
3 |
Additional Columns in Lot Details Window |
05.70.03-00 |
27366 |
|
4 |
Change in Configuration Check Box Name to Auto Select Lot on Partial Sale Return |
05.70.04-00 |
27486 |
|
5 |
Additional CID to print the Lot Number in Transfer Order Prints |
05.70.07-00 |
27735 |