
Steps to create the SQL and Batch files to set Order Task/Reminders
-
Create SQL file for executing the generateautomatedactivity procedure.
Create a ASCII file with extension .SQL enter the below command lines and save the file.
exec generateautomatedactivity
exit;
-
Creating a batch file for executing automation procedure.
Create a file with extension .Bat file with the following command line and save the file in the same folder where the .SQL file is stored.
Sqlplus username/password @connectstring @ [filename].sql
Step to do the Scheduling Automation procedure
-
To open Scheduled Tasks, click Start, click All Programs, point to Accessories, point to System Tools, and then click Scheduled Tasks.
-
Double-click Add Scheduled Task to start the Scheduled Task Wizard, and then click Next in the first dialog box.
-
The next dialog box displays a list of programs that are installed on your computer, either as part of the Windows operating system, or as a result of software installation.
-
Click Browse & locate the folder where .BAT file created in Step 2 is saved.
-
Select the file and click Open.
-
Enter a name for the new schedule, say Order task automation.
-
Select Daily as the Perform this task option and then click Next.
-
Specify the information about the day and time to run the task.
-
Select Start date for the new schedule and then click Next.
-
Type the name and password of the user who is associated with this task. Make sure that you choose a user with sufficient permissions to run the program. By default, the wizard selects the name of the user who is currently logged on.
-
Click Next to display the dialog box with information about the choices that you have made.
-
Select Open Advanced properties for this task (On selecting this option, Windows will display properties dialog box for the scheduled task when the create schedule wizard is closed).
-
Click Finish to close the wizard, and display the schedule properties dialog box.
-
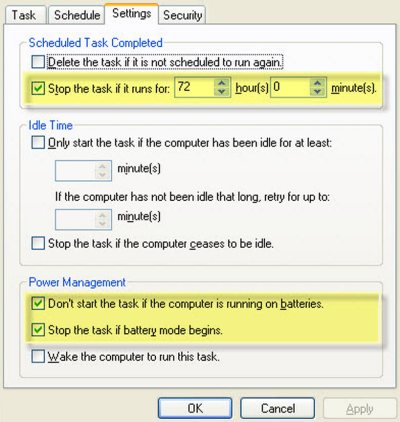
Click on the Settings Tab.
-
De-select the options which are highlighted (as shown below).
-
Click OK to save & exit schedule configuration window.