How to Create Message Template?
Creating a message template:
Go to Rules > Select Create/Edit > Select Message Templates dropdown > Click Add template.

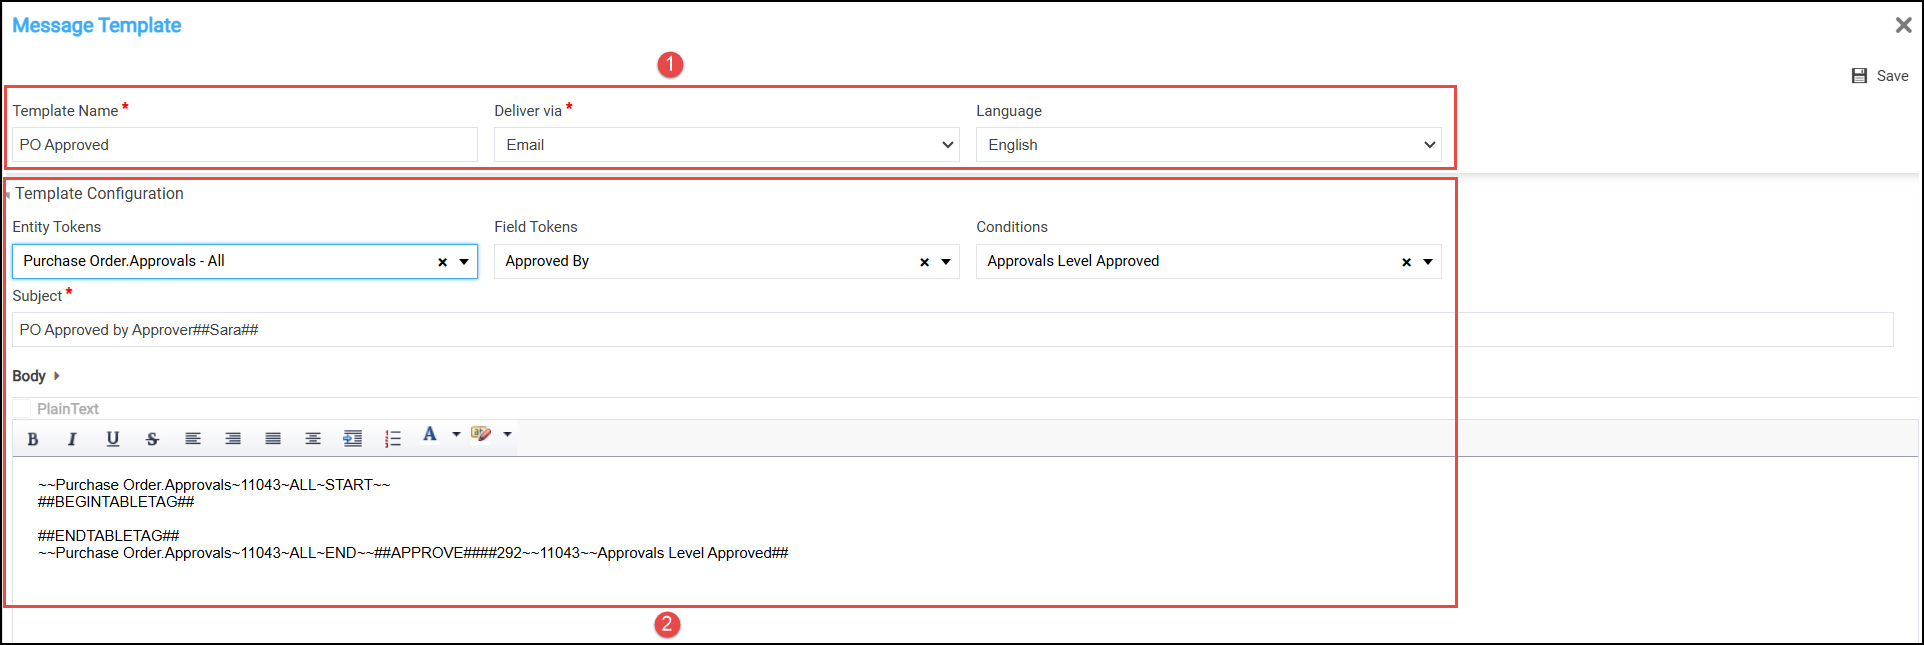
Figure 1.0: Create Message Template
Creating a Message Template
 Header Section
Template Name: Set the template name.
This text field is used to assign a name to the template for identification purpose, you can easily reference it when configuring or selecting it within the BRE.
Example: "Payment Confirmation Template," "Failed Transaction Alert," etc.Deliver Via: Set delivery method (email or portal).
This dropdown allows you to specify how the message should be delivered to the recipient. It helps the system determine the method of communication, which can be either:Email: Sends the message to the recipient's email address.
Labor Portal: This option allows you to send the message within the Labor portal, as an internal notification or alert.
Language: Set language preference.
This field allows you to select the language in which the message will be delivered. It ensures that the message content is localized or translated into the appropriate language for the recipient.Save: Saves the Message template.
 Template Configuration
Entity Tokens: Select the Entity (e.g., Order, Warehouse).
This dropdown is used to select dynamic variables (or tokens) that will be populated based on the Rule entity chosen for specific data fields (such as vendor name, order number) that will be automatically filled when the template is used.Field Tokens: Choose the Field Tokens (Listed based on entity data).
These are specific data points or fields within the entity selected. They are tokens that will be inserted into the message body and can include things like dates, transaction amounts, or any other specific data relevant to the entity.Conditions: Apply Conditions to set the message based on specific rules.
This allow you to set rules or filters that determine when the template should be used or what data should be included.Subject:
The Subject field allows you to define the email subject or message heading that will be sent to the recipient.Body: Define the subject line and body content where the placeholders will be inserted and display the dynamic information.
The Body section is where the main message content is written. It’s where you customize the actual communication that the recipient will read. This field is editable, so you can adjust the wording, layout, and use dynamic tokens.Edit the message body:
Click on the Edit option, which will allow you to modify the existing tokens in the Body or Subject fields.
You can replace templates, add new ones, or modify by selecting field tokens from dropdown.
Example:
If the current token is
customer_name, but you want to include both the customer's first and last name, you might edit it to{customer_first_name} {customer_last_name}.
