Content was last updated in 06.01.17-00
Revision History
Version No.
|
Reference No.
|
Changes
|
|
06.01.17-00 |
R2-17864 |
Support to provide return only filtered items |
|
NA |
NA |
Introduction to Return Multiple Orders window |
After the items of an order have been used in the customer's premises, they can be returned to the inventory in the Return Order window.
In the Return Multiple Orders window, the buttons located along the left side of the window provide access to the return order functions.
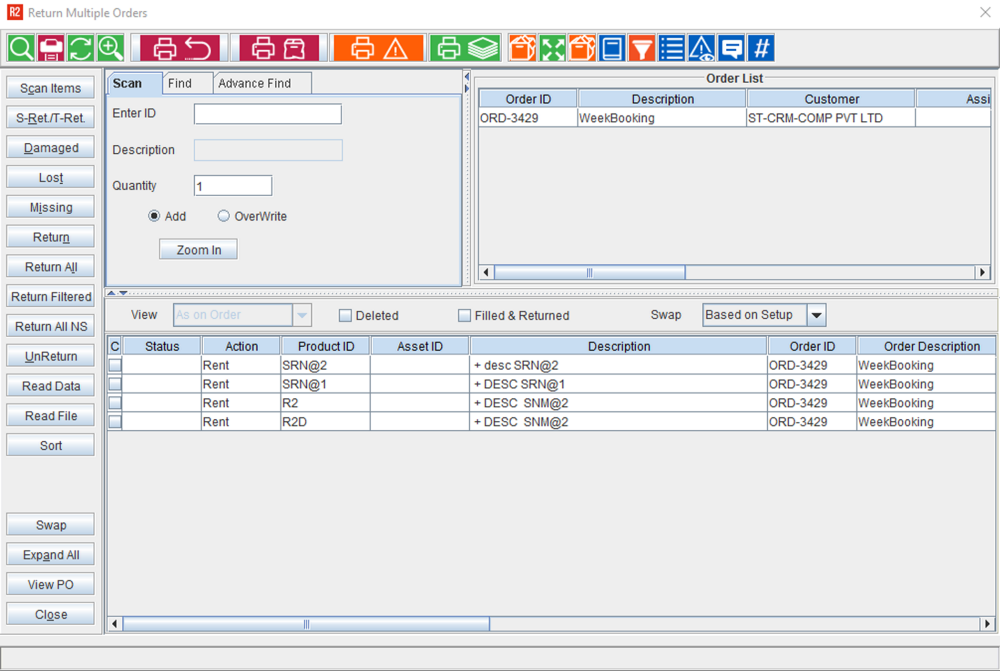
Toolbar icons at the top of the window are shortcuts to miscellaneous functions. Below the toolbar are fields that display the order and customer information. Items on the order are listed in the grid below the order and customer information.
Icon Information
|
Icons |
Description |
|
|
The Find icon opens the Find window from which you can conduct a search for items within the order. |
|
|
The print icon prints the Return/Packing list report. |
|
|
The Refresh icon updates the data shown within the Return Order window to reflect changes made since the window was opened. |
|
|
The Zoom In/Out icon hides the header information area so that you can get a larger view of the data grid. |
|
|
Click the Print Returned icon to print details about the items that are returned on the return order. |
|
|
Click Print Damaged icon to print the Damage Receipt for the return order. |
|
|
The Print Exception icon prints a list of unusual actions performed while filling an order - such as item additions, deletions and exchanges or returning items from another order. |
|
|
The Print Order List icon displays the Form Type Options window from where the return order list can be printed. |
|
|
The View Kit Details icon opens the Kit Details window where the details of the items in serial (locked) kits can be viewed. |
|
|
Select a line and click Expand/ Collapse icon to view the assets for the item/ serial kit. This feature allows you to view the child items of a Kit which are marked as Return mandatory. |
|
|
The View Kit Mandatory Details displays all the mandatory items belonging to the kit. |
|
|
You can view the changes made to the items in the order in the Warehouse by clicking on the Warehouse Order History. |
|
|
Clicking the Filter By icon displays the Filter By dialog. Here Filled & Returned and deleted items of a specific Department, Container and Dates can be filtered. |
|
|
Select Line Items |
|
|
You can click on the View Exceptions icon to view and print the exceptions that are generated for Fill Order, Return Order, Transfer Order and Ship Orders. |
|
|
Clicking on the Comments icon displays the Comments dialog, where the user can enter comments for Item lines in the Return Order window. |
|
|
View Serial Lot No. |
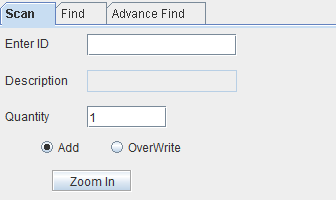
Scan
-
When you click the Zoom In button, Exceptions are displayed in zoomed text hiding the Order List.
-
The Scan Sound Configuration is available in Employee Defaults. Along with these options, ability to configure the Text Color will also be provided for different types of scans.
-
The following Printing Exceptions that are generated, will be captured and the option will be provided to print the same.
-
List of swaps.
-
Assets that were not on the selected Orders – with the action taken.
-
Assets that were not on the selected Project – with the action taken.
The entire receiving session is listed on a Return Receipt. It is listing all Items received and the Order No. that it is received from. If a new session is opened, it would print the new session only.
Find and Advance Find
Find tab allows you to search a particular text on the Item List grid. It can be used find the occurrences of the text entered in the Find What field of the Find tab in Item List Grid. For More information look here
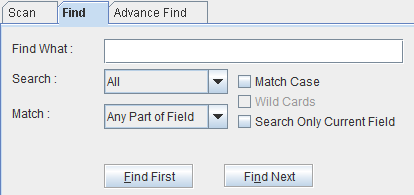
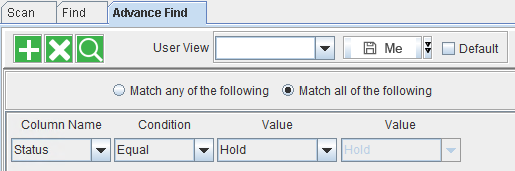
Advance Find provides you with additional filters and features to search a text string. For More information look here
Filter By options
|
Field Name |
Description |
|
View |
|
|
Deleted |
Selecting this check box and then clicking the Refresh button will filter the deleted items on the order. |
|
Filled & Returned |
Selecting this check box and then clicking on the Refresh button will filter the items of the order which have already been filled and returned. |
|
Swap |
|
Button Information
|
Button Name |
Function |
|
Scan Items |
Using this button you can scan and return an item into warehouse. |
|
S-Return/T-Return |
Use this button to return the sub-rent assigned items. |
|
Damaged |
If a damaged item is returned, then using this Damaged button you can enter this information in R2 . You can mark it as being under repair and bring it back to the inventory to prevent it from being used on another order. |
|
Lost |
If items out on Rental Order are Lost at the time of return., this button is used to enter that information into R2. An item with status 'Out' can be marked using the lost feature. On selecting a line and selecting this button, the Remarks window will be displayed wherein you can enter a comment. After closing this window, the status of the line will be updated as 'Lost'. This comment will be displayed in the Remarks column in Change History window for this item . |
|
Missing |
If items out on rental are missing at the return time, this button is used to enter that information into R2. You can mark an item as missing by clicking on this button. |
|
Return |
Click on this button to return the selected item on an order. |
|
Return All |
Click on this button to return all Serial and Non-Serial items on an order. This button will be displayed in this window only if the Fill All/Return All check box is selected in the Warehouse tab in the Configuration module. |
|
Return Filtered |
Click on this button to return ONLY the selected items on an order. See Return Multiple Orders window here. |
|
Return All NS |
Click on this button to return all the non-serial items on the return order. |
|
UnReturn |
Click on this button to change the status of the returned items as 'out'. |
|
Read Data |
Use this function to read data from a batch scanner such as the Symbol PDT3100 or Symbol P360. To use this feature, place the scanner in its cradle and click on the Read Data function button. This opens the Read Data dialog where you select a Port , Status and configure, then click on Read Data. 
|
|
Read File |
Use this function to import information previously downloaded from a batch scanner and stored as an electronic file. To use this feature, place the file on a drive accessible to this computer and click on the Read File function button. This opens the Read File dialog. Click on the more button to the right of the Select File field to choose the import file. Select a Status, then click on Read File. |
|
Sort |
The Sort button opens the Sort window where you can define how R2 will list the search results. The first field of the Sort section lists the field types. The second field allows you to choose either the ascending or descending option or no particular order at all. You can set priorities for sorting by dragging the Fields.
If None is selected then no particular sorting order will be applied at all. |
|
Swap |
Serial Items in Return order can be exchanged with other assets using the Swap functionality. |
|
Expand All |
Use the Expand All button to view and hide items included in a kit. More... |
|
View PO |
You can select a P-Assigned line and click View PO to open the purchase order that was created for the item. |
|
Close |
Click on the Close button to exit from the window after saving all the changes made. |
Order List Tab
|
Column Name |
Description |
|
Order ID |
The unique identification number of the Order |
|
Description |
The description of the Order. |
|
Customer |
Name of the customer to whom the Order was processed |
|
Assigned To |
Name of the person who has been assigned to process the Order. |
|
Sales Person |
Name of the Sales Person who was involved in handing this Order |
|
Location |
Client/Customer's location details |
|
Event Name |
Name of the event where the item was shipped |
|
Event ID |
Unique identification number of the Event |
Column Information
|
Column Name |
Description |
|
C |
If any comment is defined for an order then you will view a check mark for this column. |
|
Status |
Status of the item. |
|
Action |
The action defined for the item. |
|
Product ID |
The unique identification number of the product. |
|
Asset ID |
The unique identification number of the asset. |
|
Description |
The description of the product. |
|
Order ID |
The unique identification number of the Order |
|
Order Description |
The description of the Order. |
|
Shipped |
Displays the number of items that are shipped. |
|
Returned |
Displays the number of items that are returned. |
|
PO/Transfer ID |
The unique identification number of the Purchase Order or Transfer order. |
|
Vendor/Site |
Displays the vendor name for Sub-rental and Purchase order items,and site name for the Transfer Order items. |
|
Charge End |
Displays the Charge End Date in the Return Order window. Functionality
|
|
Pickup Date |
Displays the date on which the items were dispatched. |
|
Return Date |
Displays the date on which the items were returned. |
|
Allotted Quantity |
Count of the allotted quantity for the specific item |
|
MFG Serial No. |
Serial number allotted to the item by its manufacturer. |
|
Reserved Asset |
Reserved Asset |
|
Shipping Site |
Displays the name/location information of the site from where the items were shipped. |
|
Return Site |
Displays the name/location information of the site to which the items are supposed to be returned. |
