Content was last updated in 06.22.08-00
Revision History
Version No.
|
Reference No.
|
Changes
|
|
06.22.08-00 |
Not Applicable |
Content for entire Security Module was refurbished. |
When setting the business in R2, Groups have to be set to decide the access level of the various employees in the company.
The Groups menu contains a submenu Security Groups. Selecting Security Group displays a window with Add, Edit and Delete options.
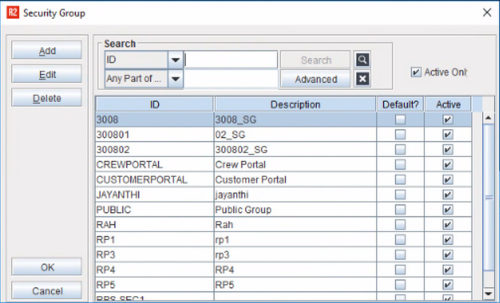
The window will list all the Security Groups. The Security Groups help the administrator set the access level for employees. An employee will be able to perform the functions depending on the access level set.
The window contains a Search panel for searching a Security Group from the list of Security Groups displayed in the window. The window also contains Add, Edit and a Delete buttons for adding, editing and deleting the Security Group with OK and Cancel options.
Add a new Security Group
-
Click on Add in the Security Group dialog.
-
Add Security Group dialog will be displayed.
-
Enter the mandatory fields Security Group ID and Description.
-
Select Default check box to make the new group as default group.
-
Click OK.
If you have already defined a group as default, then the subsequent groups you add will have the Default check box inactive.
Edit a Security Group
-
In the Security Group dialog search for the customer record you wish to open.
-
Click on record to make it active.
-
Click Edit.
-
Edit Security Group dialog will be displayed.
-
Update the changes.
-
Click OK.
Delete a Security Group
-
In Security Group dialog all the existing security groups wil be displayed.
-
Search for the customer record you wish to open
-
Select the record and click Delete.
-
System will prompt for confirmation.
-
Click Yes to delete the group, No to cancel the delete process.
-
Click OK to close the window.