The accessing of Serial Item View window from Search Inventory window and viewing the availability of Assets as timebars is explained using a sample workflow.
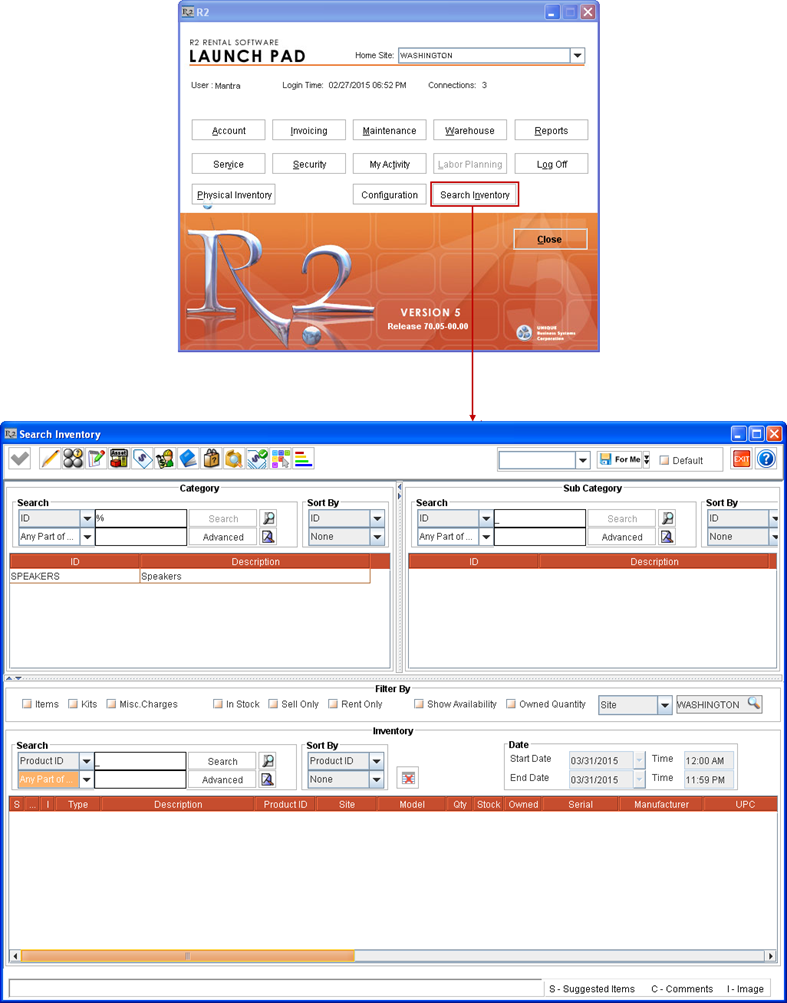
Click Search Inventory button from R2 Launchpad in Site [WASHINGTON] on February 27, 2015. The Search Inventory window gets displayed, as shown in Figure 2.0.
Figure 2.0 Search Inventory Window accessed from R2 Launchpad using Search Inventory Button
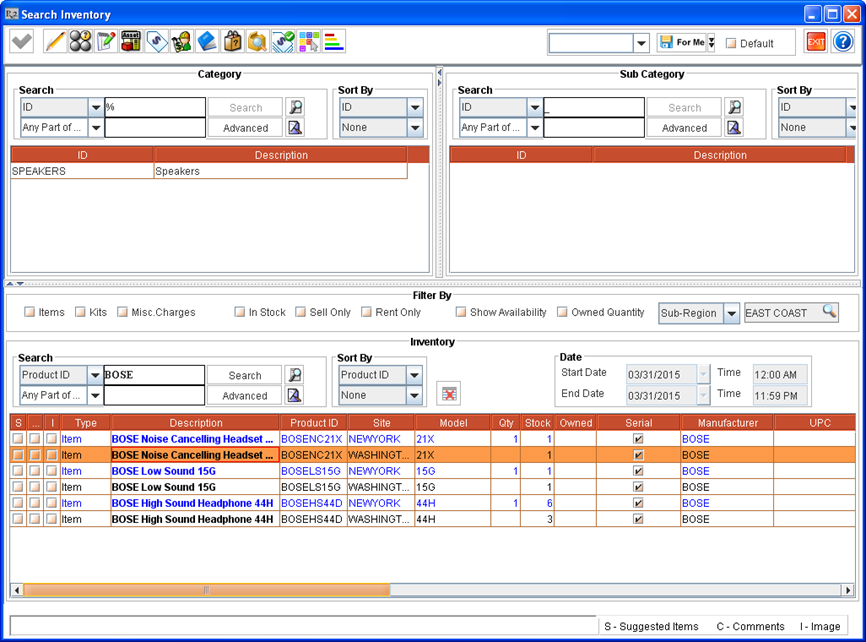
Select a Site/Region/Sub-Region using the Site selection fields in Filter By section. For example, select the Region [EASTCOAST] which is tagged to the Sites [NEWYORK], [WASHINGTON].
The selection made in the Site selection fields in Search Inventory window gets defaulted to corresponding Site selection fields in Serial Item View window accessed from this window.
The Assets of selected Serial Items get displayed for the Sites as selected in the Site selection fields.
For example, if All Sites is selected in Search Inventory window and then on searching and selecting Item line of a Serial Item [SITEM#1] listed for a single Site [SITE#1] > and opening Serial Item View window > system displays all the Assets of the Item [SITEM#1] from All Sites because All Sites will be defaulted in Site selection filter in Serial Item View window from Search Inventory window.
Search and select the Serial Items which have stock in the selected Site/Region/Sub-Region. One or more Serial Items can be double-clicked and tagged (and the Item lines will turn blue in color).
For example, search in Inventory section using keyword as BOSE for the selected Sub-Region [EASTCOAST]. Consider that there exists 3 Serial Items [BOSEHS44D], [BOSENC21X], and [BOSELS15G] which have stock in both the Sites. The Items get listed with one line each for Sites [NEWYORK], [WASHINGTON]. Double-click and tag all of the 3 Serial Items from Site [NEWYORK], as shown in Figure 2.1.
Figure 2.1 Listed Serial Items selected for Viewing their Serial Item View in Search Inventory Window
Note: Click the Clear All Tagged icon (or press ALT + L), to clear the tagging from all the double-clicked and tagged Serial Items from Search Inventory window.
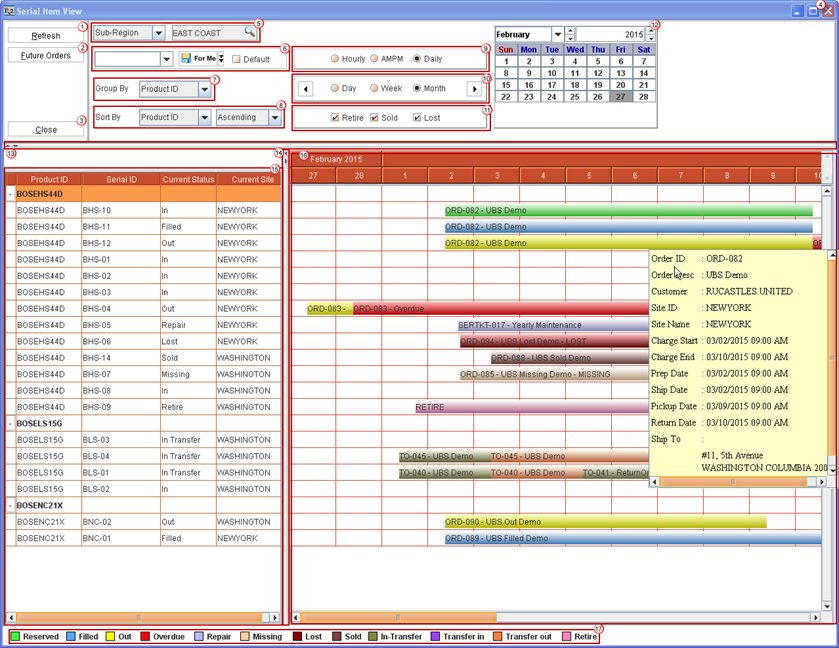
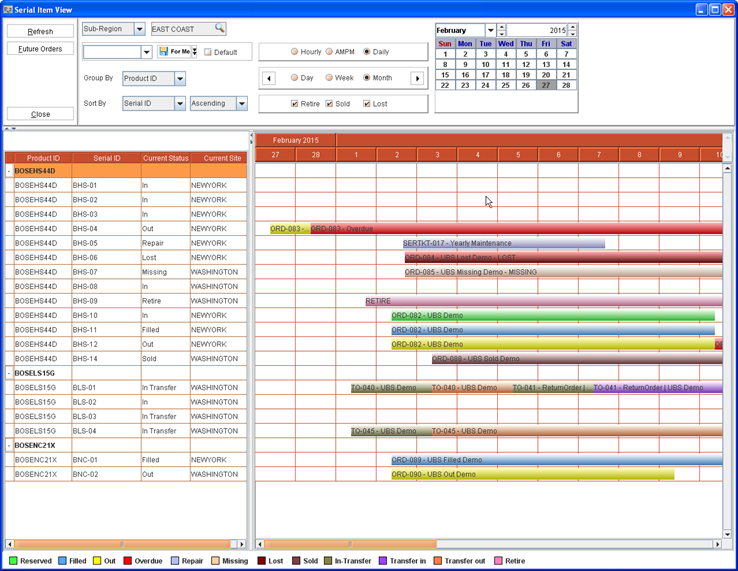
Click Serial Item View icon (or press ALT + R). The Serial Item View window gets displayed with appropriate timebars corresponding to the Assets' Statuses displayed against the Assets of the Serial Items [BOSEHS44D], [BOSENC21X], and [BOSELS15G] selected in Search Inventory window for the Sites [NEWYORK], [WASHINGTON] tagged with the Region [EASTCOAST], as shown in Figure 2.2.
Figure 2.2 Timebars corresponding to the Assets' Statuses displayed against the Assets of selected Serial Items in Serial Item View Window (based on sample workflow)
Notes:
Double-clicking on a displayed timebar opens the Order edit window of the corresponding Order (Rental Order/Sale Order/Transfer Order/Service Ticket/Physical Inventory Batch) in editable mode, where that Asset is used (as a result of which the timebar is displayed).
On making changes to the Assets in the Order (Rental Order/Sale Order/Transfer Order/Service Ticket/Physical Inventory Batch) and on saving and closing the Order, and then clicking Refresh button (or pressing ALT + R) in the Serial Item View window, the window refreshes with updated details and timebars for the listed Assets.
By default, the Asset details and their timebars are Grouped By - Product ID and won't be sorted (Sort By will be selected as Product ID but as None).
Table 2.0 Details of various Fields and Sections in Serial Item View Window
Table 2.1 Details of Timebars and Tooltips Displayed for Assets based on their Order Item Line Status
|
Asset Order Line Status |
Default Timebar Color |
Information Displayed on Timebar |
Information displayed on Tool Tip, on placing mouse pointer over the Time Bar |
|
RESERVED |
|
<Order ID> - <Order Description> |
Event Desc: <Order's Event's Description> Order ID: <Order ID> Order Desc: <Order Description> Customer: <Customer Name> Site ID: <Order Site ID> Site Name: <Order Site Name> Charge Start: <Item line's Charge Start Date> Charge End: <Item line's Charge End Date> Prep Date: <Prep Date of Asset on Order> Ship Date: <Ship Date of Asset on Order> Pickup Date: <Pickup Date of Asset on Order> Return Date: <Return Date of Asset on Order> Ship To: <Order’s Shipping Address> |
The RESERVED timebar gets displayed only if the Asset is reserved by its Asset ID on an Order.
The timebar gets displayed from the Order's Prep Date to its Return Date.
|
FILLED |
|
<Order ID> - <Order Description> |
Event Desc: <Order's Event's Description> Order ID: <Order ID> Order Desc: <Order Description> Customer: <Customer Name> Site ID: <Order Site ID> Site Name: <Order Site Name> Charge Start: <Item line's Charge Start Date> Charge End: <Item line's Charge End Date> Prep Date: <Prep Date of Asset on Order> Ship Date: <Ship Date of Asset on Order> Pickup Date: <Pickup Date of Asset on Order> Return Date: <Return Date of Asset on Order> ShipTo:<Order’sShippingAddress> |
The FILLED timebar gets displayed only if the Asset is filled on an Order.
The timebar gets displayed from the Order's Prep Date to its Return Date.
|
OUT |
<Order ID> - <Order Description> |
Event Desc: <Order's Event's Description> Order ID: <Order ID> Order Desc: <Order Description> Customer: <Customer Name> Site ID: <Order Site ID> Site Name: <Order Site Name> Charge Start: <Item line's Charge Start Date> Charge End: <Item line's Charge End Date> Prep Date: <Prep Date of Asset on Order> Ship Date: <Ship Date of Asset on Order> Pickup Date: <Pickup Date of Asset on Order> Return Date: <Return Date of Asset on Order> Ship To: <Order’s Shipping Address> |
The OUT timebar gets displayed only if the Asset is shipped out on an Order.
The timebar gets displayed from the Order's Prep Date to its Return Date.
|
OVERDUE |
|
<Order ID> - Overdue |
Event Desc: <Order's Event's Description> Order ID: <Order ID> Order Desc: <Order Description> Customer: <Customer Name> Site ID: <Order Site ID> Site Name: <Order Site Name> Charge Start: <Item line's Charge Start Date> Charge End: <Item line's Charge End Date> Prep Date: <Prep Date of Asset on Order> Ship Date: <Ship Date of Asset on Order> Pickup Date:<Pickup Date of Asset on Order> Return Date:<Return Date of Asset on Order> Ship To: <Order’s Shipping Address> |
If an Asset is OUT on an Order and has not been Returned by its Return Date then on generating Conflicts, the OVERDUE timebar gets displayed for the Asset.
The OUT timebar gets displayed from the Order's Prep Date to its Return Date. After the Return Date, the OVERDUE timebar gets displayed.
|
REPAIR |
|
<Service Ticket ID> - <Service Ticket Description> |
Service Ticket ID: <Service Ticket ID> Service Ticket Desc: <Service Ticket Description> Site ID: <Order Site ID> Completion Date: <Estimated Date of completion of Service using this Service Ticket> Assigned To: <Employee ID of Employee to whom the Service Ticket is assigned to> |
The REPAIR timebar gets displayed if a Service Ticket has been created for an Asset.
The REPAIR timebar gets displayed from the Date of creation of the Service Ticket to the Estimated Completion Date.
|
MISSING |
|
MISSING |
Asset marked as "MISSING" from Asset Edit. |
If an Asset is marked as Missing, then the MISSING timebar gets displayed from the day the Asset is marked as Missing till eternity.
|
LOST |
|
LOST |
Asset marked as "LOST" from Asset Edit. |
If an Asset is marked as Lost, then the LOST timebar gets displayed from the day the Asset is marked as Lost till eternity.
|
SOLD |
|
<Order ID> - <Order Description> |
Event Desc: <Order's Event's Description> Order ID: <Order ID> Order Desc: <Order Description> Customer: <Customer Name> Site ID: <Order Site ID> Site Name: <Order Site Name> Ship Date: <Ship Date of Asset on Order> Return Date:<Return Date of Asset on Order> Ship To: <Order’s Shipping Address> |
The SOLD timebar gets displayed when the Asset is shipped out and Sold on an Order.
ThetimebargetsdisplayedfromthedaytheAssetismarkedasSoldtilleternity.
|
IN-TRANSFER |
|
<Transfer Order ID> - <Transfer Order Description> |
Order ID: <Order ID> Order Desc: <Order Description> From Site: <From Site ID> From Site Name: <From Site Name> To Site: <To Site ID> To Site Name: <To Site Name> Prep date: < Prep Date of Asset on Order> Ship Date: <Ship Date of Asset on Transfer Order> Receive Date: <Receive Date of Asset on linked Return Transfer Order> Return Date: <Return Date of Asset on linked Return Transfer Order> |
If an Asset has a Status as In-Transfer, then the IN-TRANSFER Time bar gets displayed from the Start Date to the end of Transit Time on the Calendar.
|
TRANSFER IN |
<Transfer Order ID> - <Transfer Order Description> |
Order ID: <Order ID> Order Desc: <Order Description> From Site: <From Site ID> From Site Name: <From Site Name> To Site: <To Site ID> To Site Name: <To Site Name> Prep date: < Prep Date of Asset on Order> Ship Date: <Ship Date of Asset on Transfer Order> Receive Date: <Receive Date of Asset on linked Return Transfer Order> Return Date: <Return Date of Asset on linked Return Transfer Order> |
When an Asset is shipped to this Site (from where Serial Item View window is accessed) from some other Site, but is yet to be received in this Site.
|
TRANSFER OUT |
|
<Transfer Order ID> - <Transfer Order Description> |
Order ID: <Order ID> Order Desc: <Order Description> From Site: <From Site ID> From Site Name: <From Site Name> To Site: <To Site ID> To Site Name: <To Site Name> Prep date: < Prep Date of Asset on Order> Ship Date: <Ship Date of Asset on Transfer Order> Receive Date: <Receive Date of Asset on linked Return Transfer Order> Return Date: <Return Date of Asset on linked Return Transfer Order> |
When an Asset is shipped out of this Site (from where Serial Item View window is accessed) but is yet to be received in another Site.
|
RETIRE |
|
RETIRE |
Asset marked as "RETIRE" from Asset Edit. |
Note: If the tooltip is not displaying the entire information, placing the mouse-pointer over the tooltip displays vertical and horizontal scroll bars which can then be used for scrolling and viewing the complete information.
Note: For more information on Customizing Colors of Timebars in Serial Item View Window, click here.
Table 2.2 Selected Serial Items Assets Details - For Sample Serial Items [BOSEHS44D], [BOSENC21X], and [BOSELS15G]
Additional Figures of Asset Timebars in the Serial Item View Window
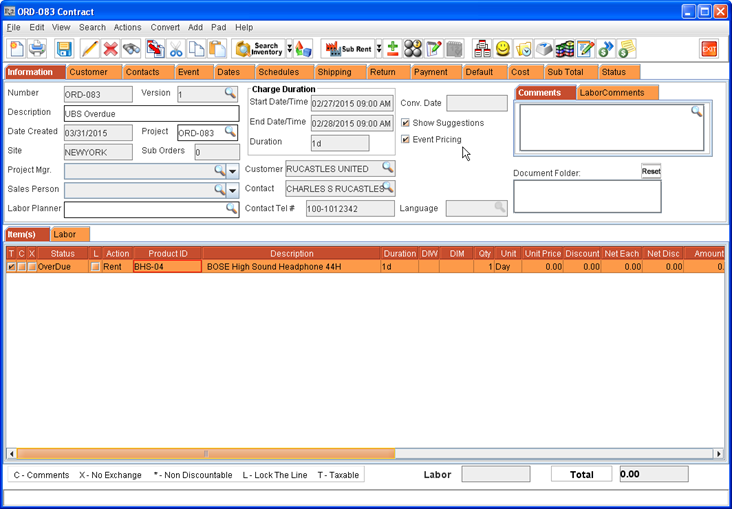
Double-click on the Asset timebar for Asset [BHS-04 ] corresponding to Status as [OVERDUE]. The system opens the Order edit window of the corresponding Order (Rental Order/Sale Order/Transfer Order/Service Ticket/Physical Inventory Batch) in editable mode, where the Asset is added because of which the timebar is displayed in Serial Item View window, as shown in Figure 2.3.
Figure 2.3 Double-clicking on an Asset's Timebar and opening its Order Edit Window
Change Sort By to Serial ID - Ascending, and click Refresh button. The details of the Assets displayed in Serial Item View window gets refreshed and displayed, as shown in Figure 2.4.
Figure 2.4 Serial Item View Window with Asset Timebars Grouped By - Product ID and Sorted By - Serial ID - Ascending
Note: The Assets grouped by Product ID, can also be Sorted by Product ID, Current Status and Current Site.
Change Group By to Current Status and Sort By to Serial ID - Ascending, and click Refresh button. The details of the Assets displayed in Serial Item View window gets refreshed and displayed, as shown in Figure 2.5.
Figure 2.5 Serial Item View Window with Asset Timebars Grouped By - Current Status and Sorted By - Serial ID - Ascending
Note: The Assets grouped by Current Status, can also be Sorted by Product ID, Current Status and Current Site.
Change Group By to Current Site and Sort By to Product ID - Ascending, and click Refresh button. The details of the Assets displayed in Serial Item View window gets refreshed and displayed, as shown in Figure 2.6.
Figure 2.6 Serial Item View Window with Asset Timebars Grouped By - Current Site and Sorted By - Product ID - Ascending
Note: The Assets grouped by Current Site, can also be Sorted by Current Status, Serial ID and Current Site.
Select AMPM radio button. The details of the Assets displayed in Serial Item View window gets refreshed and displayed, as shown in Figure 2.7.
Figure 2.7 Serial Item View Window with Asset Timebars when AMPM Radio Button is Selected
Select Hourly radio button. The details of the Assets displayed in Serial Item View window gets refreshed and displayed, as shown in Figure 2.8.
Figure 2.8 Serial Item View Window with Asset Timebars when Hourly Radio Button is Selected
Sample Workflow to Illustrate Asset Timebars for In-Transfer and Asset Expected Statuses
Consider that a Serial Item [JBLHS21] has 2 Assets [JBLHS-01] and [JBLHS-02] in Site [WASHINGTON] on March 1, 2015.
Create a two way Transfer Order [TO-035] from Site [WASHINGTON] to Site [NEWYORK]. Let this be for March 1, 2015 with Transit Time of 2 days.
Select Return Order check box in Transfer Order Information dialog box so that a linked Return Transfer Order [TO-036] from Site [NEWYORK] to Site [WASHINGTON] also gets created. Let this be for March 5, 2015 with Transit Time of 2 days.
The Auto Ship / Receive check box in Transfer Order Information dialog box should be in cleared state for both main Transfer Order and its Return Transfer Order.
Add, Fill and Ship Asset [JBLHS-01] from Transfer Order [TO-035] on March 1, 2015 from Site [WASHINGTON]. Do not receive it in Site [NEWYORK].
Create a one way Transfer Order [TO-037] from Site [WASHINGTON] to Site [NEWYORK]. Let this also be for March 1, 2015 with Transit Time of 2 days.
Do not select the Return Order check box in Transfer Order Information dialog box for this Transfer Order.
The Auto Ship / Receive check box in Transfer Order Information dialog box should be in cleared state.
Add, Fill and Ship Asset [JBLHS-02] from Transfer Order [TO-037] on March 1, 2015 from Site [WASHINGTON]. Do not receive it in Site [NEWYORK].
Figure 3.0 Serial Item View opened in Site [WASHINGTON] - Timebars for Assets [JBLHS-01] and [JBLHS-02] Shipped from [WASHINGTON] but not Received in Site [NEWYORK]
Note: The Transfer out timebar will get displayed for eternal (till the Asset gets received in To Site) for an Asset shipped in a one-way Transfer Order.
Receive Asset [JBLHS-01] from Transfer Order [TO-035] and Asset [JBLHS-02] from Transfer Order [TO-037] on March 3, 2015 in Site [NEWYORK].
Figure 3.1 Serial Item View opened in Site [NEWYORK] - Timebar for Asset [JBLHS-01] and ASSET [JBLHS-02] RECEIVED IN SITE [NEWYORK]
Fill and Ship Asset [JBLHS-01] on Return Transfer Order [TO-036] on March 5, 2015 from Site [NEWYORK]. Do not receive it in Site [WASHINGTON].
Figure 3.2 Serial Item View opened in Site [NEWYORK] - Timebar for Asset [JBLHS-01] Shipped from [NEWYORK] but not Received in Site [WASHINGTON] and Timebar for Asset [JBLHS-02] Received in Site [ NEWYORK]
Receive Asset [JBLHS-01] from Return Transfer Order [TO-036] on March 7, 2015 in Site [WASHINGTON].
Figure 3.3 Serial Item View opened in Site [WASHINGTON] - Timebar for Asset [JBLHS-01] Received in SITE [WASHINGTON]
Figure 3.4 Serial Item View opened in Site [NEWYORK] - Timebar for Asset [JBLHS-02] Received in Site [NEWYORK]