Table of Contents
The Payment tab in the Order window is used to input order payment information - including setting up periodic billing.
Periodic Billing
Periodic billing allows you to bill a customer at regular intervals (i.e. daily, weekly, monthly) for the duration of a contract or until the balance due is paid in full. Typically, periodic billing is used for orders spanning several weeks or months. On each invoice, or bill, R2 will automatically calculate the amounts due for each contract line item based on the details specified for the contract during rental.
Periodic Billing involves the following fields within the Payment tab: Terms, Billing Terms, First Invoice Date and Pay At. You may select billing settings through the Payment tab for each order, or, you may take advantage of the various default settings available within R2 to speed order entry and billing consistency.
To apply periodic billing to an order from the Payment tab
-
From an order window, select the Payment tab.
NOTE: You may be able to skip some of the following steps depending on your default field values.
-
Click on the down arrow to the right of the Pay At field.
-
Click on Periodic Billing.
-
Click on the more button to the right of the Terms field.
The Terms dialog appears.
.png?cb=6ba965fd49c97b29f0bfe79fc3da5f2f)
-
Double-click on the appropriate Term record.
The selected Id will appear within the payment tab.
-
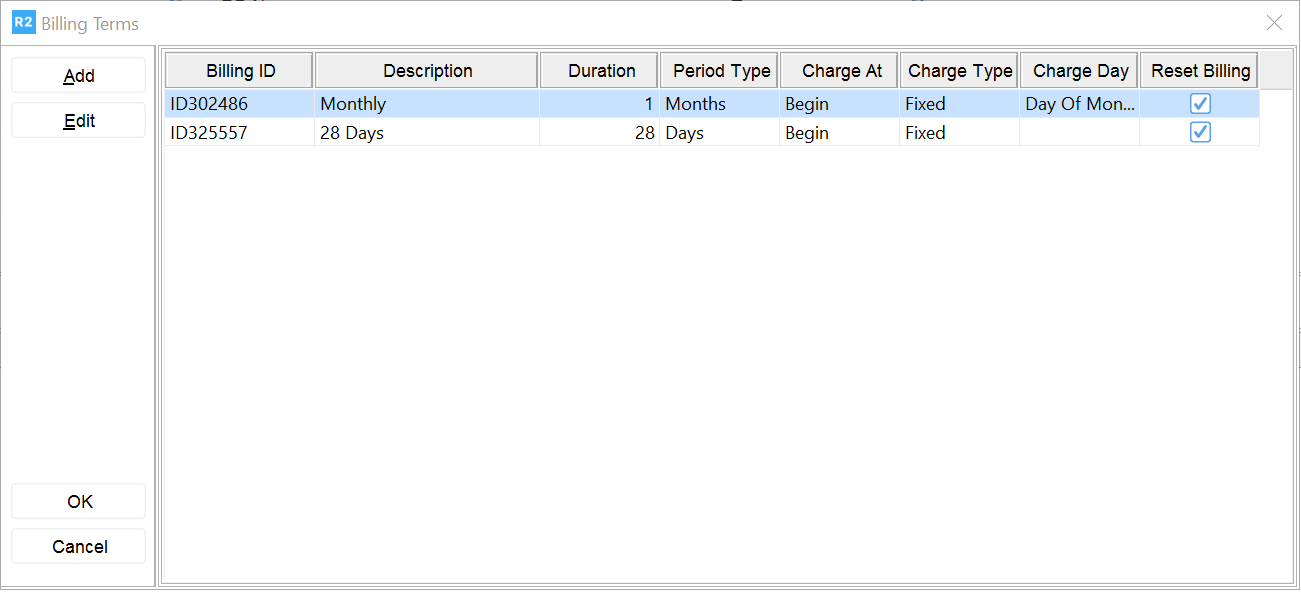
Click on the more button to the right of the Billing Terms field.
The Billing Terms dialog appears.
-
Double-click on the appropriate Billing Term record.
The selected Description will appear within the payment tab.
-
Select a First Invoice Date, if necessary.
The First Invoice Date field lets you select a specific date to issue the first invoice for this order.
Purchase Order Number
Use this PO No field to track your customer's purchase order number, if applicable. This value appears on printed orders.
To enter a Purchase Order number for an order
-
From an order window, select the Payment tab.
-
Click in the PO No field.
-
Enter your customer's Purchase Order number for this order.
This value will appear on printed versions of this order.
Default
The Default tab displays "default" information for the order, usually based on the selected customer file settings. Exceptions include Profit Center, which is based on the salesperson's Employee setting, Tax Region which defaults to the Tax Region assigned to the order's ship- ping address, Default Unit which is based on the setting in Configura- tion and Valid Till which must be entered for each order. Use the Default tab to view or change default settings for this order.
Tax Region
The order's Tax Region determines the Tax rate applied to items on an order. You will need to assign a Region to an order if you wish to charge any rate other than your configured default.
To choose a Tax Region for an order
Within the Order window, click on the Default tab.
Click on the more button to the right of the Region field.
The Tax Region dialog appears listing all available tax regions.
Double-click on the tax Region that applies to the order.
This returns you to the Order window. Your selection now appears in the Region field.