Content was last updated in 06.01.17-00
Revision History
Version No.
|
Reference No.
|
Changes
|
|
06.01.17-00 |
R2-17740 and R2-17895 |
Change in Design how PAT Testing is executed. |
|
06.00.04-00 |
R2-3520 |
Prompts displayed during PAT validation. |
|
NA |
R2-23 |
Configuring 'Effective Date' for Maintenance Schedules |
|
NA |
NA |
Content ported from previous release pertaining to same topic. |
Support has been provided to skip the prompt displayed while scanning the Asset with the expired Periodic Schedule of 90 Days from the Transfer Order window.
Sample Workflow
-
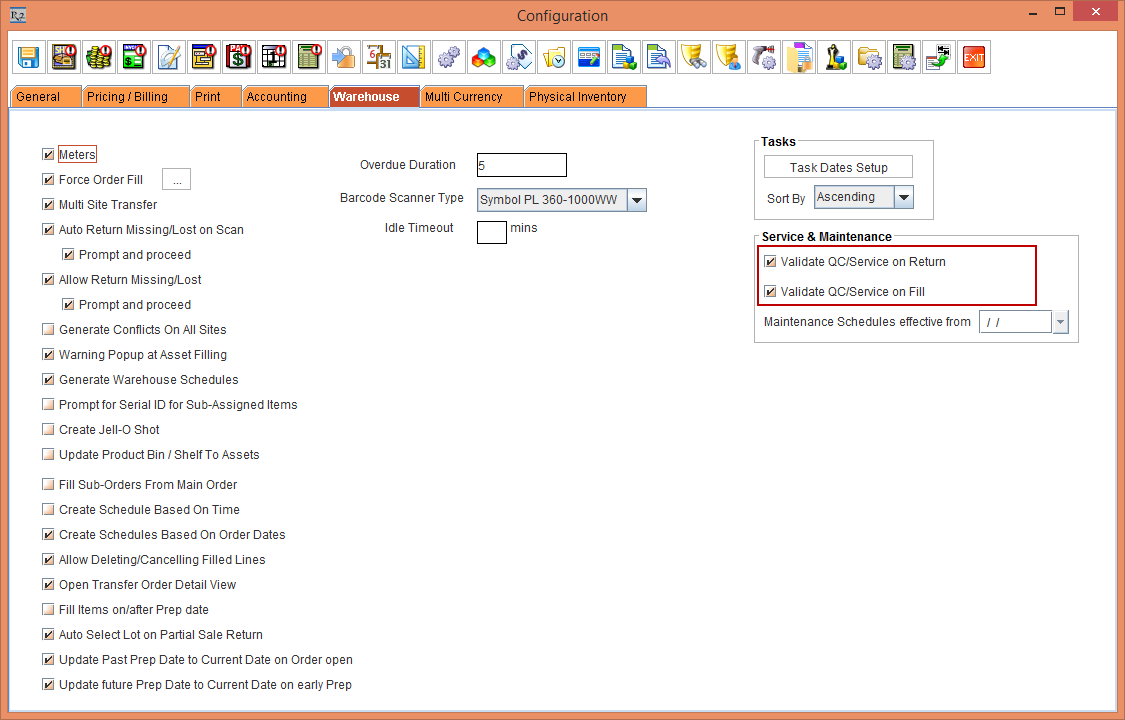
Select the Configuration module > Warehouse tab > select the check boxes Validate QC/Service on Return and Validate QC/Service on Fill, shown in Figure 3.0.
-
Save and exit the Configuration module.
-
Login to R2 application as Employee [JAMES].
-
Create a Serial Item [CRANE#K].
-
Tag Maintenance Group [PERIODIC90DAYS] with Maintenance Schedule Periodic 90Days to Item [CRANE#K], as shown in Figure 3.1.

-
Receive the Assets [CRANE#K05] and [CRANE#K06] for [CRANE#K] on the Date [15-Jan-2019].
-
On the Date [16-April-2019], create a Transfer Order [TO-204] from [SANFRANCISCO] to [NEWYORK] with Prep, Ship and Receive dates as [16-April-2019].
-
Search and add the Serial Item [CRANE#K] with 2 Qty.
-
Click the Fill Items icon. The Transfer Fill dialog box is displayed.
-
Scan the Asset [CRANE#K05]. The system displays a prompt with the message "R2_01555: Asset is due for Service. Do you want to mark it as QC / Needs Service as per its Maintenance setup?" with "Skip this prompt for all the Assets scanned during this session" check box and Yes, Skip Service & Fill, Suspend & Fill, and Do Nothing buttons, as shown in Figure 3.2.

-
Select Yes option to Fill the Asset.
-
Select Skip Service & Fill option will skip the Service and fills the Asset .
-
Select Suspend & Fill option will suspend the Service and fills the Asset.
-
Select the Do Nothing option will not do anything to the Asset.
-
Select the "Skip this prompt for all the Assets scanned during this session" check box to skip the prompt for all the Assets in all the future scans in the same session.
-
Select the "Skip this prompt for all the Assets scanned during this session" check box and click the Suspend & Fill button. The system displays the Status bar message "Item filled successfully" in the Transfer Fill dialog box.
-
In the Transfer Fill window, scan the Asset [CRANE#K06].
-
The system does not display any prompt with message, as the "Skip this prompt for all the Assets scanned during this session" check box was selected during the scan of the Asset [CRANE#K05]. Hence, while scanning the Asset [CRANE#K06] in the same session, the system displays the Transfer Fill dialog box Status bar message "Item filled successfully" as shown in Figure 3.3.

-
Close the Transfer Fill dialog box. The system displays the Print Exception prompt with the message "R2_00134:Exceptions found during scanning. Do you want to view it now?" with Yes and No buttons.
-
Click Yes. The Print Type dialog box is displayed with the Exception and FullPrint radio buttons.
-
Click the Exception radio button and click OK. The Exceptions are printed and displayed in MS Word format, as shown in Figure 4.4.

-
The Status of the Item [CRANE#K] is modified to Filled in the Transfer Order [TO-204] and the Status of the Assets [CRANE#K05] and [CRANE#K06] will be modified to In Transfer.
-
Click Ship All to Ship all the Assets [CRANE#K05] and [CRANE#K06].