Content was last updated in 06.01.17-00
Revision History
Version No.
|
Reference No.
|
Changes
|
|
06.01.17-00 |
R2-17740 and R2-17895 |
Change in Design how PAT Testing is executed. |
|
NA |
NA |
Content ported from previous release pertaining to same topic. |
While transferring Assets from Site to Site that have an expired PAT Test effective period, the system does not stop any user from being able to do so.
This is explained in the sample workflow below:
Sample Workflow
-
Create an Item [LOADERCRANE] and tag Maintenance Group for Periodic 90 Days.
-
Receive Assets [LOADERCRANE#1] and [LOADERCRANE#2] for [LOADERCRANE] on 1 - March - 2017. Based on Maintenance setup the asset should be on QC on 30 - May - 2017.
-
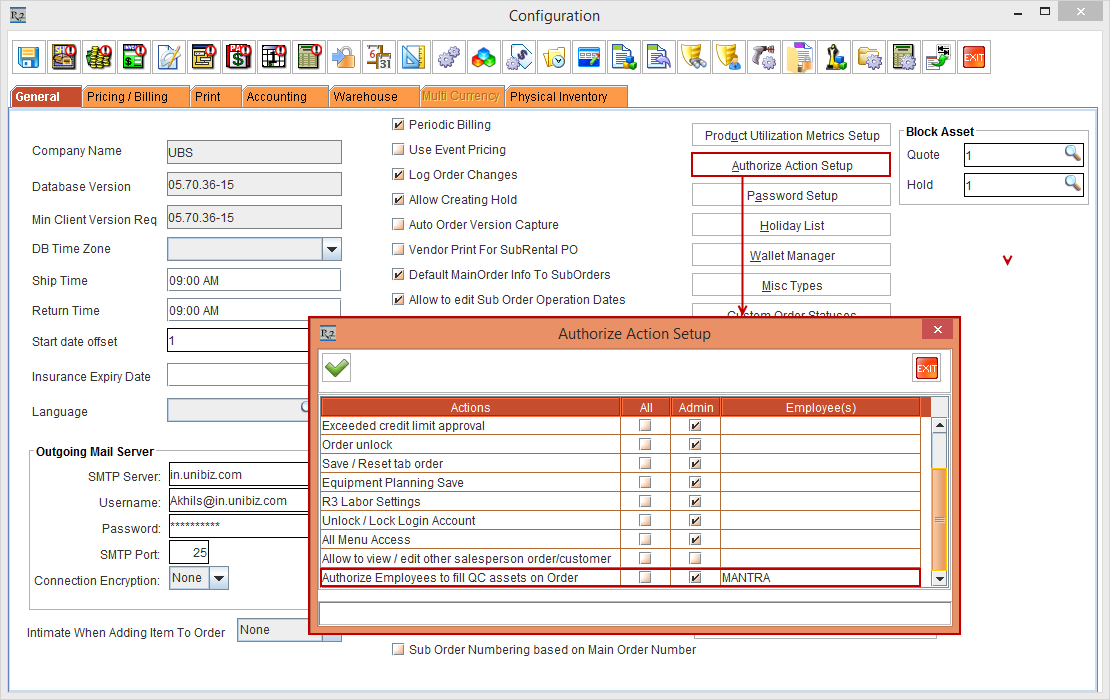
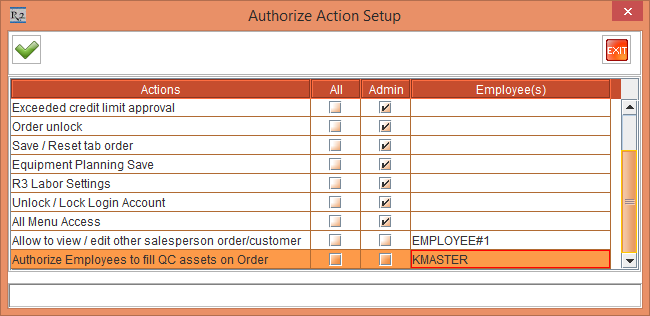
Select the Configuration module > General tab > click the Authorize Action Setup button. The Authorize Action Setup window is displayed. Select the Employee [MANTRA] in the Authorize Employees To Fill QC Assets on Order Action > click the OK button.

-
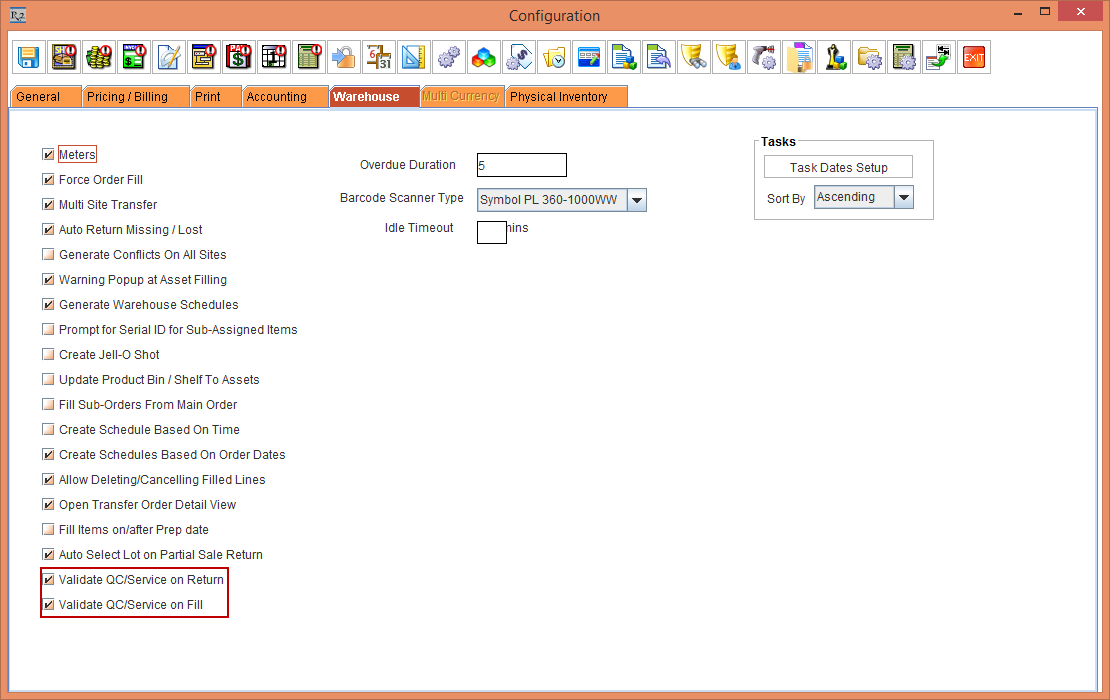
Select the Configuration module > the Warehouse tab > select the check-boxes Validate QC/Service on Return and Validate QC/Service on Fill. This is, as shown in Figure 4.1. Save and exit configuration module.

-
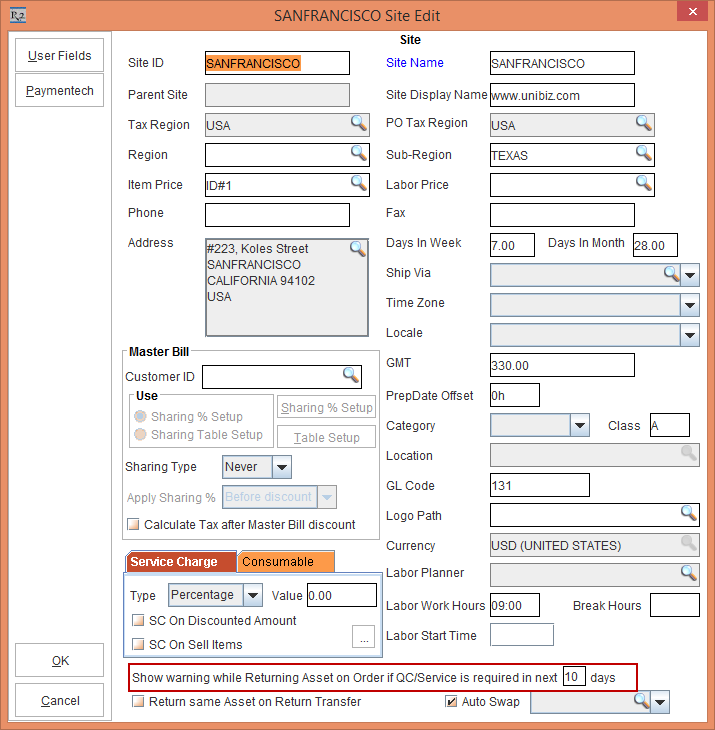
Select the Maintenance module > Employee tab > Site > select the Site [SANFRANCISCO]. Enter 10 in the Show Warning On Return If QC/Service Is Required In Next Days field. This is as show in the Figure 4.2. Similarly, set it as 10 for the Site [NEWYORK].
-
Create a Serial Item [LOADERCRANE].
-
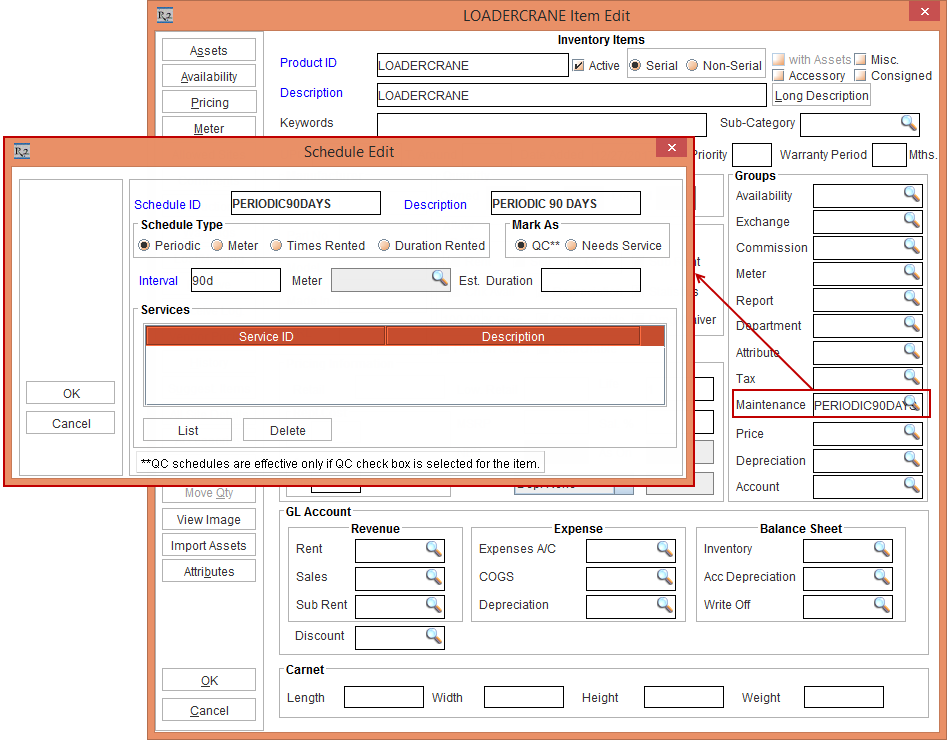
Tag Maintenance Group [PERIODIC90DAYS] with Maintenance Schedule Periodic 90Days to Item [LOADERCRANE]as shown in the Figure 4.3.
-
Receive Asset [LOADERCRANE#1] and [LOADERCRANE#2] for [LOADERCRANE] on 01 - March - 2017 in Site [SANFRANCISCO]. Based on Maintenance setup the Asset is on QC on 30 - May - 2017.
-
Create a Transfer Order [TO-124] from [SANFRANCISCO] to [NEWYORK] with Prep, Ship and Receive dates as 20 - May - 2017.
-
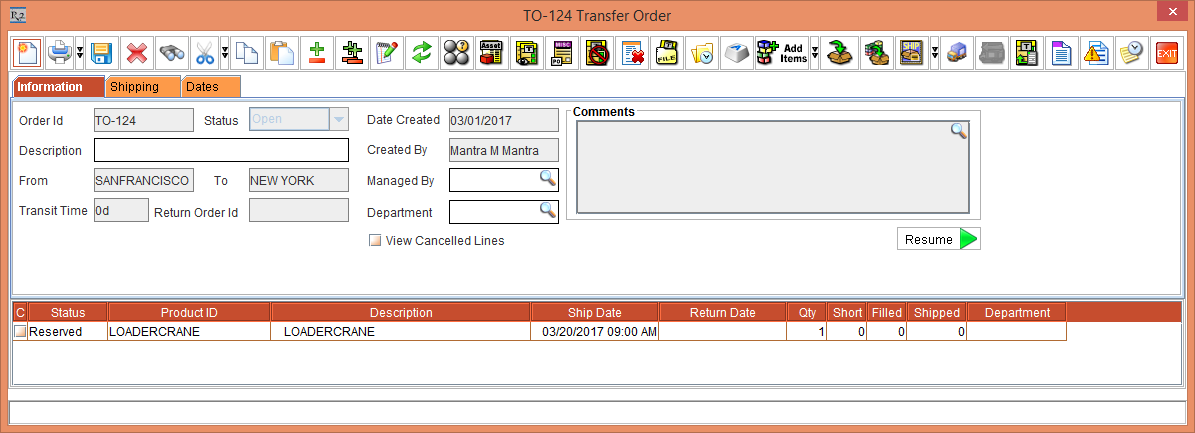
Receive 1 Qty of the Item [LOADERCRANE]. This is, as shown in the Figure 4.4.
-
On the 20 - May - 2017, open the Prep Task of [TO-124] and scan [LOADERCRANE#1] and fill it. It gets filled successfully > now, dispatch the Asset [LOADERCRANE#1] and receive it to [NEWYORK]. It will be received successfully to [NEWYORK] as IN status successfully.
-
On the 30 - May - 2017, select the Service module > click Generate Needs Service button. The Assets [LOADERCRANE#1] and [LOADERCRANE#2]'s Status will be QC according to the Maintenance settings.
-
On 31 - May - 2017, create a Transfer Order [TO-125] from [SANFRANCISCO] to [NEWYORK] with Prep, Ship and Receive dates as 31 - May - 2017.
-
On 31 - May - 2017, open the Prep Task of [TO-125] and scan [LOADERCRANE#2] to fill it. The system fills the Asset [LOADERCRANE#2] on Transfer Order even though when it is in QC Status.
-
Dispatch the filled [LOADERCRANE#2] on [TO-125] and receive it to [NEWYORK]. It will be received to [NEWYORK] as IN status. The system displays the message, “Asset is due for Service. Do you want to mark it as QC/Needs Service as per its Maintenance Setup?”, click the Yes button.
-
Create an Order [ORDER#8] in [NEWYORK] and reserve [LOADERCRANE] from 01 - June - 2017 to 10 - June - 2017.
-
Open the Prep Task of [ORDER#8]on 01 - June - 2017 and scan [LOADERCRANE#2] to fill it. The system displays the message, “Asset is due for Service. Do you want to mark it as QC/Needs Service as per its Maintenance Setup?”, as shown in the Figure 4.5.

-
Click the Yes button.
-
The Asset [LOADERCRANE#2] will be marked as QC.
-
Create and complete the Service Ticket of Asset [LOADERCRANE#2] either by Quick Service Ticket or Normal Service Ticket to bring the Asset to IN Status.
Sample Workflow 1: Fill the Asset in Transfer Order Having the Drop ship and Auto Ship / Receive Options Selected
The following sample workflow displays Asset being filled in the Transfer Order.
Prerequisites:
-
Select the Configuration module > General tab > click the Authorize Action Setup button. The Authorize Action Setup window is displayed. Select the Employee [MANTRA] in the Authorize Employees To Fill Qc Assets on Order Action > click the OK button.
-
Select the Warehouse tab > select the check-boxes Validate QC/Service on Return and Validate QC/Service on Fill. This is as shown in Figure 4.7. Save and exit Configuration module.
-
Login R2 in the Site [NEWYORK].
-
Create an Item [CRANE#1] and receive 10 Qty.
-
Tag the Maintenance Group [PERIODIC90DAYS] with Maintenance Schedule Periodic 90Days to Item [CRANE#1].
-
Receive Asset [CRANEASSET##1] for [CRANE#1] on 1 - March - 2017. Based on Maintenance setup the Asset will be on QC on 30 - May - 2017.
-
Mark the Asset [CRANEASSET#9], [CRANSEASSET#10] as QC.
Steps
-
Login to R2 from Site [SANFRANCISCO].
-
Create a Rental Reservation Order [ORD-1443] from 20 - May - 2017 to 20 - June - 2017.
-
Add the Item [CRANE#1] in [ORDER#1]. It will be Not Available. This is, as shown in the Figure 4.8.

-
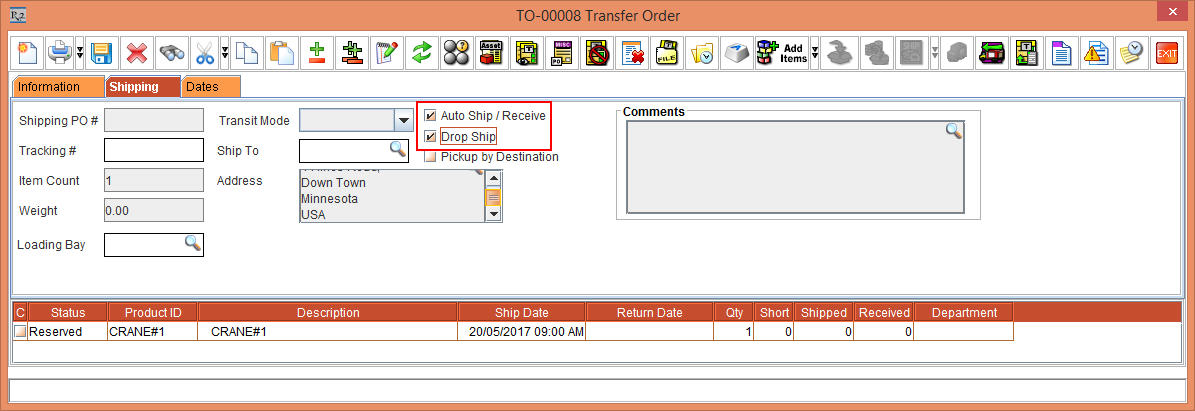
Right click the Item [CRANE#1] > Assign > Transfer In > User Assign > Create new Transfer Order [TO-00008]. In the Transfer Order [TO-00008] > Shipping tab > select the Auto Ship / Receive and Drop Ship checkboxes. This is, as shown in the Figure 4.9.
-
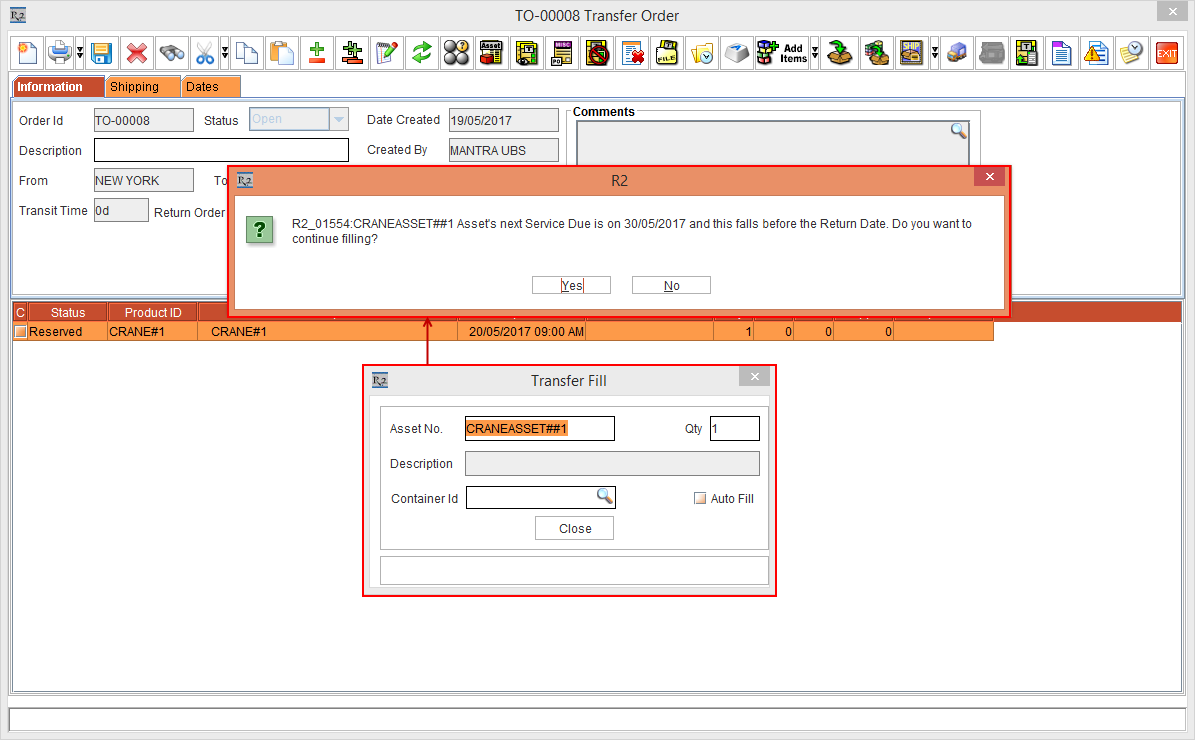
On 20 - May - 2017 open the Transfer Order [TO-00008] in the Site [NEWYORK]. Fill the Asset [CRANEASSET##1]. The system displays a message as, “R2_015154:CRANEASSET##1 Asset’s next Service Due is on 30/05/2017 and this falls before the Return Date. Do you want to continue filling?”. This is shown in the Figure 4.10.
-
If you choose Yes button, the Asset is filled.
-
If you choose No button, filling will be skipped. The No button can be secured, if this action is not preferred to be chosen.
-
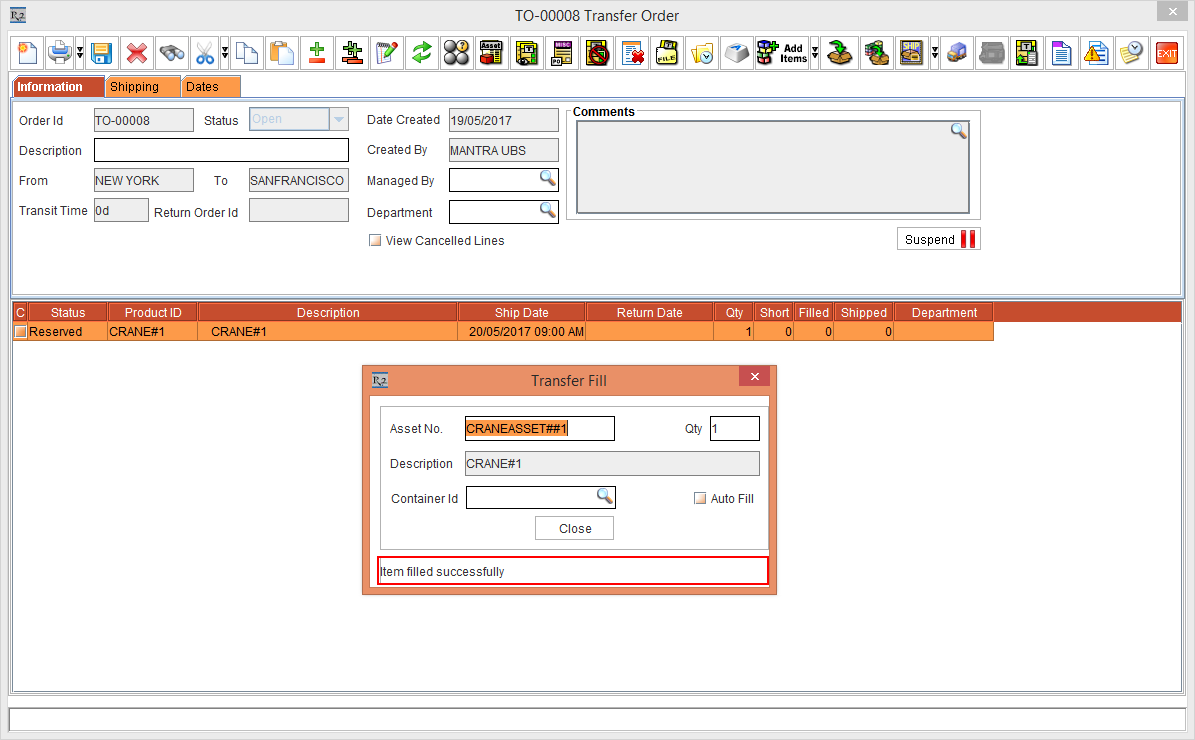
Click the Yes button. The Asset is filled. This is shown in the Figure 4.11.
Sample Workflow 2: Fill the Asset in Transfer Order Having the Drop ship and Auto Ship / Receive Options Selected:
-
Create an Item [HEAVYDUTYCRANE] and receive some stock
-
Receive Asset [HEAVYDUTYCRANE#1] for [HEAVYDUTYCRANE] on 1 - March - 2017. Based on Maintenance setup the asset should be on QC on 30 - May - 2017.
-
Login to R2 from the Site [SANFRANCISCO].
-
Create a Rental Reservation Order [ORD-1445] from 20 - May - 2017 to 20 - June - 2017.
-
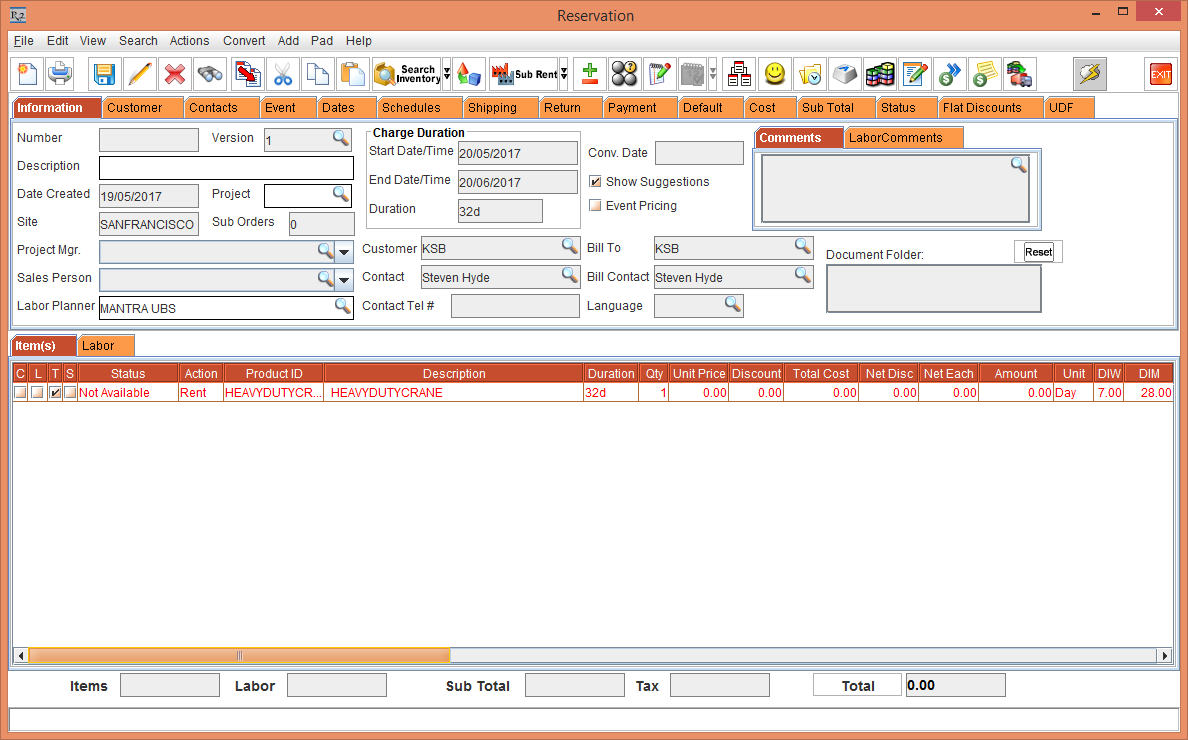
Add the Item [HEAVYDUTYCRANE] to the Order [ORD-1445]. It will be Not Available. This is shown in the Figure 4.12.
-
Right click the Item [HEAVYDUTYCRANE] > Assign > Transfer In > User Assign > Create new Transfer Order [TO-00010]. In the Transfer Order [TO-00010] > Shipping tab > select the Auto Ship / Receive and Drop Ship checkboxes.
-
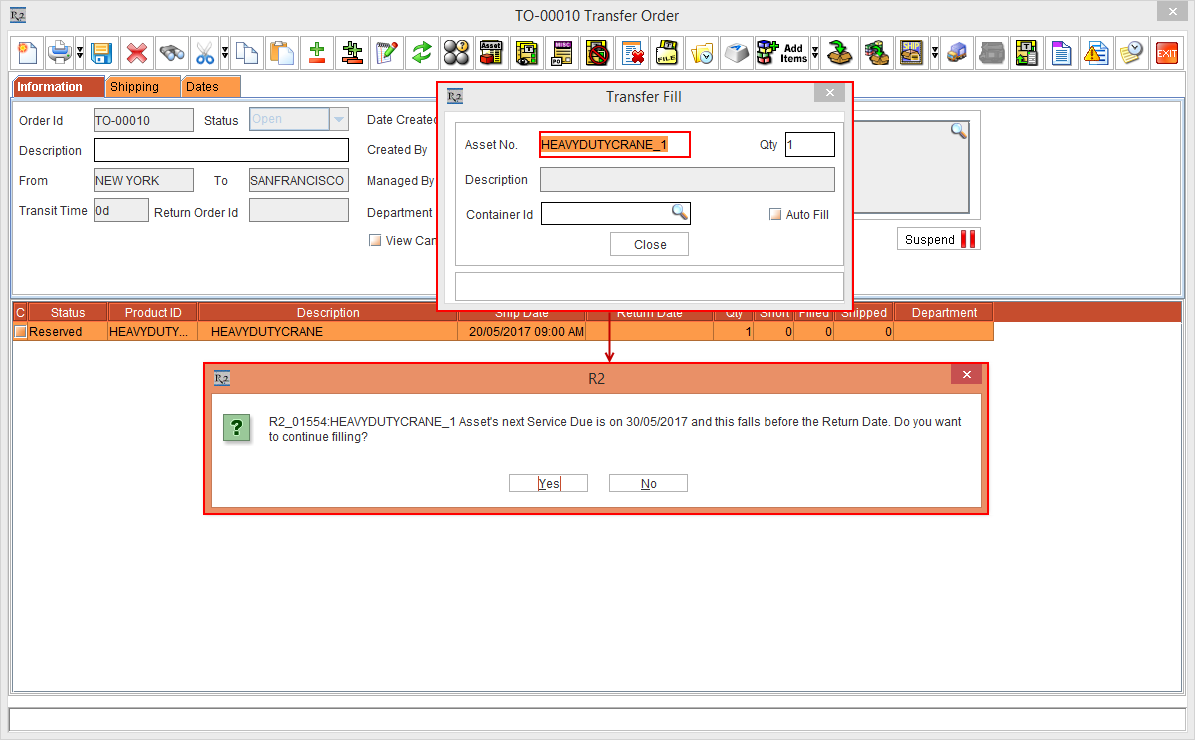
In the Site [NEWYORK], on 20 - May - 2017 open the Transfer Order [TO-00010] and scan the Asset [HEAVYDUTYCRANE_1] to fill it. The system displays the message as, “Asset is due for Service. Do you want to mark it as QC/Needs Service as per its Maintenance Setup?”. This is, as shown in the Figure 4.13.
If you choose No, the system not fill the Asset.
-
In this workflow click the Yes button.
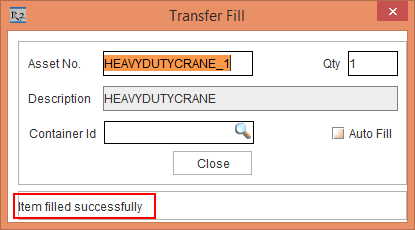
The Item is filled successfully, as shown in the Figure 4.14.
The Asset [HEAVYDUTYCRANE_1] status will be marked as Filled.
Sample Workflow 3: Asset Filled by a unauthorized Employee for filling QC Item
-
Login with [MANTRA].
-
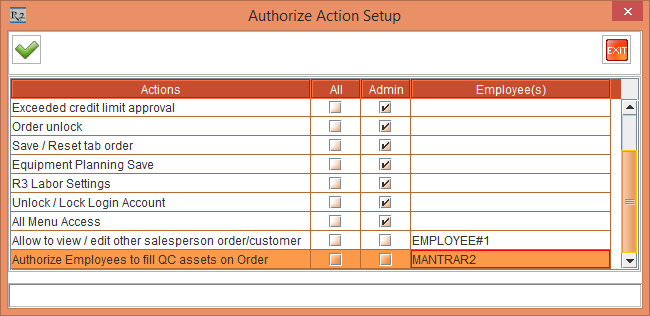
Select the Configuration module > General tab > click the Authorize Action Setup button. The Authorize Action Setup window is displayed. Select the Employee [MANTRAR2] in the Authorize Employees To Fill QC Assets on Order Action > click the OK button.
-
Create an Item [CARRYDECKCRANE] in [SANFRANCISCO].
-
Receive Asset [CARRYDECKCRANE#1] for [CARRYDECKCRANE] on 1 - March - 2017. Based on Maintenance setup the asset should be on QC on 29 - May - 2017.
-
Login to R2 as [KMASTER] (un-authorized Employee) from the Site [SANFRANCISCO].
-
Create a Rental Reservation Order [ORD-1452] from 20 - May - 2017 to 20 - June - 2017.
-
Add the Item [CARRYDECKCRANE] to the Order [ORD-1452]. It will be Not Available. This is, as shown in the Figure 4.16.

-
Right click the Item [CARRYDECKCRANE] > Assign > Transfer In > User Assign > Create new Transfer Order [TO-00012]. In the Transfer Order [TO-00012] > Shipping tab > select the Auto Ship / Receive and Drop Ship checkboxes.
-
Open the Transfer Order [TO-00011] in Site [NEWYORK] and scan the Asset [CARRYDECKCRANE_01]. The system displays the message with user ID, Password and Remarks since [EMP#1] is not authorized for filling QC Item. This is, as shown in the Figure 4.17.
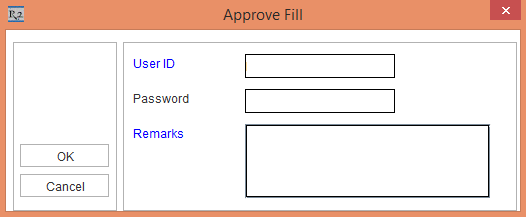
When Close button is clicked, the system does not perform any operation in the Approve Fill dialog until the User ID, Password and Remarks are entered.
-
Enter the valid User Id, Password that is tagged in Configuration (that is for, [MANTRA]) and enter the Remarks - the Item gets filled.
Sample Workflow 4: Asset filled by an authorized Employee for filling QC Item
-
Select the Configuration module > General tab > click the Authorize Action Setup button. The Authorize Action Setup window is displayed. Select the Employee [KMASTER] in the Authorize Employees To Fill Qc Assets on Order Action > click the OK button. This is, as shown in Figure 4.18.
-
Login to R2 as [KMASTER] from the Site [SANFRANCISCO].
-
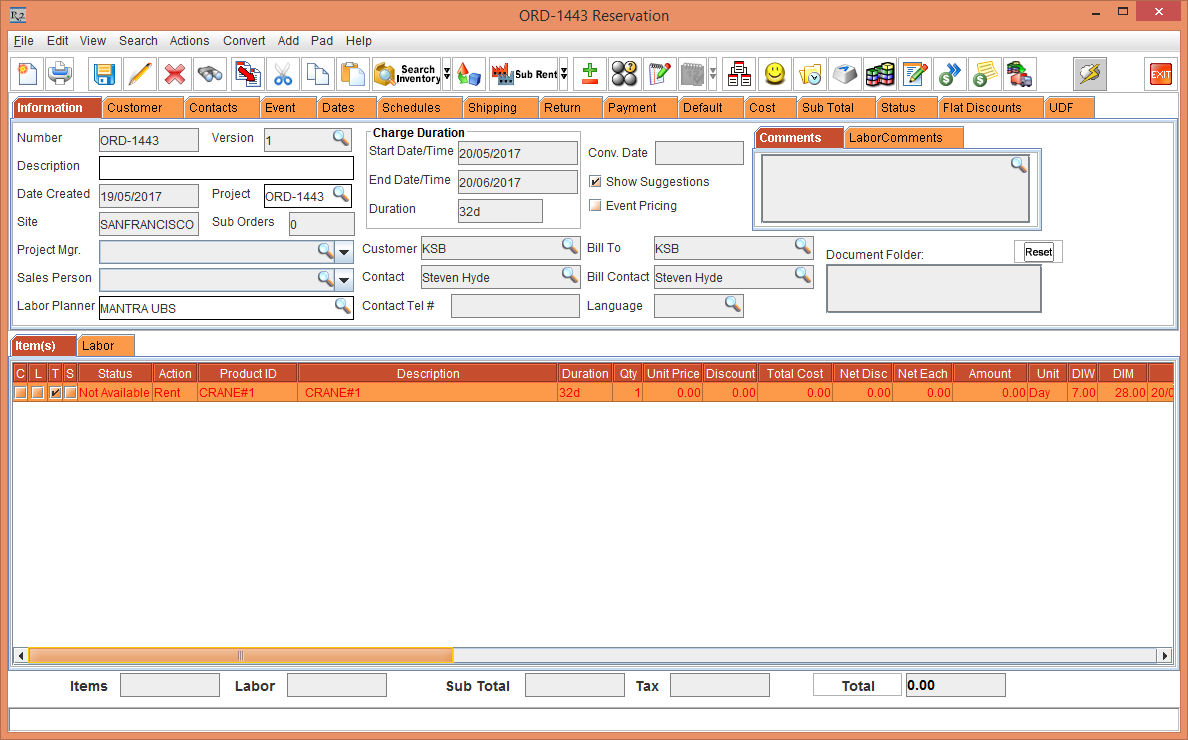
Create a Rental Reservation Order [ORD-1443] from 20 - May - 2017 to 20 - June - 2017.
-
Add the Item [CRANE#1] to the Order [ORDER#1]. It will be Not Available, as shown in Figure 4.19.
-
Right click the Item [CRANE#1] > Assign > Transfer In > User Assign > Create new Transfer Order [TRANSFERORDER#1]. In the Transfer Order [TRANSFERORDER#1] > Shipping tab > select the Auto Ship / Receive and Drop Ship checkboxes.
-
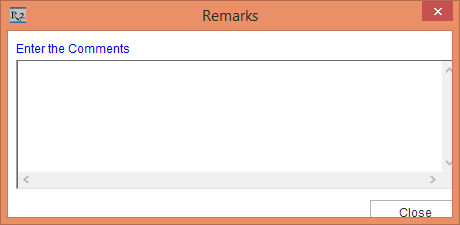
Open the Transfer Order [TRANSFERORDER#1] in the Site [NEWYORK] and scan the asset [CRANEASSET#9]. The system displays the Remarks dialog as in Figure 4.20.
-
Enter the Remarks > the Item is filled.
If the Drop Ship check-box has been selected and Item line is linked to the Order - only Validation happens
Fill the Asset in Transfer Order Having the Drop ship and Auto Ship / Receive Options Not Selected
The following sample workflow will describe how the Asset is filled in the Transfer Order having Drop Ship and Auto Ship / Receive options not being selected.
Prerequisites:
-
Select the Warehouse tab > select the check-boxes Validate QC/Service on Return and Validate QC/Service on Fill. Save and exit Configuration module.
-
Launch the Application with Site [NEWYORK].
-
Create an Item [CRANE#1] and receive 10 Qty.
-
Tag the Maintenance Group [PERIODIC90DAYS] with Maintenance Schedule Periodic 90Days to Item [CRANE#1].
-
Receive Asset [CRANEASSET#1] for [CRANE#1] on 1 - March - 2017. Based on Maintenance setup the Asset will be on QC on 30 - May - 2017.
-
Mark the Asset [CRANEASSET#9], [CRANEASSET#10] as QC.
Steps
-
Login to R2 with [KMASTER] from the Site [SANFRANCISCO].
-
Create a Rental Reservation Order [ORD-1443] from 20 - May - 2017 to 20 - June - 2017.
-
Add the Item [CRANE#1] in the Order [ORD-1443]. It will be Not Available. This is shown in Figure 4.21.

-
Right click the Item [CRANE#1] > Assign > Transfer In > User Assign > Create new Transfer Order [TRANSFERORDER#1]. In the Transfer Order [TRANSFERORDER#1] > Shipping tab > do not select the Auto Ship / Receive and Drop Ship check-boxes.
-
On 29 - May - 2017, open the Transfer Order [TRANSFERORDER#1] in the Site [NEWYORK] > Scan Fill the Asset [CRANEASSET#1] to fill it. The system displays the message, "Asset is Due for Service. Do you want to continue filling?”. If you click the No button, no operation is performed. This is, as shown in the Figure 4.22.
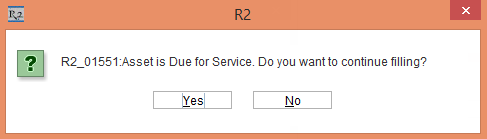
-
Click the Yes button. The Item is filled.
The behavior will be same even in case of independent Transfer Order (Site to Site) which is not linked to Order also.
The Scenario for filling a QC Item
Steps
-
Login to R2 from the Site [SANFRANCISCO].
-
Create a Rental Reservation Order [ORDER#1] from 20 - May - 2017 to 20 - June - 2017.
-
Add the Item [CRANE#1] in the Order [ORDER#1]. It will be Not Available. This is, as shown in the Figure 4.23.

-
Right click the Item [CRANE#1] > Assign > Transfer In > User Assign > Create new Transfer Order [TRANSFERORDER#1]. In the Transfer Order [TRANSFERORDER#1] > Shipping tab > do not select the Auto Ship / Receive and Drop Ship checkboxes.
-
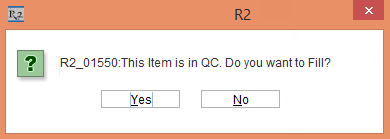
Open the Transfer Order [TRANSFERORDER#1] in the Site [NEWYORK] and scan the Asset [CRANEASSET#9]. The system displays a message, "This Item is in QC. Do you want to continue filling?”. If you select the No button, no operation is performed. This is, as shown in the Figure 4.24.
-
Click the Yes button. The Item is filled.
-
When the Drop Ship option is selected and the line which is going to get filled is linked to the Order, then the PAT Validation happens.
-
When the Drop Ship option is not selected or the line which is going to get filled is not linked to the Order, then the PAT Validation will happen but the prompts will be displayed whether to continue to Fill the Item or not.
-
In Transfer order where Dropship option is not been selected, whether linked to Order or not , the Employee Authorization prompt for filling the QC Asset will not be displayed; even if he is not authorized to fill QC Asset.