Reference No: R2-957
Details
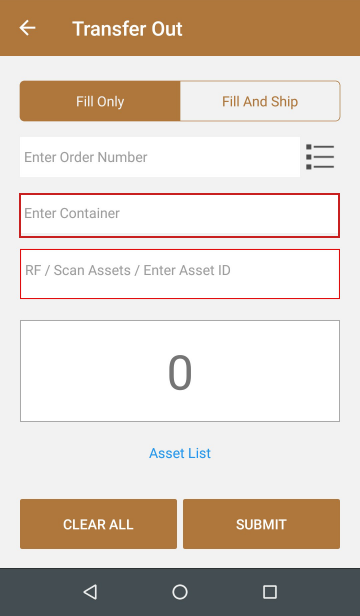
Support to Enter Container ID is provided in the Check Out screen and the Transfer Out screen of the Asset Manager App, as shown in Figure 1.0 and 1.1.

Scenario A - Container in the Check Out Screen
The below Sample Workflow explains the above functionality:
Sample Workflow
Prerequisites
-
Select the Maintenance module > Items tab.
-
Create a Serial Item [JBL EVEREST] with 3 Assets [JBL EVEREST#01], [JBL EVEREST#02] and [JBL EVEREST#03].
-
Save and Exit the Maintenance module.
Scenario A-I Check Out - Fill Only
-
Select the Account module.
-
Create an Order [ORD#002].
-
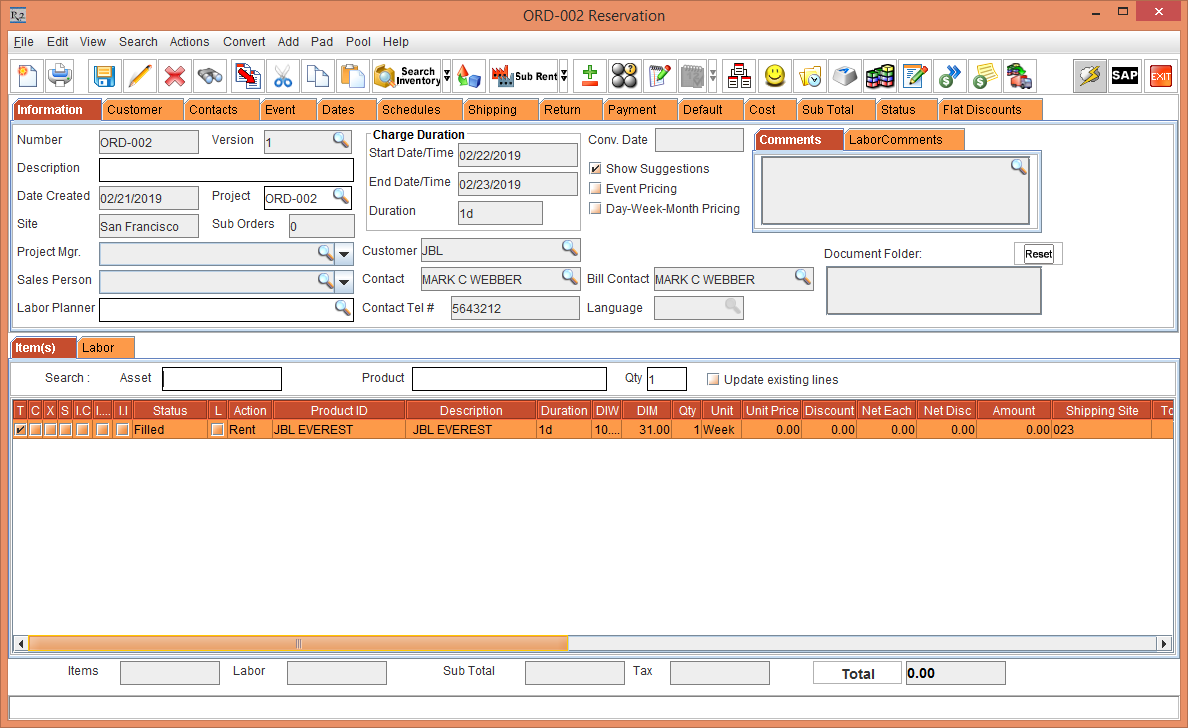
Add an Item [JBL EVEREST], as shown in Figure 2.0.

-
Save and Exit the Order [ORD#002].
-
Login to Asset Manager app.
-
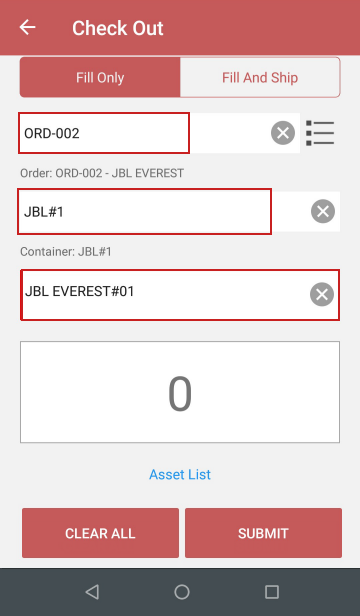
Select the CHECK OUT button > Fill Only option. The following screen appears, as shown in Figure 2.1.
-
In the Enter Order Number field, enter the Order ID [ORD-002], as shown in Figure 2.2.
-
In the Enter Container field, enter the Container ID [JBL#1], as shown in Figure 2.2.
-
In the RF/ Scan Assets / Enter Asset ID field, enter the Asset ID [JBL EVEREST#01], as shown in Figure 2.2.
-
Scan the Asset by clicking the button from the mobile. The count is displayed as [1], as shown in Figure 2.3.

-
Click the SUBMIT button.
-
Click on the generated batch Log to view the generated Batch Details, as shown in Figure 2.4.

-
Exit the Asset Manager App.
-
Open the Order [ORD-002]. The Status of Item [JBL EVEREST] is modified to Filled, as shown in Figure 2.5.
-
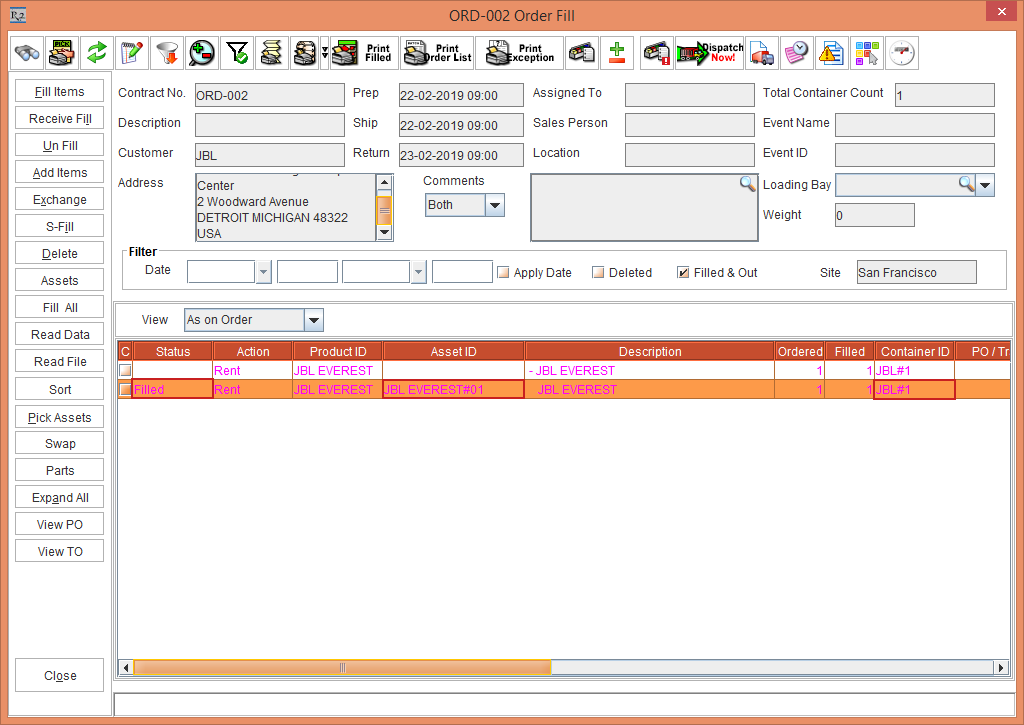
Select the View menu > Fill Order option. The Fill Order window is displayed with the Asset [JBL EVERESTE#01] in Filled Status and with the Container ID [JBL#1], as shown in Figure 2.6.
-
Exit the Fill Order window.
Scenario A-II Check Out - Fill And Ship Item
-
Select the Account module.
-
Create an Order [ORD-159].
-
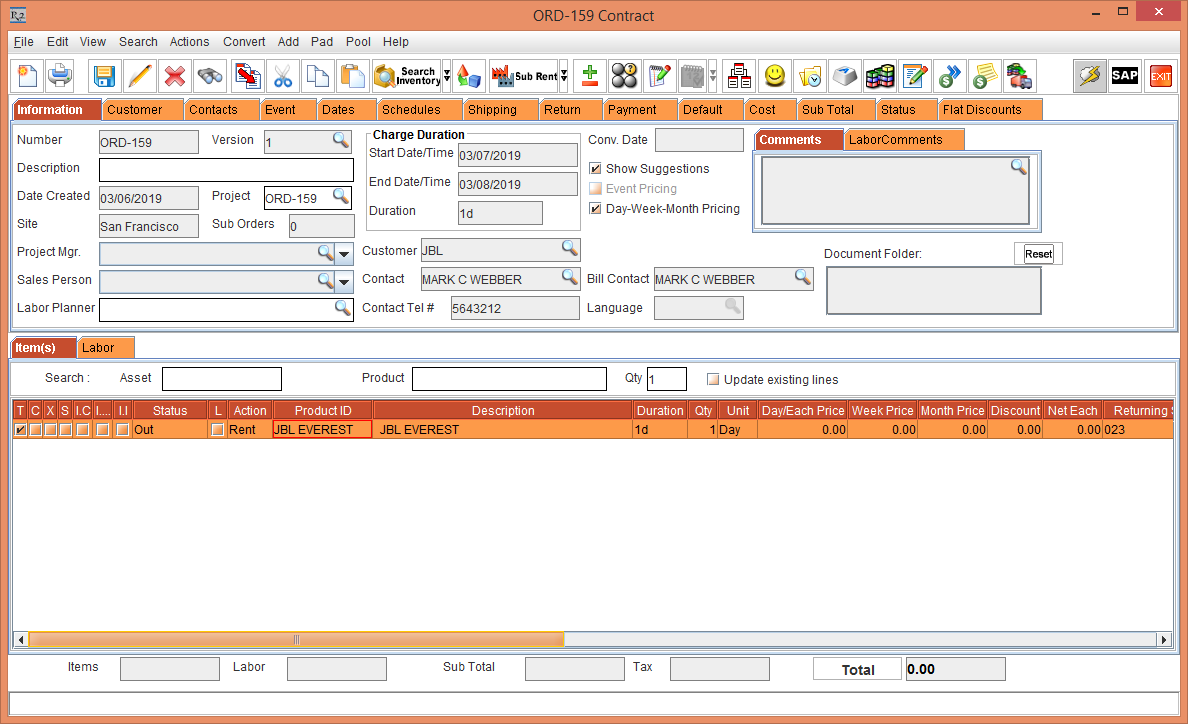
Add an Item [JBL EVEREST], as shown in Figure 3.0.

-
Save and Exit the Order [ORD-159].
-
Login to Asset Manager app.
-
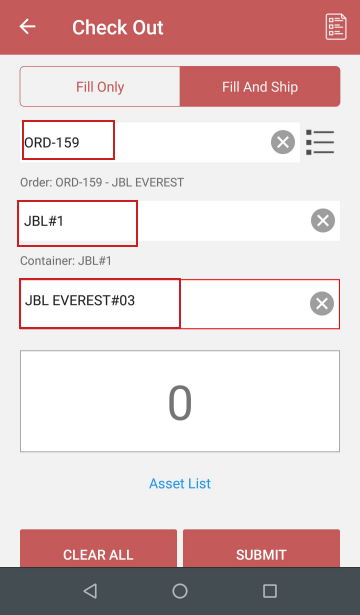
Select the CHECK OUT button. Click the Fill And Ship option. The following screen appears, as shown in Figure 3.1.

-
In the Enter Order Number field, enter the Order ID [ORD-159], as shown in Figure 3.2.
-
In the Enter Container field, enter the Container ID [JBL#1], as shown in Figure 3.2.
-
In the RF/ Scan Assets / Enter Asset ID field, enter the Asset ID [JBL EVEREST#03], as shown in Figure 3.2.
-
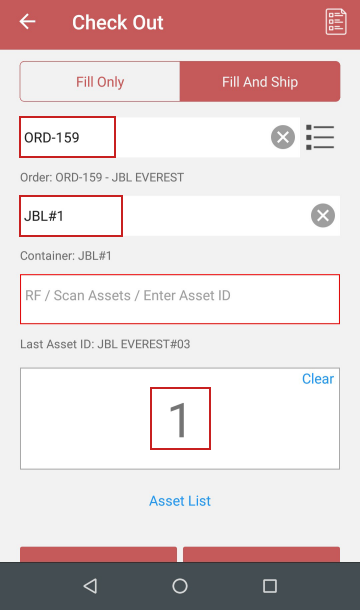
Scan the Asset by clicking the button from the mobile. The count is displayed as [1], as shown in Figure 3.3.
-
Click the SUBMIT button.
-
Click on the generated batch log to view generated Batch Details, as shown in Figure 3.4.

-
Exit the Asset Manager App.
-
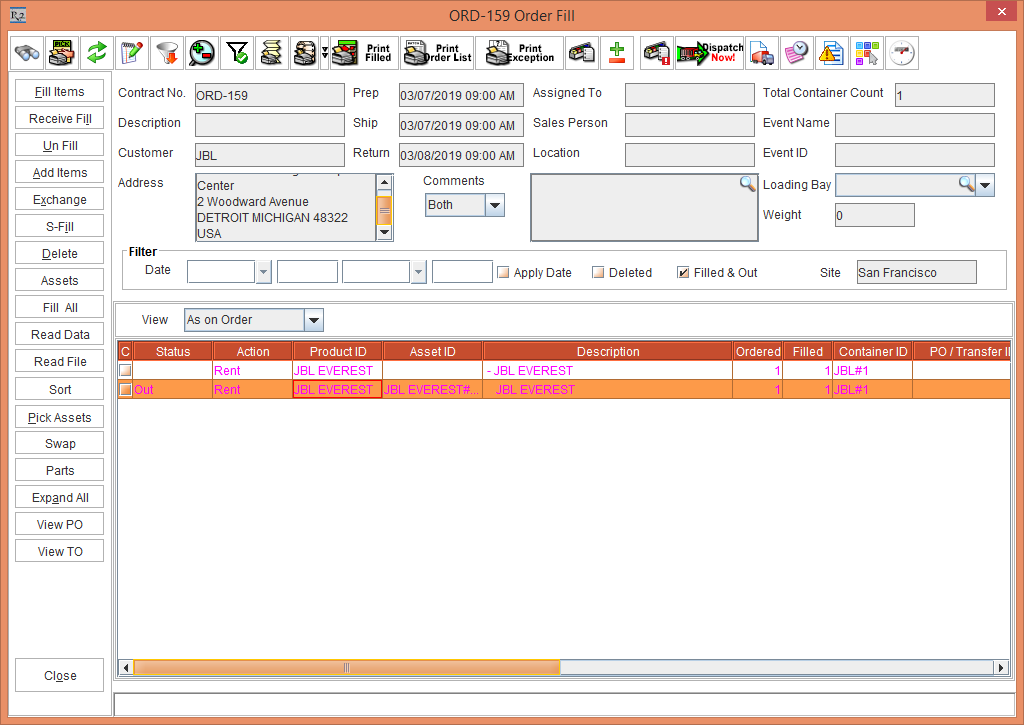
Open the Order [ORD-159]. The Status of Item [JBL EVEREST] is modified to Out, as shown in Figure 3.5.
-
Select the View menu > Fill Order option. The Fill Order window is displayed with the Asset [JBL EVERESTE#02] in Out Status and with the Container ID [JBL#1], as shown in Figure 3.6.
-
Exit the Fill Order window.
Scenario B - Container in the Transfer Out Screen
The below Sample Workflow explains the above functionality:
Sample Workflow
Prerequisites
-
Select the Maintenance module.
-
Create two Sites [SANFRANCISCO] and [CALIFORNIA].
-
Select the Site [SANFRANCISCO].
-
Select the Maintenance module > Items tab.
-
Create a Serial Item [JBL ENDURANCE] with 2 Assets [JBL ENDURANCE#01] and [JBL ENDURANCE#02].
-
Save and Exit the Maintenance module.
Scenario B-I Transfer Out - Fill Only
-
Select the Account module.
-
Create a Transfer Out Order [TO-01] from the Site [SANFRANCISCO] to Site [CALIFORNIA].
-
Add a Serial Item [JBL ENDURANCE], as shown in Figure 4.0.

-
Save and Exit the Order.
-
Login to Asset Manager app.
-
Select the TRANSFER OUT button > Fill Only option. The following screen appears, as shown in Figure 4.1.
-
In the Enter Order Number field, enter the Order ID [TO-01], as shown in Figure 4.2.
-
In the Enter Container field, enter the Container ID [JBL#1], as shown in Figure 4.2.
-
In the RF/ Scan Assets / Enter Asset ID field, enter the Asset ID [JBL ENDURANCE#01], as shown in Figure 4.2.

-
Scan the Asset by clicking the button from the mobile. The count is displayed as [1].
-
Click the SUBMIT button.
-
Click on the generated batch log to view generated Batch Details, as shown in Figure 4.3.


-
Exit the Asset Manager App.
-
Open the Transfer Out Order [TO-01] > the Status of Item [JBL ENDURANCE] gets modified to Filled, as shown in Figure 4.4.

-
Click the Transfer Detail icon. The Container ID [JBL#1] gets updated, as shown in Figure 4.4.

Scenario B-II Transfer Out - Fill And Ship
-
Select the Account module.
-
Create a Transfer Out Order [TO-02] from the Site [SANFRANCISCO] to Site [CALIFORNIA].
-
Add a Serial Item [JBL ENDURANCE], as shown in Figure 5.0.

-
Save and Exit the Order.
-
Login to Asset Manager app.
-
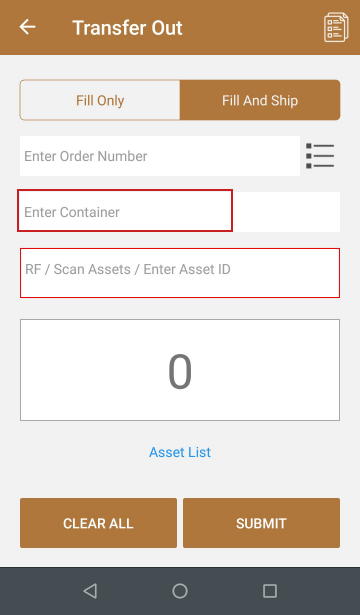
Select the TRANSFER OUT button > Fill And Ship option. The following screen appears, as shown in Figure 5.1.
-
In the Enter Order Number field, enter the Order ID [TO-02], as shown in Figure 5.2.
-
In the Enter Container field, enter the Container ID [JBL#1], as shown in Figure 5.2.
-
In the RF/ Scan Assets / Enter Asset ID field, enter the Asset ID [JBL ENDURANCE#02], as shown in Figure 5.2.

-
Scan the Asset by clicking the button from the mobile. The count is displayed as [1].
-
Click the SUBMIT button.
-
Click the batch log to view generated Batch Details, as shown in Figure 5.3.

-
Exit the Asset Manager App.
-
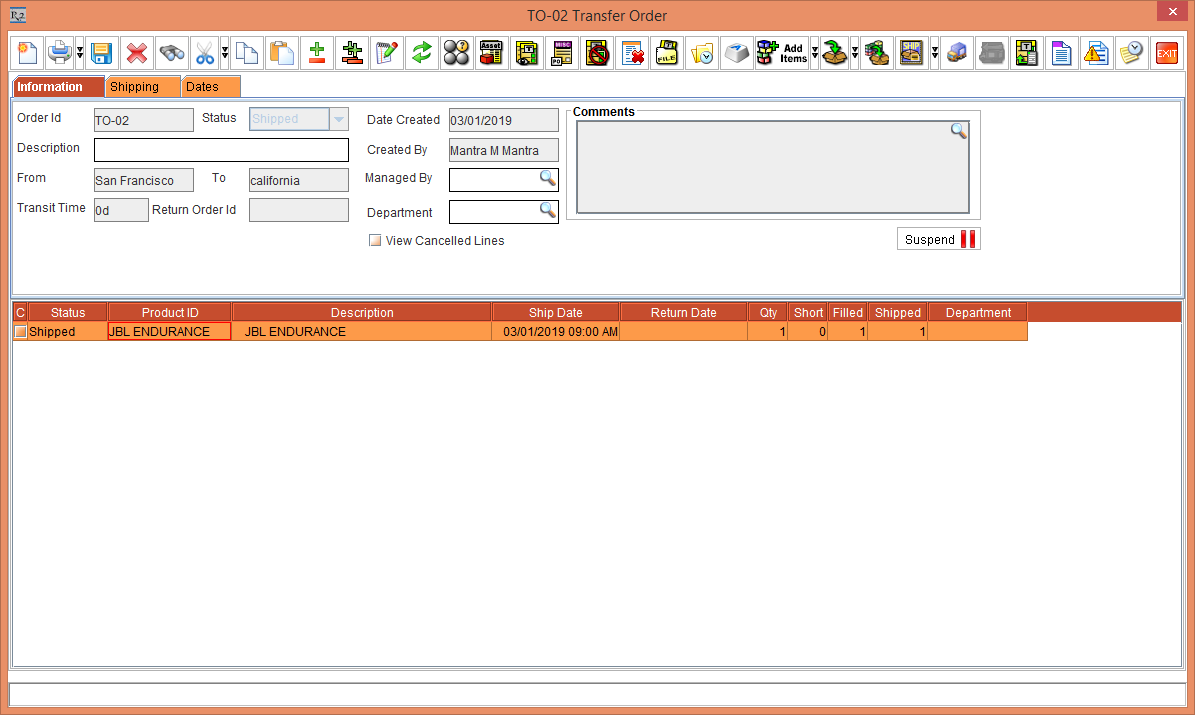
Open the Transfer Out Order [TO-02] > the Status of Item [JBL ENDURANCE] gets modified to Shipped, as shown in Figure 5.4.
-
Click the Transfer Detail icon. The Container ID [JBL#1] gets updated, as shown in Figure 5.5.

Updating different Container ID with different Asset ID is not supported from the Asset Manager App as it is supported in the R2 application. The Asset Manager App will update the last scanned Container ID to all the Assets.