Content was last updated in 06.22.01-00
Revision History
|
Version No. |
Reference No. |
Changes |
|
NA |
NA |
Setting up Taxes |
The Maintenance > Misc > Taxes section is used to set up Tax records.
Each Tax record consists of a Tax Area, Region, Start (date), Customer Group, Item Group, Action, and Tax Schedule.
The Tax schedules need to setup in accordance to the local and state tax ordinances to ensure that your customers are taxed correctly.
Taxes window
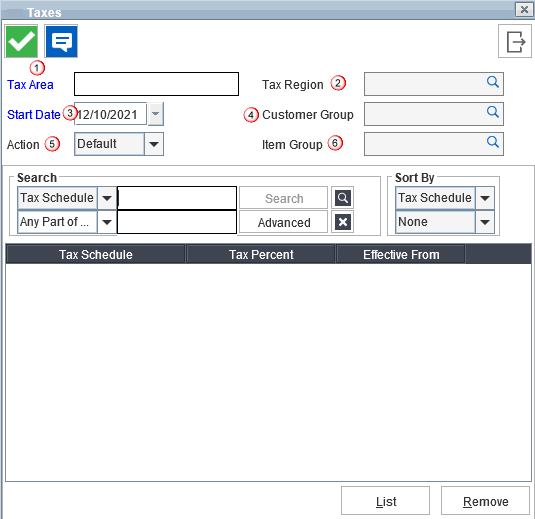
Table 1.0: Taxes window field details
Field
|
Description
|
|
Tax Area |
Tax Area is typically a general geographic region such as State. You will need to create tax areas for all states in which you are taxable as a company, as well as a tax exempt area to apply to all non-taxable states in which you do business. |
|
Tax Region |
Tax Region names are based on counties or other geographic regions defining tax rates. Each county may charge different tax amounts, therefore you will likely need to create a tax region for each county in which you are taxable as a company, as well as a tax exempt Region to apply. Create a tax record for each region (county) within your defined tax areas. For more details on tax region click here. |
|
Start Date |
Enter the month, day, and year that this tax should first apply ( By default, system date is displayed as the default date). This field is especially useful when entering tax rate updates in advance. Note: If two similar tax definitions are defined then R2 will look for the start date and apply the latest definition to the order. For example: If the definition 1 and definition 2 are similar but have start dates defined as 08/09/2008 for definition 1 and 10/09/2008 for definition 2. Then definition 1 will be applied to orders in the duration 08/09/2008 and 10/09/2008. For all the orders created after 10/09/2008 definition 2 will be applied. |
|
Customer Group |
The field indicates which customers, within this region, this tax rate applies to. This rate applies to customers with the same tax group field value on their Company or Individual record. Typically customer groups will be either Non-Taxable and blank (serving as a default value of taxable), or Non-Taxable and Taxable (requires a selection on each customer record). Whichever method you choose, remember to be consistent. Also note that once a Customer Group is applied to a Tax record, you can't change the value back to blank. |
|
Action |
This field indicates the action type to which this tax record applies. Action choices are: Rent, Sell, Labor, Misc. or Default. You may create separate records for each action if tax rates vary by transaction type for this region, customer group or item group. Alternatively, you may select Default to apply this rate to all transactions.
Note: The action type Misc and Defaults will be considered for calculation of Service Charge, Damage Waiver, and Consumables since R2 considers these charges as misc. charges based on the Inventory Settings in Configuration module.
|
|
Item Group |
This field indicates which items this tax rate applies to. |
|
List |
To create a Tax Schedule. More.. |
To access Taxes window,
-
In R2 launch pad, click Maintenance.
-
R2 displays the Maintenance Window.
-
Click Misc tab in the vertical tab panel, to switch to Misc module.
-
Click Taxes tab in the horizontal tab panel, to switch to Taxes section.
-
Click New icon to display the Taxes window a show in Figure 1.0.
To Create a New Tax record
-
Open Taxes window
-
Enter the Tax Area.
-
Select a Tax Region from the 'Tax Region Group' window, which can be invoked by clicking the importable button in 'Tax Region' field.
-
Define Start Date from which the tax definition has to be implemented.
-
Select a Customer Tax Group definition in Customer Grp field by clicking the importable button present.
-
Select a Item Group definition in Item Grp field by clicking on the importable button present. The Item Group window opens listing the ID and Description for each available Item Tax Group. When this region is selected on an order, the Tax record rate will apply to Items, Kits, Labor, and Misc. Charges belonging to the Tax Group inserted in the Item Grp field here. Items, Kits, Labor and Misc. Charges are assigned an Item Group when a selection is made in the record's Tax field.
-
Enter an Action type for this tax record. Available options ( Rent, Sell, Labor, Misc., Default)
-
Select a Tax Schedule. Tax Schedules can be added to the Tax Record either by Clicking on the Add button, which will create a new blank record in the Tax Schedules section and following a valid Tax Schedule Id should be entered in the Tax schedule field or by tagging existing Schedules definition from the Tax Schedules dialog box, which can be invoked by clicking on the List button.
Tax Region
The tax region assigned to an Order defines the tax charges applied to labor, miscellaneous charges, purchases, and rentals. Typically a tax region is a geographic area, such as a county.
The Tax percent charged may vary depending on the transaction type or goods and services purchased.
For example: In some states, labor is not taxed, and rentals are taxed at a different rate than purchases. This is handled by setting up different tax records for the same region and area, but with different actions and schedules attached.
You will create tax regions and then apply them to tax areas as necessary. Any record with no tax region assigned will be charged your default tax rate. A tax region is defined by its assigned customer tax group (Customer Grp), item tax group (Item Grp), action (Action), and tax schedule (Tax Schedule).
Add Tax Region
-
Click the importable button to the right of the Tax Region field. Tax Region Group list window displays listing the ID and description for all existing tax region records.
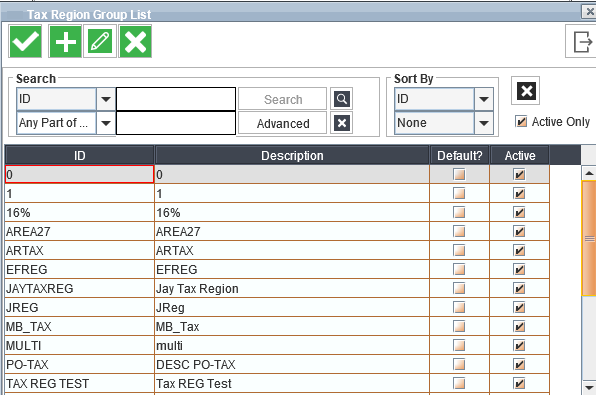
-
Click the Add icon. The Tax Region Group window displays.
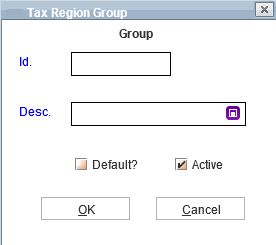
-
Enter the Region ID and Description.
-
Select the Default checkbox to make the tax region as default.
-
Select the Active checkbox to make the tax region as active.
-
Click OK button.
The ID and Description for your new tax region appears in the Tax Region window.
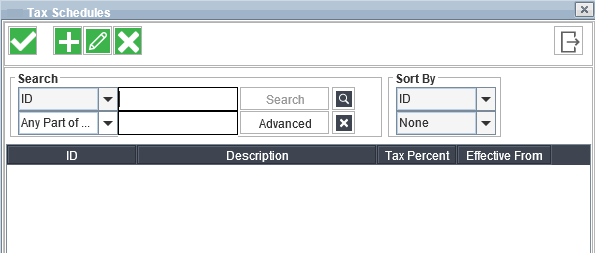
Tax Schedules
Tax Schedules determine the actual tax rate applied by a tax record.
To add tax schedule
-
Click the List button to display the Tax schedules window.
-
Click Add to display Tax Schedule edit window.
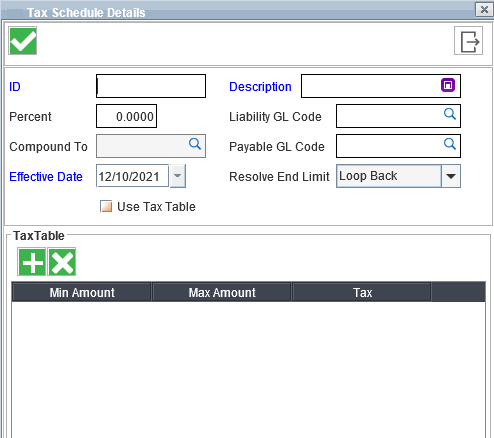
-
Enter Schedule ID and Description.
-
Enter a value into the Percent field, if you want to add a Fixed Percentage of Tax
or
to apply different Tax % on different amount slabs as in the Tax tables leave this field blank and select the option Use Tax Table.
-
To apply Compound To Tax on the Order, tag a tag schedule to the Compound To field by clicking the importable button in the Compound To field. Know more?
-
Select the Effective Date for the tax schedule. Multiple Tax Schedule with the same ID can be created, provided the Effective Date is different. However, the Effective Date is considered to apply the right Tax Schedule. Know more?
-
Select the Resolve End Limit option. Available options are Loop Back, Use Tax Percent, and Use Last Percent. Know more?
-
Click OK.
Defining Tax table for schedules
The Tax schedules can be set either based on a fixed percentage or based on Tax table computation. The Tax table allows you to define percentage based on a range of values ( as shown below). In order to consider the Tax table for computation , make sure that the Use Tax Table option is selected in the 'Tax Schedule Edit' window.
Illustration
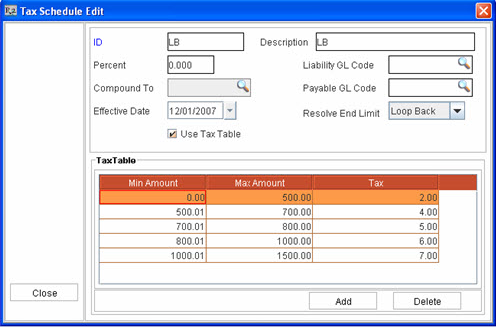
Based on the above table, if total amount on the order is 1700.00 , then the tax will be computed as follows
Table 1.0: Tax computed
|
|
Total Amount for Which Tax has to be computed |
Amount considered for Tax Calculation |
Tax Percentage |
Calculated Tax Amount |
Balance Amount for which tax has to be computed |
|
Step 1 |
1700 |
500 |
2 |
10 |
1200 |
|
Step 2 |
1200 |
200 |
4 |
8 |
1000 |
|
Step 3 |
1000 |
100 |
5 |
5 |
900 |
|
Step 4 |
900 |
200 |
6 |
12 |
600 |
|
Step 5 |
600 |
500 |
7 |
35 |
200 |
|
Step 6 |
200 |
200 |
2 |
4 |
0 |
Total Tax Computed : 74
The above tax computation has been done based on the value range defined and the Resolve End Limit option ' Loop Back' which is selected.
Resolve End Limit
The option set for the Resolve End Limit field determines how the computation should be processed , if Tax table is used for calculation and the total order amount exceeds the Max Amount defined in the table. The available options are: Loop Back, Use Tax Percent, and Use Last Used Percent.
-
Loop Back : If this option is set as the Resolve End Limit Option, then if the order amount exceeds the Max Amount, the tax computation process for the excess amount will be continued from the first range of value and the tax percent defined for it. ( Refer above illustration)
-
Use Tax Percent : If this option is set as the Resolve End Limit Option, then Tax Percentage defined in the percentage will be calculated for the excess amount .
-
Use Last Percent : If this option is set as the Resolve End Limit Option, then tax computation will be done based on the Tax percentage defined in the last value range in the table.
Taxes in Sites
In Site edit window, option has been provided (as shown below) for the user wherein tax region can be tagged to site based on which tax will be calculated for the orders which is created in the site.
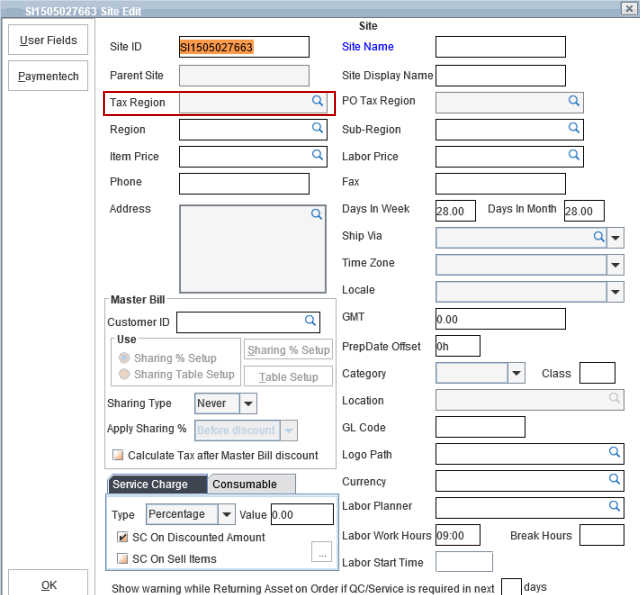
-
On clicking the Importable button in the Tax Region field, R2 displays the 'Tax Region Group' window where in a desired tax region can be selected and tagged.
-
Whenever an order is created, by default the tax region selected for the order site will be displayed as the order tax region.
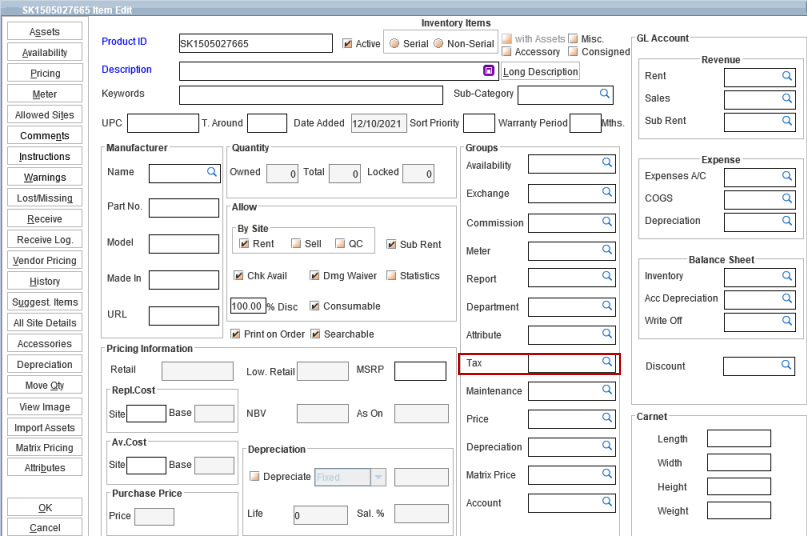
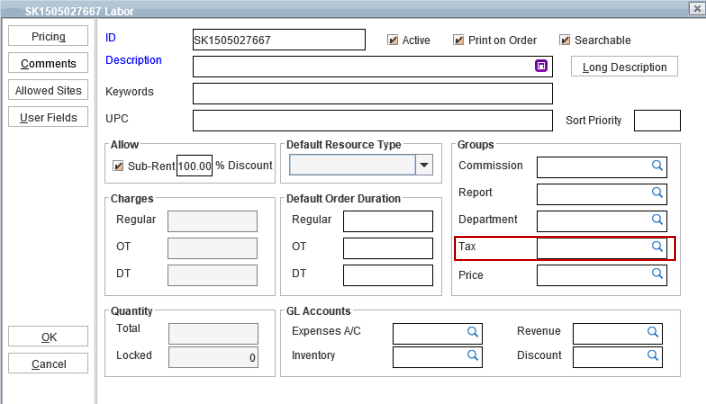
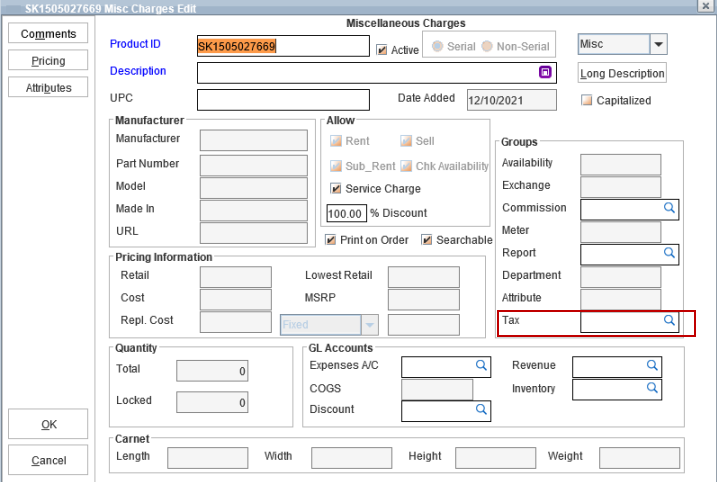
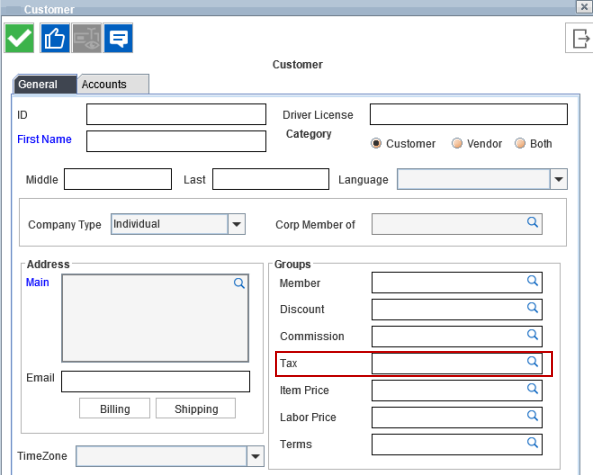
Setting Up Tax calculation for Customer/Item/Labor/Misc. Charges
Taxes can be implemented for Customer/Item/Labor and Misc. Charges by tagging the Tax Groups in the respective edit windows as shown below.
-
Item edit window
-
Labor edit window
-
Misc Charges edit window
-
Customer edit window
See also: Implementing Taxes in R2 for detailed information on tax implementation.