The Transportation Schedules feature allows you to effectively manage the transportation of item on any type of orders to the required location. This can be achieved by creating individual transportation schedules and organizing the warehouse tasks of the order under it from the Logistics Details Window. .
To Create a New Transportation Schedule
Transportation Schedules can be created or edited from the Transportation Logistics Main Window by clicking on the New icon ![]()
![]()
-
From the Transportation Logistics window, Click on New icon

-
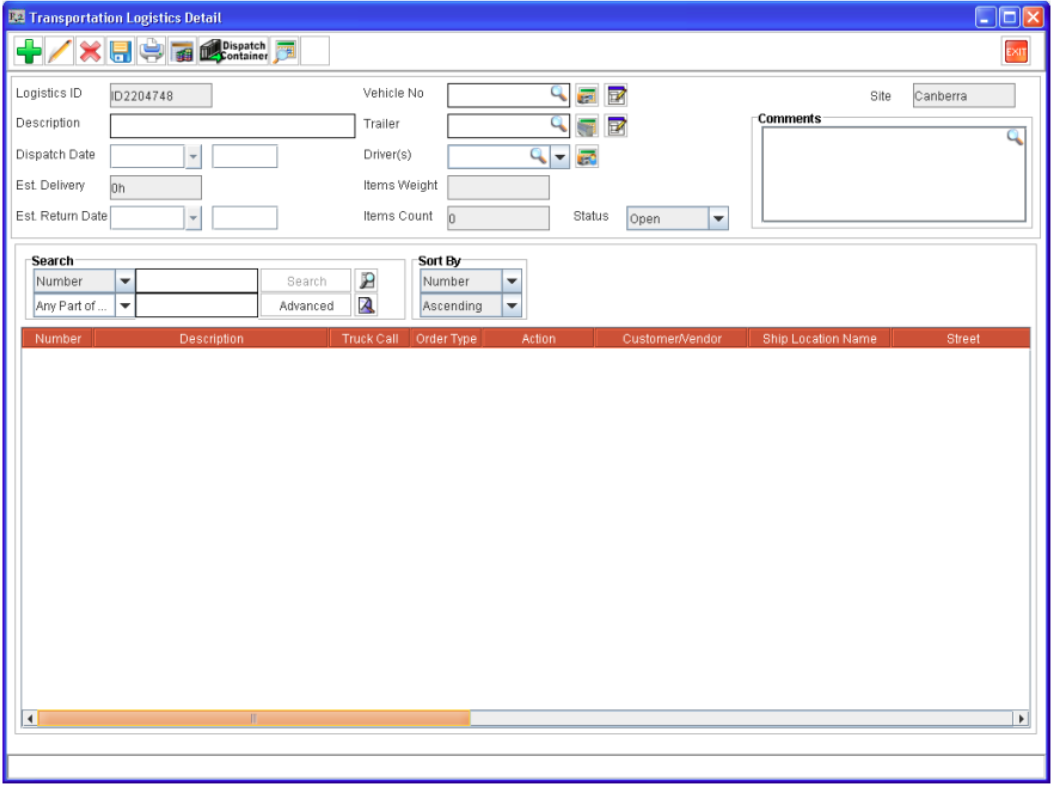
R2 will display Transportation Logistics Detail window. By default R2 will auto-generate ID for the Transportation schedules. The schedule ID will be updated based on IDs defined when saved. If IDs is not defined for the schedule, R2 will save the Transportation schedule with the auto-generated ID.
-
Enter a Description for the schedule.
-
To Define a Vehicle which will Transport this Logistic, click on the import button next to Vehicle No field to open Vehicles Dialog box where in you can select the Vehicle Detail. Or key-in the Vehicle ID.
-
You can search for Vehicle details and select desired Vehicle detail by double clicking on it. Before selecting a Vehicle you can also check the Availability of the Vehicle by clicking on the Vehicle Availability icon. For more information read How to create Vehicle Detail.
-
To Define a Trailer which will Transport this Logistic, click on the import button next to Trailer field to open Trailers Dialog box where in you can select the Trailer. Or key-in the Trailer ID.
-
You can search for Trailer and select desired Trailer by double clicking on it. Before selecting a Vehicle you can also check the Availability of the Trailer by clicking on the Trailer Availability icon. For more information read How to define Trailer
-
To Define Drivers who will Transport this Logistic, click on the import button next to Driver (s) field to open Search Drivers Dialog box where in you can select the Drivers. Or key in the Driver name.
You can search for Drivers and select desired Drivers by double clicking on it. Before selecting a Vehicle you can also check the Availability of the Drivers by clicking on the Driver Availability icon. For more information read How define Driver Resource
-
Click on the Vehicle UDF icon to set the value for the UDF field of Vehicle. For more details click here.
-
Click on the Trailer UDF icon to set the value for the UDF file of Trailer. For more details click here.
-
Set the Date of Dispatch in the Dispatch Date field.
-
Set the Estimated Return date in Est Date field.
-
Set the Current Status of Transportation. By default , the status will be displayed as Open. Available options that can be used for setting status are : Open, Ready, In-Transit, and Complete. You can also update Transportation Schedule status in the Transportation main window.
-
Click on the importable button in the comments field to enter comments for the schedule.
To Add Warehouse Tasks to the New Schedule
-
Click on the Add icon

-
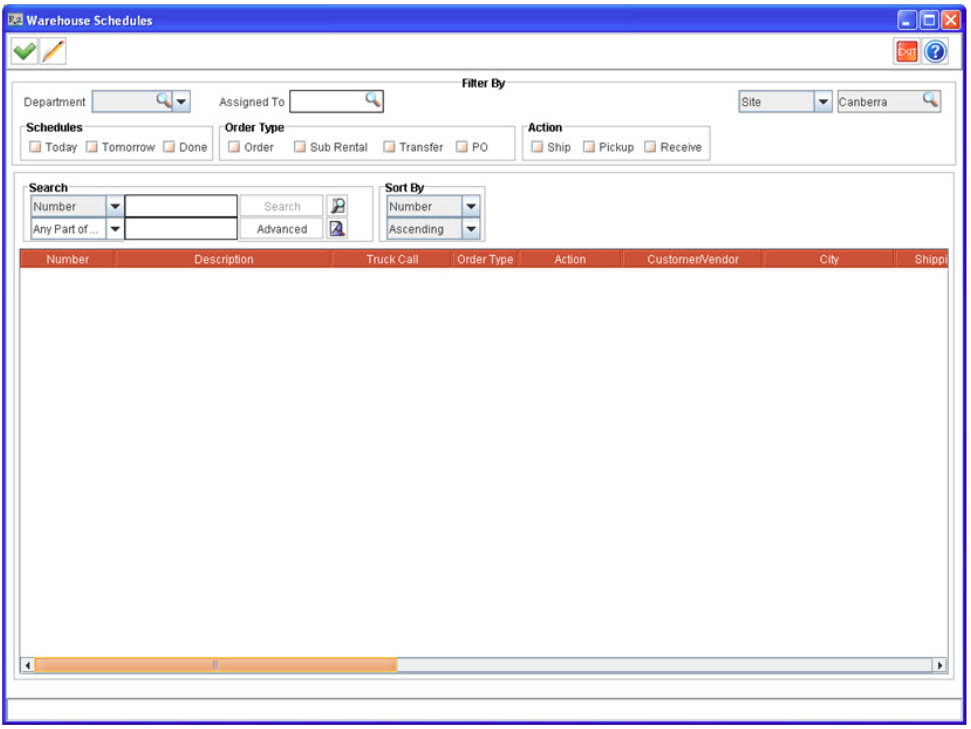
Search for the Warehouse Task that has to be added to the Transportation Schedule. The warehouse tasks will be listed for the orders based on the Pickup/Return method selected for the respective order.
-
Click OK to save the changes and return to the Schedules window.
-
Click on Accept icon

-
The selected warehouse tasks will be displayed in the Transportation details window.
-
Click Save icon in the Transportation Schedules window to save the new schedule.
You can also save a schedule while exiting from the Transportation Schedules window. On clicking the Exit icon, R2 will display a prompt for saving the changes. Click "Yes" to save and " No" to exit without saving.
If the Order dates are changed, following the schedule dates are also changed, then R2 will regenerate the Warehouse schedules for the order and previous schedules for the order will be deleted. The deleted warehouse tasks will be removed from Transportation schedules and the user has to add the tasks manually to update the schedule.
Selecting Items for Dispatch/Pickup
The items can be selected for dispatch/pickup either by scanning individual assets/ container or by defining quantity of the item which has to be Dispatched/Picked Up . This can be achieved by using the features Dispatch Container or Item Details from within the Transportation detail window
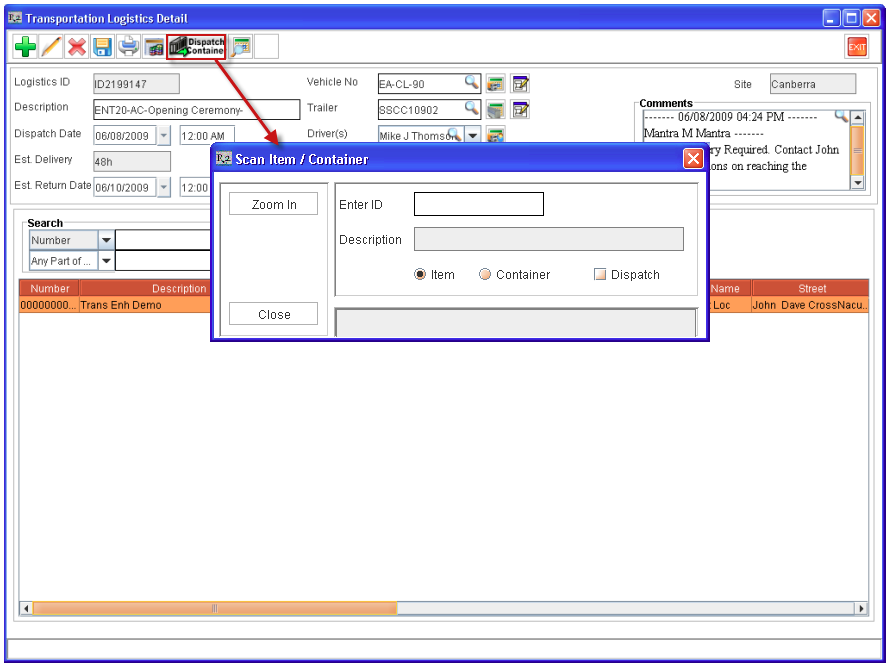
Dispatch Container Method
Clicking on the Dispatch Container icon from the Transportation Detail window will display the Scan Item/Container dialog wherein you can scan the individual items or container. On scanning an product / container , system will validate whether a product or a container is present in any of the warehouse task added to the transportation schedule.
-
On entering an Non-serial item ID, system will automatically select the non serial item line present in all the warehouse task(s) selected in the transportation schedule for dispatch.
-
On selecting the option Dispatch while scanning items or container, the status of the asset will be updated as 'OUT'.
The Dispatch Container Method can only be used for managing the dispatch of item(s) present in the warehouse tasks added to the Transportation Schedule.
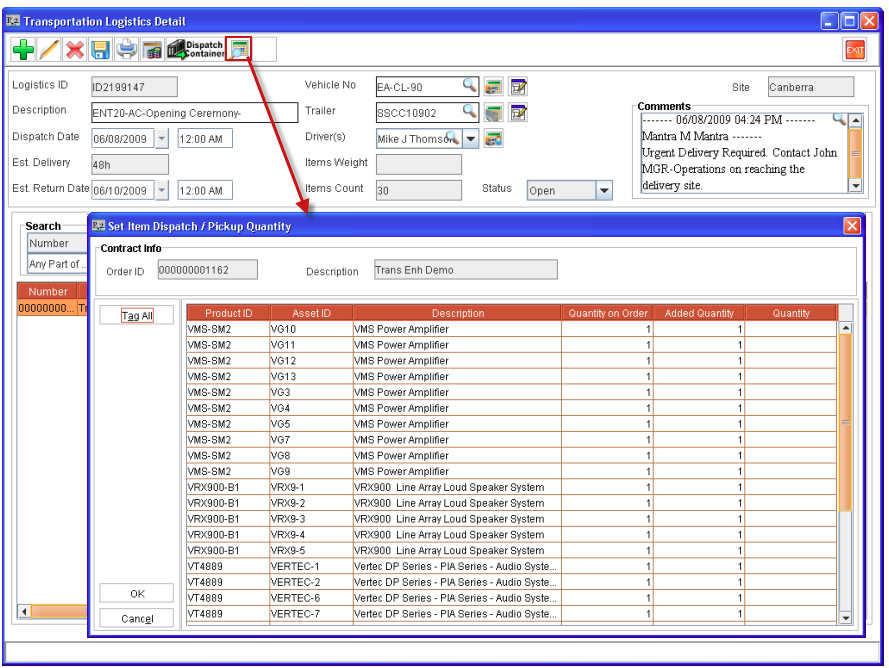
Schedule Item Details Method
By highlighting a warehouse task and clicking on the Schedule Item Details icon will display the Set Item Dispatch/Pickup Quantity dialog wherein you can define the quantity of items to be dispatched/picked up.
-
On Clicking the Schedule Item details by highlighting a Ship Task, the Set Item Dispatch/Pickup Quantity will allow the user to define the quantity of items which has to be dispatched.
-
On Clicking the Schedule Item details by highlighting a Pickup Task, the Set Item Dispatch/Pickup Quantity will allow the user to define the quantity of items which has to be picked up.
-
For serial items, based on the quantity of items filled/out on the order, the item details will be displayed in the Set Item Dispatch/Pickup Quantity dialog individually for every asset filled/out on the order.
-
For Non Serial Items, the total item quantity filled/out on the order will be displayed as the quantity on order in a single item line.
How To
-
Access Set Item Dispatch/Pickup Quantity Dialog by highlighting a warehouse task and clicking on the Item Details icon.
-
Tag the item lines to select for dispatch / pick up. The items present in the Set Item Dispatch/Pickup Quantity dialog can be tagged using the following methods:
-
Double-clicking on an item record(s) to be dispatched. On double clicking on an item to select, system will update the Quantity column as 1, which can be edited if required.
-
Selecting the Tag All button (which will select all the item lines present except for the lines which have already been selected for dispatch / pickup)
-
In addition, system will automatically tag an item record while entering the value in quantity column by highlighting a item.
While double clicking on record(s) or selecting the Tag All feature to tag the item records, system will tag the item records if and only if the Added quantity is less than the Quantity on Order.
-
Verify the Dispatch/Pickup details by selecting Dispatch/Pickup Details Icon.
-
Click OK.
Set Item Dispatch/Return Quantity Dialog Column Information
-
Product ID - Product ID of the item Filled/ Out on the order.
-
Asset ID - Individual Asset ID of the assets Filled/Out on the order. For Non-Serial Items , the Asset ID column will be displayed as blank.
-
Description - Product / Item Description.
-
Quantity on Order - Quantity of item Filled/Out on the order.
-
Added Quantity - Quantity of item previously selected for the transportation schedule.
-
Quantity - Allows to select the quantity of item for dispatch/pickup.
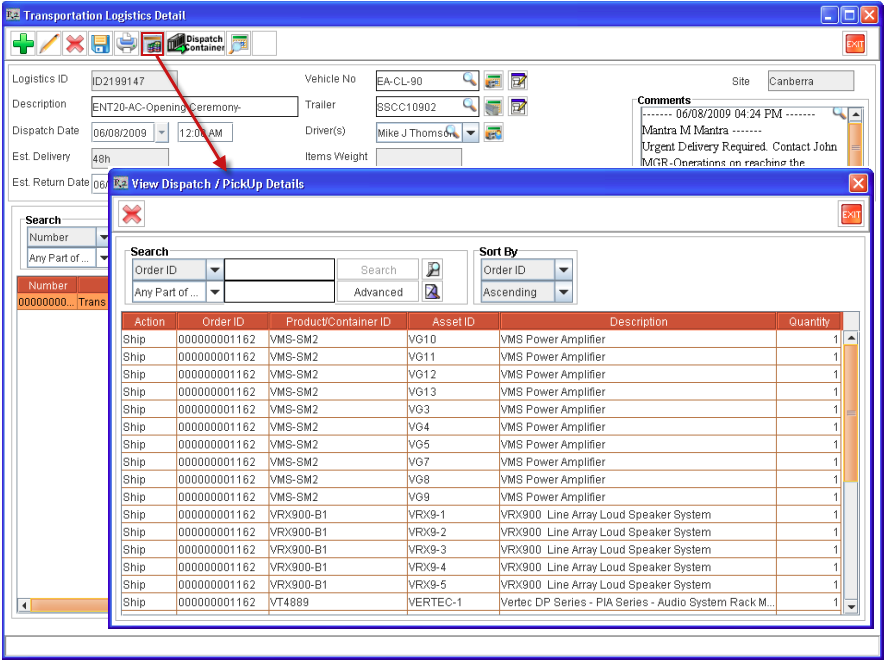
Viewing Dispatch /Pickup Details
You can also view the Items which are selected for dispatching/pickup with the current Transportation Schedule. Click on the Dispatch/Pickup Details Icon to display the view Dispatch/Pickup details window which will display the dispatch/pickup details of the current schedule.
-
The Dispatch/Pickup details window will also allow the user to delete any item which has been selected for dispatch. This can be done by tagging item line(s) following by clicking on the Delete icon

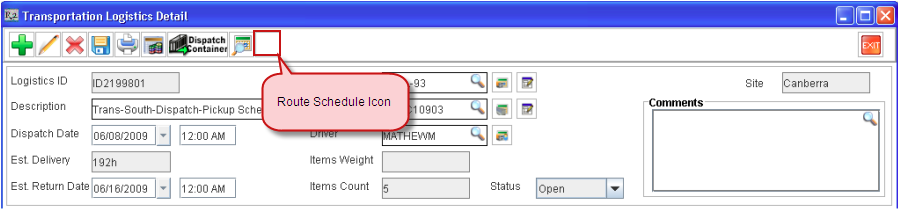
Setting up Route Schedule based on Shipping Location/Order Site
User can set Route Schedule based on the Shipping Location/ Order Site of the Order Schedules which are added to a Logistics Schedule. When clicked on the Route Schedule icon in the Logistics Detail window, system will display the Route Schedule dialog box wherein the user can set the Route Schedule. Fore more details on Route Schedules.
Points to Note
-
Items can also be filled and dispatched, through Warehouse Tasks which is accessed from Transportation Logistics Detail window by double clicking on the Warehouse tasks, the will display the respective Ship Order window or Return Order window.
-
In Warehouse tasks that are opened through Transportation Logistics Detail window, the items will be Grouped by Container, for more details read Group by container.
For more information on Transportation Logistics, click here.